![]() You don't need to be an 'investor' to invest in Singletrack: 6 days left: 95% of target - Find out more
You don't need to be an 'investor' to invest in Singletrack: 6 days left: 95% of target - Find out more
I will start off that i am pretty sh!te at DIY so i need some pointers from people who are 🙂
I bought a Vivaro to convert to a camper / day van and when i get back from work in a couple of weeks work will start in earnest.
To start i have seen a couple of threads on here that have ace advice regarding the insulation and re plying.
But what i am pretty unsure about is how to fix the ply and roof / floor batons to the inside of the van. I will be raising the floor and lowering the roof slightly to fit insulation and fixing batons in place to the fit the floor and roof ply to.
Self tapping screws or no more nails were my first thoughts. But i try not to follow my own ideas too much as thats where danger lies.
Cheers all.
No battens in mine FWIW
and I just remembered I'm still to come up with a price for lining material.
scotroutes, no rush on the lining. Is the plywood on the floor directly on top of the insulation then?
On mine, yes. Probably not as thermally effective as it could be, but good enough.
decisions decisions 🙂
Some good stuff here if you haven't already found it
http://www.vwt4forum.co.uk/showthread.php?t=381383
we glued battens onto the floor, and screwed onto the battens.
i was going to use proper panel clips to screw the side panels on, but its nigh on impossible to get the holes close enough to where they need to be, so just used 3.5mm drywall self tappers straight into the steel. Made me a bit sad, but you cant see it once its up! Just be sure you arnt going to hit anything important, or the outside skin.
I use mine in the Scottish Highlands in winter. How much colder is it going to be where you are using yours?
Got a vivaro 5 yrs ago, insulated with kingspan behind a bought ply kit that was fastened in with self tappers. Was a new van so before put any thing in covered it all in anti rust solution.
Ours has been brilliant for everything including over 2 wks in Scotland wild camping, only used campsites 3 times in that time. It's a swb with a garage big enough for two bikes and kit and sleeps both of us, snug but comfy. External screens were our best purchase to stop condensation.
Good luck and enjoy.
Thanks all, good advice to keep me going until the next idea / problem.
Scotroutes, i don't think i will use it anywhere colder than Aviemore in the winter 🙂 but i want to do this right the first time and putting batons in didn't seem to much of an issue TBH. I was just wondering about the best way. The floor is not really a problem, the roof needs to be bombproof obviously.
Plied and insulated our Vivaro. Screwed straight through with self tappers. We have a futon in the back. Use a camping Gaz thing for cooking on. Can carry two bikes in the back. There's room for the dog to kip at the end of the bed. No bells and whistles but we love it. Cheap, cheerful and just the job.
Northernmatt,thats the van thread to end all van threads. Awesome 🙂
Before you do anything take photos / measurements / draw a diagram of where all the beams and wires are.
MrSparkle, good van thread. A window on the sliding door is my next plan. Need to phone a few places to get it priced up. If you dont mind me asking how much was yours?
Just had a sunroof put in mine near the back doors. Lots of light and ventilation for sleeping in non official sites. Better than having side windows cracked open. I used self tapping screws for attaching side panels. Easier to undo than glue. You may not want to remove insulation in future but you never know.
Mac - we paid £150. Did it outside the house. The tint is ace, you can see out no problem but you really can't see in unless you have a light on inside. Bungee nets are good for hanging stuff up inside to stop it rattling round on the move.
Go to Screwfix, get a caulking gun and a few tubes of Sikaflex EBT+. Mental strong. Lots of people also swear by Stixall from Toolstation -- not tried it myself but it seems like essentially the same stuff. Stays a little bit rubbery when it's set so it copes well with vibration. Our van is pretty much held together with it 🙂
+1 for sikaflex battons and screw panels to them. Held together well on my iveco. Could do pull ups on 18" bit of 2be2 sika'd to the roof.
I screwed into panels where I could and on the roof (where I could not as it is single skin) I glued battens using tiger seal the attached the ceiling panels to that. 🙂
Mine is utility over aesthetic.... but I still managed some nice touches. I am upgrading the bed soon, smae design but wood from pallets so a bit stronger. I am also getting better door pockets for storage, but apart from that I am happy with it and get out and about in Scotland in it no bother!! 😀
[url= http://singletrackmag.com/forum/topic/i-made-a-stealth-camper-and-i-want-to-show-off ]My camper[/url]
Edit: Just realised all my image links are broken, I must have tidied up my folders and broken them...
Added images to my original thread, last post now, link above
@ Sazter, any chance of getting those pics back up? I'm in desperate need of inspiration as I'm off work this week with the intention of re-fettling my Vivaro and my 'back of fag packet' planning is falling apart.. 🙁
EDIT; must type faster 🙂
Mactheknife, I have commented on my post with the link to the wiring system I bought, I went with that as it is rated and saves the risk of messing it up, clear instructions, I managed and I can barely wire a plug! (well, could, now I'm a pro ;))
I used non-slip lino for the floor as it will have muddy bikes in it, bought an offcut that fit great, used stretch carpet from 'megavanmats' on ebay too, got the kit with the glue included, great stuff to work with. I was lucky/ cheeky enough to get the lights and the mattress filling for free, and got handy with the sewing machine and power tools!!
Converting a van is a great excuse to buy power tools!
I part converted my T5 for a generic panel van to a Kombi/camper last year. It's got space in the back for bikes as well as a storage area over/between the wheel arches that can fold down to form a double bed. I insulated the van before fitting carpeted ply lining and also changed the interior lights to something more suitable.
Other things to consider might be a swivel seat base (makes a big difference to my van) and a leisure battery. Basically, think about electrics first so that you can fit them before you do walls, floors, etc. Otherwise you end up like me with wires running loose in places.
Slight hijack but this has given me ideas for doing a removable conversion on the escort.
Do camp sites just allow you on in a van and let you kip in it or do you have to pitch a tent and pretend you are sleeping in that ?
Simmy, I sleep where I like in mine as I am in Scotland, so I can do that. I stayed at the Glen nevis site once and they state you cannot sleep in a van, but I had a tent pitched as a shed anyway so it was never questioned.
[quote=simmy ]Do camp sites just allow you on in a van and let you kip in it or do you have to pitch a tent and pretend you are sleeping in that ?Some sites will charge you as a camper/motorhome so it can actually be cheaper to pitch a tent and just park beside it.
ooh - I love threads like these.
I bought a swb trafic last year and slowly are converting it over. I still need it to shift bikes around during the week for work so It needs to be modular. I've insulated, panelled and carpeted the van out, fitted a strong Lino floor and In the process of getting power into the back.
One thing I did do which has worked out quite well is to fit some hidden cupboards into the recess between the skin wall, insulation and the ply. That way I can carry all the cooking equipment stored in the recesses all the time. Saves loads of time when wanting to get out on the weekend.
Sounds interesting stumpy, any pics of your little cubby holes?
Il take some when I'm out and about today. Il dig out the conversion pics too. One word of advice though. If you are carpeting the ply don't go overboard on contact adhesive. Iv still got 4 cans of megavanmats carpet adhesive. However do use megavanmats as they are top guys and are based in leeds.
I appreciate that this may not add value to this thread, but whenever I see 'megavanmats' I sing it in my head to the tune of 'super match game' from Blankety Blank.
Anyway. As you were.
Well thats the leisure battery kit ordered thanks to sazter, I am away with work for 10 days so i wont be posting anything on here until i get some headway with the van. And stumpy i would love to see your pics. All van related pictures are welcome 🙂
Well this is my effort from yesterday;
[img][url= https://farm8.staticflickr.com/7581/15646649433_b8c91c3a56.jp g" target="_blank">https://farm8.staticflickr.com/7581/15646649433_b8c91c3a56.jp g"/> [/img][/url][url= https://flic.kr/p/pQDaKP ]IMG_20150112_134914[/url] by [url= https://www.flickr.com/people/36115930@N02/ ]pat5barnes[/url], on Flickr[/img]
Its a box
[img][url= https://farm8.staticflickr.com/7508/16240624756_33ef04469a.jp g" target="_blank">https://farm8.staticflickr.com/7508/16240624756_33ef04469a.jp g"/> [/img][/url][url= https://flic.kr/p/qK8rVE ]IMG_20150112_134932[/url] by [url= https://www.flickr.com/people/36115930@N02/ ]pat5barnes[/url], on Flickr[/img]
and another box what the first box sits on,
like so..
[img][url= https://farm8.staticflickr.com/7524/16080677327_814e3dbd54.jp g" target="_blank">https://farm8.staticflickr.com/7524/16080677327_814e3dbd54.jp g"/> [/img][/url][url= https://flic.kr/p/quZF8n ]IMG_20150112_135003[/url] by [url= https://www.flickr.com/people/36115930@N02/ ]pat5barnes[/url], on Flickr[/img]
The bottom box is fixed, the top box, which will have cooker and gas bottle in it (and a lid and doors), will be movable and sits where it is in the first pic which is on the seat which then becomes the bed.
The idea is to get it out of the way but still usable when in work/day van mode.
Not sure if I'm happy with it though, bit over complicated with a whiff of Heath Robinson about it...I'll probably never finish it anyway 🙄
Next - overhead locker... 🙂
OK i said no more but i have a bit of a puzzler, i have ordered all the kit to fit the leisure battery and fuse box, it seems pretty simple. What i don't get though is the wiring of any lights and other appliances into the fuse box. The blade types have 1 socket for the positive. Where does the negative go? You cant have an electrical circuit with 1positive wire in a fuse box. I know i could wire it to the vehicle itself but is that the only solution?
My googling skills are not throwing up much so i am assuming i am being a nugget.
Just ground everything to the van bodywork/chassis. The nearer the earth points are to the lights/appliances the less wire you need, but also fewer earth points are better in terms of troubleshooting. Ours has got one each side of the van. We used these:
Sand off a bit of paint somewhere, self-tapper (or bolt, if you can get access) it on, stick all the neg wires in it. Job bejobbened 🙂
Awesome mike, cheers. This elektrickery is a minefield 🙂
Latest modification - a sunshade
[url= https://farm9.staticflickr.com/8594/16092266289_86c03c8f32_b.jp g" target="_blank">https://farm9.staticflickr.com/8594/16092266289_86c03c8f32_b.jp g"/> [/img][/url][url= https://flic.kr/p/qw2584 ]DSC_0007[/url] by [url= https://www.flickr.com/people/22384952@N02/ ]ScotRoutes[/url], on Flickr
For twang here are the pics of my hidden holes...[img]  ?1421238273617&1421238275880[/img]
[img]  ?1421238273617&1421238275880[/img]
[img]  ?1421238273617&1421238275880[/img]
I used foam insulation with contact adhesive to fill in the voids on the panels first. second once you have your piece of 8mm ply all sized up draw up where you want your doors to be. take the ply out and cut out the doors. fit a couple of simple door hinges so you have doors. finally contact all the ply and stick your carpet over. make sure you have one section in between the 2 doors which you can screw into a baton to give the ply more rigidity and a secure place to put the little slide bolts onto . once its all back in the van spend a pleasant hour or so threading elastic through all the machined out pressings in the shell to make a sprung net to put your stuff behind. it keeps it safe and stops it rattling around. iv constantly got 2 chairs, 2 fold out camp beds, a fold up table, thermarests and sleeping bag in there. just add the fridge or heater, food and bikes and off you go.
Awesome, missed these pics. Nice work stumpyjumper.
Made a fair bit of headway today, striiped out all back down to the bare metal. Covered the wheel arches in flashing and spent ages completing a cardboard template for the roof.
Found a set of 3 LEDL lights in B&Q that work off 12v so that was easy 🙂
Work called off again so ill get some celotex fitted tomorrow then when i get home in a week or so ill get the roof cut, lights wired and fitted 🙂 Really enjoying doing all this myself. Very steep learning curve with the electrics but its really not rocket science.
Missed these last posts, but yeah, earth to some bare metal on the chassis!
Good work guys!! DIY vans rule!!
Sazter, are you doing any of the SES rounds this year, if so we will have to have a van off 🙂
Mac, I am not as I am not quite confident / good enough, also too poor! I might go along to some though as a marshall / just to watch!
The marshalling is a good way to spend the weekend, my girlfriend does it sometimes and ill bimble round the courses 🙂
Few pics of the work i have done so far. I know its not much but really enjoying the conversion.
Ply and electrics next 🙂
[img] 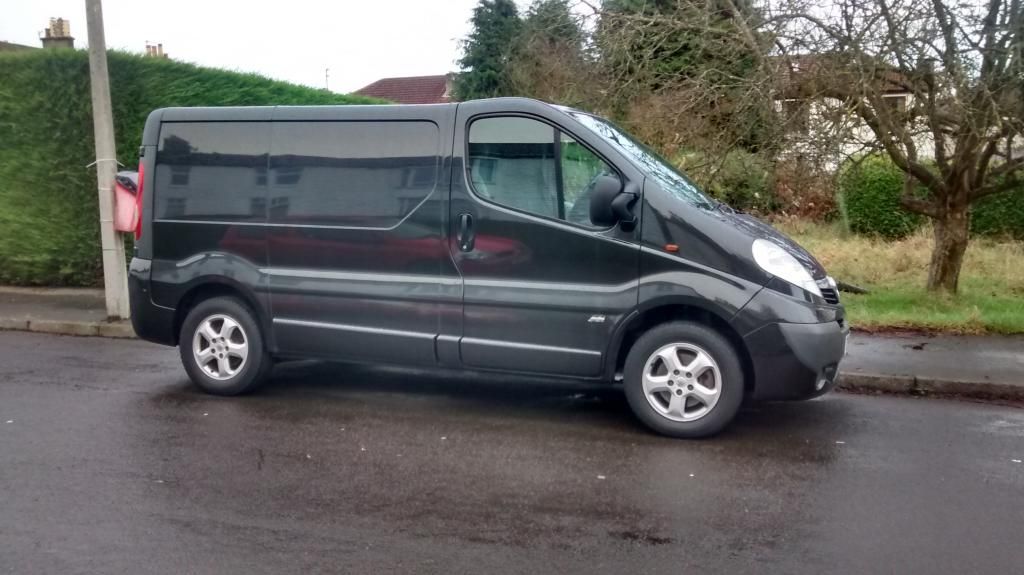 [/img]
Before i ripped out the old ply
[img] 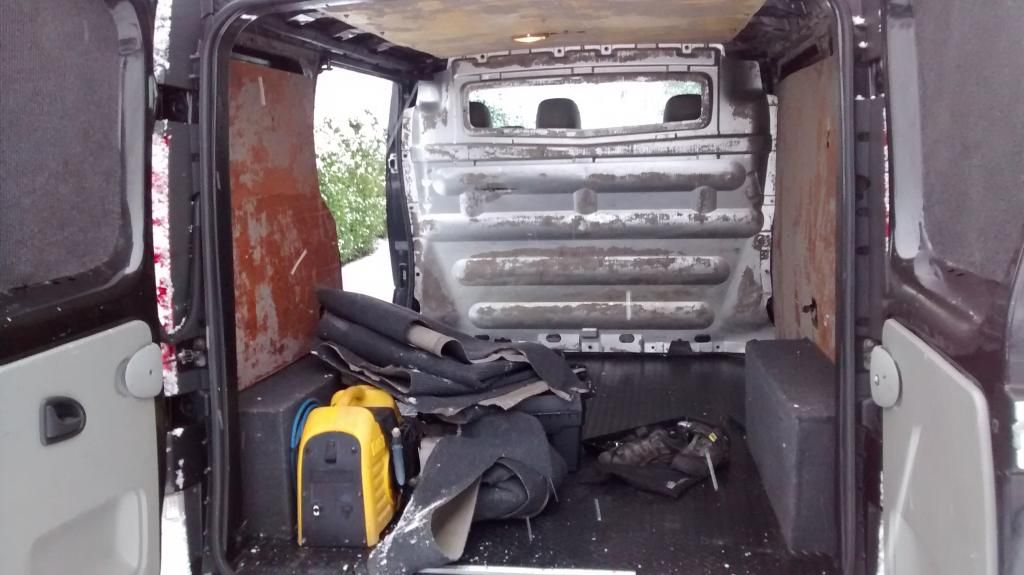 [/img]
As it is today, Insulation on both sides completed, roof and floor next.
[img] 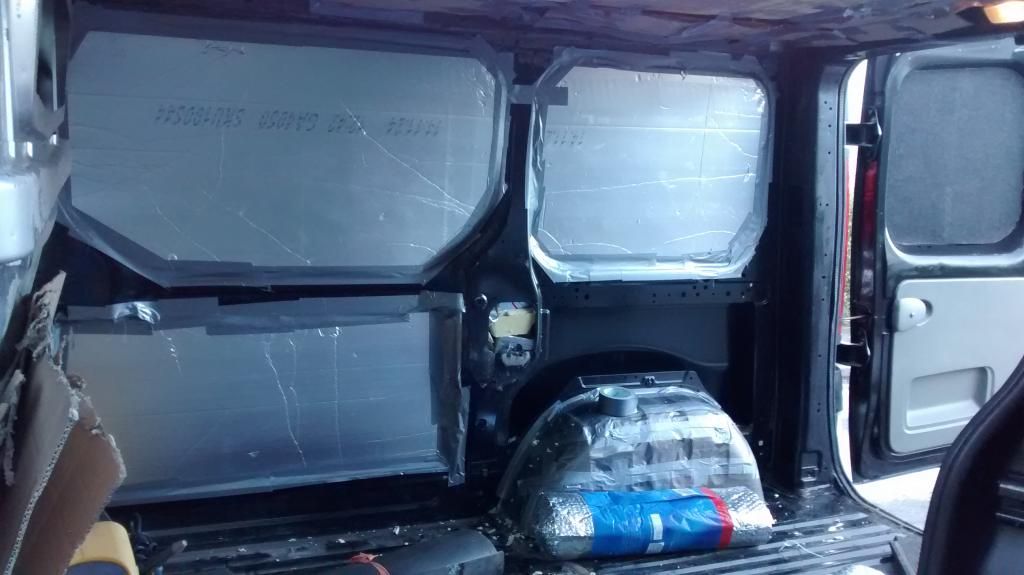 [/img]
[img] 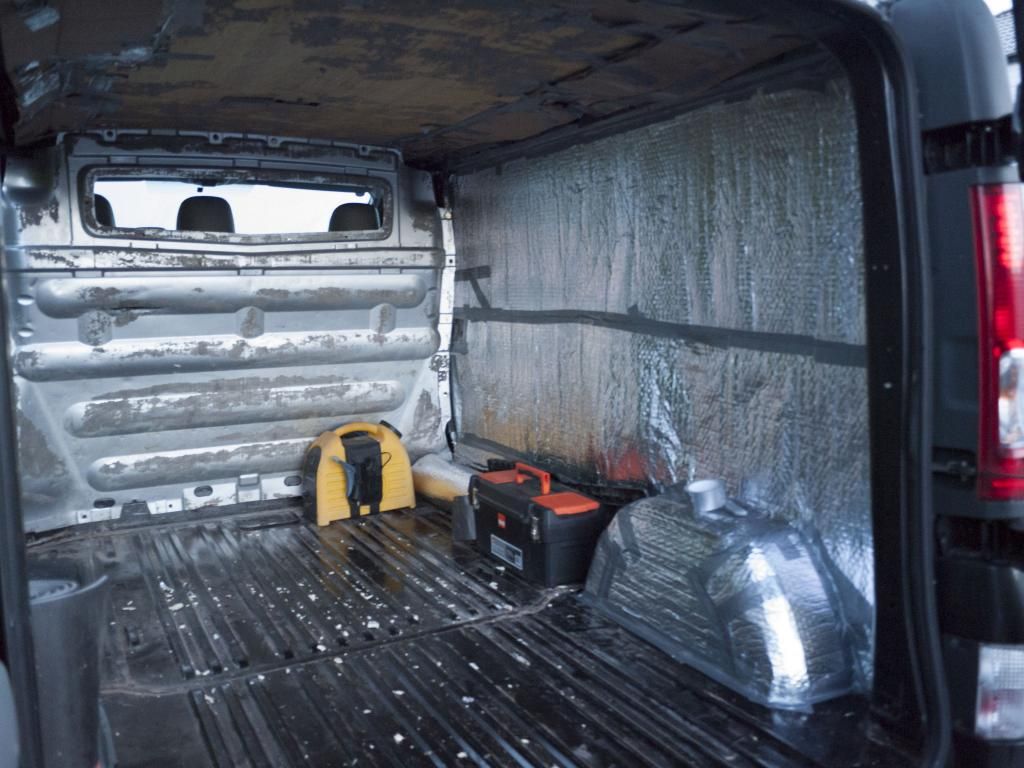 [/img]
[img] 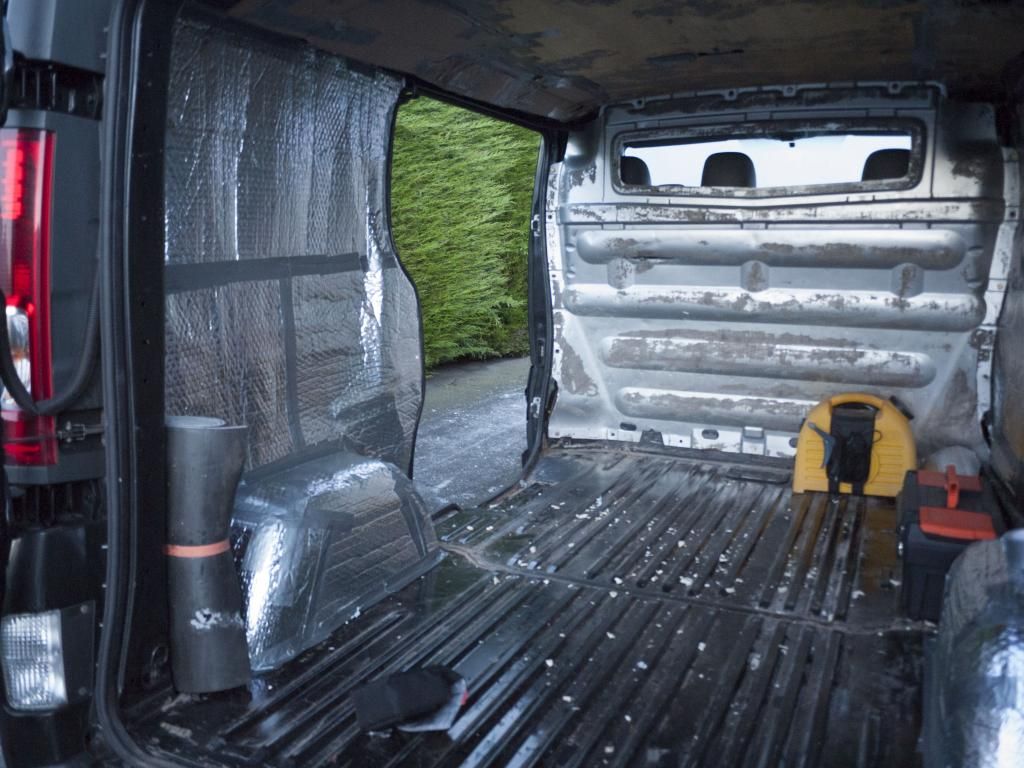 [/img]
Its a lot more time consuming than i was expecting. The Celotex fitting took ages 🙂
Yes! But well worth it to be toasty!! I hope to get a bigger van in the next couple of years, can transfer the lights, heater and bed over to a new van if I don't manage to sell it as a stealth camper! 🙂
I have the same jetwash, make sure you put a socket for it in easy reach, mine was up too high and I slipped on the step and shoved the pug through the socket, so replacing that one with a double usb for charging things and putting a socket for the jetwash on the battery box itself. 🙂
Nice looking van Mac - stealthy 8)
Its a bit of a ball ache plying the sides of Vivaro's because they aren't anywhere near flat, there's a sticky out bit where the struts cross so you'll have to batten the rest out to get it flush - a bosh with a stout hammer helps 🙂 This is definitely worth doing if you plan to fit seating or cupboards, it will give you something to screw to.
Have you sussed out the black art of electrickery yet? My battery and split charger 'thing' arrived today but, pfff, no idea tbh - looking forward to your in depth, pic heavy post on that one... keep em coming 🙂
[quote=twang ]Its a bit of a ball ache plying the sides of Vivaro's because they aren't anywhere near flat, there's a sticky out bit where the struts cross so you'll have to batten the rest out to get it flush - a bosh with a stout hammer helps I managed no problem, without battens.
Any more progress mactheknife?
I manage to successfully install my split charger without any explosions or dead starter batteries/kittens..
[img] 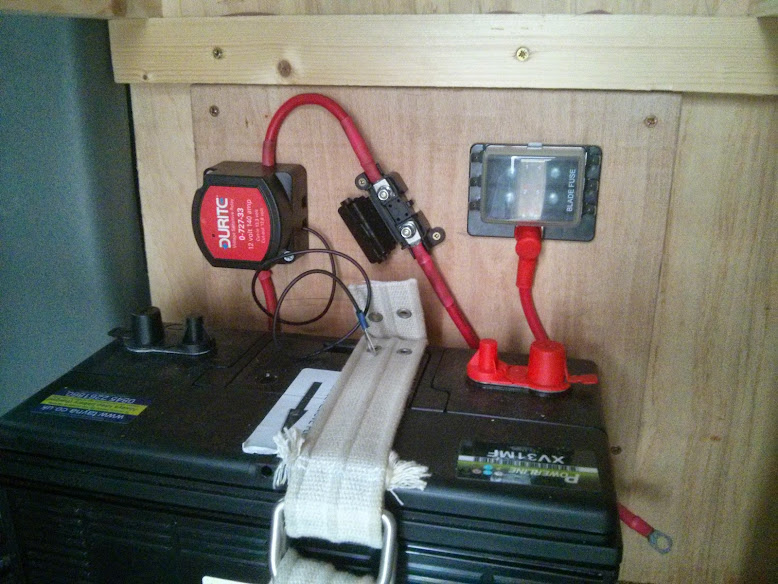 [/img]
Took the cable under the van externally and came in through a convenient hole in the little step behind drivers seat..
[img]  [/img]
its box section so the internal hole in the pic I had to drill, robbed the grommet from next to the starter battery.
Found the clips in BnQ which are perfect for the conduit diameter.Tip - pull the cable through the conduit before threading it in and around your chassis nooks and crannies, its right a bugger to get on!
Thanks to Mike D and Sazter I now 'need' a pull out bed
a start...
[img]  [/img]
Your wiring's a lot tidier than mine 🙂
Early days, I'll soon spaghettify it when I get the fuse box wired 😀
Glad I'm not the only one who has used an old belt as a battery clamp!
van envy 🙁
Hey twang, nope i have been offshore for the last few weeks. Home tonight and have ordered a plywood lining set. Need to give megavanmats a call tomorrow and order the carpet and floor lining.
I have the lights and switches and all that gubbins ready to roll. Just got to spend a few days getting my mitts dirty.
Infact if anybody could tell me how to wire this switch i would be grateful 🙂 3 clips and no instructions 🙂
[img] 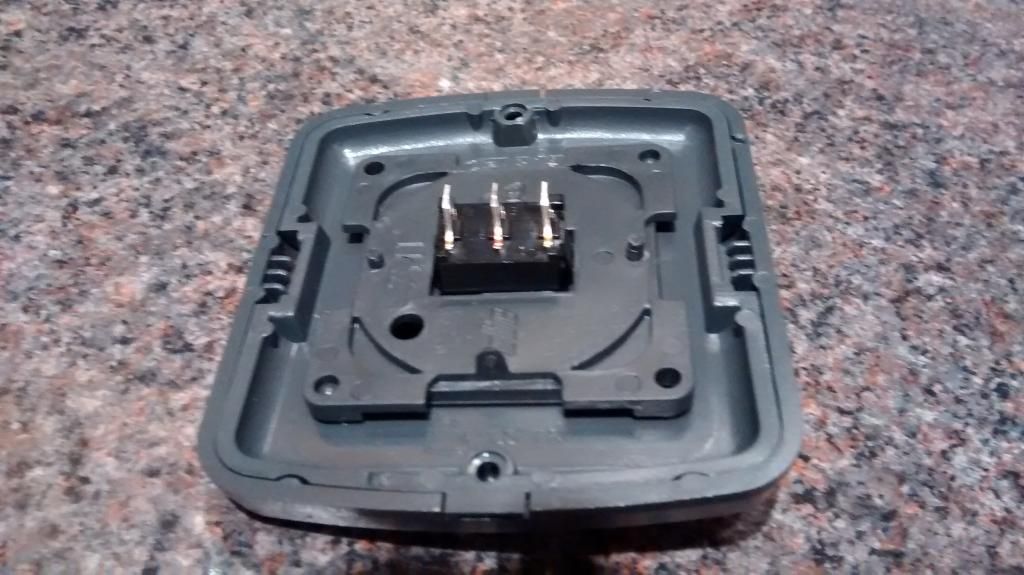 [/img]
Been looking at switches today, seems the three prongs are for live, neutral(earth) and the third is the earth for the illumination on the switch itself so its permanently lit. If its not marked though?.. a bit of trial and error made be called for 🙂
iS that a switch or a lamp? If its a switch it is a double throw switch. Totally normal to leave one do the sides disconnected.
SPDT (single pole, double throw) on this image. the unused position acts as "off", the common pole is the centre spade.
[img]  [/img]
If a lamp, it could be that one of the leads is for manual operation, and the other is for courtesy light operation.
Get a multimeter across it and work out what connects to what
My guess is live feed, load, earth for internal indicator light.
Cheers guys. I have just ordered all the electrics for the van so before i fit i will have a play and see what works and what doesnt.
Multimeter - good shout 🙂
Oh its a switch, i got it to wire the LED lights up to.
I've bitten the bullet and I have ordered and fitted the split charge relay. The instructions are very easy to follow. It helps if you mark all the cables up to their corresponding letters on the diagram. I ordered the 3 metre kit then discovered the main battery is in the passenger footwell and the leisure is going under the passenger seat. Total length of cable needed ...... 65cm! Used the rest to go through the bulkhead and onto the the fuse board in the back. Finally fitted it all last night. Il get some pics up later. I actually really enjoyed the process and it has got me over my fear of electrickery. Must say I feel very proud that Iv done it all myself. Iv just got one question left for [b]sazter[/b][u], how much draw does the ceramic heater take on your battery? I've got a 85amp battery. Iv reserved a place for it on the board.
Sorry there has been little progress. I have ply-lined the back and wired in the led lights and 12v cigarette lighter currently. I have actually managed to get a fair bit of riding done but not much van work.
I had to get my father-i-law (the shame) to show me how to crimp the connections and make sure all my wiring was safe 🙂 but as he is a sparky it made the pain easier.
Oh got a stealth window on the sliding door. Just needs some privacy curtains as you can still see through.
But i will continue to plod along next time i am home and i aim to have the rear floor and walls/roof all covered. I got stretchy carpet for the roof and sides and vinyl flooring for the floor. And the sparky side finished as well.
[i]EDIT; Ignore bump, slow typing and uploading of pics took longer than it did for you to reply - 1 hour![/i]
Interested in the heater battery draw too in you're about sazter?? Have you connected it direct to battery and what size fuse have you got in there?
I'm considering sticking in a woodburner 😛
I've made a 'bit' of progress (hope you don't mind me sticking these up here mactheknife, no hijack intended)
Pull out bed thing;
[img]  [/img]
[img]  [/img]
[img]  [/img]
A lot of effort for a 200mm extension 🙂
The infill bit will be from the back rest that will hook on the er... back rest bit, needs foam obviously 😉
It's my 'control panel';
[img]  [/img]
Aaargh my eye!...needs a smiley mouth and a cupholder hat 🙂
Nice set up twang, and put up as many pics as you can upload. Gotta spread this van love 🙂
I like your control panel. Might steal that idea for a few chargers. Have you got an inverter in there yet?
No inverter, don't think I really need one tbh. Don't they drink your battery dry in no time?
I've got a portable compressor fridge that'll plug into the lighter socket and a couple of usb charger ports, can't think of anything else I'll need...
I was talking to a mate at the weekend who has an inverter wired into his van and he was quite surprised how little power it drew from the battery.
I wired up a 12v lighter near to the rear door yesterday for my dirtworker. A couple of USB sockets and ill be reet i reckon.
Solar panels haha nearly bought one at the weekend. Had to have a serious word with myself. My finances have taken a mullering.
Ha! I know what you mean, I've spent, (from a self confessed tight arse) a stupid amount on all this interior shizzle considering the van is getting desperate for new shocks and clutch and..etc 😕
Next; over-garage, flip-up double bed 😀
Any more progress Mactheknife?
I've bitten the bullet and splashed out on shiny things..
[img]  [/img]
carcass built (out of off-cuts)
[img]  [/img]
doors made (out of off-cuts 🙂 )
[img]  [/img]
[img]  [/img]
Aluminium corners scrounged from a skip.
It took more than a few days tbh but I've enjoyed it - a labour of love. 😀
what handles for...
Hey twang, my van has been in the garage for the last few weeks as Vauxhall are finally replacing all the injectors. Its been an absolute epic getting to this stage.
I got one side carpeted and the roof ready to roll. Hopefully when I get home I'll get stuck in. I have had one problem after another with the engine but hopefully that's sorted now.
Keep the updates coming, keeps me motivated to get stuck in
Oof, sounds like you've had a bit of a mare. What happened with the injectors and how did you get Vauxhall to pay?
There is a known fault with some models of Vivaro where water can get into the engine bay and sit on top, corroding the injectors. I already paid £800 to get one changed before the others went. But hopefully I can make some headway now 8)
Heard about the fault, it was on Watchdog apparently. Renault and Nissan admitted they were liable but Vauxhall dug their heels in and were only paying for repairs on certain models and vans no more than seven years old I think and then only as a good will gesture 🙄
Anyway,(trying to ignore potential injector woes) my first night out with the new kitchen and pull out bed last night and apart from the chill factor, it all worked rather splendidly 8)
[img]  [/img]
[img]  [/img]
Massive problem with condensation though.
There's a small exposed strip down the middle of my roof where the lighting will eventually go, the bare metal AND the insulation stuck to the roof was covered in a heavy frost this morning which started to drip out of every joint in my ply lining!..needs completely redoing 🙁
Do it right do it once eh..
Splendid kitchen unit 🙂
Hey twang, that van is looking fantastic 🙂
Well done 🙂
@Twang. Excellent ideas with the kitchen unit. Where did you source the sink/burner unit?
Cheers chaps 🙂
Did you have to set such a high standard Mike D? I was perfectly happy with my stacking boxes and camping bed before your thread 😉
Felo, combi sinks a smev 911, the narrowest I could find. £150ish from loads of places.
Come on Mac, lets have some more piccies... 🙂
twang, i would love to mate but i am being completely messed about by Vauxhall. They have had it for 4 weeks now and apparently the injectors are getting removed today 😕
They are either very incompetent or there is something i don't know about that has caused all these delays.
I have all the carpet, lights flooring and extras ready to fit so i need the van back 8)
There have been problems with injector removal. So.much so that some folk make a living from doing little else. They've invested in kit that your local dealer won't have and do it on a contract basis. Could be they've had to call on one after trying everything else.
Re: condensation, as a user of vans for years, I wouldn't bother ripping everything out, you can't stop it, people produce a lot of moisture. I'd just increase the ventilation.
Good tip is to pick up some window deflectors
[img]  [/img]
and always leave both window cracked an inch when camping. You can't stop condensation, all you can do is chase it somewhere else.
Looks like a cold night too, that will make it worse, you'll find you barely get it in the summer.
Scotroutes, yep thats what they said they were going to do 2 weeks ago. Bring a company in to do it. Every time i call it seems to be the same excuses over and over.
I am a very patient guy but this is getting beyond a joke
Did you have to set such a high standard Mike D? I was perfectly happy with my stacking boxes and camping bed before your thread
STW: Raising the van conversion bar 🙂
And +1 for ventilation to combat condensation.
Sorry Mactheknife, hadn't realised your van was still with Vauxhall. At least its in while the weathers rubbish - sorted for summer! 8)
I did sleep with windows slightly open but it was a very cold and still night so not a lot of air exchange going off.
Ive got a rotary ventilator to go in which should help (if there's a breeze)
Other than installing a powered fan I can't think how I could improve ventilation?
May just take your advise Pictonroad and ignore it 😀