![]() You don't need to be an 'investor' to invest in Singletrack: 6 days left: 95% of target - Find out more
You don't need to be an 'investor' to invest in Singletrack: 6 days left: 95% of target - Find out more
Thanks again. Off to bed. OG ended up at 1.44, looks like there is quite a bit of sediment as still cloudy. Better than the first attempt though.......
regarding efficiency - I've never worried about it - worked it out once at 68 and that'll do for me.
+1
Even if you had "terrible" efficiency, all that means is you need to use a bit more grain in your recipe. Given the scale of homebrew batches, that just means someone with terrible efficiency ends up paying 50p more per batch than someone with great efficiency. Definitely not worth worrying about. Still, it's interesting to know roughly what you're coming out at, since it can highlight the effect of changes on your process (like crushing the grain more finely or changing how you sparge).
looks like there is quite a bit of sediment as still cloudy. Better than the first attempt though.......
Don't worry about that, it will all settle out in the FV.
Now the yeast will work its magic and leave you with some nice beer! 🙂
(just to be sure....in case you were tired when you finished up last night...did you leave part of the lid on the FV slightly cracked? If not, do it now. With the massive brewery FV, I just left about 1-2 inches not fully locked on and that provided ample release for Co2, but without anything nasty being able to get in)
Think I added too many chillis to my ginger beer wort, easy summer drinking it is not. 😯
Malt group buy anyone interested
I put a post up last night and then thought it should have been here
Any Allgrain brewers within collecting distance of Skipton want to join in a group buy of crushed grain from Fawcetts Maltsters of Castleford
My Brother and I are getting some bags Minimum order is 10 bags and we have hit that with our requirements but can add on some if anyone is interested
Prices are approx £20 for a 25KG sack
I will be collecting the order before the 14 June
Hey all,
I've been mulling over how to improve my wort chiller following the first effort and took on board the feedback from guys here regarding the possibility of leaky connections.
I knew the hose i had used was too big for the copper and wasn't a snug fit on the 10mm pipe, so i was looking for a hose with a smaller ID that would fit neatly over the copper. The presented an issue though with the ability to interface with a standard hosepipe connection for running the water in.
I happened upon a great wee solution today whilst browsing in the time thief known as Tesco - a wee 10m micro hose for a tenner. Link [url= http://www.tesco.com/direct/tesco-10m-micro-reel-garden-hose-with-spray-gun/577-4001.prd ]here[/url]
Its ideal - 11.5mm hose with the standard hose connectors built in, all on a tidy reel. The hose fits really snugly over the copper, i had to heat the hose end in boiling water to get it about an inch over the copper. I took 1.5m off one end of the hose and this will be the waste outlet into the sink, with the remaining 8.5m wound onto the hose reel with a hose connector on one end. I'll never need 8.5m of reach with the hose but the fact its on a reel means its not too obtrusive.
I also got some amalgamating tape and wound loads of it onto the copper so the tape, a tighter hose fit and a jubilee clamp must surely banish any hope of leaks! I still need to do a live test though.
A few pics below but i'm really rather chuffed with this, turned out pretty well imo.
[img]  [/img]
[img]  [/img]
Looks good:-) is it all up to being boiled for 15 mins?
Yep just boil it and check but looks good. FWIW I occasionally coincided my brewday with my spa refill and used the heat exchanger to give the spa water a headstart, it was a double 50ltrx2 setup so produced quite a lot of v hot water !
Boil test is going to happen this week, so fingers crossed. Cracking idea reusing the water there nzcol, need to think about ideas for that.
Incidentally the wife has dubbed me the mad scientist after buying stuff and cannibalising it 🙂
good work david, that looks great!
I brewed a black IPA very very early yesterday morning (i'd finished up by 10am!) and I'm due to bottle an oatmeal stout at some point this week.
Happy to report the boil test was a complete success! Looks like the chiller worked quite well, i'm amazed at the heat of the water coming out at the start and how quickly the wort cooled from c.70 degrees to about 40. I didn't take temps to start with and finished when it had cooled to about 40 but everything looked in order. No leaks anyway which is the important bit. Happy days.
so i'm all guns blazing now 🙂
Got a VM running the beersmith trial at the moment to see what its like and found a simple SMASH recipe using Maris Otter and Citra hops. converted it using Peterfile's original BIAB profile and upped the volume to the full 10l for the final volume. The recipe is calling for the following:
California Ale (White Labs #WLP001) (i was going to use us-05 as it seems to be a fine substitute)
Citra Hop 54.25g
PH 5.2 Stabilizer (is this necessary? I assume poss not based on your tap water.)
Pale Malt, Maris Otter 2.88kg
Whirlfloc Tablet (i assume protofloc is the same thing?)
do those figures seem about right? Also another silly question but i assume we use crushed Malt?
I'm going to jam an order in with Brewuk soon as i have a voucher to spend and i'll get this beer brewing soon!
US05 works well with citra.
2.88 kg crushed malt sounds good for 10L
the pH stabiliser is not strictly necessary unless you have really hard water
Protofloc will do nicely
what's the timing on the hops?
Hi john
The amounts are wrong here but the timings should be ok:
Ingredients
Amount Name Type #
1.00 tbsp PH 5.2 Stabilizer (Mash 60 min) Misc 1
10 lbs Pale Malt, Maris Otter (3.0 SRM) Grain 2
0.5 oz Citra [12.0%] - Boil 60 min Hops 3
1.00 Whirlfloc Tablet (Boil 15 min) Misc 4
1.0 oz Citra [12.0%] - Boil 10 min Hops 5
0.5 oz Citra [12.0%] - Boil 5 min Hops 6
1 pkgs California Ale (White Labs #WLP001) Yeast 7
1.00 tsp Yeast Nutrient (Primary 3 days) Misc 8
1.0 oz Citra [12.0%] - Dry Hop 4 days Hops 9
That all looks good (although as john suggests, drop the stabilizer until you know your own water profile).
Also, for your first brew I would either dry hop straight into the primary FV once fermentation is complete, or don't bother with it at all (if it was me, I'd go for the latter on the first brew). Until you've got your processes a bit more slick, transferring to a secondary will probably do more harm than it's worth (i've stopped sticking things in secondary unless really necessary), it's the perfect opportunity for oxidation to rear its ugly head.
You don't necessarily need the yeast nutrient. Just splash the wort around for a few minutes before you pitch the yeast, then sprinkle on a whole pack of US 05 (get it all in there, it's cheap anyway!). The yeast will be fine on a beer that size without nutrient.
What are you using for sanitation on the cold side (ie after you've cooled your wort)? I can thoroughly recommend Star San. It really makes keeping everything sanitised a whole lot easier.
those hop amounts & timings look fine 🙂
I don't agree with peterfile about secondary though - when fermentation has finished in my brews, I do rack them into secondary, where I add Isinglass finings & leave for 2-3 days before bottling. Lovely & clear when it goes into the bottle from there
hey guys, thanks for the advice as always. the hop timings etc was a copy/paste from the recipe on my ipad so i didn't chop out the yeast nutrient - i'd already decided that wasn't happening :). fair point on the water stabiliser though, we're central scotland so nice soft water here. the stabiliser was 12 notes from brewuk, so a bit of money saved.
I was also going to avoid dry hopping this one, mainly because its messy and its my first "complex" brew. i'll be neurotic enough about it!
I also use starsan PF, its great to work with. dont fear the foam!
brewday scheduled for Sunday so its all happening now, looking forward to it!
edit - i'm assuming its crushed malt! also buying som muslin bags as i'm sure they will be useful.
I was also going to avoid dry hopping this one, mainly because its messy and its my first "complex" brew. i'll be neurotic enough about it!
one way round that is when you get to chilling the wort, only take it down to 80deg, then turn off the chiller & add the dry hops; leave for half an hour, then resume chilling
I would imagine it will be already crushed, it's more likely than unmilled. If there's a floury powder (*well, flour really) amongst the malt then it is already crushed
Or another way is a hop tea
pop your hops in a Cafetiere add boiling water / steep for a while
and add the hop tea to your brew when cooled .
the instant dry hop method
mmm, hop tea sounds cool 🙂
I should have been more specific on the malt - the brewuk sells crushed malt [url= https://www.brewuk.co.uk/store/maris-otter-pale-malt-1kg.html ]here[/url] as well as whole malt [url= https://www.brewuk.co.uk/store/ingredients/ingredientsgrains/pale-malts/maris-otter-pale-malt-whole-1kg.html ]here[/url]
i assumed it was crushed malt i'd need, rather than wholegrain, but not so sure now!
Yes unless you have a grain mill then you need ready crushed grain .
great, thanks for confirming trout. be prepared for endless boring updates throughout Sunday!
Is anyone maing elderflower champagne this year? Mine is fizzing away in the bin nicely. After good results last year by pulling as much of the stalks off as practicable and using bread yeast I'm hoping for another cracking batch
and lo, on the seventh day he brewed.
Yes, i'm breaking my 6 month duck and actually brewing a batch today. Any last minute advice? Heres the recipe etc - if you see a glaring omission let me know. Thanks to all the contributors on this thread, a great resource. i'll pop up some pics of the brew day later!
SMASHing it
American Pale Ale (10 A)
Type: All Grain
Batch Size: 10.00 l
Boil Size: 12.12 l
Boil Time: 60 min
End of Boil Vol: 10.92 l
Final Bottling Vol: 9.17 l
Fermentation: Ale, Two Stage
Date: 22 Aug 2012
Brewer: David Russell
Asst Brewer:
Equipment: David's BIAB
Efficiency: 70.00 %
Est Mash Efficiency: 73.5 %
Taste Rating: 30.0
Taste Notes:
Prepare for Brewing
? Clean and Prepare Brewing Equipment
? Total Water Needed: 13.63 l
Mash or Steep Grains
Mash Ingredients
Amt
Name
Type
#
%/IBU
2.46 kg Pale Malt, Maris Otter (5.9 EBC) Grain 1 100.0 %
Mash Steps
Name
Description
Step Temperature
Step Time
Saccharification Add 13.63 l of water at 70.2 C 66.7 C 75 min
Mash Out Heat to 75.6 C over 7 min 75.6 C 10 min
? If steeping, remove grains, and prepare to boil wort
? Add water to achieve boil volume of 12.12 l
? Estimated pre-boil gravity is 1.047 SG
Boil Ingredients
Amt
Name
Type
#
%/IBU
7.57 g Citra [12.00 %] - Boil 60.0 min Hop 2 20.4 IBUs
0.53 Items Whirlfloc Tablet (Boil 15.0 mins) Fining 3 -
15.13 g Citra [12.00 %] - Boil 10.0 min Hop 4 14.8 IBUs
7.57 g Citra [12.00 %] - Boil 5.0 min Hop 5 4.1 IBUs
? Estimated Post Boil Vol: 10.92 l and Est Post Boil Gravity: 1.055 SG
Cool and Transfer Wort
? Cool wort to fermentation temperature
? Transfer wort to fermenter
? Add water if needed to achieve final volume of 10.00 l
Pitch Yeast and Measure Gravity and Volume
Fermentation Ingredients
Amt
Name
Type
#
%/IBU
1.0 pkg Safale American (DCL/Fermentis #US-05) [50.28 ml] Yeast 6 -
? Measure Actual Original Gravity _______ (Target: 1.055 SG)
? Measure Actual Batch Volume _______ (Target: 10.00 l)
? Add water if needed to achieve final volume of 10.00 l
Fermentation
? 22 Aug 2012 - Primary Fermentation (6.00 days at 19.4 C ending at 19.4 C)
? 28 Aug 2012 - Secondary Fermentation (6.00 days at 19.4 C ending at 19.4 C)
Dry Hop and Bottle/Keg
Dry Hop/Bottling Ingredients
Amt
Name
Type
#
%/IBU
14.98 g Citra [12.00 %] - Dry Hop 4.0 Days Hop 7 0.0 IBUs
? Measure Final Gravity: _________ (Estimate: 1.012 SG)
? Date Bottled/Kegged: 03 Sep 2012 - Carbonation: Keg with 86.48 KPA
? Age beer for 6.00 days at 18.3 C
? 09 Sep 2012 - Drink and enjoy!
Notes
mashing as we speak. Hit upon using my brewfridge climate controller to chek oven temps. We'll see if its a good idea![img] 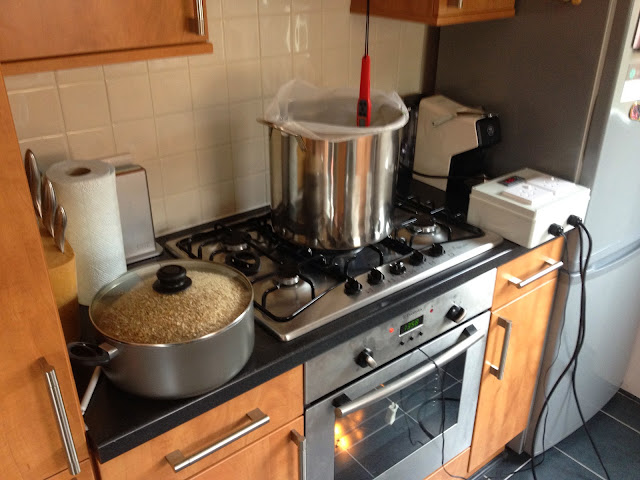 [/img]
Brilliant! Glad you've finally popped your cherry!
I've brewed a complete game changing beer (for me at least!). Opened an IPA that's been in the bottle for jusr 10 days that I used some new techniques on...and it's utterly brilliant. In a totally different league to all previous brews.
Pretty sure it's down to a combination of:
getting the water chemistry spot on
no bittering hop additions, all IBUs and flavour are picked up 15 mins onwards
fermentation temp control
Feedback has been great, so now it's back to the drawing board but from a new, better base! 🙂
Keep me posted on how your brew day goes David!
Thanks PF, its been a long time coming as you know! Feel confident that things are going ok. Oven temp is about 63 degrees but i dont want to start messing with it as i'll just let the mash do its work. I know mashing too low is an issue but getting into fractions of a degree at this stage is a bit beyond me. We'll see what the OG says at the end of the mash. I think next time i'll get either put the probe from the brewfridge into the mash itself or get one of these probe thermometers with a remote wire and see whats going on in there.
just popped the vacuum pack of citra hops, smells lovely. i think i will dry hop this batch as i have plenty of muslin bags and my syphon will cope with residue.
one q though, the recipe above calls for 75 min mash and then slowly raise temps to 75 degrees over 10 mins, not sure what this is for or if i should bother doing it? I dont want to go off piste from the recipe if i can help it, but all the recipes discussed here dont menion a step like this.
Cheers
David, a mash out probably isn't necessary. It can help a bit with efficiency and target an exact malt profile, but on the scale we brew at, it's probably more hassle than it's worth.
sweet, i was just contemplating how to hit those figures with temp etc. Wont be long until the boil now!
so, first brew post mortem:
1. missed pre-boil OG by 3 points (hit 1.044 instead of 1.047), possibly due to mash temps being too low? That was accounting for wort temp so it was a real 3 point difference.
2. Chilling the wort took FOREVER to get to 20 degrees. in the end i think at 21/22 i gave up and got things moving, it must have taken 45 mins. No leaks though!
3. my digital thermometer seemed to be givin me funny readings from the wort during chilling. one area was c. 7 degrees hotter than the other. stirred it a bit which leads me to:
4. hot/cold break settling nicely before i whirlpooled the pan. pointless i think as it stirred it all up and then when i tried to syphon it all went in to the FV anyway 🙁 Not sure what the protocol is on this, i've read leaving the break in the pan is recommended, but a bit in the FV will do no harm. hard to whirlpool it then leave it long enough to settle out after chilling as that took ages.
5. nailed the OG in the FV - 1.056 and i was shooting for 1.055. However, and this is the worrying bit, i was c. 1.5l off my target of 10l into the FV. I had to top up the FV to 10l with water. Not sure if that was the right thing to do or not but its done now. mixed in the rehydrated us-05 so we'll wait to see what happens.I think my volumes were ok to start with but i can only assume i had less in the pan than i thought i did pre boil. need to find a repeatable method of measuring water (i did weigh it this time on bathroom scales but thats a faff and probably not all that accurate)
6. drinking during a brew is not a good idea. i knocked in 4 cooking lagers and 1/2 bottle of wine whilst waiting. definitely clouded judgement towards the end of the brew.
all in all though a most enjoyable afternoon so we'll see what comes out of it in 2 weeks!
your c+c would be most welcome 🙂
1. missed pre-boil OG by 3 points (hit 1.044 instead of 1.047), possibly due to mash temps being too low? That was accounting for wort temp so it was a real 3 point difference.
Don't worry about pre boil gravities being a bit off. By taking a reading in the first place, it allows you to more accurately predict (and therefore adjust) where the OG will come out.
I tend to take a pre boil gravity just to make sure i'm not a million miles away from where i need to be.
A refractometer is great because it lets you take readings on the fly all the way through the boil.
2. Chilling the wort took FOREVER to get to 20 degrees. in the end i think at 21/22 i gave up and got things moving, it must have taken 45 mins. No leaks though!
In winter, I can get 10l of wort to 20 degrees in 20 mins. At this time of year though it takes 30 and will struggle to do the last bit from 24 - 20. I presume this is due to water temps.
I usually just pitch at 23/24 these days.
3. my digital thermometer seemed to be givin me funny readings from the wort during chilling. one area was c. 7 degrees hotter than the other. stirred it a bit which leads me to:
I stir every 5 mins or so while cooling.
4. hot/cold break settling nicely before i whirlpooled the pan. pointless i think as it stirred it all up and then when i tried to syphon it all went in to the FV anyway Not sure what the protocol is on this, i've read leaving the break in the pan is recommended, but a bit in the FV will do no harm. hard to whirlpool it then leave it long enough to settle out after chilling as that took ages.
Don't worry about getting it in the FV. The general consensus is just to dump it all in there. It will settle out anyway.
That said, I pour through a sieve into the FV, simply because I lose less beer to trub and it helps aerate the wort.
5. nailed the OG in the FV - 1.056 and i was shooting for 1.055. However, and this is the worrying bit, i was c. 1.5l off my target of 10l into the FV. I had to top up the FV to 10l with water. Not sure if that was the right thing to do or not but its done now. mixed in the rehydrated us-05 so we'll wait to see what happens.I think my volumes were ok to start with but i can only assume i had less in the pan than i thought i did pre boil. need to find a repeatable method of measuring water (i did weigh it this time on bathroom scales but thats a faff and probably not all that accurate)
How much strike water did you heat up? I find that 15-15.5 litres gets me 10 litres into the FV (after shrinkage).
I wouldn't have topped up the FV with water for two reasons. Firstly, you'll have knocked off your OG. Secondly, there's an increased risk of infection from dumping in water straight from the tap. I'm sure it will be fine, but at the end of the day, you were only going to be 3 bottles short of your desired batch size. I'd prefer hitting target OG than target volume.
For next time, measure in your desired strike water, stick in your brewing spoon and mark the water level on the spoon. That way you can quickly fill it up from then onwards.
6. drinking during a brew is not a good idea. i knocked in 4 cooking lagers and 1/2 bottle of wine whilst waiting. definitely clouded judgement towards the end of the brew.
As much as I hate not to have a beer or 4 while brewing, I have to admit that most mistakes I've ever made while brewing seem to be due to beer!
Well done though! Glad you're finally a brewer! Just wait until you drink something that you've produced from grain.... 🙂
Thanks for your comprehensive update PF - much appreciated! I need to google why the pre-boil OG was a bit low but i think i'm right in assuming that its not mashed quite enough. Like you say the post boil OG should be the key factor and i went and monkeyed ith it when there was no need to. You are quite right about the extra 3 bottles and thinking back there was no valid reason to top it up apart from the recipe saying so. Thats the beer-brain at work right there 🙂
Re the cooling i saw all this lovely clear wort and didn't want to disturb it, so i left it alone. and then promptly stirred it all up using the whirlpooling, so yeah kind of pointless 🙂
Sounds like an idea using the sieve though, as the other thing that occurred to me was that i didn't aerate the wort very much on putting it into the FV as i siphoned it in. I needn't have worried though, went downstairs at 7am, roughtly 12 hours after pitching the yeast and before i opened the brew fridge i heard the welcome sounds of a gurgling airlock. c. 24 hours later and its going like stink!
I normally fermented at 18 degrees but i have the temp set at 19.3 according to the recipe and its working away really well, so i'll let it be for a few days before dry hopping.
On the strike water the recipe only called for 13.6l of strike water and estimated my final batch vol should have been 10l, so something is off quite a bit somewhere. i followed the recipe i posted almost to the letter so if any beersmith whizzkids can see something obvious i'd be interested to see what went awry.
just got the brewing bug again, can't wait to see what its like!
A quick half to see if my Black IPA is properly carbonated yet...
[url= https://farm3.staticflickr.com/2897/14440886942_a8de4956a5_n.jp g" target="_blank">https://farm3.staticflickr.com/2897/14440886942_a8de4956a5_n.jp g"/> [/img]
[/url][url= https://flic.kr/p/o16jzm ]2014-06-17 18.00.17-2[/url] by [url= https://www.flickr.com/people// ]W Hyde[/url], on Flickr
Yep 🙂 (Don't worry, it's evening in this part of the world, I'm not having beer for breakfast.) Tastes great, a nice roasted bitterness from the malt goes great with the hoppiness. Might have to have another, just to make sure...
That looks great Will!
You might need to drop the "I" at 4.2% though 😉
Black Pale Ale sounds even better IMO!
Yeah, the name is from the recipe I used. Target ABV was 5.7%, but my refractometer was giving me some dodgy numbers so 4.2% is actually a bit of a guess. Post-boil gravity measured at 1.055 on the refractometer (which had previously been calibrated to zero using distilled water). Final gravity then measured 1.033 on the refractometer. The beer tasted like it had fermented out, or at least wasn't as sweet as I'd expect at 1.033, so I checked using a hydrometer, which gave me 1.016 - still a touch higher than the target but good enough.
But I didn't take a hydrometer reading post boil, so don't have solid numbers to calculate the ABV. The brew was a bit of a cock-up anyway, as I had some problems with my urn cutting out during the boil - managed to bypass the cut-out and get it going again though. And I also realised mid-boil that the home-brew store hadn't given me enough hops, so I had to change the hop schedule on the fly.
Anyway, the beer tastes awesome so none of the above matters, anyway. I'll try this recipe again properly soon enough, and compare to this version. Who knows, the Black Pale Ale might even be better than the Black IPA!
Dry hopped the brew last night. Sterilised the muslin bag and dropped in another 20g of citra. Not much but that's what the recipe called for. Will bottle next week at some point, can't wait!
A bit of an update on my refractometer quandary from my last post... based on a very high FG reading I figured something had gone wrong with the refractometer (it’s a very cheap one from ebay) so I decided to check its calibration. I had in mind a series of known volumes of water with a known amount of sugar dissolved in each, then checking all the samples with both the hydrometer and the refractometer, and noting any differences. I figured I could at least work out if any fudge factors were needed when working out my numbers. Or maybe whether the refractometer was destined for the bin.
A quick google later – to check the best method of calibrating it – and the bleeding obvious is staring me in the face: using the refractometer during or after fermentation will give dodgy results due to the alcohol in the liquid. It seems obvious now, but hadn’t occurred to me before. There are handy calculators online, such as this one: [url= http://www.musther.net/vinocalc.html#monitorferment ]http://www.musther.net/vinocalc.html#monitorferment[/url] which returns an FG of 1.013 based on the refractometer readings, close enough to the 1.016 FG given by the hydrometer (which I’ve never calibrated, so combined with the estimating-where-the-curved-surface-of-the-liquid-meets-a-tiny-scale method of reading it, may or may not be particularly accurate anyway).
Just thought I’d post this up in case anyone else is new to using a refractometer and runs into similar issues.
Brewed up a wheat beer the other night
Still not hitting the target OGs though.
Making sure the mash temp is spot on (stirring and checking temps every 5 mins).
Really mashing all the wort out of the grain bags.
Taking the reading just before adding the yeast.
Seem to generally be about 0.005 to 0.01 low....
Any ideas?
Still not hitting the target OGs though.
Making sure the mash temp is spot on (stirring and checking temps every 5 mins).
Really mashing all the wort out of the grain bags.
Taking the reading just before adding the yeast.Seem to generally be about 0.005 to 0.01 low....
What temp were you mashing at?
What was your total grain bill and water volumes?
Did you add the grain slowly, stirring the whole time to make sure there's no doughballs?
How far off was your preboil gravity from the OG?
Sounds like it could just be your water volumes that are off. it wouldn't take much extra strike water to throw your OG off by 0.005. Easy enough to fix if you pick it up preboil - just boil for a bit longer.
General consensus seems to be that you don't need to stir grain during the mash.
A word of warning to those using Beersmith....
I think the carbonation levels are massively off for some recipes (at least they are when I use it). For some recipes that I scale, it's asking for up to 60g of corn sugar.
I keep detecting an off flavour in many of my IPAs/PAs that I've been struggling to put my finger on. Everything tastes great when I bottle, tastes great after a week, but then goes downhill once fully carbonated and takes some time to improve.
I had at first thought it was oxidation, but after paying close attention to my processes, the off flavour comes on too quickly for it to be oxidation and it tends to get better after a time, rather than worse.
So after turning the internet upside down looking for an answer, I arrived at carbonic acid. The off flavour definitely has a "bite" too it, which is in line with carbonic acid.
I warmed a couple of problematic beers up room temp and vented the caps for about 15 minutes then resealed. I then cooled them back down and tested...much better.
The thing is, the beers don't appear to be over-carbonated (ie they are not too fizzy).
However, after checking other carbonation calculators, the quantity I ought to be using is in some cases almost [i]half[/i] of the figure the beersmith recipes have been giving me.
I'm going to try 30g of corn sugar for the next batch that I'm due to bottle next week.
Definitely worth cross checking the figures beersmith gives you. Also, bear in mind that you'll need to adjust the measured volume to reflect the amount you will actually bottle, rather than the amount you entered as being put in the FV.
Apologies for the hijack, but I'm very new to this homebrew game and am still using brewing kits.
I've had another go at Woodforde's Wherry and try as I might, I can't seem to avoid getting a somewhat "soapy" taste.
Have I been overzealous with the sterilisation?
How long was your beer sitting in primary fermentation? If you leave it too long it can lead to soapy flavours, but IME you'd have to leave it pretty long indeed.
What do you use to for cleaning and sterilizing your FV and bottles? I'm assuming you don't let fairly liquid (or similar) anywhere near your kit or bottles?
Two weeks in primary fermentation, in keeping with the instructions.
No, I don't use washing up liquid. I use the sterilization granules sold in Wilkinson's and ensure that everything is sluiced out with water afterwards to try to avoid this.
Can you give a bit more detail about how you clean and sanitize? That would be the best thing to try changing first for two reasons: if it's happening across all your brews regardless of yeast used etc, then it sounds like a process issue (ie sanitation) and secondly, it's a cheap and easy thing to try differently.
I clean with a soak/scrub with oxy cleaner, then rinse repeatedly and then sanitize with Star San.
I wouldn't be particularly comfortable using an all in one cleaner/sanitiser, particularly one that requires you to rinse with tap water after you've "sanitised". I think bruclens is a chlorine based cleaner...perhaps it's residue?
You could try another cleaner and a no rinse sanitiser (like Star San). Star San is great stuff and makes most brew sanitation a doddle.
hey guys, my first brew has been in the primary now for 11 days, so will be fermented out. it was dry hopped a week ago so should be coming along nicely. question is how long do you chill it down for if you use temp control? i'm going to bottle soon so i'm going to chill down to 6 degrees for a few days. actually looking forward to getting this one n the bottle and planning my next brew!
Back to the low OGs
I don't check the gravity after the mash. Mash temp is 66c
Here is the recipe I used:
Ingredients
Amt
Name
Type
#
%/IBU
1.37 kg Wheat Malt, Ger (3.9 EBC) Grain
0.54 kg Pilsner (2 Row) Ger (3.9 EBC) Grain
9.68 g Hersbrucker [2.75 %] - Boil 60.0 min Hop
2.42 g Perle [8.00 %] - Boil 15.0 min Hop
2.42 g Spalter [4.50 %] - Boil 15.0 min Hop
0.4 pkg Weihenstephan Weizen (Wyeast Labs #3068) [124.21 ml] Yeast
Gravity, Alcohol Content and Color
Est Original Gravity: 1.045 SG
Est Final Gravity: 1.011 SG
Estimated Alcohol by Vol: 4.5 %
Bitterness: 13.0 IBUs
Est Color: 7.2 EBC
Measured Original Gravity: 1.035 SG
Measured Final Gravity: 1.? SG
Actual Alcohol by Vol: ?
Mash Profile
Mash Name: Single Infusion, Light Body, No Mash Out
Sparge Water: 7.38 l
Sparge Temperature: 75.6 C
Total Grain Weight: 1.91 kg
Grain Temperature: 22.2 C
Tun Temperature: 22.2 C
Mash PH: 5.20
Mash Steps
Mash In Add 4.78 l of water at 72.6 C 65.6 C 75 min
Sparge: Fly sparge with 7.61 l water at 75.6 C
Continuing my single hop exploration, my latest, repeating the same recipe and varying the hops, used Columbus.
Oh yes! Very much yes!
I used to have some issues with phenols in my final beer, which gives that soapy/medicinal taste. I put it down to using powdered chlorine based cleaner (VWP) and some of the powder not being fully dissolved, getting into fine scratches in the fermenter.
so for cleaning I now use this stuff:
http://www.morleyhomebrewcentre.com/ucommerce/cleaning-sanitiser/pro-kleen-purple-beer-line-cleaner-5ltr/c-23/c-162/p-1206
a capful of this in a washing up bowl sized volume of water is fine.
then rinse well with cold tap water and leave upside down to air dry.
Starsan is good but you do still need to [i]clean[/i] your post-boil equipment, especially the fermenter where the scum from the kreuzen head remains after it's finished fermenting. I use a foam kitchen thing and make sure I don't use the scourer side of the pad.
Also a good idea to add a crushed campden tablet to your brewing liquor (water) before the mash
davidrussell - Member
hey guys, my first brew has been in the primary now for 11 days, so will be fermented out. it was dry hopped a week ago so should be coming along nicely. question is how long do you chill it down for if you use temp control? i'm going to bottle soon so i'm going to chill down to 6 degrees for a few days. actually looking forward to getting this one n the bottle and planning my next brew!
Just a word of warning - fermentation might not have finished after 11 days (but then again it might). Best thing is to take a sample, measure the gravity. Do the same again 24hrs later. If there's no change then it's probably finished primary fermentation. Common advice is to take a third sample, and if you get three days in a row with no change in gravity then you're done. Just because it's been 11 days and it [i]looks[/i] like it's finished, doesn't mean it has.
I tend to leave my beers in the FV for about three weeks, which seems to work for me. Some people swear by two weeks, some swear by four weeks, and pretty much everything in between. Like many things in brewing, there really is no right or wrong way to do things, but a spectrum of possibilities, and as long as you end up with good beer it doesn't matter how you go about things. Like with chilling at the end of fermentation - some will tell you all the crap drops out and the beer will be clearer, others will tell you how they've tried with and without and it makes no difference. I suspect it won't do it any harm if you give it a go. 48hrs should be plenty.
good point, time to check the gravity and a wee cheeky taste!
How well would 25kg of malt store by the way? Its going to get expensive mail ordering 3kg ofgrain with a 6.95 delivery charge, so was thinking of going for a 25kg sack. The other option i might have is that i live in alloa and i think there is still a maltings here, so might be worth trying to buy direct!
as long as you've got somewhere dry to store it, free from mice & rats, no problem. at a 2.5kg grain bill per "Massive" brew, you'll only get max 10 brews out of it so if you're anything like most brewers, it won't haver time to go 'off'
thanks j_d i smell a bulk buy coming on!
edit - the Crisp maltings group are on my doorstep!
Well against better advice i just bottled my brew today, without taking 3 days of readings 🙂
Good news is the FG was 1.008, from an OG of 1.057. These were values taken at 20 degrees, although I’m not sure how the addition of the water after i took my first reading will have affected it - i assume the volume is greater as I took the OG before adding c. 1.5l to the wort so the ABV will be less than what i think should be 6.5%. Either way a pretty potent brew, although I’ll be amazed if those figures are bang on.
It also tastes really good. Lovely colour, malt character and a nice bitterness from the hops but not too much flavour or aroma. I'm sure this is to do with only dry hopping with 20g of hops but overall I’m really pleased. I think once it’s carbonated it should be great. Definitely a platform to improve upon.
Did have a bit of an issue with my syphon appearing to introduce bubbles in the wort (not sure what went on as it was underwater but bubbles were appearing in the syphon line) but i didn't drag very much sediment through at all, it was a pretty clean brew. The trub was also very liquid and the gunk on the FV (Krausen?) was not difficult to clean off at all, compared to some of the brews I’ve don’t where you almost have to pressure wash it off...
I got 14 500ml bottles out of it, so 7l bottled which i think is good. I had nearly 1/2 a litre left over from bottling which was my hydrometer sample and the dregs from my bottling FV (see below – it became my first taster :)) and i had 1.75l of trub / yeast / wastage which sounded a lot but i don’t think i could have got more out of the FV without getting right into the sediment, so overall just shy of 10l into the FV.
Really quite happy so far, plans to get more malt and just do the same recipe again with a couple of tweaks to see how it compares!
[img]  [/img]
Excellent! Looks great!
1.008 sounds like it's reached the end of the road, but i'd be really careful in future and just take a couple of readings. Getting it wrong can mean exploding bottles.
:O
yeah good call. i think the wife would have a canary if the cupboard under the stairs was coated in beer! 🙂
So how does the refractometer work then PF? I'm going to be shopping for malt soon and its payday 😈
I bought [url= http://www.amazon.co.uk/gp/product/B00FFB3YYI/ref=oh_aui_detailpage_o04_s00?ie=UTF8&psc=1 ]this[/url] one for about £20, but it's currently out of stock.
I calibrated mine with some wort that i'd taken a hydrometer reading from. It's a great wee bit of kit and surprisingly accurate.
You just pull a tiny sample from the wort with a dropper. I then squirt it into a little dish which cools it an a few seconds. Then pick it back up with the dropper and put the sample onto the refractor window. All in all it takes about 15 seconds from taking the sample to having a reading.
I always take an OG and FG with the hydrometer too for certainty, however the refractometer means you can take as many gravity readings as you like on the fly. My accuracy for hitting target OG is now within 0.001. No more hoping where it will end up!
If there was one thing I'd recommend spending £15 on, it's the water report and advice for water treatment from Murphy and Sons. Water forms the largest part of beer and I've noticed an incredible difference (particularly in IPAs/pale ales) since adjusting my water.
super excited for this weekends brew. I was looking for a recipe to use up some maris otter and my leftover citra, but i took a hankering for brewing the SNPA clone that Peterfile posted on page one. So i started looking around for the ingredients etc and happened across this [url= http://forum.northernbrewer.com/viewtopic.php?t=15532 ]post[/url] regarding the SNPA brewers gettin involved. So in short, the ingredients are on the way to make this at the weekend. Recipe below that i've scaled using my equipment profile, comments welcome. (OG looks a bit optimistic!) Can't wait for this!
[img] 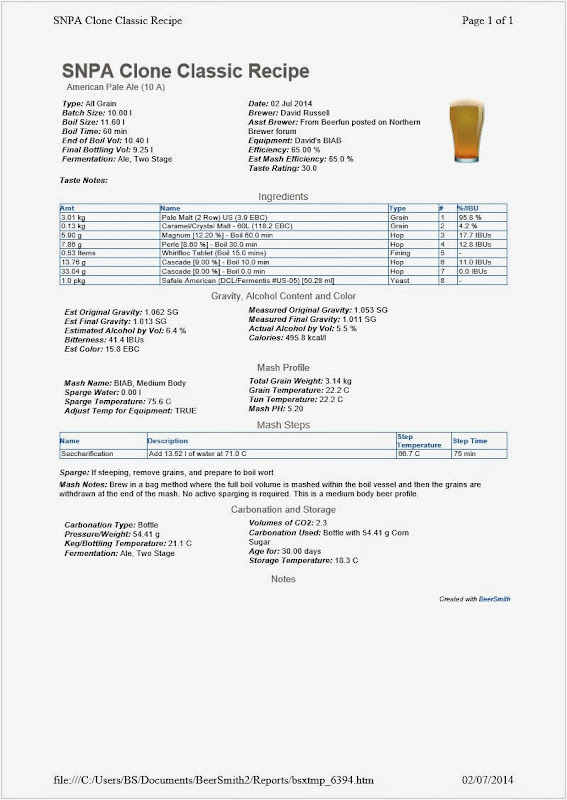 [/img]
Sorry to bring this back to mere kit ales but my Coopers Dark Ale kit has turned out very nice indeed. It's black as the ace of spades and very sticky. The head is much better than shown here, this is the second pint I drew after I'd managed to blow the seal on the barrel.
[url= https://farm4.staticflickr.com/3908/14560047342_3a74d5f3da_h.jp g" target="_blank">https://farm4.staticflickr.com/3908/14560047342_3a74d5f3da_h.jp g"/> [/img][/url][url= https://flic.kr/p/obC3P1 ]2014-06-29 16.29.34[/url] by [url= https://www.flickr.com/people// ]Jon Wyatt[/url], on Flickr
Just realised my finbar moment. 😉
Nothing wrong with kit beers Samuri, especially when they turn out looking like that 🙂
I brewed a festival ales porter at the tail end of last year and loaded it with the pellet hops that came with it. 7 months on and its got a great earthy character and jet black colour. Can't have too many of them though 🙂
So i brewed up the SNPA clone yesterday and it’s in the FV now. Much more relaxed about brew day now, i don’t feel the need to watch over the mash like an expectant mother 🙂 Brew time was about 4 hours so there’s room for improvement there but I didn’t feel rushed or forget anything.
I took a lot of care this time to get an accurate mash volume by measuring out the water - i have a stainless 1litre jug and the markings were close enough to 1kg when i weighed it so i was confident the mash volume was correct to within a few ml, certainly not wildly out. I think my mash temps might be a bit low still, but it’s difficult to measure within the pot (I use PF's trick of sticking it in the oven at 60ish degrees) so a thermometer with a probe might help, although realistically I’m not sure how you could adjust the mash temp quickly or accurately enough to make a difference. I think it’s probably a case of leaving it well alone.
I actually did better than my target OG for pre-boil - i hit 1.056 instead of 1.053, so if I’m right i think that means my mash efficiency is better than 65%? Either way I was reasonably chuffed so far.
I also just added the hops to the boil loose. I got a decent conical sieve from Sainsbury’s - solid stainless steel with holes punched in it – far better than the mesh design. It filtered all the gunk out and as said before it aerated the wort really well. I might use a hop bag for dry hopping but I think I’ll add hops loose to the boil now.
The issue came with post-boil OG / volume - it was miles over the target – 1.078! instead of 1.062 and when I put it in the fermenter it looked like 7.5L, so I topped up with tap water again (naughty) to hit the target OG of 1.062 spot on in the fv. I ran the risk of contaminating the brew again though so hopefully I’ll get away with it again.
However, I’m puzzled as to how I’m losing so much volume between the mash and post boil. I give the mashing bag a good squeeze after mashing, so I know I’ll be losing some volume there but that should be accounted for. I also googled the evaporation rates and I think I have the standard figure plumbed in, but I don’t think I could be boiling off 2.5l more than the figure. The only explanation I have is that beersmith calcs are off somewhere, either with the initial mash volume (although pre boil OG would be off surely?) or I’m losing too much to the grain.
I’m going to work out accurate volumes for my pot using a measuring stick and also test the boil off rate for my kit too, to try and get to the bottom of this. Happy enough with the process though and I’ve got 22.5kg of Maris otter pale malt in the brewshack to experiment with!
How much water are you mashing with David? I get 10 litres into the fermenter and that means starting with 15.5 litres of strike water.
The fact that you overshot on your OG suggests that your volumes were out (i.e you didn't start with enough water), which is confirmed by the fact that you only got 7.5 into the FV.
So. An update from St Michel de St Geoirs brewery. The first batch where I mashed it at way too high a temperature actually turned out way better than expected. So much so that Mrs Mugsy prefers it to what we normally drink here: Affligem, Grimbergen etc (not strictly through pure choice).
The second brew went much better and is due to be bottled shortly.
Had a bit of an epic bottling the first batch. I used a bottling bucket, but with just using the tap on the bucket I must have lost at least 1.5l on the floor. I have now bought a little bottler and a much better capper. So plan to bottle the 2nd batch tonight and get the 3rd batch brewing this week to be left whilst we go on holiday.
Ha! Your bottling experience sounds very similar to mine! complete nightmare!
I too have the little bottler and it makes the whole process a breeze.
+1 for little bottler. great wee bit of kit.
I started with 13.52L for the mash PF, per the beersmith instructions. If you plumb in the recipe above (its called SNPA clone classic recipe on beersmith)what volume of strike water does your beersmith suggest? or shoul i be ignoring that altogether?
sounds like its definitely a recipe scaling issue with the water then 🙂
I'll check when I get home, but 13.5 is definitely a bit shy for a full volume mash.
Are you using the equipment profile for the massive brewery kit? It may be that that's throwing your numbers off, given that your using a bigger pot and not sparging?
I've got a slightly tweaked equipment profile that takes into account i'm getting 10l into the FV and starting with a full volume mash and no sparge. I can upload it later if that would help?
I am using a tweaked equipment profile so its based mostly on your previous profile, but upped the volumes to get 10l into the FV. If you could upload your current one i'll download it and compare it to mine. It seemed to square with all the other values when i did the equipment wizard on beersmith, but clearly something is off.
Thanks again for your help, appreciate it.
so here's my equipment profile from BS - anyone spot anything odd?
[img]  [/img]
David, I managed to read that before you took it down. Your batch volume needs to be 10 litres. I'd probably take your fermenter loss down to closer to 1 litre too.
That will give a total boil volume of between 13-13.5 litres.
I've just scaled a recipe with a grain bill of 2.6kg...shooting for 4.7%...and it's telling me I need 15 litres of strike water. That sounds about right, it's normally between 15-15.5 litres.
Hi Pf, quick on the draw 🙂
Yeah the equipment profile was way out, but i copied it via the cloud to beersmith on my desktop, so something went awry in between.
something weird going on though as my grain bill as posted above was 3.1x kg (i did tweak the colour very slightly manually) and a volume of 13 litres. What other settings do you select in Bs i.e. mash profile?
I always do a regular BIAB mash (ie no mash out or sparge). It's the first option on the mash type list.
Just ploughed through this whole thread! Still quite a bit I don't quite get but I guess it will become apparent when I get going.
I have a standard home brew kit I was bought as a gift a while ago and never ended up using. Being a bit of a nerd and liking to do things properly I think I'd like to try doing BIAB rather than starting with the kit.
Seeing as I've got the bits from the kit already is it still worth getting the Massive brewery thing (out of stock at the mo anyway)?
AFAICS what I need in addition to what I've got is something to boil in, a bag for the grain, and a wort chiller - is that right? Any recommendations for where to get these?
Thanks!
A sheet of viole from a fabric shop makes the boiling bag - cost £2 plus MiL to stitch it into a bag shape with a sewing machine.
Wort chiller is just a length of copper pipe (10 m?) - £25 from B&Q for mine but prob cheaper elsewhere. Check you tube for instuction vid showing how it is wound around a cyclindrical template like a paint pot to make the coiled chiller. Not absolutely essential to chill the wort in this fashion, but I wouldn't be without one personally.
Something to boil in is the most important question and depends on what heat source you're working with and what batch size you're planning. In simple terms all you need is a massive stock pot. How massive? Well a 'standard' brew bin is 25 L, so holds 23-24 L of wort to ferment. This will come from ca. 34 L of water after it is boiled - that's a big old stock pot sat on the stove. Obv you can brew smaller to suit what you kitchenware you have to hand - also your hob size will need looking at to see if you can effectively (and safely) heat the volume of liquid you need.
I have a tea-urn boiler that sorts all this out - costs around £100 though.
Thanks Garry. Bag shouldn't be too hard to sort. Not sure if my DIY skills are up to making a wort chiller but I'll look into it.
I was thinking of getting the big stock pot peterfile linked to on ebay way back in the thread. Not sure if it will work ok on my stove or not really without trying it. If I can make a wort chiller I could probably splash out on an electric boiler in suppose.
Grum...davidrussell made a rather impressive looking DIY chiller. Perhaps he could be of assistance?
Hi Grum,
I'll drop a better note out tonight with my experiences but if you have a gander at this [url= http://singletrackmag.com/forum/topic/brewers-of-stw/page/8#post-6003190 ]post[/url] and this [url= http://singletrackmag.com/forum/topic/brewers-of-stw/page/10#post-6073123 ]post[/url]it gives you some idea of how i did it.
Excellent. Thanks everyone.
Hey Grum,
Hope the wort chiller posts above make sense. My top tips if i was doing it again would be:
1. the crucial bit of the wort chiller is getting a nice curve without crimping the pipe to get the exit pipe running up the inside of the coil. if i was doing this again i'd make that bend using a pipe bender. I'd feed the pipe bender approx 2 feet onto the coil and make a near 90 degree bend, leaving the pipe bender in place (could be controversial doing this but i think it would stop the pipe crimping. I'd then feed my gas main over the now bent 2ft section after taking a check out of the bottom of the gas main. I'd then start winding the pipe round the gas main (or whatever else you have)working from the ground floor up. This would allow you to wind the coil around the exit pipe without having to worry about trying to squeeze it through the coil after making it. To be honst neither scenario is ideal as this is where you are most likely to bend the pipe. copper is surprisingly pliable until it starts to kink and then it creases very easily, so it was a tetchy moment doing the last section as i almost buggered it. Luckily some gentle work with pliers got it back to normal(almost, my OCD is still smarting 😉 )
2. If you can get a bit of gas main thats straight is really good to use, just about the perfect size for a 15-19l pot.
3. give the copper a good heat in the oven, it makes it easier to bend until it cools down, which it does rapidly - an essential property of a wort chiller 🙂
4. never straighten a section and then try to rebend it if at all possible, it almost never bends as well 2nd time round. If you follow point 1 above straighten the pipe as mich as you need to but be careful when bending it afterwards.
5. work out the height of your pot and how many coils you'll need before the pipes exit the pot and get a good bend on them to get them out of harms way as much as possible. As others menioned up there if it leaks you are in trouble.
6. the wee mini hose i linked to in one of the posts is the best tenner i spent on my AG setup. does the job brilliantly and i got a free spray gun for my regular hose to boot 🙂
7. get your copper from a plumbers merchant and shop around - its probably a tenner cheaper than b and q in most cases. Also check the coil for damage before you take it home/start using it, if a small ding is there it will probably kink when you start bending it.
8. finally, unless its a really serious issue, don't let OCD get the better of you and try to fix it. I did and wasted £16 worth of copper in doing so. In most cases the kink will not be serious enough to severely impair the flow so just let it be 🙂
Hopefully this helps, good luck if you try it.
Cheers
EDIT - crude visual representation if what i mean below. copper is coopper coloured coil, the grey bit is your pipe bender. The yellow thing is a cutout of the gas main and the black blob in the bottom lefthand corner is your cutout for the pipe to come through. The copper would be wound anti clockwise from the ground up.
[img]  [/img]
Think I'd made my wort chiller in the time it took you to type that post David 🙂
You're right about being careful not to kink it though - need to make small adjustments when you bend the pipe up through the centre of the coils.
Overdetailed Dave strikes again!
Thanks David, that's really helpful - definitely going to give it a go. Hopefully soon - will let you know how I get on.