
Wa gwan.
I decided to get my drill out today and stick a hole in my perfectly good and relatively new Production Privee Oka frame so that I could fit a new 150mm Reverb Stealth.
I thought I'd take a few pics along the way in case anyone else wanted to see it done.
It's dead easy really, but will most likely invalidate your warranty. Meh...
🙂
[b]Ingredients[/b]
Bicycle
Reverb Stealth or other dropper with internal cabling
Drill
Centre punch
Selection of metal drill bits up to the one required for your rubber grommet (8mm in my case)
A rubber wiring Grommet such as this from [url= http://www.halfords.com/workshop-tools/garage-equipment/fuses-electricals-fixings/halfords-wiring-grommets-6-5-8mm ]Halfords for £1.70[/url]
Small round file
Cable cutters
The bike is this one here, a Production Privee Oka hardtail, but this will work on any bicycle.
I already have a Reverb fitted. It's about 3 years old with an external actuation attachment but it's 125mm drop and I've been finding with this new frame that the seat gets me goolies on the steeps, hence the longer drop needed.
[img] 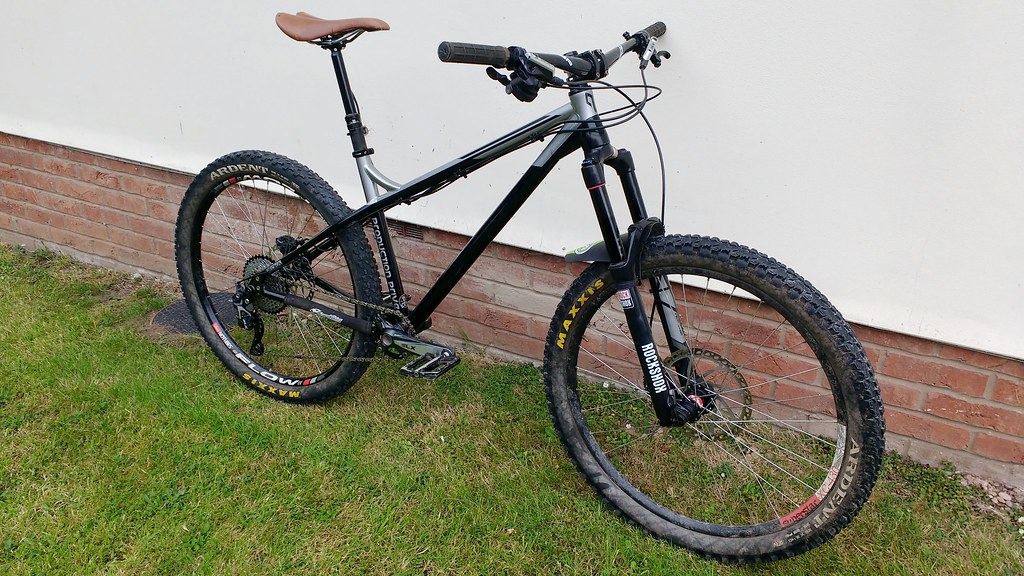 [/img]
First thing I did was offer up the new post just to get an idea where things would sit. This new post is considerably longer than the old one and I had to make sure that all the gubbins would fit in my seat tube.
Luckily, your average steel hardtail tends to have quite a nice, long and straight seat tube and I had more than 25mm sticking out before the collar on the old one and so it was all fine.
[img] 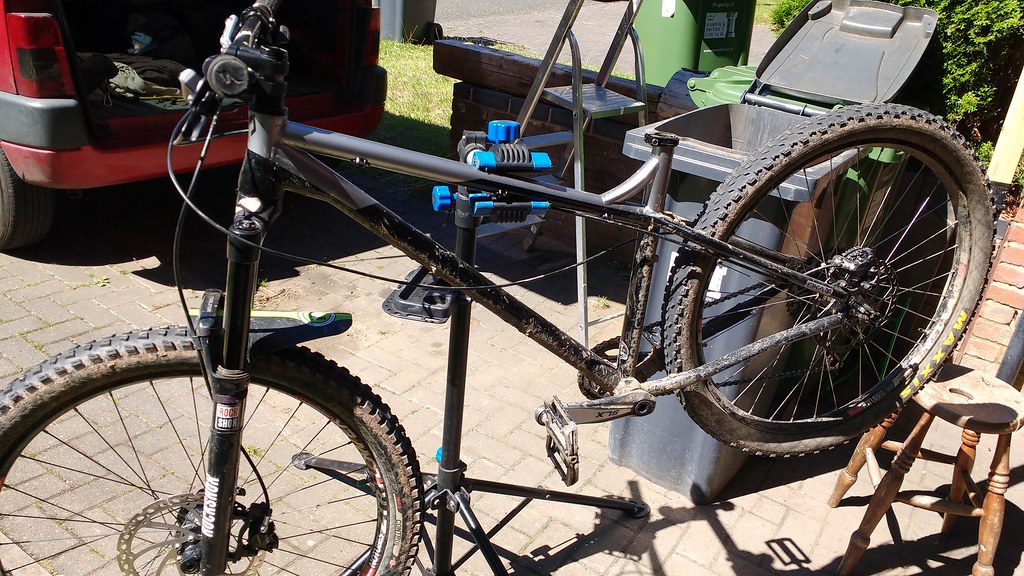 [/img]
Offering up the new post
[img] 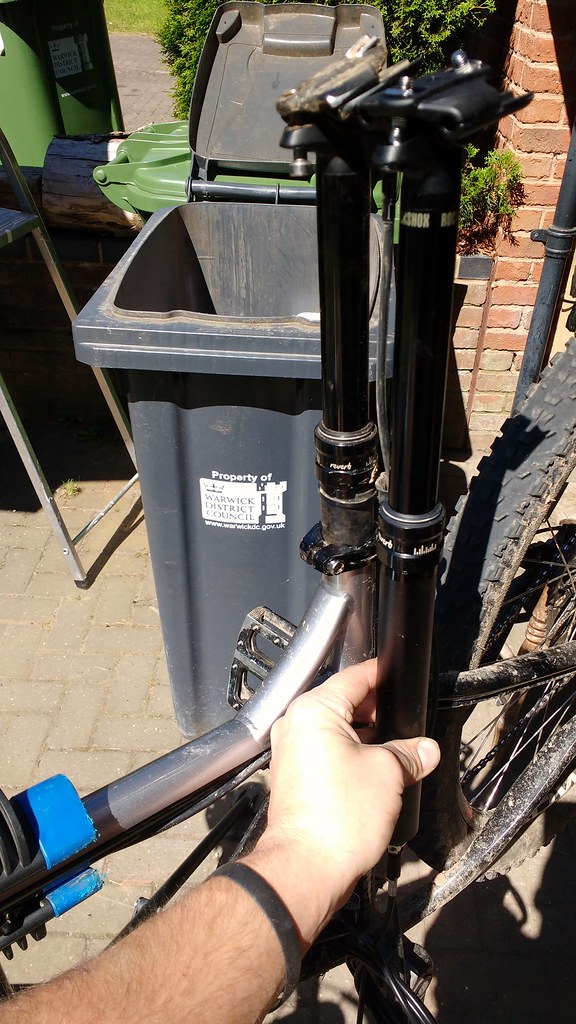 [/img]
I then observed the lower end and where I would likely exit the seat tube. I also had to bear in mind where I could physically get a drill in. Drilling into the tube slightly off centre isn't a bad thing and so that's where it would be. High enough away from the bottom bracket area to get a nice bend, no kinks, roughly in line with the 'U' in 'Production'.
[img] 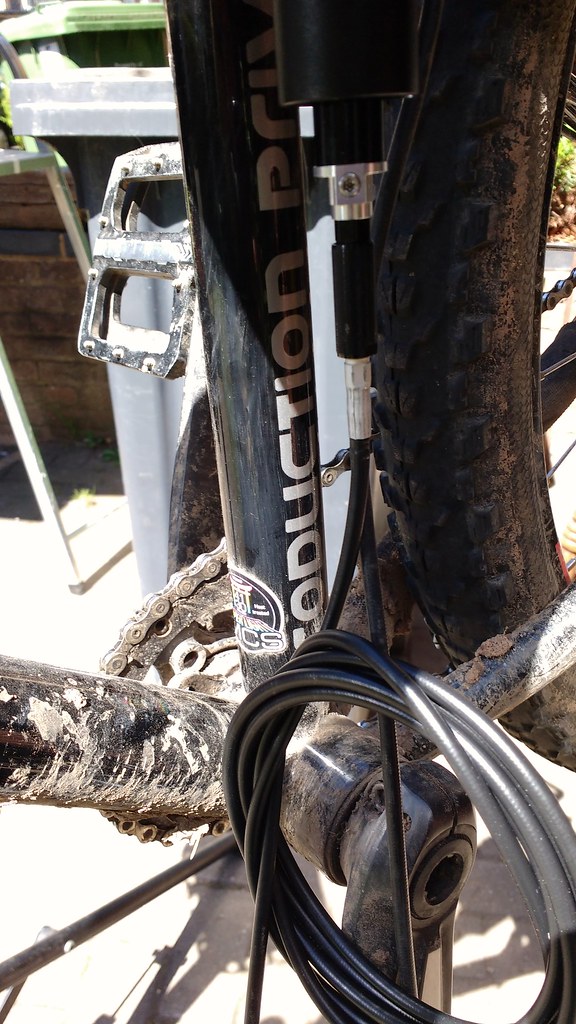 [/img]
something like this aroundabouts.
[img] 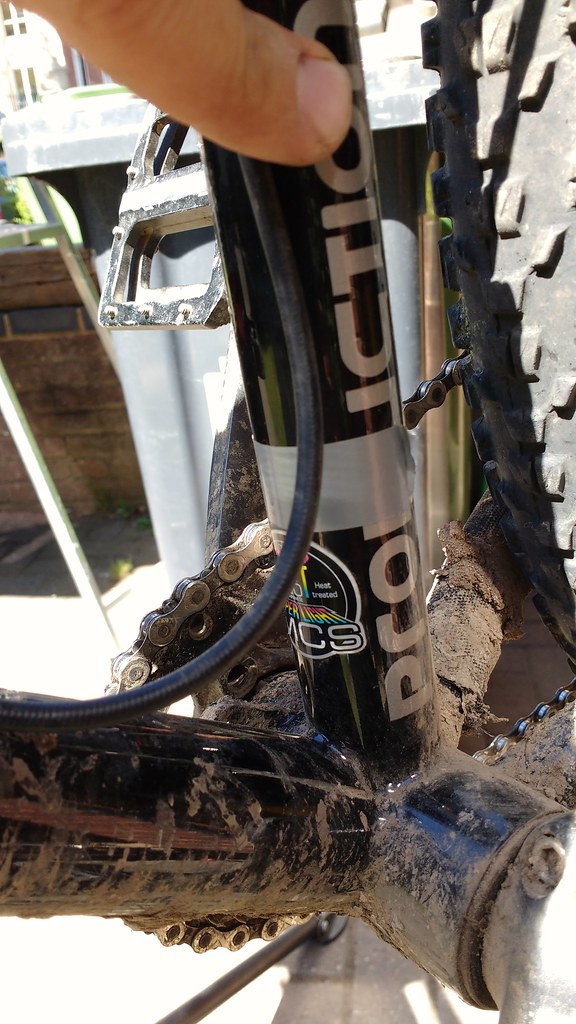 [/img]
I put a bit of insulation tape on the area to help stop the drill slide about. I then offered up my drill to get the spot and gave it a nice tap with a centre punch, also to help stop the drillbit slide about.
I then started drilling my nice new frame 😯
I used a 2mm bit to start with and worked my way up, right up to an 8mm, which may seem quite big but the hose needs room to exit the grommet at a shallow angle. Other people doing this have made a slot instead. Either way works.
[img] 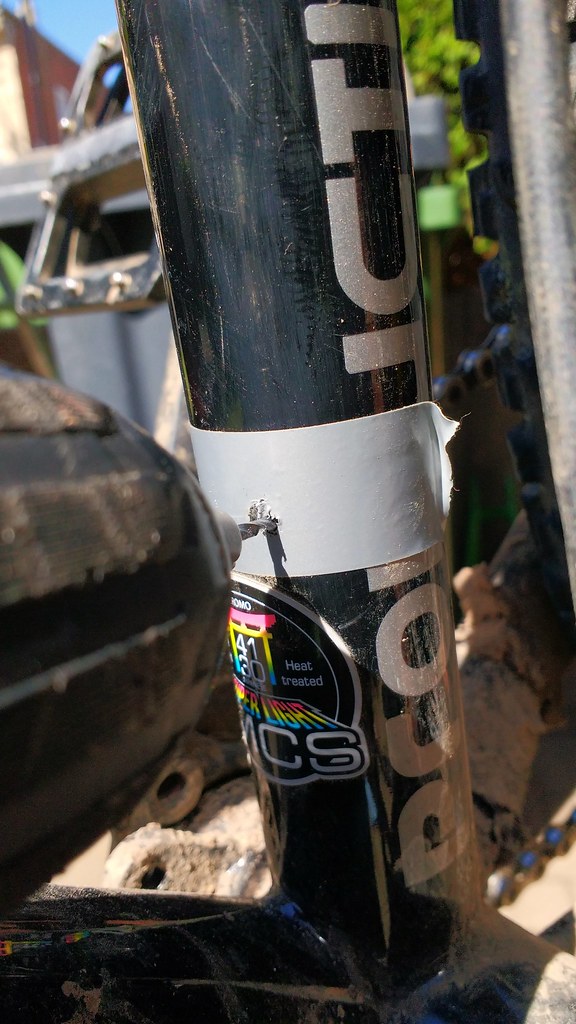 [/img]
[img] 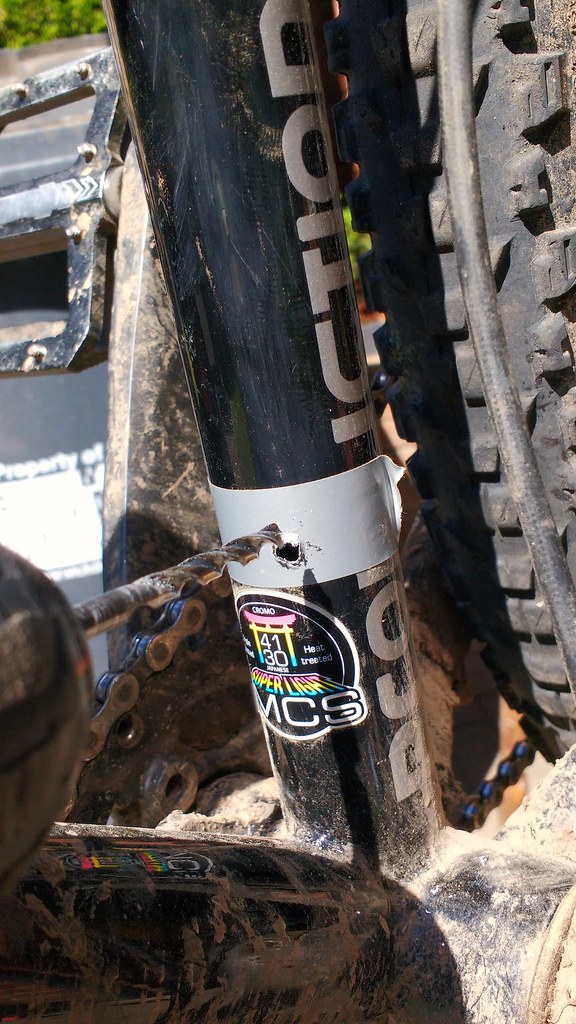 [/img]
[img] 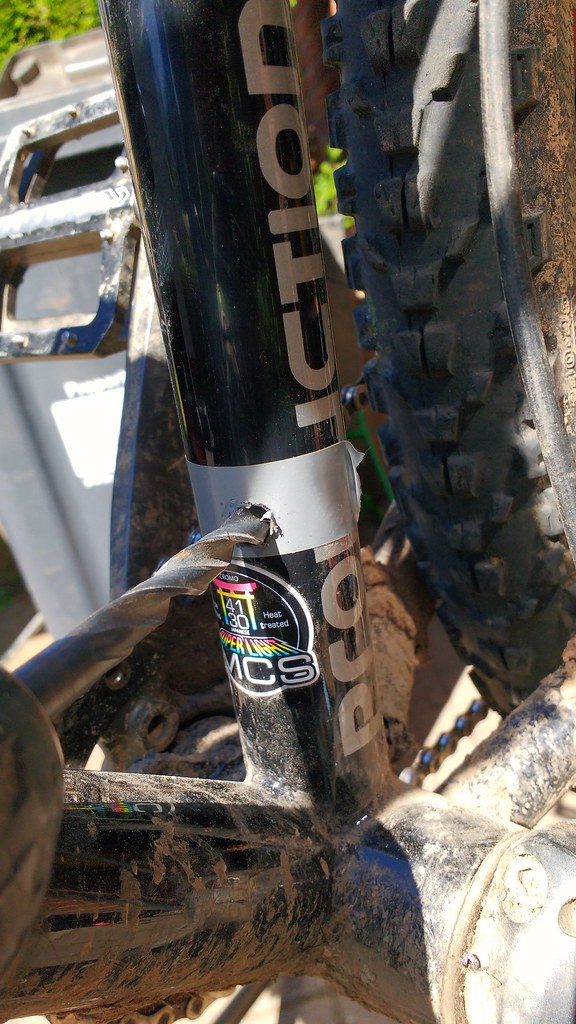 [/img]
Then you want to clean up the hole with a small round file. You don't want any burrs on the inside or outside of the hole.
[img] 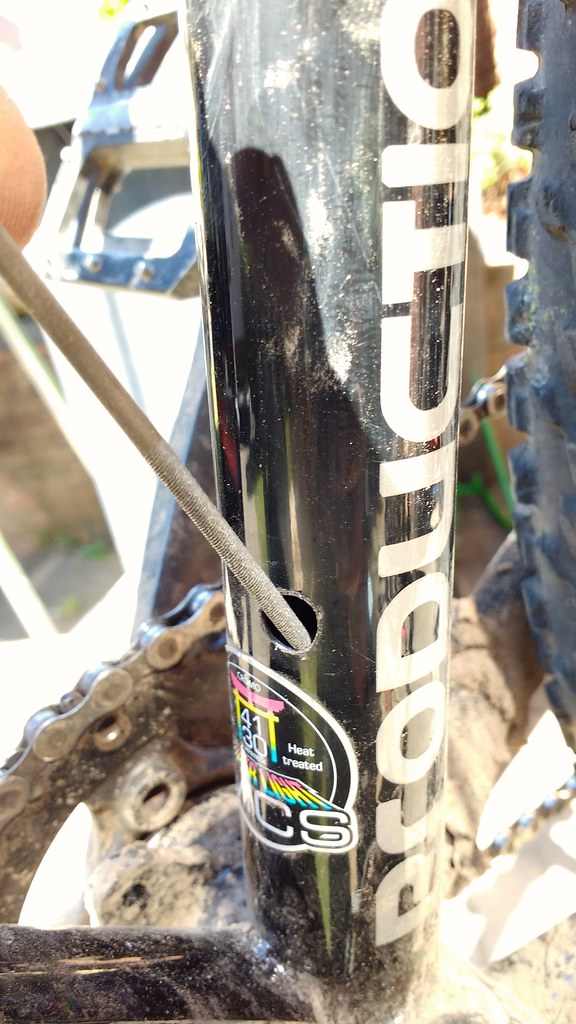 [/img]
Next, wind the Reverb speed control all the way out (slowest setting), grasp the hose and being very careful not to depress the button, wind the actuator button anti-clockwise, unscrewing the threaded barb from the hose.
[img] 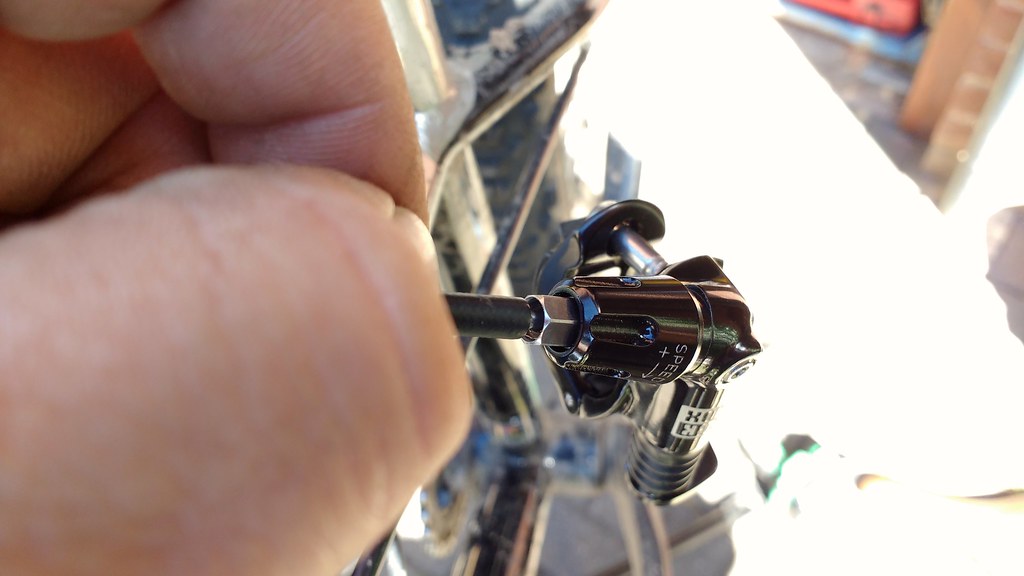 [/img]
Now feed the hose down into the seat tube and find the hole. I found this quite easy and helped the hose through the hole with the end of my file. Another method is to thread a bit of brake outer through and then use the double-ended threaded barb that you got with the post to then pull your hose through.
[img] 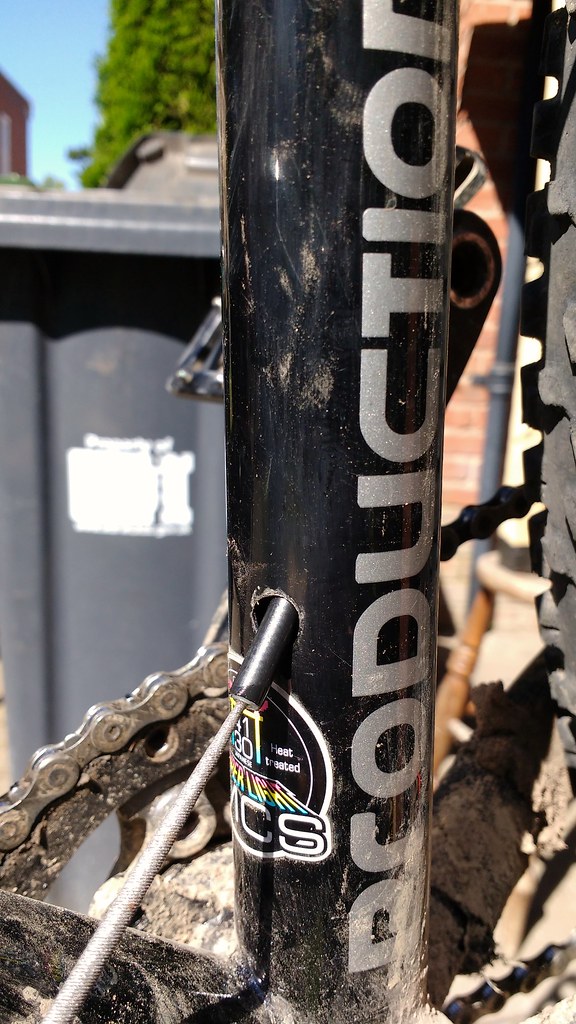 [/img]
Now stick your grommet onto your hose and fit it to the seat tube hole. It can be quite hard to fit but you can use a blunt poky thing to push the internal side of the grommet past the tube-wall until it fits.
[img]  [/img]
Grommet in place
[img] 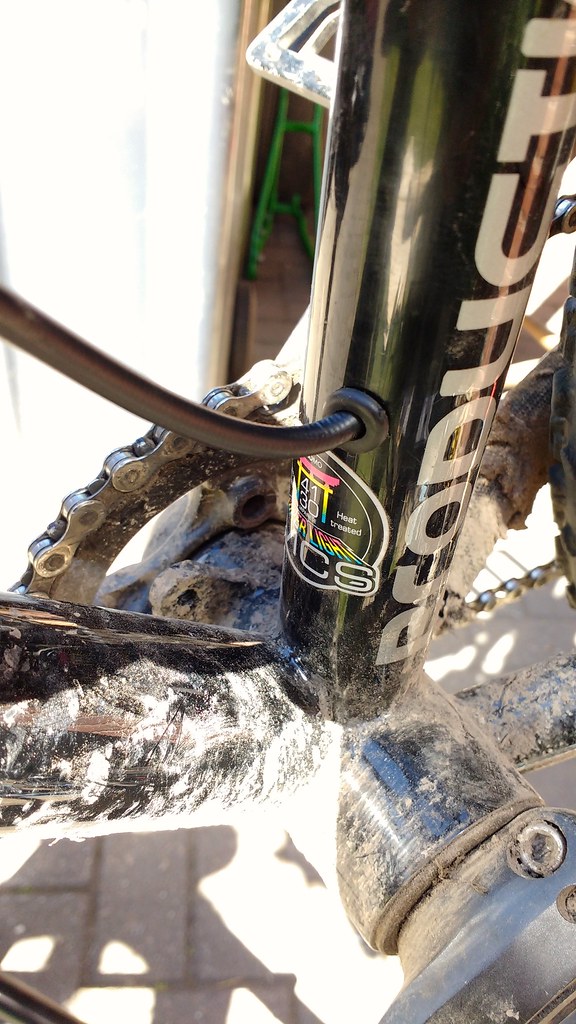 [/img]
Getting the hose into position on the frame. It looks a bit 'pulled' here so you just need to tweak it about until you have a nice loop of hose at a nice angle to the grommet.
[img] 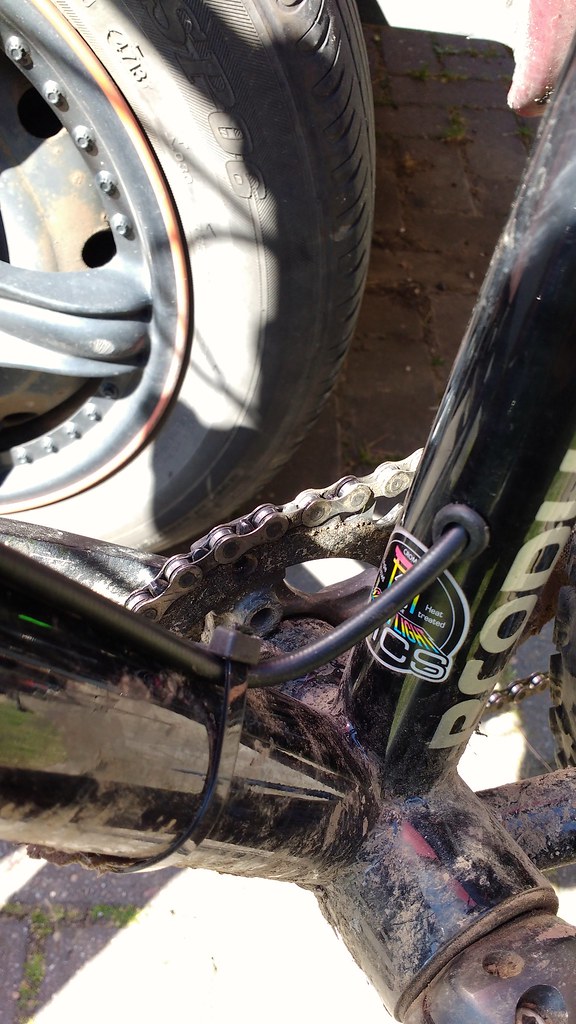 [/img]
Then all you have to do is offer the hose up to the bar where your button is going, making sure you leave plenty of room for [s]bar spins[/s] crashes where the bars may twist, cut the hose with a good hose cutter or quality cable cutters I found worked fine.
Screw the actuator button back on, fit it to your bar, wind the speed adjust in to where you want it and then go off and fiddle about getting your optimum seat height.
[img] 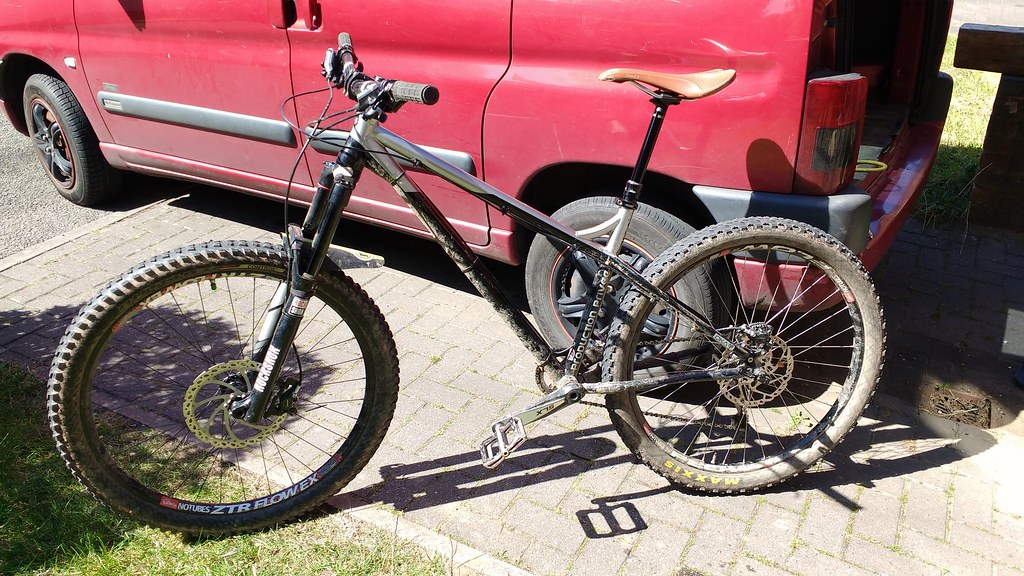 [/img]
Cheers.
🙂
Hmm, might try this on my Trans AM. look out for the "I've broken my seat tube, what do I do" thread!
Cheers 🙂
Ha!
No you'll be fine. I already did this to my 2012 Mega and it's still going strong.
Tidy job !
I'd stick some tape under that cable tie & where the cable touches the frame.
Otherwise - nicely done & cheers for the info 🙂
Nice guide! Drilling the hole offset makes it so much easier, I was obsessed with neatness and symmetry on mine and it turned it into a total [i]bastard [/i]of a job.
nicely done
Now you might be fine but when I asked cotic about drilling my Rocket Cy strongly recommended against it (due to the butted tube used and thinner wall thickness of steel vs alloy or carbon).
Those wheeltrims on the van are hideous.
Probably would have been a good idea to take out the BB before drilling so you dont end up with rusty swarf clogging up the bearings.
I'd have put a bit of paint or nail varnish where you drilled to avoid any rust issues where the grommet went.
Other than that, good job!
What's with all the "offering" going on. Is it some joke I'm not getting?
Also, nice job.
nixie - that's interesting, I was told drilling the seat tube of a Rocket 26 is fine.
nixie - Member
Now you might be fine but when I asked cotic about drilling my Rocket Cy strongly recommended against it (due to the butted tube used and thinner wall thickness of steel vs alloy or carbon).
Yeah, some manufacturers seem to be quite against it, others seem ok. I think it'll be fine.
To be honest, on a newish frame, it's a bit disappointing that it's not done already really.
bigyinn - Member
Those wheeltrims on the van are hideous.
Probably would have been a good idea to take out the BB before drilling so you dont end up with rusty swarf clogging up the bearings.
I'd have put a bit of paint or nail varnish where you drilled to avoid any rust issues where the grommet went.
Other than that, good job!
Can't believe you're dissing me wheel trims. Those rims are the fly shizzle, straight up and down dawg! Was thinking of getting spinners... 😉
Good shout about taking the bb out, I did turn the bike upside down after and give it a good shake about mind. Good advice on the nail polish too around the hole-edge. I'll ask a lady in my immediate vicinity for some.
timmys - Member
What's with all the "offering" going on. Is it some joke I'm not getting?
Don't think so. 'Offering up' is a bit like measuring twice, cutting once.
What's with all the "offering" going on. Is it some joke I'm not getting?
He should offer his chain some lube 😛
Tidy job OP. Not tempted to go 'Full Stealth' and do the downtube too?
That would mean another hole in the downtube and another in the headtube. It'd be like a piece of Swiss cheese!
I did consider keeping it all internal but it would be quite a tight kink inside the BB.
He should offer his chain some lube
I will when it needs it... 😉
Nice Work.
What do you think of the Oka frame and how the bike rides? I don't think I've seen you say. Does it feel a heavy frame?
Not a bit. The build there is about 29.5lbs or so. Plenty light for being so burly.
It rides really well. It's cracking downhill and feels fairly good uphill too. My riding mates commented that I was faster climbing on it but I'm not sure, it's never been my forte so much.
Going down however, brilliant.
Love it.
Van could do with a back door....
Otherwise, nice job.
Looks a tidy job but wouldn't do it myself as I'm sure at least a little more thought goes in to adding such things by the manufacturer. Happy to be proved wrong though.
Also, why bother if you then have to cable tie right up the down tube? Oh, and why not clean it and strip the frame down?
thegreatape - Member
Van could do with a back door....
Always wondered what that draught was from.
chestrockwell - Member
Looks a tidy job but wouldn't do it myself as I'm sure at least a little more thought goes in to adding such things by the manufacturer. Happy to be proved wrong though.
Also, why bother if you then have to cable tie right up the down tube? Oh, and why not clean it and strip the frame down?
You're right of course, though this manufacturer didn't think about it seemingly. Plenty other frames have it without issue. I'm confident it won't cause any problems but happy to be wrong should I turn out to be.
The main reason for doing it was that I wanted 150mm drop, which they don't do in an external hose version. Plus, I just prefer not having a moving hose as I had before.
I agree, zip tying it to the downtube isn't perfect, but it'll do for now and I don't want to drill further routing holes just yet. Maybe I can find some prettier cable guides.
Clean and strip the frame just to fit a seatpost? It's a mountainbike. It's got mountain on it. I'm okay with that 🙂
Good job. Although would'nt you have been better off routing it through the BB shell and up the downtube then just drilling a hole in the side of the headtube or something?
If you use 2 cable ties to make a loop it keeps the cable rubbing on the frame .
Routing it through the bb shell is a little tight I thought. Very small tubing and bb so not much room for a nice bend.
The cable shouldn't rub. It's a hardtail so no movement particularly.
Ross, I was suprised as I thought steel either be strong enough. However I've no idea how thick it is. I think a cable dropper could be routed out of the cable guide hole on the BB shell. You can definitely get the cable to the shell. I stopped at that point as I didn't think the reverb hose would go around the hope BB I have. Reverb hose is thicker than gear cable which is why I think a cable dropper might work. In the end I just decided to try a vyron instead and not do any drilling.
Would said drilling would be OK to you?
nixie: Cy did: https://twitter.com/CoticLtd/status/760401826407735301.
I don't actually have a stealth dropper so this was entirely academic, I was wondering if routing via the BB hole would work but I was worried about wrapping it around the BB itself and then the reverb cable being really exposed to flying debris.
Bike took a heavy root induced battering at Bringewood today. Seat tube is still whole, which I'm glad about 🙂
Now you might be fine but when I asked cotic about drilling my Rocket Cy strongly recommended against it (due to the butted tube used and thinner wall thickness of steel vs alloy or carbon).
Dan Stanton has said the same too about people drilling his frames. I know one Slackline has broken gather it was drilled; chap tried to warranty it for a cracked seat tube and sent in pics with his thumb covering the hole.
Anyhow, fair play OP. Not sure I'd fancy doing that to a new frame!
For others that might be considering this, steel will be fine drilled. I wouldn't do this to alum or carbon though, regardless of thickness. Thickness has little to do with it; it's the properties of the material that matter in this case.
I wouldn't do this to alum or carbon though, regardless of thickness
I did the same to my alu Mega well over a year ago. It's since been thraped all over the place from BPW to Alpine Dh tracks.
Bike and rider currently still alive... 🙂
This was inspiration for me to drill my old Kona Steely, until I noticed that it's much easier and safer to use one of the bottle bosses. Gear cable outer fits, not sure about Reverb hose as its a 27.2. Have ordered a Ks cruxi integral seat post.
gotdurt - Member
For others that might be considering this, steel will be fine drilled. I wouldn't do this to alum or carbon though, regardless of thickness. Thickness has little to do with it; it's the properties of the material that matter in this case.
Had the downtube on my carbon bike drilled 2 years ago, I'm 100kg and it's survived 12hour solo races, weekends hooning down big hills and general mucking about. Carbon is as tough as old boots.
[img] 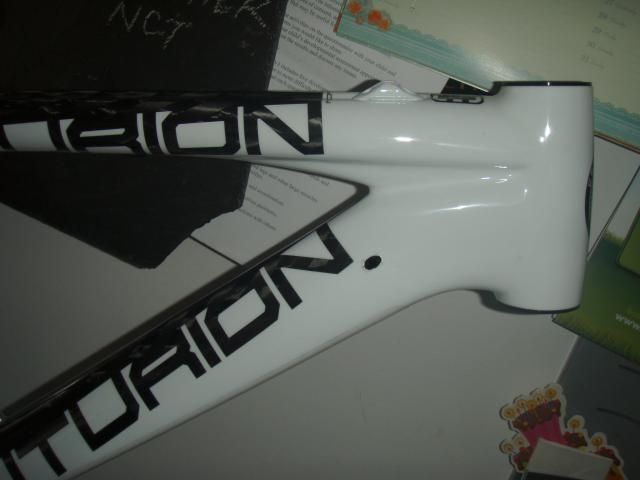 [/img]
Ay oop.
I've been at it again I'm afraid! 😈
I remember seeing the Gulf coloured Production Privee Shan when it first came out and fell in lust with it, but with a limited run of 500 I didn't think I'd ever own one.
My Oka was a totally unexpected and accidental Ebay bargain while I was still riding my Transition Trans-Am 26" so with the Production Privee itch scratched and totally sold on their frames after owning the Oka for ages, the quality and ride characteristics were spot on for me so it was time to see if I could scratch that original itch!
The trouble with Production Privee frames, if you can call it a trouble is that they use a press fit BB, and that they don't have stealth dropper routing (The routing thing in this day and age is pretty rubbish imho... 🙄 )
The BB I have found has been absolutely no issue, not a sausage of trouble in the months I've run mine through the slop, not a creak, nothing.
The dropper routing however was something I had to make suit my build right away, and that's what I did above.
So I scratched the Gulf Shan itch....and I guess some people might think I'm crazy/stupid/insane for drilling a hole (a slot actually) into a brand new frame and voiding my warranty, but meh... Having done it now to two frames with long service history with zero issue in steel and aluminium on every kind of #Gnar, I was ok with it and feeling confident...ish.
Hopefully I'll never have to eat my words... 🙂
So, before I had even taken the wrapping off the frame, I took it into work and set about creating a stealth slot, so that I could fit one of the very neat little Vitus Bikes routing guides. I also got myself some BBB self-adhesive cable guides to take the new hose under the downtube.
[url= http://www.chainreactioncycles.com/vitus-bikes-zenium-internal-brake-cable-guide-2015/rp-prod129590 ]Angled cable guide[/url]
Here it is for anyone that's interested.
Exciting box![url= https://c1.staticflickr.com/1/286/32490570922_95c0a457ae_k.jp g" target="_blank">https://c1.staticflickr.com/1/286/32490570922_95c0a457ae_k.jp g"/> [/img][/url][url= https://flic.kr/p/Rv5EMh ]Untitled[/url] by [url= https://www.flickr.com/photos/79912681@N06/ ]Kayak23[/url], on Flickr
Lovely, lovely, shiny, shiny
[url= https://c1.staticflickr.com/1/386/32603146256_0d2bd1b3c4_k.jp g" target="_blank">https://c1.staticflickr.com/1/386/32603146256_0d2bd1b3c4_k.jp g"/> [/img][/url][url= https://flic.kr/p/RF2Dvj ]Untitled[/url] by [url= https://www.flickr.com/photos/79912681@N06/ ]Kayak23[/url], on Flickr
Marking out the seat tube. I wanted it left of centre, a good distance above the weld, and between the stickers. The frame decals give you a reference to get it vertical. Masking tape helps you mark and helps stop any drill slip.[url= https://c1.staticflickr.com/1/361/32264338950_68e18c4c9f_k.jp g" target="_blank">https://c1.staticflickr.com/1/361/32264338950_68e18c4c9f_k.jp g"/> [/img][/url][url= https://flic.kr/p/Ra6aU3 ]Untitled[/url] by [url= https://www.flickr.com/photos/79912681@N06/ ]Kayak23[/url], on Flickr
Initial pilot holes, coming in from the end marks by half the final drill diameter.
Gulp! 😉
[url= https://c1.staticflickr.com/1/359/32603149096_27e7316c8e_k.jp g" target="_blank">https://c1.staticflickr.com/1/359/32603149096_27e7316c8e_k.jp g"/> [/img][/url][url= https://flic.kr/p/RF2Emh ]Untitled[/url] by [url= https://www.flickr.com/photos/79912681@N06/ ]Kayak23[/url], on Flickr
Enlarging the holes
[url= https://c1.staticflickr.com/1/606/32264343570_fb314edaf8_k.jp g" target="_blank">https://c1.staticflickr.com/1/606/32264343570_fb314edaf8_k.jp g"/> [/img][/url][url= https://flic.kr/p/Ra6cgG ]Untitled[/url] by [url= https://www.flickr.com/photos/79912681@N06/ ]Kayak23[/url], on Flickr
Final holes with an 8mm drill
[url= https://c1.staticflickr.com/1/473/32264346150_672ee0a647_k.jp g" target="_blank">https://c1.staticflickr.com/1/473/32264346150_672ee0a647_k.jp g"/> [/img][/url][url= https://flic.kr/p/Ra6d3b ]Untitled[/url] by [url= https://www.flickr.com/photos/79912681@N06/ ]Kayak23[/url], on Flickr
Filing out the slot (Be careful to only take the file inwards, to avoid pulling any paint)[url= https://c1.staticflickr.com/1/273/32264349900_4bda63f907_k.jp g" target="_blank">https://c1.staticflickr.com/1/273/32264349900_4bda63f907_k.jp g"/> [/img][/url][url= https://flic.kr/p/Ra6e9Q ]Untitled[/url] by [url= https://www.flickr.com/photos/79912681@N06/ ]Kayak23[/url], on Flickr
Neatening up with the file. See that paint lifting ever so slightly? I took a round file and very, very lightly chamfered the edges of the slot inwards to prevent it lifting(should be fine once painted and with the guide fitted though anyway)
[url= https://c1.staticflickr.com/1/550/32603155826_2b6e791836_k.jp g" target="_blank">https://c1.staticflickr.com/1/550/32603155826_2b6e791836_k.jp g"/> [/img][/url][url= https://flic.kr/p/RF2Gmj ]Untitled[/url] by [url= https://www.flickr.com/photos/79912681@N06/ ]Kayak23[/url], on Flickr
Painting the finished slot with gloss paint to try to reduce the chance of rust.[url= https://c1.staticflickr.com/1/567/32603157156_5b950d22e9_k.jp g" target="_blank">https://c1.staticflickr.com/1/567/32603157156_5b950d22e9_k.jp g"/> [/img][/url][url= https://flic.kr/p/RF2GKf ]Untitled[/url] by [url= https://www.flickr.com/photos/79912681@N06/ ]Kayak23[/url], on Flickr
Popping the guide in. Looks pretty neat imho[url= https://c1.staticflickr.com/1/344/32264357270_cd303e5b6b_k.jp g" target="_blank">https://c1.staticflickr.com/1/344/32264357270_cd303e5b6b_k.jp g"/> [/img][/url][url= https://flic.kr/p/Ra6gkU ]Untitled[/url] by [url= https://www.flickr.com/photos/79912681@N06/ ]Kayak23[/url], on Flickr
[url= https://c1.staticflickr.com/1/625/32490584932_b14e5cce7f_k.jp g" target="_blank">https://c1.staticflickr.com/1/625/32490584932_b14e5cce7f_k.jp g"/> [/img][/url][url= https://flic.kr/p/Rv5JWQ ]Untitled[/url] by [url= https://www.flickr.com/photos/79912681@N06/ ]Kayak23[/url], on Flickr
Bike together, cable guides fitted, stealth Reverb routed.[url= https://c1.staticflickr.com/1/584/32643826125_9149ecdb76_k.jp g" target="_blank">https://c1.staticflickr.com/1/584/32643826125_9149ecdb76_k.jp g"/> [/img][/url][url= https://flic.kr/p/RJC9dn ]Untitled[/url] by [url= https://www.flickr.com/photos/79912681@N06/ ]Kayak23[/url], on Flickr
Number 282 [url= https://c1.staticflickr.com/1/482/31800766184_01f6efe861_k.jp g" target="_blank">https://c1.staticflickr.com/1/482/31800766184_01f6efe861_k.jp g"/> [/img][/url][url= https://flic.kr/p/Qs8eS9 ]Untitled[/url] by [url= https://www.flickr.com/photos/79912681@N06/ ]Kayak23[/url], on Flickr
Built up (Green fender now replaced with an orange detailed one natch...)[url= https://c1.staticflickr.com/1/332/32643822105_5452a9b1a0_k.jp g" target="_blank">https://c1.staticflickr.com/1/332/32643822105_5452a9b1a0_k.jp g"/> [/img][/url][url= https://flic.kr/p/RJC824 ]Untitled[/url] by [url= https://www.flickr.com/photos/79912681@N06/ ]Kayak23[/url], on Flickr
Nice bike mister! And a nice how-to too 😀
Tidy job, nice bike 🙂
You're a braver man than I drilling that ... knowing my luck I'd probably punch straight through!
On a vaguely related note, I had to trim my reverb hose the other day and used some £3 clippers designed for cutting guinea pig claws. I've used them on brake hoses as well and they're do a great job as the blades are curved and super sharp.
Harking back to the comment from Cy at Cotic. Strange that the twitter update states fine to drill whereas I've contacted him direct and got the same "don't do it as the butted tubing won't take it...we strengthened the hole for the 27.5". Wonder why the same person would give 2 totally different pieces of advice unless the twitter response was from someone else? Has anyone gone ahead on a 26 rocket and done it?
In the manner of Nick Parks, nice grommet Grommet
From whence was it purloined?
tmb467 - MemberIn the manner of Nick Parks, nice grommet Grommet
From whence was it purloined?
I take it you didn't actually read the thread..... 😆
So, before I had even taken the wrapping off the frame, I took it into work and set about creating a stealth slot, so that I could fit one of the very neat little Vitus Bikes routing guides. I also got myself some BBB self-adhesive cable guides to take the new hose under the downtube.[url= http://www.chainreactioncycles.com/vitus-bikes-zenium-internal-brake-cable-guide-2015/rp-prod129590?utm_source=awin&utm_medium=link&utm_campaign=Skimlinks&awc=2698_1485954000_2bf8c52d3ffad272ba43a35787825f9a ]Angled cable guide[/url]
Ah. I just do pics, me 🙄
I did read the previous thread linked whereby Northwind glued on a Look internal brake cover and also googled Maplin and Ebay but in my brief flick through I had not spotted the standalone link
Cheers 
And to add - one successfully purchased
My attempt here;
http://singletrackmag.com/forum/topic/diy-stealth-seatpost-routing
Did it before Christmas on a steel BFe and about to do it again on a Solaris. I had a choice of round or oval grommets and went with the round one as it meant a single round hole. The hole in the grommet was angled enough to cope with the angle of the cable which was a bonus.
Nice job that st.
I did a single hole like that on the frames I did previously but I thought I'd go for the low angle approach on this one. 🙂
Liking those Downtube cable guides. What did you use? I'm toying with the idea of drilling s Soul275 but don't want zip ties on my downtube.
(edit: wait, emoji break posts?)
[img]  [/img]
I did it on my BFe with a slot and angled doofer and I've just done my Soul with a hole and grommet. The BFe looked nicer so I'm going to re-do the Soul. Drilling stuff!
Ahhh 'vitus hose guides'. Missed that first time round!
I've found a few odd things break the parsing in STW comments. I gave up trying to post a link the other day as it had an ampersand in it which seems to be read as 'end post here' ... :/
Whoops, no the vitus guide is the oval cable exit job. The routing guides are BBB...
The How To guide very helpful. Mad props to Kayak23.
Alex