![]() You don't need to be an 'investor' to invest in Singletrack: 6 days left: 95% of target - Find out more
You don't need to be an 'investor' to invest in Singletrack: 6 days left: 95% of target - Find out more
Anyone tried a service on this yet? Mines feeling a bit sticky and gritty. It functions and is warranty but the stanctions losing its coating.
I haven't yet but there is a service document out there - google PNW Bachelor Service - its the same post as my Ascend XL.
Lovely thanks.
In case anyone wants it...looks super easy 🙂
PNW Bachelor Service document
and it's in the first link.
edit- too slow!
Just bought an ascend XL, so I’ve saved the link to that service guide as it will no doubt come in handy. Thanks.
That does look straightforward. Thanks.
Great place this. Thanks.
Should also apply to the Trans-X posts too I think.
What grease is it best to use?
Thanks guys - and yes that is identical to my Trans-X post.
I have some RockShox grease for forks, I will use that.
Just read the instructions and this does seem simple, but, have I missed something? I assumed there would be an air cartridge of some sort to allow the post to regain its height once you trigger the lever? Or is there a spring assembly internally?
I run a Brand -X Ascend, are these guidelines suitable for my post also?
Air cartridge is a sealed unit inside the post.
Unsure if spares available in UK but have seen them on an italian website.
But CRC 2 year warranty means it will be a while before needed.
@vmgscot - cheers. Reason I ask is I wasn’t sure if you needed to release the air before you take apart.
The ascend doesn't have a valve so you can't endurokid.
Im guessing the guidelines will be similar, well hope so.
Interestingly theres an option for a 170 travel but only in 30.9. Hopefully Chain reaction will be releasing that soon.
The Ascend XL 150MM has a valve in the head of the post to adjust air pressure, bit other that that, identical to the PNW one in terms of operation, maintenance etc.
Both the 120mm Ascend and the 150mm Ascend XL I have bought had the air valve under the seat clamps hidden by rubber cap).
Ok. If there is an air cap do you release the air first before taking the post apart? Last thing I want is to be blinded by something flying off due to the air pressure!!
Cheers
I wouldn't since you're not going anywhere near the cartridge.
I’ve got no intention of messing about with the air, but I was thinking along the lines of removing your fork lowers. I.E you’d release the air first.
Not messing with the air pressure is a bonus.
Mines started fore / aft wobble, CRC will take it back - but i'm concerned how long it'll take to get back. Anyone know if / where spare internals are available from?
Thanks for that, I’ve been struggling to find a seller for my Pro dropper post parts, seems it’s as identical internally as it is externally to that.
Mine no longer returns the top inch (unless I pull on it). Will a service sort that or is it borked?!
Giving the internals a good clean should fix it not returning fully. Just to mention, it the top collar/dust cap won't undo by hand, you'll need a strap wrench. Thats what I need for my X-fusion Hilo SL.
Sorry, I’ve just realised why you’ve brought this thread back from the dead.
on YT there’s a nice little vid how to service the Pro Koryvak post, near the end there’s a part number for a service kit, I’ve never found anywhere that sells it, but I’m told they’re available from Maddison via an LBS. kit includes the brass inserts that will likely be worn.
<div class="bbp-reply-author">
<div class="bbp-author-role">
<div class=""></div>
</div>
</div>
<div class="bbp-reply-content">
Mine no longer returns the top inch (unless I pull on it). Will a service sort that or is it borked?!
</div>
I've had that issue with a different dropper when it was overclamped..
Servicing and Ascend is a doddle, and no need to release air first. Took me 10 mind start to finish.
Google "Pro Koryak seal and bushing kit"
Various online shops have them listed, and so does Ebay. the kit is around £15
*not google shopping tab
Don’t think it’s overclamping canopy as haven’t touched seatclamp and it’s a recent development (fine beforehand).
Just had a swap from crc, well in fact it wasn't even a swap, they just gave me a new one after I sent a video in of the post wobbling. Tbey weren't interested in having the original back. Definitely worth a quick email to the warranty team.
Hi all,
Looking for help with a link to the disassembly of the Ascend Brand X Dropper post - with external cable actuator -
I've seen countless videos and text descriptions of the internally routed cable actuator model disassembly - but none explaining the disassembly of the (externally) actuated model...
The external actuator, in it's default 10-oclook position, is rubbing against my thigh as I pedal - which is maddening - and Chain Reaction refuses to allow me to return the post for a swap to a different model, despite the fact that the unit is brand new, with under 10 minutes of use on it...
Aaarg!
So, if anyone can point me in the direction of a link that shows or describes disassembly, that would be cool. I've heard rumor online that one can disassemble the unit, rotate the actuator until it sits at the four O'clock position, and then install it - creating a better situation for leg-rub.
Appreciate your time.
Andrew Drouin
Hello Andrew and welcome to stw.
It's late and I've had a couple of beers but I'm fairly sure this exact epic came up a few weeks ago.
I don't profess to remembering the whole thread but I think it was one of the very few times stw didn't come up with an answer for the poster.
A search should show the thread at least.
Good luck and I hope you get it sorted bud.👍
Andrew just turn the post 180 degrees, remove saddle, put saddle on other way, bingo 10 becomes 4
I was searching how to service an external cable Brand X and this thread came up.
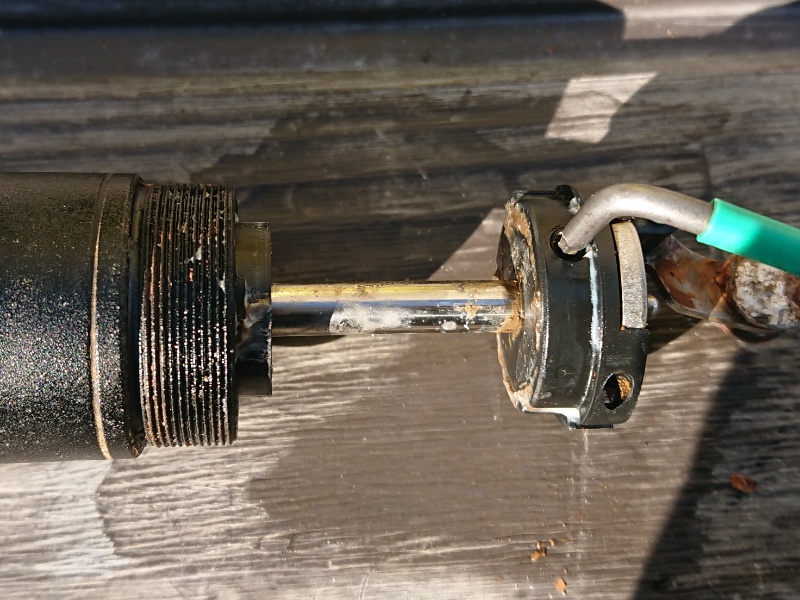
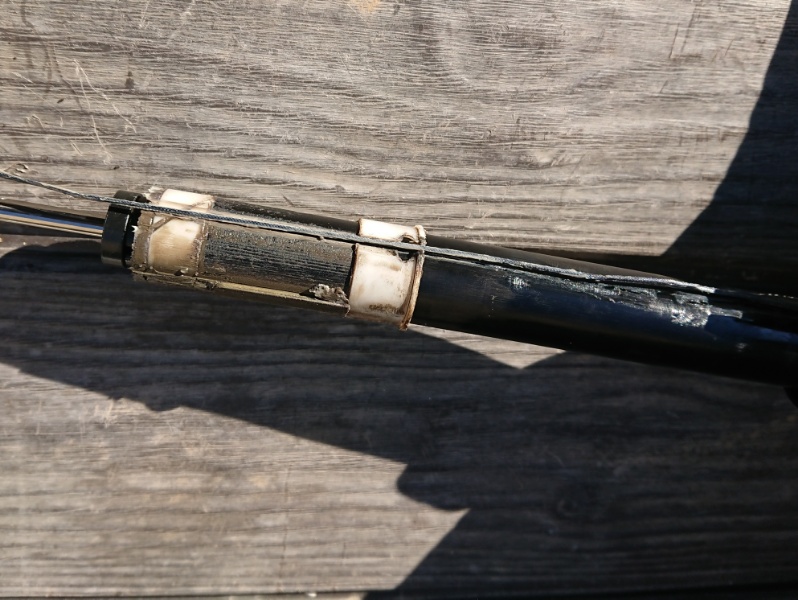
The link above is good for how to rebuild the steath dropper, but not the external. I've taken one apart now so I thought I would add a few pictures it might help someone.
Firstly unscrew the cap at the base. You can now see it's the same mechanism as the steath with a bit of nylon cord pulling the actuator. Undo the bolt holding the cord.

You can now pull the cord out from the top of the dropper and access the grub screw holding the top seal on.

Now the seal can be lifted.

Slide the body up you can now access a grub screw holding the base in place. This is keyed and needs to be removed completely.

Now you can pull the base off and slide the outer off, now it's all apart and can be cleaned up and re-greased.

Re-assembly I fed the cord through the body first then slid the post back in. If you got this far with dis-assembly I'm sure you'll work it out!
@fooman thanks for posting this, V useful as noticed last ride that my external brand x dropper has gone all grouchy so will have a go at cleaning and greasing later.
No problem, someone asked recently (was it you?) and I thought I'm sure I took some pictures I'll have to find them, forgot I had posted them previously! You can see how gritty my post was, it worked great after a clean and grease.
You left that one over-long.😉
Excellent, thank you.