![]() You don't need to be an 'investor' to invest in Singletrack: 6 days left: 95% of target - Find out more
You don't need to be an 'investor' to invest in Singletrack: 6 days left: 95% of target - Find out more
Is there any reason why I can't use a router bit in a pillar drill?
I need more precision than I think I'm capable of getting with a hand-held router and can borrow the drill.
Thanks
side loading a piller drill isnt a good idea - based on most of them having poor shaft bearings and keyways anyway - id probably give it a go with my meddings but i wouldnt like to try it with anything from machinemart or any of the other rebranded crap.....
know anyone with a mill ?
I don't have an answer for you but what are you trying to achieve with the router bit? Can you not construct a jig to give you more precision with the router?
I am currently on a furniture making course and haven't done much with the router yet so interested to know for future reference.
How does the max rpm of the drill compare to the router?
My guess is that the drill would be a lot lower. That would affect the feed rate and finish quality, I'd think.
Doesn't work too well - OK for MDF but not much use on harder materials. Better off fixing router baseplate to a piece of plywood, clamped to a workbench and making a fence/guide.
The normal way to gain precision is to mount the router in a router table.
This can be done very cheaply and very expensively!
Simple version is to clamp/screw the router to a rigid plank/sheet.
What are you actually trying to achieve?
I've put router bits in pilar drills when I've wanted to make a nice clean looking blind hole (actually lots of them - it used it to make the dots in a set of large oak dominos.
If you are wanting to make acurate straight grooves then a router table as above is quite a simple diy able thing to do. What you can't do easily that way is plunge, so if you wanted to cut a shape midway in a board thats not so good
A further option is fitting a router collar and cutting a jig - that controls the extents of the shape you want to cut and you can fit stops on the jig so that you can repeat the position of the cut on multiple boards.
For anything complicated I draw a jig up in CAD and get a local sign making co to cut it from a bit of scrap.
Hmm. I quite like the router table idea. Never occurred to me to make on. Should be doable with a workmate, clamps and some wood?
.
I 've got some 20mm thick pine which I'm making mortice and tenon joints in, 36 of them. Did one in about an hour yesterday with a chisel so could take a while... I can borrow a band saw to speed up the mortice bit.
.
The thing that concerned me was that I'm trying to cut 6mm slots into 20mm wood, it was fine with a chisel but a little wobble when routing could ruin large bits of it.
.
goes off to google router tables
Just buy a router table insert plate for about about a tenner. You can get quite OTT making up a table but the quickest way is to fix the router to the plate, screw two battens of wood to the the plate and fix a board the same thickness as the plate to the batten. Then you can just screw a fence anywhere you want on that board.
I"ve maybe described that poorly!
Doable but not always sensible. Have seen some nasty injuries from router tables. A proper one is a great tool, a dodgy one could cost you a bit of finger.Should be doable with a workmate, clamps and some wood?
If you have 36 to do how about making a mortise drill? If you already have a drill press it won't be too tricky
I 've got some 20mm thick pine which I'm making mortice and tenon joints in,
Actually a router table isn't really the tool - you can't plunge the router in use - you could make grooves the length of the wood, you could't really cut a mortice.
A router hinge jig is probably more what you need (EDIT or even more appropriately a 'Router Mortice Jig')
Could you use a top guided router bit and make a template of the mortice dimensions.
Clamp this as required and it would stop you from taking chunks out.
Could you use a top guided router bit and make a template of the mortice dimensions.Clamp this as required and it would stop you from taking chunks out.
the difficulty with that is the top guide won't meet the template until you've plunged the full depth of the mortice so any wiggle while you plunge the router and you'll bugger the workpiece and the template.
Cutting an over size template and using a guide collar would be more reliable and repeatable but takes a bit of figuring out.
Cutting an over size template and using a guide collar would be more reliable and repeatable but takes a bit of figuring out.
^Is the way to do it.
Just subtract the cutter diameter from the collar diameter and add this to the dimensions of the mortice you want to cut. Make a hole that big in a piece of 6mm ply / MDF etc. Add a fence to the underside to position the slot in the right place on your stock (and provide a handy way to clamp the jig in place). Like this:
[img]  [/img]
(From [url= http://www.finewoodworking.com/workshop/article/super-simple-mortising-jig.aspx ]here[/url])
You can make a similar jig to cut the tenons with the router too.
[img] 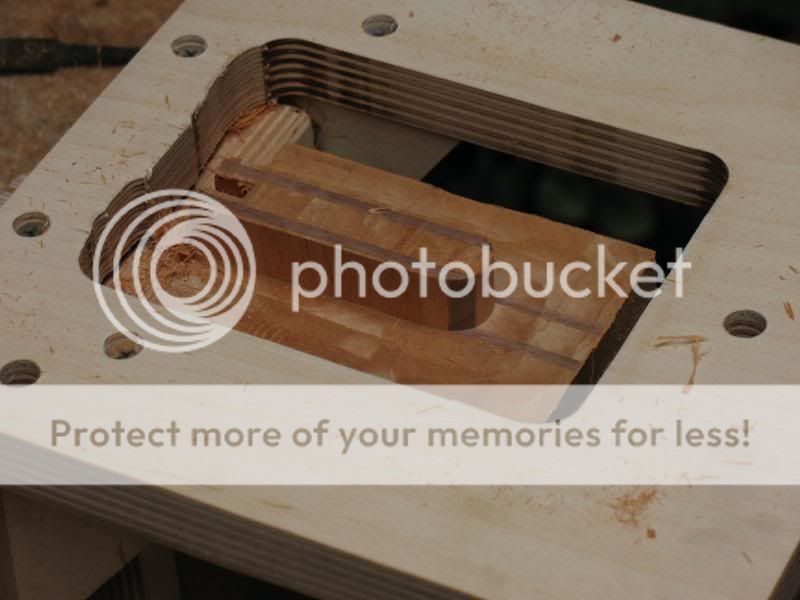 [/img]
In addition to all the reasons not to try and use a pillar drill, I will add that the chucks are often on a taper fitting, and if you side load them without any downward pressure, the taper comes loose and the chuck drops off (with hilarious consequences...)
I finished my router table and fence last weekend. Give me a mo to go to the garage and photo it. not the best I am sure but okay for the playing around I do
Mount the router onto a plate
[img] https://goo.gl/ph5QgL [/img]
Get an old bit of work top and cut out a hole for the router and plate. I fixed mine to a shelf where I store the router and bolt the hole lot to my work bench when I use it or slide it out the way (as now) when not needed
[img] https://goo.gl/prJE48 [/img]
The fence is two bits of wood mounted at 90 degrees to each other. Two sliding plates on the front allow big or little bits in the router to fit and keep the fence close
[img] https://goo.gl/c0S29K [/img]
The butterfly nuts adjust the two sliding plates. The box allows me to put a vacuum and get rid of the dust
[img] https://goo.gl/yBgJp8 [/img]
Clamps to hold the fence tight on the worktop/router table
[img] https://goo.gl/973JK5 [/img]