![]() You don't need to be an 'investor' to invest in Singletrack: 6 days left: 95% of target - Find out more
You don't need to be an 'investor' to invest in Singletrack: 6 days left: 95% of target - Find out more
Last year we had the edges of the garden turned into raised beds with sleepers. Now the OH want's to turn one section into a bench arround the BBQ by adding a second sleeper and another as a T* on top of it.
Should I:
a) use a piece of <50mm thick timber on the back, hammer into the ground untill flush with the 2nd sleeper, repeat several times at ~2ft intervals, attach to the sleepers with 100mm screws then just use 150mm countersunk screws through the top one into the middle one.
b) purchase a 1" auger bit and make some holes vertically through the sleepers, hammer 1" dowel into the holes.
As usual I like the idea of purchasing more tools. But not sure how it'll look after a couple of summers when the wood has warped a bit and the dowels have shrunk or protrude.
*we argued between T and upside down L and T won so don't start wit that again.
So 2 sleepers balanced on one sleeper?
How about running the 50mm timber along the length of the base sleeper, screwed to the base sleeper horizontally and then screw through the 50mm timber up into the top sleepers. For bonus points, tie the top sleepers together with galvanized strapping in the hidden part under the seat.
So 2 sleepers balanced on one sleeper?
Pretty much.
Could use some right angle under the T, but I think the lower two will need something beefier to stop them being levered off when people are sat on them or someone tries to stand on it, or I unleash my inner Danny MacAskill and ride it.
[url= https://live.staticflickr.com/65535/49802034723_230860dd01_k.jp g" target="_blank">https://live.staticflickr.com/65535/49802034723_230860dd01_k.jp g"/> [/img][/url][url= https://flic.kr/p/2iSQrR6 ]2020-04-21_07-08-58[/url] by [url= https://www.flickr.com/photos/7614571@N05/ ]thisisnotaspoon[/url], on Flickr
I used oak sleepers to make raised beds, 19mm steel round bar as dowels to join at corners and along straight runs with half lap joints. That was about 6 or 7 years ago and nothing has moved or fallen apart in all that time.
If you have some way of taking a 100mm channel out of the centre of the top sleeper that'll locate it on the lower ones a bit better, or failing that a length of tiling batten or similar under the join, front and back, would strengthen it up a bit.
Sorry not very good at describing things but hope you get the idea.
Sorry, started this before dinner and just finished it now. Realised that this is what Murray is saying in his post.
Apologies.
Dovetail it. 👍
If you have some way of taking a 100mm channel out of the centre of the top sleeper that’ll locate it on the lower ones a bit better,
Not a bad idea actually, I wonder if a few passes with the electric plane would do it.
Dovetail it. 👍
I've neither the tallent, inclination or jumbo oversize router bits that would be needed, it would look quite spectacular though!
Dovetail it.
+1
Big dovetails are easy to cut and theres no real emphasis on super accuracy. One chisel, one hammer is all you need so super cheap because it likely you've got one of those at least.
Aye, the planer would do it but I'd just set the depth on a circular saw and rattle it up a few times until you've got what you need. You can do the outside edges from each side then just chew out the middle bit.
Dovetail.
They're not hard. They're a bit tricky if you want a gap less joint in a thin bit of walnut or something.
Choppy choppy wacky wacky.
Although i'm not sure how the dovetail will deployed in this situation...
You could cut the dovetail edges with a circular saw as long as it tilts but you'd need to slide the whole top sleeper along the bottom one which might be a bit tricky. Really good way to do it if you could be reasonably accurate, wouldn't need anything to hold it together either.
i’m not sure how the dovetail will deployed in this situation…
My understanding of it is the sleepers are stacked, so the dovetails are like on yon lovely oak table posted the other day.
What about dowelling them together ?. Dowel rod is available in soft and better for here hardwood and up to 1" diameter in places like b&q.
Dowels normally use something called a dowel markers to locate accurately. You drill a hole them instert a marker, which sits in the hole and projects a point to drill the opposing hole, so when you line up the joining board the point make a mark which you can line up exactly.
You probably wont find 1" markers, but a piece of 1" rod with a nail up the center will do the exact same job.
https://www.ebay.co.uk/i/153446501815?chn=ps&norover=1&mkevt=1&mkrid=710-134428-41853-0&mkcid=2&itemid=153446501815&targetid=878020360040&device=c&mktype=pla&googleloc=9046953&poi=&campaignid=9461445814&mkgroupid=97644908122&rlsatarget=pla-878020360040&abcId=1139576&merchantid=101483308&gclid=EAIaIQobChMI2KuOiOD76AIVgaZ3Ch3nmQQ6EAQYAiABEgL8qfD_BwE
You can see the principle from the pic, the flange just stops it sliding right in.
Despite its super simple appearance, this method is professional and used for centuries. Most of CR Mackintosh furniture is simply doweled together, as that was all about the painting and decoration as opposed to the longevity of the furniture itself.
I was only joking about the dovetails.
I'd use wacking great sleeper screws and joining plates 😂
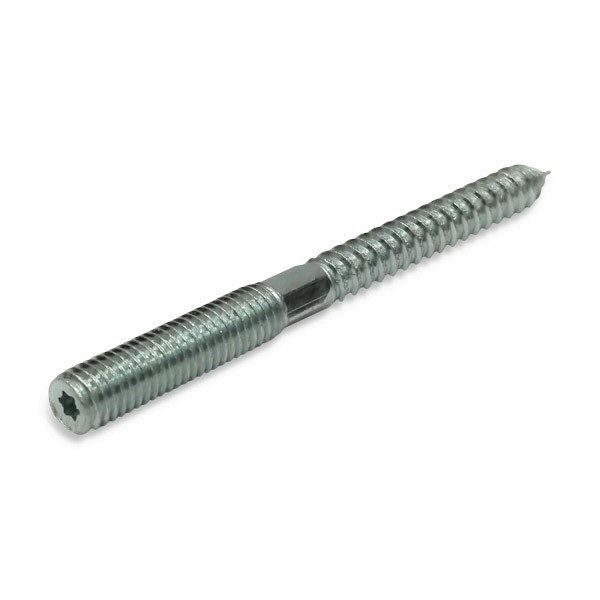
Or how about some of these screwed into the sleeper underneath, then the top sleeper drilled through, then bolted on with washers. Fill bolt holes with some araldite or suttin, or just leave.
Dowels normally use something called a dowel markers to locate accurately. You drill a hole them instert a marker, which sits in the hole and projects a point to drill the opposing hole, so when you line up the joining board the point make a mark which you can line up exactly.
That's probably the least bodge option. I don't think with the greatest will in the world I'd be able to get a dovetail accurate enough to get the wall flat, not without a lot of practice.
And if it turns out wobbly I can always just lift them off and try something else!
Practical answer is drill small hole through sleeper into other sleeper, enlarge hole halfway through top sleeper, drive lag bolt into whole, fill hole with dowel, epoxy or whatever.