![]() You don't need to be an 'investor' to invest in Singletrack: 6 days left: 95% of target - Find out more
You don't need to be an 'investor' to invest in Singletrack: 6 days left: 95% of target - Find out more
Mini fix this morning. I bought some MTB shorts, but the poppers were a bit weak (nothing to do with my girth) and popped when I bent over.
I spread the male part of the popper a bit with a hammer and an allen key. Sorted!
Fixed our 30+ year old boiler today.
Domestic hot water escaping into radiator circuit, replaced the diverter valve as this was the cause a few years ago - nope still doing it.
Removed secondary heat exchanger / calorifier as this is the other potential cause.
Unable to remove fittings from H-EX so took it to work.
Applied heat but they still sheared from the metal casing. TIG welded a bolt to the sheared remains - heat plus vice = removed fittings.
Installed new heat exchanger - boiler working properly again.
[url= https://i.ibb.co/VQTgGMn/2-A789-BD7-3679-40-DF-BB9-A-387923081-DBB.jp g" target="_blank">https://i.ibb.co/VQTgGMn/2-A789-BD7-3679-40-DF-BB9-A-387923081-DBB.jp g"/> [/img][/url]
[url= https://i.ibb.co/ChmVQ8H/2-A60-CDA7-F89-B-415-E-93-A5-82601-B811957.jp g" target="_blank">https://i.ibb.co/ChmVQ8H/2-A60-CDA7-F89-B-415-E-93-A5-82601-B811957.jp g"/> [/img][/url]
[url= https://i.ibb.co/KWmhvML/ECFB7431-99-D0-4222-99-D8-9972577-AFC38.jp g" target="_blank">https://i.ibb.co/KWmhvML/ECFB7431-99-D0-4222-99-D8-9972577-AFC38.jp g"/> [/img][/url]
[url= https://i.ibb.co/02K1RTS/B4-CF833-C-073-F-4-D0-F-A3-E8-17-AF4464-AFBB.jp g" target="_blank">https://i.ibb.co/02K1RTS/B4-CF833-C-073-F-4-D0-F-A3-E8-17-AF4464-AFBB.jp g"/> [/img][/url]
[url= https://i.ibb.co/2NXnh0J/DE26-F68-E-3318-432-B-929-E-58-E725-D17-F43.jp g" target="_blank">https://i.ibb.co/2NXnh0J/DE26-F68-E-3318-432-B-929-E-58-E725-D17-F43.jp g"/> [/img][/url]
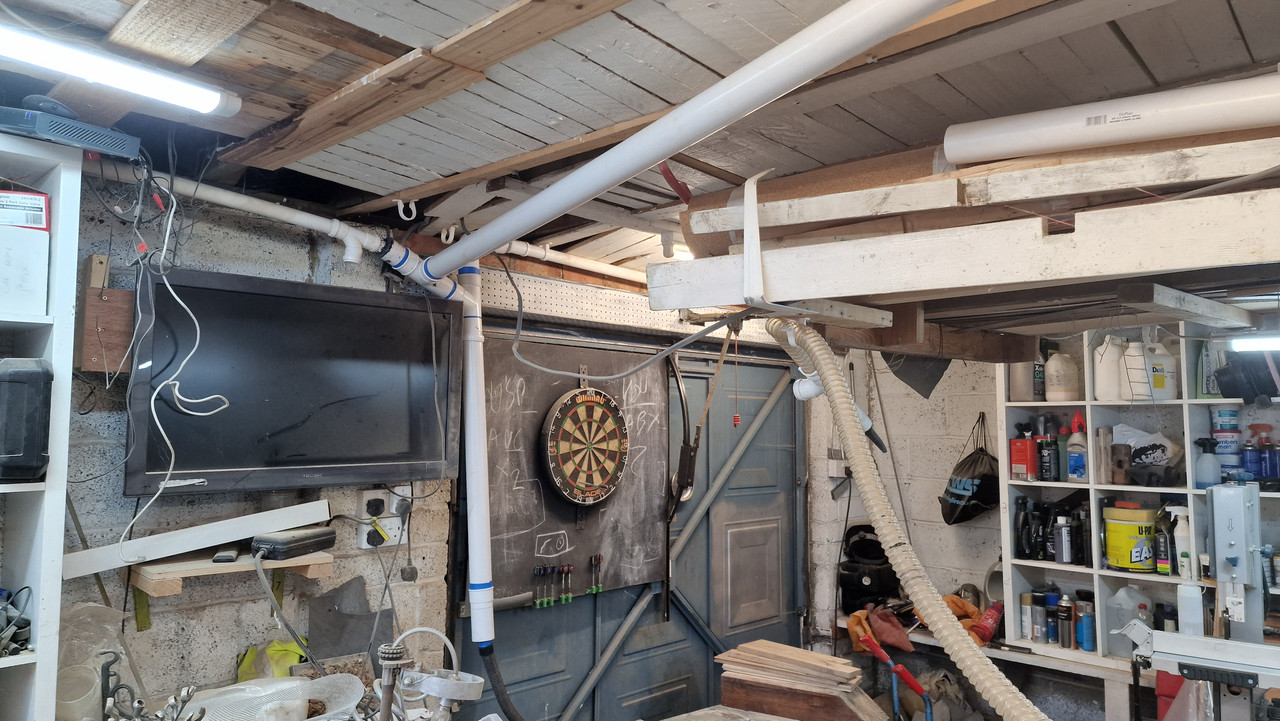
I have been doing a bit more wood work than usual in the garage and this has created a lot of wood shavings. My home made dust extraction was made from 40mm push fit plastic and coped fine with dust and small debris but was getting constantly blocked and choked by the wood shavings.
I upgraded the 40mm pipe to larger waste water pipes for the section leading to the main work bench but left the 40mm in place for the other extensions for dust collection elsewhere in the garage which don't get the wood shavings.
The difference is amazing with no blockages and no loss of suction event though the pipes are not permanently glued but just have blue painters tape keeping the joints airtight.
It only took a couple of hours to repair including 2 trips to B&Q but then another hour or so to clear up all the shavings that have accumulated over the last few days.
In an effort to get the electrical side of mum and dads decades long house renovation finally completed I've been getting a bit of workshop time in rebuilding this outside lantern for them...
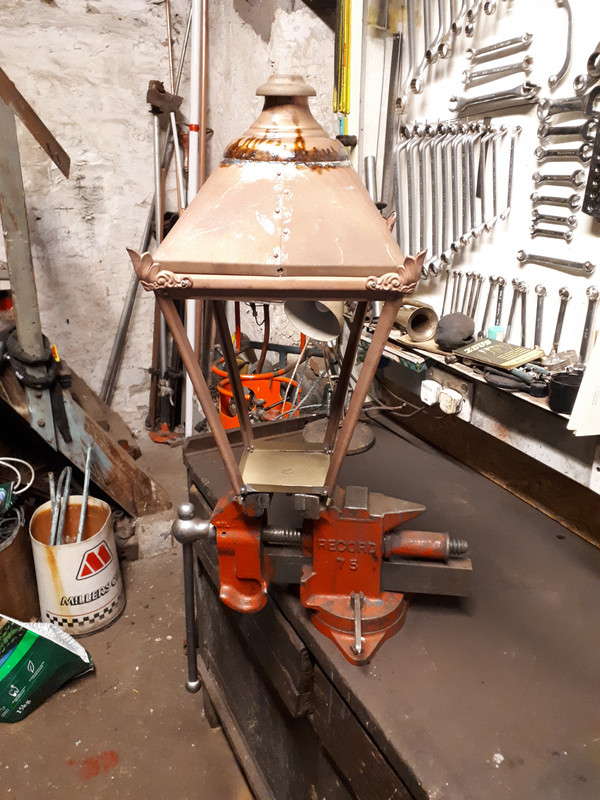
Record 75 bench vice for scale...
The sparky persuaded them to get the whole lantern and bracket powder coated... unfortunately the lantern is made of copper and was soldered together and disintegrated into myriad pieces when it went in the oven 🤦♂️
It's now partly held together with solid copper rivets (fiddly but interesting to do) with the top all re-soldered together.
Had to rig up a jig to hold everything straight-ish for soldering using The Daddy Of All Soldering Irons...

Pleased to get it done 🙂
Next on the hit list is a A901 Kenwood Chef that I rescued from the local tip some years back with speed controller problems 🙂
£38 for 6 meters x100mm
Power steering pump on the van. Turbo next, garage job that one though!
Hoofed the Dremel down the drive (by accident).
This it did not like and it displayed such feelings by removing the "rotary" from "rotary multitool".
Bit of YouTubing and it seems the winding (?) wires are a bit fragile.
Sure enough it was a broken wire to a connector. A bit of solder and a strand of wire from some old cable and it's working again.

Yea, i fixed my gas boiler too. Only required wd40 on the valve as it was sticky from previous owners love of fry-ups!
Recently sorted out the speed control on my mums Kenwood Chef A901 that's considerably older than me...
Got the same job to do on another one for my nephews mum that I rescued from a skip some time ago. Sadly its a bit later and a wee bit more tricky to do 🤔
Last couple of days have been dedicated to putting a new clutch in my mates mums Daihatsu Terios. Bit of a tedious job 😬
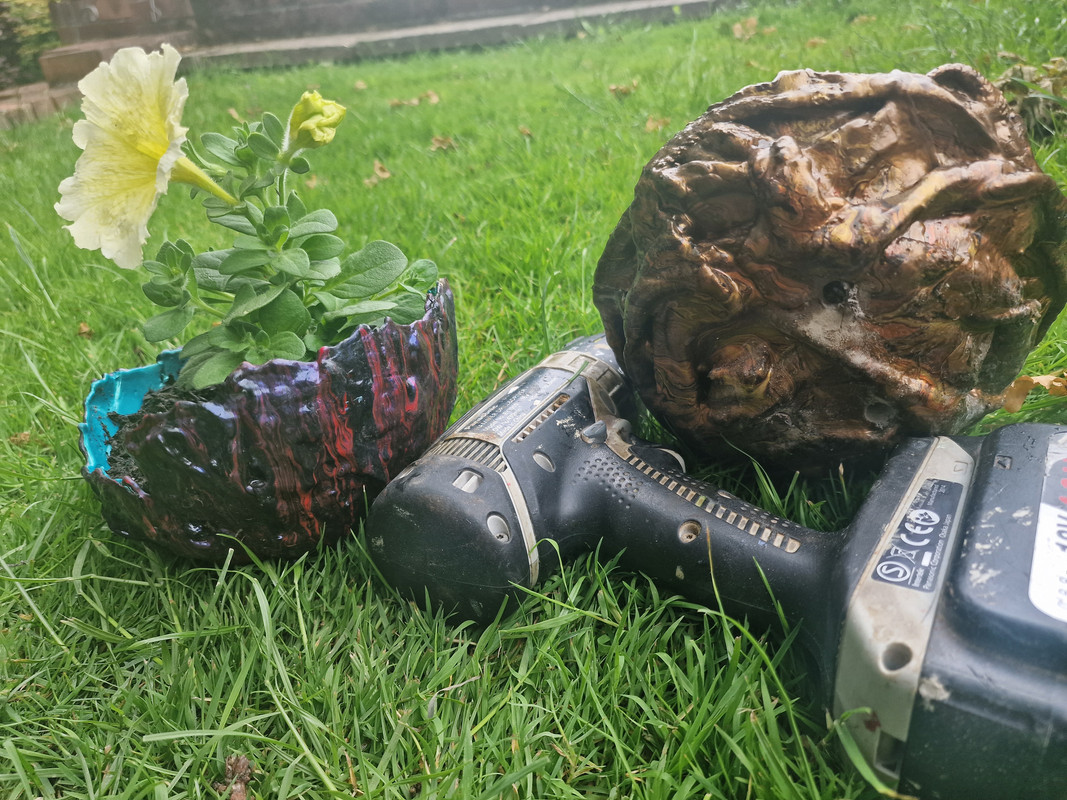
My wife decided that my ornamental painted bowls should become ornamental painted flowerpots. This was lovely but when it rained they behaved like bowls and filled with water.
Just drilled three holes in the bottom of each
Repaired is probably pushing it a little, but i sourced (which was actually pretty tricky) and fitted a replacement battery in my Garmin Edge 25 so I've now got 7 hours of battery life again rather than the 2 it had ended up at.
Feeling pretty smug as Garmin don't really do a newer version and its nice to keep this one going.
I think I’ve mananaged to repair my pir floodlight for the second time, as it had gone into random disco mode again. The previous fix was to pull out the old white sensor lens and to wedge/glue in a random eBay replacement lens (never was quite as good but it mainly worked). Anyway, after a few years, disco mode again, sensor lens all brittle and cracking and bits flapping in the wind. I managed to break out the old sensor unit fairly neatly, and then by cutting the light body where the pir unit was fixed I’ve managed to be able to screw in a replacement pir sensor unit that came with built in screw thread (with lots of uhu to help /water seal), rewired it all and it’s now back up on the wall, it worked in the garage so hopefully it’ll work in real.
Last thing I fixed: nerf gun for my neighbour's kid. Well I kind of cheated and replaced a bunch of inside bits with bits from another differently broken nerf gun of the same model, but he doesn't know that.
Next thing will take a little longer, sometimes finding gold flecks is a good thing, but not when it's in an oil filter!
[img]  [/img]
Recently sorted out the speed control on my mums Kenwood Chef A901 that’s considerably older than me…
Well get you, Mr Johnny Come Lately, with your A901 Kenwood Chef.
We're still using the A701 I fixed about 10 years ago.
Repaired my Mrs' hair straighteners after Jnr w2k dropped them on the floor. Heater plate had cracked, 5 mins on ebay found some replacements for £5, then it was a relatively easy repair. Everything that needed disconnecting was a small screw fitting instead of solder, just a bit fiddly. Maximum browny points for me 🙂
Went all in on this one. My old (>10 years at least) Black & Decker belt sander died, ironically while I was doing a job as a favour for a charity - karma, eh - but I knew it had been unhappy for a while. I thought the belt was just stretched, but then it seized solid.
Got it on the bench at home and started taking it apart. Obviously there was 10+ years of caked wood dust, despite the occasional blow out with compressed air. Things escalated quickly.

I thought one of the gears had stripped, which might have been came over (spare parts seem to have all been available at one point, but lots no longer stocked now) but it turned (no pun intended) out the end of the toothed shaft is just ground down to locate in a bearing:

There's actually a bearing under that clump of grease, bits of gearbox and wood dust above the gear on the left.
Then having extracted the rotor from the plastic housing, I realised the main problem was that this was all that was left of the main drive side motor bearing:

Fortunately there was enough left to identify it for replacement.
Checking the rest of it over, I realised that driven roller that holds the belt was turning pretty stiffly. I took a while to extract the aluminium base it's mounted into from the gearbox. It had two needle bearings inside, which were fairly shot but they proved a nightmare to extract. There was a spacer between them that had a slot in it, but I couldn't find anything that would fit in the slot and still give sufficient purchase to drift it out. Eventually I ended up drilling one out, and going a bit into the spacer which turned out to be plastic. Not ideal, but not terminal.
Bearings ordered, I cleaned everything out, and then couldn't resist doing one of those ****y flatlay pictures of all the bits. Those far too familiar with the B&D KA85E (Type 2) may notice that one of the rollers has furtively rolled off out of shot under the pizza oven.

About an hour of putting together, realising that bit should have gone in there first, taking apart, and then putting back together again (one screw I must have put in at least dozen times), and it looks like a belt sander again. Screws leftover: 0.

I reckon all the taking apart, cleaning up, trying to remove bearings, ordering bearings, and reassembling must have taken at least 6 hours all-in. A new one is about £50. The sound when it started back up: priceless (and much quieter than before!).
Auxilary belt tensioner on the van, only took an hour but was a git of a job, needed about 3 pairs of hands. No more squeeling racket when parking now though 😀
Bled the brakes on the full suss too.
Started renovation on my conservatory... much shout out to Neil who lurks on here for helping me. He's a joinery dude with skill and patience.
I'm a clot with a claw hammer...
Anyway I'm not overly enamoured with the build quality of the timber kit. The pick of the rusty stringer is the joint between top frame and lower frame, no step or sealant, just 2x beads to act as weather strips. Might be ok in Surrey but not up here.
Nothings in permanent were just cutting out rot and letting it dry out and treatment being applied.
Also have a pic of Geoff....
[url= https://i.postimg.cc/DmxkSg3y/20220629-174853.jp g" target="_blank">https://i.postimg.cc/DmxkSg3y/20220629-174853.jp g"/> [/img][/url]
[url= https://i.postimg.cc/jnxbG3VB/20220702-114915.jp g" target="_blank">https://i.postimg.cc/jnxbG3VB/20220702-114915.jp g"/> [/img][/url]
[url= https://i.postimg.cc/rKYkP9fY/20220702-114926.jp g" target="_blank">https://i.postimg.cc/rKYkP9fY/20220702-114926.jp g"/> [/img][/url]
[url= https://i.postimg.cc/RWTkKQj0/20220702-120751.jp g" target="_blank">https://i.postimg.cc/RWTkKQj0/20220702-120751.jp g"/> [/img][/url]
[url= https://i.postimg.cc/tsmLBC40/20220702-133746.jp g" target="_blank">https://i.postimg.cc/tsmLBC40/20220702-133746.jp g"/> [/img][/url]
[url= https://i.postimg.cc/MMcZ9FS5/20220702-152832.jp g" target="_blank">https://i.postimg.cc/MMcZ9FS5/20220702-152832.jp g"/> [/img][/url]
[url= https://i.postimg.cc/Xp2j0WYL/20220703-080747.jp g" target="_blank">https://i.postimg.cc/Xp2j0WYL/20220703-080747.jp g"/> [/img][/url]
[url= https://i.postimg.cc/McgJpZC0/20220703-080801.jp g" target="_blank">https://i.postimg.cc/McgJpZC0/20220703-080801.jp g"/> [/img][/url]
[url= https://i.postimg.cc/p9SR5JFF/20220703-080813.jp g" target="_blank">https://i.postimg.cc/p9SR5JFF/20220703-080813.jp g"/> [/img][/url]
Pretty pleased with my kid free Friday evening. Free to me pressure washer was always patchy firing up and a winter in the shed had killed it completely. Handy YouTube video showed a common problem with these so stripped it down. Cleaning the corrosion off the pressure valve bore was a bit tricky but a bodge with some wire wool wrapped round a drill seemed to have done the trick.
[url= https://i.postimg.cc/KzpjfnBx/IMG20230303215706.jp g" target="_blank">https://i.postimg.cc/KzpjfnBx/IMG20230303215706.jp g"/> [/img][/url]
No pictures but repaired my parents conservatory. Nearly a rebuild including a new screed floor. Managed about a 2 mm deviation over 4.5 m was happy with that.
TIG welded a bolt to the sheared remains – heat plus vice = removed fittings.
Tig welder has been on my don't need but really want tool list since I did a welding course ~ 20 years ago. I keep making do with a big old buzz box but of course no good for anything requiring "finesse".
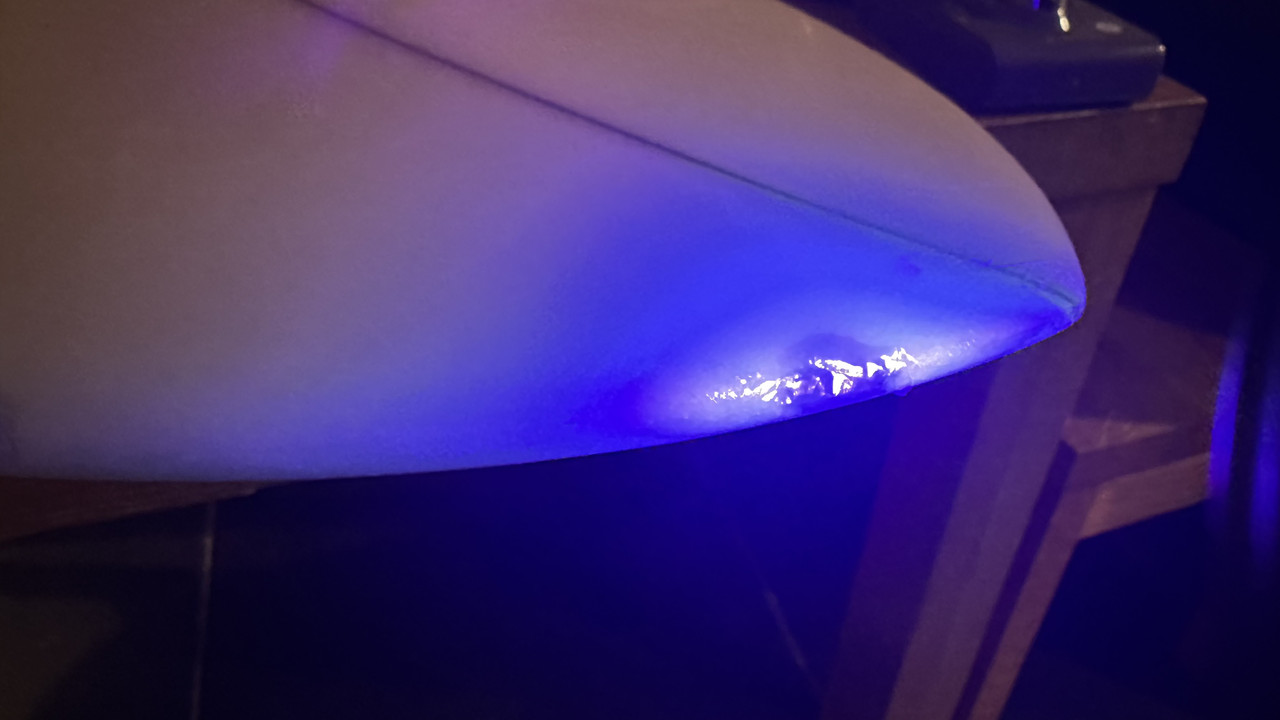
Surfboard ding. UV torch makes it much easier to control the cure.
Non DIY proficient (ironically, aeronautics engineer) mate lost a peak retaining bolt on a spin last weekend, back to my shed after, sift through the bolt stash, found the correct size, out with the dremmel to cut to the right length, simple job, happy "customer".
And replaced the positive air chamber seals on the fox float X2 rear suspension unit on the secondhand bike I bought which hopefully will sort out the 50psi per spin pressure loss issue.
Sunday's spin will provide the answer as it only loses pressure on spins.
Now I'm no handyman but earlier this week my hot water cylinder died so I needed to get under the house to Isolate it so we could at least have cold water until such time as it can be replaced. Problem was the hinges on the inspection hatch were seized making access a problem. Fortunately they bent so I could get in.
Anyway today I bought brand new set of hinges and replaced the seized ones. Inspection hatch now works as it should.
I also completely restrung the rotary washing line. This is quite significant as I didn't break and wasn't told it was broken (i only found out when going to put laundry out to dry) and upon finding it broken I haven't waited several months to get around to fixing it.
Small fry to the stuff above, but just changed a toilet inlet valve. It failed earlier this week and I just turned the supply off and put an 'out of order ' sign on it. That wasn't deemed an adequate solution so have now got on and swapped it. Checking for leaks now.
Replaced the steering pump pulley belt on my Daihatsu 4Trak.
Simply remove the engine bash guard, loosen the pulley adjustment bolts, remove the old belt, fit the new belt, re-tension and tighten the pully before re-instating the bash guard.
Simply was obviously a typo as every bolt was sieves, every bolt head was partially rounded, the pully wouldn't move, even with the bolts fully loosened and the new belt wouldn't fit even with the pulley at the maximum adjustment. Apart from that it was simple I guess.
Small fry to the stuff above, but just changed a toilet inlet valve. It failed earlier this week and I just turned the supply off and put an ‘out of order ‘ sign on it. That wasn’t deemed an adequate solution so have now got on and swapped it. Checking for leaks now.
Mine has failed in the upstairs bog so it's only refilling on a dribble, this is proving troublesome for heavy traffic or double flush situations. So far my solution has been to put an empty 4 pint milk container beside it so it can be refilled from the bath tap but this is proving a surprisingly unpopular "solution". I'll get to it when I get to it.
Replaced the screen on a Nokia 8 the other day, let's just say my peripheral neuropathy made using tweezers on the wee connectors and screws a bit tricky!
Haha, sounds as unpopular as my mid week solution! I put a fluidmaster replacement in. £16.50 from screwfix.
Rear airsprings on my merc. YouTube tutorials should be used as a guide only. Fortunately I can see where they are wrong and sort out a solution / better way fairly easily.
Went to service the compressed Air drier for the above to fimd it fitted backwards.
Then spotted the intercooler hose not fitted correctly either and practically hanging out the intercooler, which needs a flush as it contains pcv oil.
just noticed that the radiator was cold, so looked at the boiler and pressure was too low. 5minutes on google, and figured out what needed doing so the heating is back on. Im new to boillers
currently trying to repair my car, think its a turbo problem. The last 2 nuts,very tricky to access, havent been moved for 15 years, going to try again with the impact drill
Also didnt like the white colour that my planet x fleegle bars came with, so now theyre blue, thanks to the powdercoating dept at work
Sticking caliper changed on the mazda and then a parasitic drain found on the the t4...
It's been flattening the battery... so out with the multi meter....
[url= https://i.postimg.cc/S219FWSg/20230304-120528.jp g" target="_blank">https://i.postimg.cc/S219FWSg/20230304-120528.jp g"/> [/img][/url]
[url= https://i.postimg.cc/vDD97Shk/20230304-131602.jp g" target="_blank">https://i.postimg.cc/vDD97Shk/20230304-131602.jp g"/> [/img][/url]
[url= https://i.postimg.cc/BXKKkLdC/20230304-131613.jp g" target="_blank">https://i.postimg.cc/BXKKkLdC/20230304-131613.jp g"/> [/img][/url]
Rebuilding our 215k XC90, finished the front end disassembly today - struts, control arms and driveshafts. Pretty much everything being replaced with new and the inner arches being cleaned and zinc epoxy'd before moving on to the back end then engine stuff.
[url= https://i.ibb.co/KsShzfW/87-B1-F92-D-ED7-D-4-E22-AED7-C3-A104-C71762.jp g" target="_blank">https://i.ibb.co/KsShzfW/87-B1-F92-D-ED7-D-4-E22-AED7-C3-A104-C71762.jp g"/> [/img][/url]
[url= https://i.ibb.co/pPQPhqV/F459-B6-FA-16-C7-4-B6-D-BDC2-1858-E5-CFAFE5.jp g" target="_blank">https://i.ibb.co/pPQPhqV/F459-B6-FA-16-C7-4-B6-D-BDC2-1858-E5-CFAFE5.jp g"/> [/img][/url]
I had forgotten about this thread, and I've been busy.
Changed the engine oil seal and thus the clutch on the car (Ford 6 speed boxes weigh a lot more than mk2 Golf 5 speed ones!)
Changed the chuck on my DeWalt combi drill, turns out you need to dismantle the whole gearbox to get to a bit of the shaft you can grip in a vice, and the gearbox turned out to contain 3 sets of planetary gears and lots of other bits. Does work beautifully now though for a good clean and grease.
Sabre saw needed some love as did the SDS drill, but relatively simple machines.
The heat pump tumble dryer needed the clever bit cleaning, you can't do that everyone said. Of course you can, just needed a bit of care, patience and ultimately a hosepipe. Knocked about an hour of the typical drying time 🙂
Now repairing our house exterior, the render has failed and was trapping water into the brickwork. Once removed this has uncovered rotten wooden lintels and that the lead flashing had only been set into the render not the brickwork, so plenty more work to keep me busy 🙂
Repaired a crash-damaged Timberbell with bits of Sugru. Good as new now.
Yesterday I used gorilla glue to fix two snapped plastic sliding brackets on a Lakeland clothes horse which I had broken in a fit of stupidity a few weeks ago. Try as I might I still managed to get the stuff on my fingers!
As mentioned elsewhere the oil boiler. Turns out that heating oil pumps work better not full of dirt and rust.
Snow outside and no heating fixed for £2.25 (half a can of carb cleaner) and my time, and as snow had stopped me working on the roof I was looking for something useful to do.
Added bonus, running the burner outside of the boiler means you get to see the fire you make!
It just never ends.
This is a in progress report. Fuel lift pump on a B275 international Harvester (early 60s I think forget exact year). Ordered gasket. Remove to find stripped thread on one bolt. Heil coil kit 5/16" ordered, replacement bols (cap head for easier access).
Leak around hydraulic control for linkage and and auxiliary diversion valve. Still under investigation. Don't want to pull apart until I have bits aas I really need to use the tractor asap.
Heating oil system. The new and clear filter body showed up an air leak in the line somewhere. This turned out to be at a 6mm x 3/8" fitting which promptly stripped with fingertip pressure on the spanners. Cut the fitting off, sleeved the 6mm with some 8mm, new fitting and joy!
carbon chainstay on the wife's road bike, it been dropped on something and cracked quite nastily but not all the way though. So sanded it back "resined" in a carbon wrap seems to have done the trick and very solid. Not pretty but still to paint it.
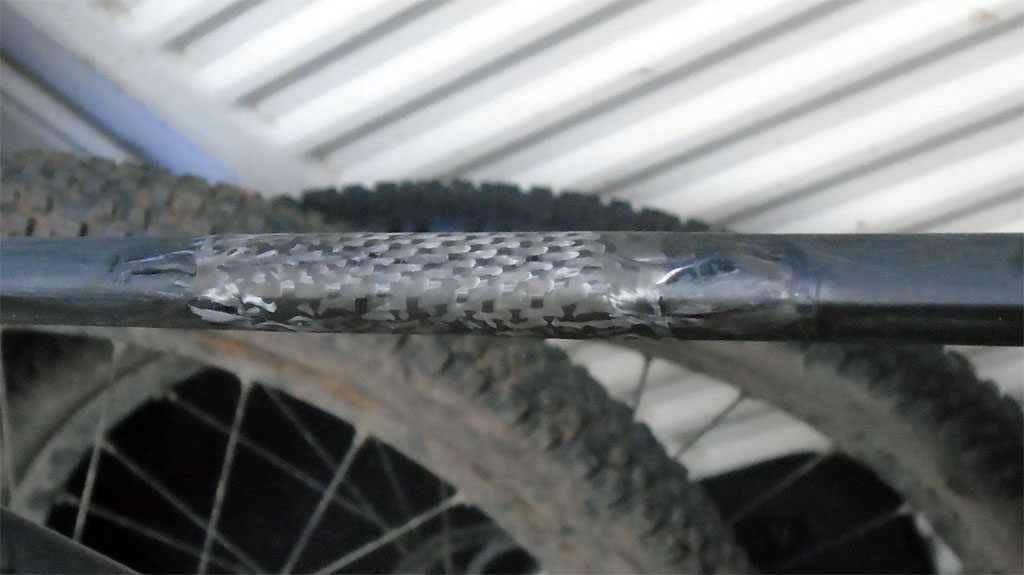
@Klunk - unless that is carbon cloth, normal carbon wrap is just printed vinyl so not that strong. Hopefully the resin will bond with the cracked original CF though
Hardly the height of engineering but…. Couldn’t thread the screws into a kitchen cupboard handle, little bit of tinfoil in there and it’s all good.
Matches are great for that.
In the process of replacing a ‘blown’ double glazing panel in a window. Cost of £40 + my labour. Actually quite easy to do.
I read your later description, but do you have a page or video that taught you? I have millions of failed units that are all about 40 years old - so no warranty.
Has anyone tried this approach? Seems to involve fitting a breathable vent and dumping new desiccant into the void...?
https://condensation2clear.com/shop/
Mid ride I had a nasty chain drop on a technical climb.
Whipped the chainring off and used a precision rock to correct the bent tooth.
https://ibb.co/7bWxZ08
https://ibb.co/Zx8DT6t
Perfect!
Washing machine brushes, so pleased as I really thought WM was toast. Impressed with the Meile, looks designed to be fixed, very easy just fiddly getting the brush assembly back on. £13.88 from my local guy, was £43 on spares. Double win.
The boot handle on the Ibiza - it just wasn't triggering the release. Took it all apart, tested everything for continuity and worked out it was the switch. The switch is hidden - I managed to get in clean it, and voila we are back working.
40 mins work, £100+ saved for a new switch.
Bissell spot carpet cleaner - hose split just as I went to clean up a load of cat pee from the back door mat (the joys of new kitten). That was Tuesday morning. Quick google and espares had a replacement for £15. went for 7-10 day postage for £3 (next day was £10). It turned up at 11am the next day!
Then time to replace it. A quick youtube video showed a couple of screw heads hidden under a sticker. After that it was all phillips heads screws and very easy to take apart and replace the hose. So nice to work on something that has been designed to come apart and be fixed so easily.
This week I found a fixed a leak in my sleeping mat that gave me an uncomfortable night on a bikepacking trip. The finding obviously being the difficult bit, but on the plus side, it got cleaned by way of a sponge bath on both sides - obviously the leak was on the last tube I came to. Blob of Seam Grip sorted it out.
Also fixed, and in fact improved the toaster. The bit that holds the bread wasn't doing a very good job of that, being made out of the most flexible metal I've ever come across, and so bread was getting stuck down the side, and it would either not go down (which turned out to be a separate issue) or not pop back up, so I took it apart, straightened it, and reinforced it with some stainless builder's band for good measure.


The front discs/pads on my car (Nissan leaf) were a bit grindy, and the disc was badly scored..
I htink the pads had seized a bit in the caliper..
So swapped them over:


I'm still alive, so they work I guess!
DrP
Put a new handle in an axe today. Been keeping some lengths of ash for these jobs. Split to near thickness with another axe, finished with a pocket knife. Bit of oak in the end as a wedge. jobs done. Bit quicker than one I did for a maul years ago when all I had handy was the maul head.
Also fitted a new bog seat.
Pair of Fox Defend trousers for my mate. Wore the arse through.
[url= https://i.ibb.co/gRDkhds/20230407-184032.jp g" target="_blank">https://i.ibb.co/gRDkhds/20230407-184032.jp g"/> [/img][/url]
The turned an awkward rip into a phone pocket in my pair of Troy Lee Skyline trousers.
[url= https://i.ibb.co/gTjp0k1/20230410-183204.jp g" target="_blank">https://i.ibb.co/gTjp0k1/20230410-183204.jp g"/> [/img][/url]
Managed to fix a GaN charger, that has a slide-in adapter for U.K. three-pin sockets. I knocked it out of an extension lead, and one of the pins that carry current came out of the adapter. I thought they were moulded in, but they’re a press-fit, and I thought impossible to put back. The manufacturer was non-responsive, so I thought it was fubared, then I had an idea. I’ve got a tiny little vice that I bought at a country fair some years back, screwed to a block of wood, so I wondered if the adapter would fit into the vice jaws, so I could try to press the pin back in.
It did, and after some very careful closing of the vice jaws, and a very loud click, it was back in place and working! Big sigh of relief, I used the charger a lot, because it has two USB-A sockets, and two 100w USB-C sockets. You can see how the adapter allows the thing to be used with American sockets, with two fold-out pins, which slot into the U.K. adapter when they’re folded into the body. A neat bit of design, just not up to being maltreated!


I’ve got that hyper juice (albeit has another name ).
Really handy bit of kit.
some 2007 fox talas rlc 140 with a 25p o-ring after being turned down by tftuned :/
replaced the carb on my ancient ride on lawn mower, it started first time and is now back to full working order. I am now feeling very manly and successful!
Washing machine brushes, so pleased as I really thought WM was toast
Snap, did ours last week too. Very nearly bought a new machine with next day delivery as repair appointments were a week away. Then I thought to check the brushes. Zanussi spares would only recommend an entire motor, even though it looked like they sold the exact brushes required. Apparently the specific motor fitted can vary, hence they are non-committal on which brushes you need.
Local parts shop had the exact parts needed for £25.
Delonghi KG79 Coffee Grinder.
Apparently a common issue: Blue light doesn't glow and the motor runs for a second then stops.
Thread on coffeeforums.co.uk: Link
Swapped the yellow capacitor thingy on the circuit board and the magic was unbroken.
[url= http://i.imgur.com/35tZxbi.jp g" target="_blank">
Replaced the window regulator in the offside rear door on my BMW 3 series after it failed the other weekend. £8 for a trim removal kit and £40 for the new part. Surprisingly easy to do even if I did it watching a YouTube video showing me how.

A 2 part repair. A Mk1 Cotic Soul that had a seat post proper stuck. That took about 2 days of sawing, filing and hammering to get it out. I've now put an NX Eagle set up on it. And my Atera Strada rack with longer straps to take a 2.6 x 29 tyre.
And removable arms to make mounting the bikes a bit less impossible.
Fixed a mitre saw with blade guide not retracting correctly.
Currently in the process of repairing a tractor loader, took a few hours of heat and beat with the aid of a hydraulic jack on side to remove two 20mm pins that hold a hydraulic cylinder in place.
Next job will be to overhaul the cylinder I think. Then fun of attaching and plumbing it in. The joys of vintage tractors.
Today. Fixed sticking throttle on petrol brush cutter, made a new guard and sharpened the blade. Stripped and rebuilt a SRAM Rival hydro lever, stripped, painted, mended and reassembled a cast iron hose reel, tightening all the joints in the hose as well and managed to reduce our surplus stock of ice cream. Did nowt this morning though.
Removed a stuck seatpost from my P7.
Relatively easy to remove as friend built a seatpost removal contraption as his seatpost was stuck last year.
It would be a right bigger to remove without this.


Wife noticed some of the radiators were on when the hot water only was running. Not ideal in the heat. Fortunately its a Honeywell 3 way valve so took a punt on a new genuine synchron motor. Only £23.99 from Screwfix but twice the 'copies'. Easy fit and all working. Looking at the old motor, we'd obviously had another many many years ago (beyond my memory but must have been in first few years of having the house - been here 28 years) as the Honeywell OEM Synchron has orange wires, this old one had blue like the replacement.
Relatively easy to remove as friend built a seatpost removal contraption as his seatpost was stuck last year.
That is very cool! I bought something similar to remove a stuck mouthpiece from my son's trumpet.
I performed surgery on a Croc to close a pulled through where the rivet for the rear strap had ripped. Probably the same texture as sewing a wound closed. Seems to be holding OK. Needed better thread and clinical hooked needles really, but nice result and I'm ready for field wounds now.
Just fixed the leaking hot water tap on the kitchen mixer. The cold went a few months ago. Bought replacement cartridges at the time (ceramic discs) but the serrated top (for the tap) and the body length weren't the same, so butchered it for parts. Did the same this time.
I love that seapost puller. The only concern I have with that method, (and I've seen photos of similar before - including using a fork lift truck as the jack! 😨 ) is that it risks ripping the BB shell off the bottom of the seat tube. Can't really think of a solution that could universally be applied to frames that have anything other than a round tube though.
Relatively easy to remove as friend built a seatpost removal contraption
That is insane!! (in a good way)
The last thing I fixed was my bike. The pedal somehow came off (don't ask me how because I dont know myself) and I had to fix it while on my journey.
tthewFull Member
I love that seapost puller. The only concern I have with that method, (and I’ve seen photos of similar before – including using a fork lift truck as the jack! 😨 ) is that it risks ripping the BB shell off the bottom of the seat tube.
I know, I was worried it might damage the frame but it worked well. It even came with a sacrificial BB so I wouldn't damage mine. Just had to swap it over before pulling the post out.
Just need to remember to wiggle the new seatpost every month so it doesn't seize again.
Seen loads pulled with one, never heard of a breakage.
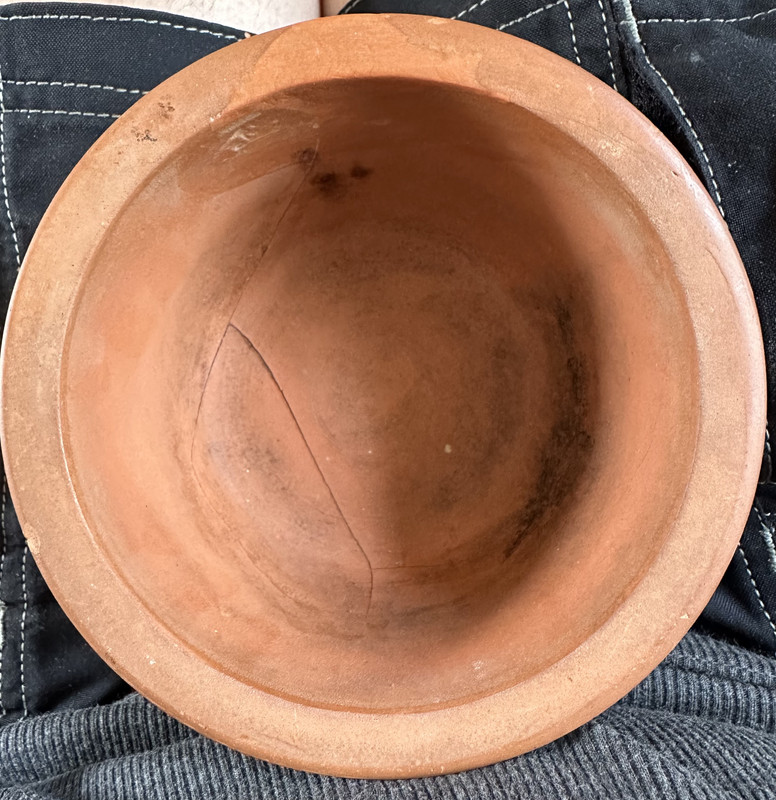
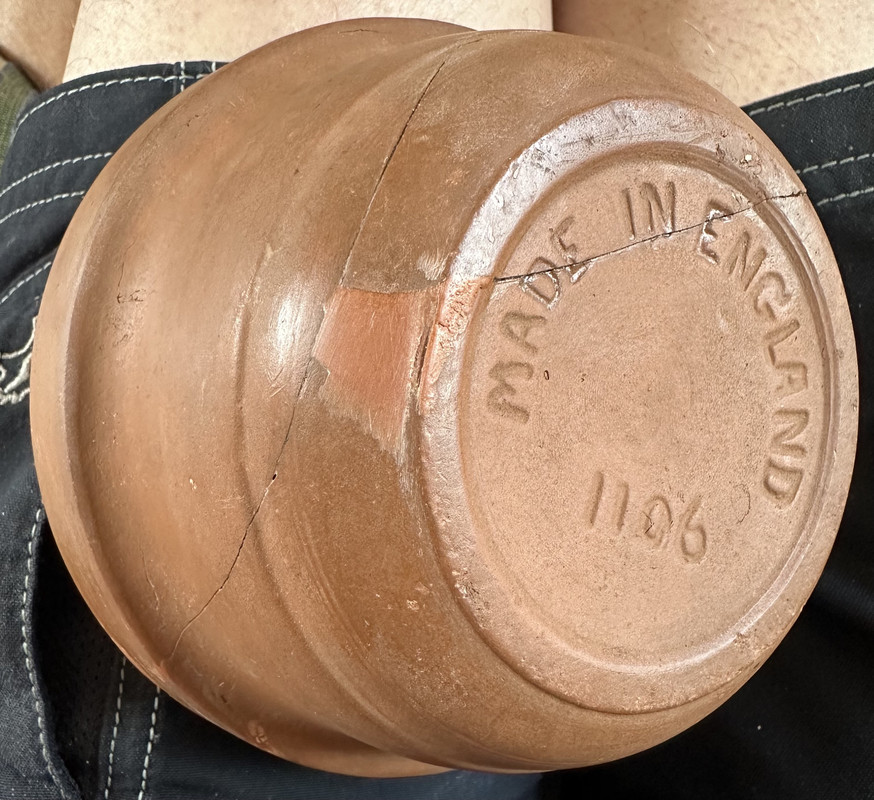
Most recent thing was a terracotta pot that has a lot of sentimental value. Originally bought by my mum, God knows how long ago, it doesn’t have a drainage hole so probably for a succulent. Anyway, it had been put outside and Jo my partner had ‘adopted’ it as something to stub her fagends out on and drop them into. At some point, it had been kicked or knocked over and cracked in a number of places, but amazingly stayed intact. I nearly smashed it to use the pieces in the bottom of other pots, but as it had survived years outside and maltreatment, and it had the marks left where Joey had stubbed her cigs out, I couldn’t bear to part with it, and it’s a very pleasing shape. Trouble was, trying to figure out how to stick the cracks in such a way to stabilise it without actually breaking it to glue it. Then I had an idea, I watered down some PVA glue, and sucked some up into a syringe with a long, large-bore needle, and carefully let the glue soak into the cracks, letting it draw along them and allowing it to set, then adding some more. It worked really well.
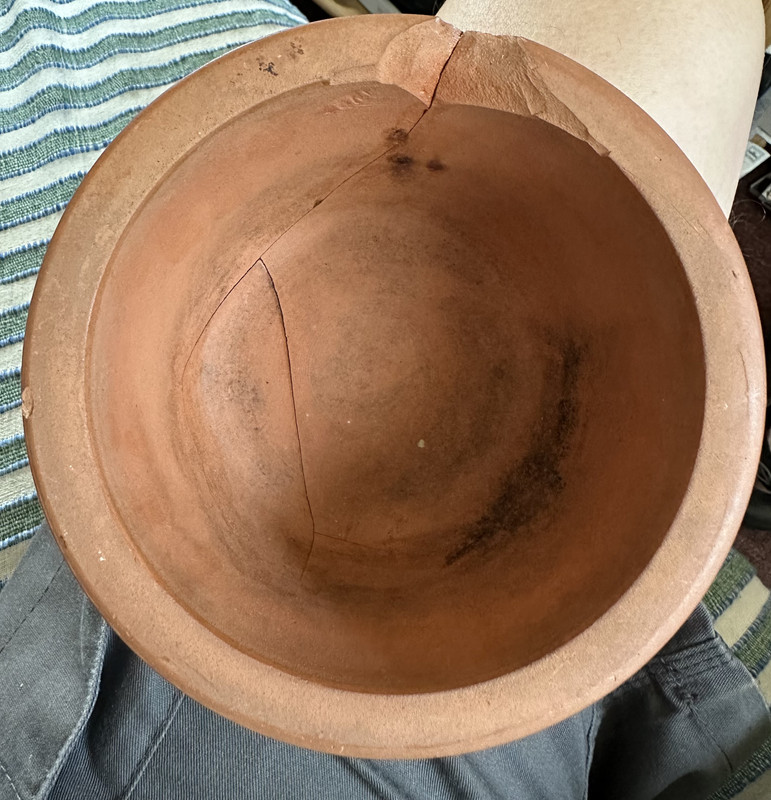

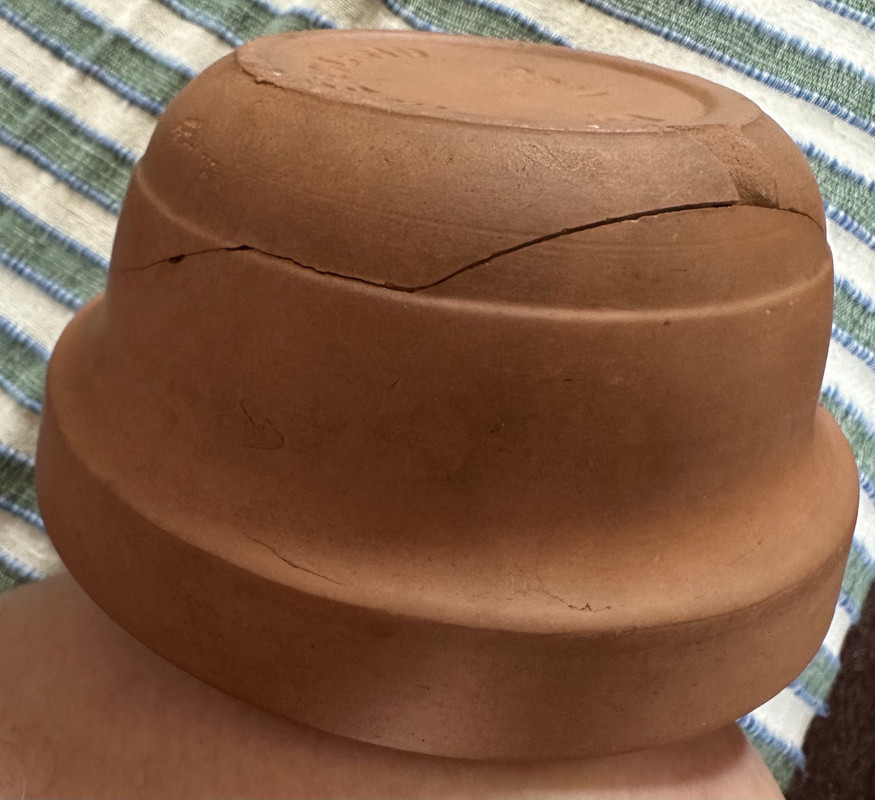
The separate pieces couldn’t be pushed together, because most were still joined in places, but the adhesive filled in the gaps and once fully dried, made the whole structure really solid, it almost ‘rings’ if tapped with a fingernail. However, there were small gaps where pieces had been lost, so I got some terracotta coloured Milliput epoxy modelling putty, and filled in the spaces, and while it’s not a perfect match, I’m chuffed with how it’s turned out. It’s sitting on my coffee table, and is a handy little bowl for putting all sorts of loose odds and ends in.
Nice job CZ!
Thank you, although I can’t see the photos at the moment. I’ll restart my pad, maybe that’ll work.
Yep, turn it off, turn it back on again!
Again, thank you, I’m really happy how it turned out. I like the shape of it, it’s a perfect size for putting odds and ends in on my table, and it’s got a lot of sentimental value. I used ordinary white PVA glue, but I’ve since discovered that The Works sell clear PVA for craft use, and that might have been better. Not that it really matters, it works perfectly enough to hold it together.
Bit early to call it fixed, but,

Got this very cheap with a rattly engine, drove it til it was properly dead. Replacement (bigger) engine is coming together with a general freshening and some hotter cams, exhaust is in the post back from cerakoting, everything from the rear wheels forward is completely derusted and has a first rustproofing on with a second to come (everywhere you see brown, there was either rust or damaged paint that was going to rust, all gone now and all the sills and other hollows and inaccessible bits have been rust-killed and treated), all new suspension and bushings are waiting to go in (nothing to attach them to yet)... At this point, everything that was broken or suss has been addressed though and I reckon today is the official point where it's coming together more than it's coming apart.
Unfortunately the rear end still needs all the rust and refresh work and my driveway's too slopey to safely have the car up on 4 stands, so that's all got to wait til it's got front wheels again. It's pretty scruffy too, mazda just suck at paint frankly but that'll have to wait til next year probably.
@Northwind - I was going to ask what it is, but you’ve just mentioned Mazda, so obviously an MZ-5/Miata, (as the Americans like to call them). What are you stuffing in the front? First thought is a V6 from a Jag or big Mazda saloon.
Yah an NC mx5- sorry, should have said, they're harder to recognise without their stupid fat hampster face.
I'm doing the boringest swap- this was a 2 litre, but they make these duratec engines in about 5 different capacities so I'm swapping it for a 2.5 litre. Very common in the states where the 2.5's common as dirt, over here it's scarce but I luckily found a really terrible mazda 6 with a crooked MOT and stole its heart. (original plan was that I had an £80 focus 2.0 engine that I was going to swap the vvt heads onto just to get it back on the road for the lowest price, but this is ironically less work and really not much more money)
It ought to start and run, on the stock ECU and map but with the bigger 2.5 injectors left in (though it'll need mapped to work right), all the induction and exhaust and accessories are compatible or nearly so it'll retain the aircon and power steering and be generall like normal, and there's only a few kilos weight difference (though, it does sit a bit higher) The main thing is that in the standard spec it's a really lazy uninspiring company car engine, wouldn't be right, but the cams and binning the balancer and some other tricks will wake it up. Should make low 200s at the wheels but also have a ton more midrange than the 2.0. TBH it's all pretty well trodden, and none of it's actually difficult except man, there's a lot of bits and I don't really remember where they all go.
Tbh it's the derusting that's going to actually matter! These are just really badly made and this one was just on the tipping point of being not worth fixing, there was probably more rust on any square foot of it than on my entire 3-years-older Subaru. Once I'm done it'll be good til the end of petrol or til I spin it into a bus full of nuns. But hey, it was cheap. I think I'm going to bring it in under the £4000 budget inc both cars, though admittedly that was supposed to include a back garden respray, and now it won't.
@Northwind - that ought to be pretty nippy with a 2.5 in the front; I’ve always been fond of the MX-5, Mazda did the right thing taking cues from Lotus and the Elan, a proper little sports car perfectly suited to narrow British roads.
Today, I fixed a little Lava Lamp I bought some years back at the Science Museum. It had got a bit cloudy, and Joey, bless her little fluffy heart, decided to fix it when I was at work - she popped the cap off and emptied it, then filled it up with ordinary tap water. Of course, there’s a bit more science to it than that, and it didn’t work, sadly. I was a bit miffed, but she was only trying to do it as a surprise for me. It’s been sat on a shelf ever since, so I thought it was about time I had a go at sorting it out. After doing some research, it turned out that what I needed was a bottle of distilled/de-ionised water* and some food colouring. I also needed some Epsom salts and some liquid soap. The easy bit is putting the water in with some food colouring in, and several drops of liquid soap.
The tricky bit is getting the salt right - I filled a shot-glass with hot water and kept adding small amounts of the Epsom salts and stirring it until it dissolved, probably about a teaspoon full. Then I put the bottle part back on the base and turned it on. Once it got hot and the wax soft, I used a large plastic straw as a pipette and kept adding the salty water, a bit at a time. At first the wax did nothing, but the more I added, the more the wax bubbled up, until by the time I’d used all of the salty water, it was working really well!
Chuffed to bits, I was hoping it might work, but it’s better than I expected.
*I used that because the water isn’t tainted with any impurities, which tap water might be. Until I put the mag sulph in, obviously, but that’s a crucial part of the process. 😁
Now I know what to do in future if the water goes a bit cloudy again.
My youngest got some overpriced Nike Goalie gloves & Nike football for their birthday, it was literally minutes after its maiden voyage to the park before the football ended up in a bush and got punctured!
I got a syringe and wide gauge needle and squirted a few ml of Stans into the ball at the needle valve, pumped it up , gave it a shake and after a few minutes of bubbling it sealed
Its held up fine for several weeks now, so Im quite pleased

I heard a bit of a clunk under the truck a few drives back so parked it on the drive. It didn't take long to spot the issue. Clue - look just in front of the rear wheel.
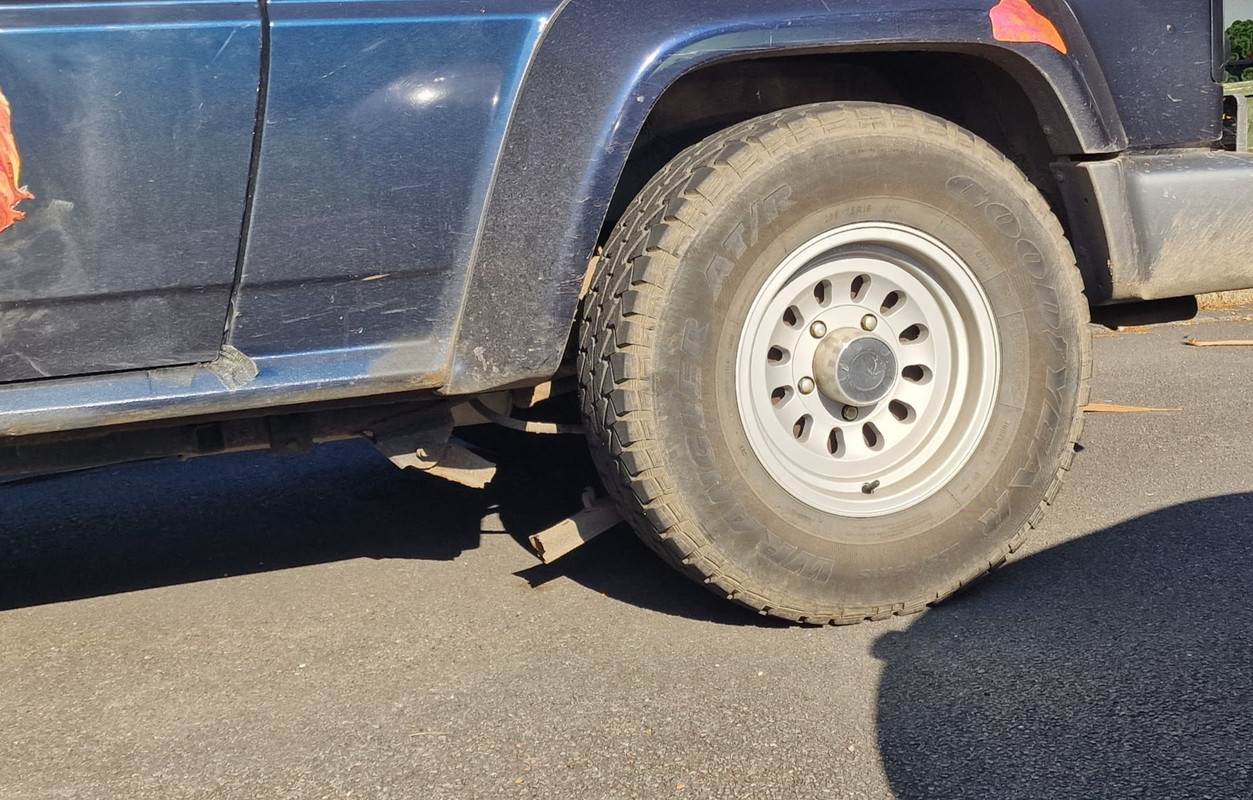
Nothing that a bit of duct tape can't fix. Actually I welded a plate in place and then sprayed it blue so I could see any new cracks or movement easily on the test run.
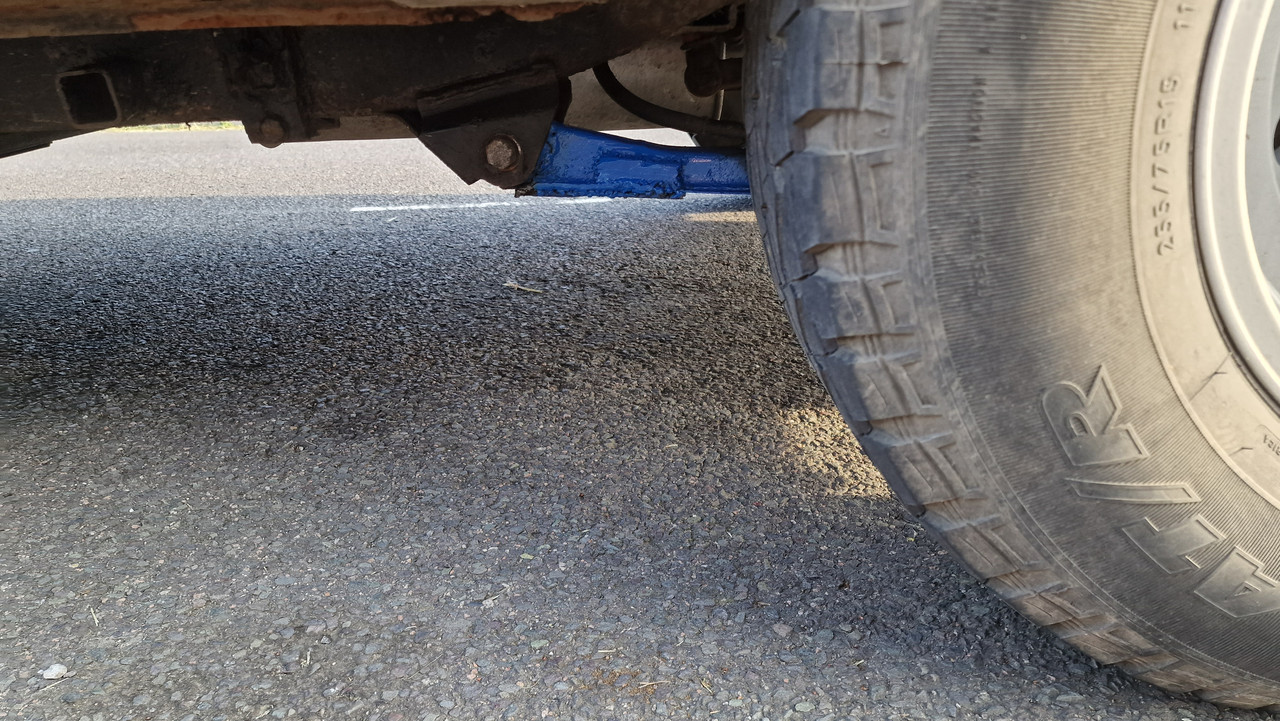
All is fine now.