![]() You don't need to be an 'investor' to invest in Singletrack: 6 days left: 95% of target - Find out more
You don't need to be an 'investor' to invest in Singletrack: 6 days left: 95% of target - Find out more
Going to have a crack at redoing our 50s ensuite.
Plan is wet room style as its only small (3.7m2). I also want to raise the floor a good deal as there is currently a 19cm step/fall into it from the other room - so plenty of space for underfloor heating / insulation / waterproofing.
So questions -
How do I insulate the floor so more of the underfloor heating is going 'upwards' and heating the bathroom, not the ceiling below?
What are decent underfloor systems to look at, and how much wattage should I be looking at?
For the shower, should I buy one of those preformed trays to tile over, or as I need to redo the whole floor would something like this https://victoriaplum.com/product/orchard-waterproof-floor-kit-432-sq-m be appropriate?
Any other tips / things I need to watch out for / wonder products?
things I need to watch out for
something to keep your bog roll dry when you are splashing about in the shower
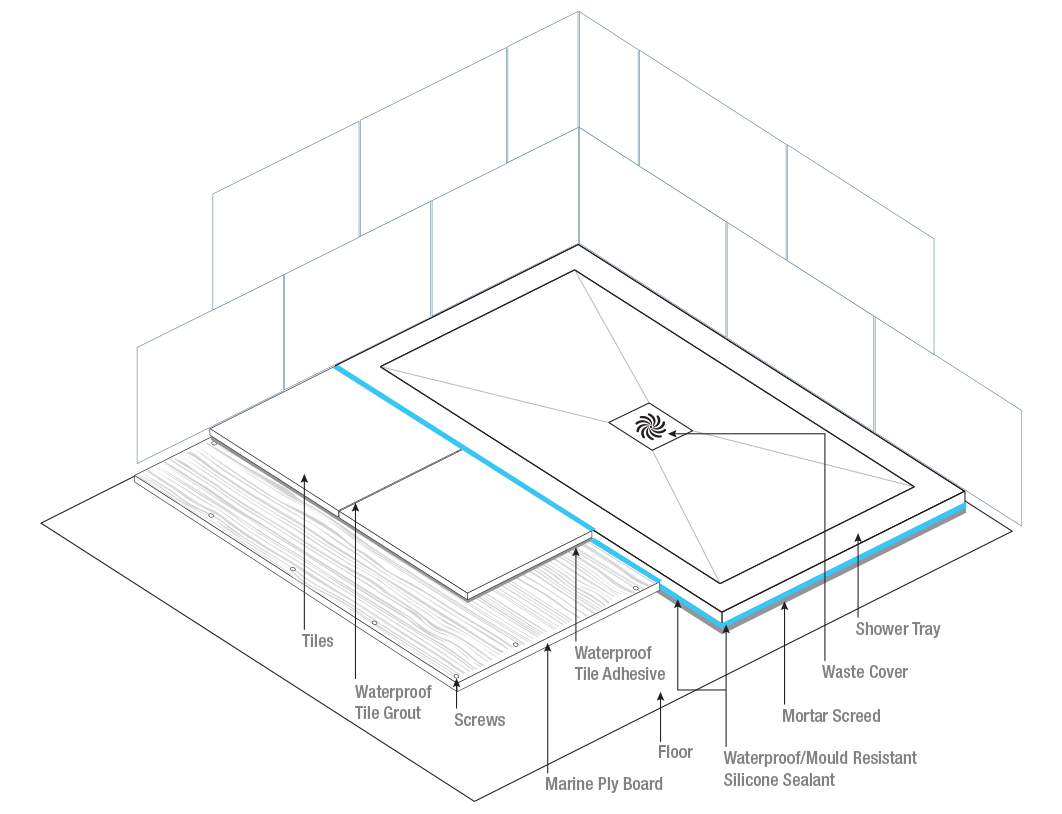
I've used Mapei products and always got on well with them (DIY). Main things are to be diligent with corner details and making sure the falls are correct - you don't want water pooling or flowing away from the drain - a pre-formed tray will help with this as you've picked up on.
You can get 20mm thick fibre-cement backed insulated tile boards which may be good to use on the floor beneath the underfloor heating mats.
Thanks I'll take a look at tile boards -
I've used mapei in the cloakroom and it all went well there
Just had a little poke around. As I suspected the cowboy who put in the fan has it venting into the void beneath the flat roof - no ducting or anything. Luckily other than a massive dead wasps nest it doesn't seem damp or mouldy.
So next question - it appears my flat roof over the ensuite has no insulation, which explains why is is bloody cold.
It looks like approx 13cm void with what looks like 3 layers / 6cm of plasterboard. Is it a stupid idea to rip the lot down and use something like kingspan?
Plus are there any vent fans you can put next to the shower in the wall, as I only have easy access to where the shower is planned to be?
i use these
http://www.tilemasteradhesives.co.uk/shower-trays
and then use there boards for the rest of the floor. don't normally put the heating wire into the tray so use a 12.5mm board on the floor(trays are 20mm) and then cover the wire with self leveling to make the levels up.
always a good idea to cover the UFH with self leveling for protection while working and to make sure the wire is fully covered.
use reinforcing tape on the joints and corners with walls with tanking paste, a mall area i would just tank the whole floor as well.
wattage depends on if you want to take the chill of tiles or heat the room, i've only done ones that are to warm the tiles and have used these kits a lot.
https://www.ambient-elec.co.uk/shop/under-tile-cable-kits-(tpp)-professional/28/?r=1;3;
simple square rooms the mats work ok but i've generally found it to be much easier with the loose wire ones
Insulation - do think about ventilation and how that is going to work. If it is between rafters, a rockwool is easier, cheaper and all the wee gaps of a rigid board loose lots of heat. I would then overboard with an insulated plasterboard.
Could you re-roof? It is often a quick way to lob down extra insulation, then new roof over top.
You can get IPX5 fans ( clicky ) that can be in/next to shower. Or I fitted an 'inline' fan hidden in ceiling, so away from shower.
inline fan in the ceiling would need access so may/may not be possible. kingspan can be cut to be a tight fit and then any gaps filled with foam, stays up better before its boarded. insulated plasterboard a good idea as well if there's enough ceiling height.
Thanks guys, reroofing wasn't on my to do list as it all seems water tight, and I would have to get a firm in to do that.
I have about 18cm from the current ceiling height to what looks like a ply layer, presumably this has the felt / tar waterproofing on. So I have some space to play with, though increasing the ceiling height maybe nice as I'll be raising the floor 19cm to level it and it will start to get a bit small compared to the rest of the house.
With kingspan do you need to leave a void? Or could you glue it straight to the ply and the glue the plasterboard to it? Presumably if/when I take the ceiling down i'll find some joists to screw the plasterboard into.
What a pain in the ass.
I don't think an inline ceiling fan is doable as I can't vent it to anywhere (hence why cowboy didn't bother), it will need to go out of the wall directly to the side of the shower so will take some spray.
In terms of cost, its not a huge amount as its a small room, 2 sheets of kingspan and plasterboard would cover it.
yeah you need a void between the insulation and the roof, with kingspan cut it tight and wedge it up flush with the bottom of the joists.
there should be vents either end of the roof to allow air flow between the joists so you need that void to allow the air flow.
Mine has some sort of screed on the main bathroom floor and a tray in the shower area. All walls were waterproof board (might have used a different board in the shower) and then he appeared to use some sort of waterproof duck tape on all the joins / corners. Then tilled over, then used clear sealant at all the joins. I'm really please with it especially the tiled wetroom tray. My tip of useless/useful info, Ideal Standard do a shower controller that is slim enough to fit inside a stud wall (see pic)
[img] 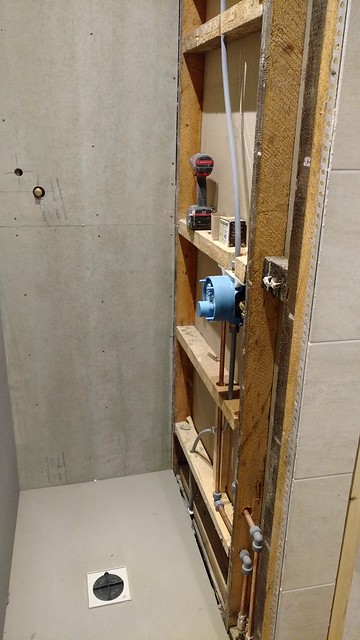 [/img]
[img] 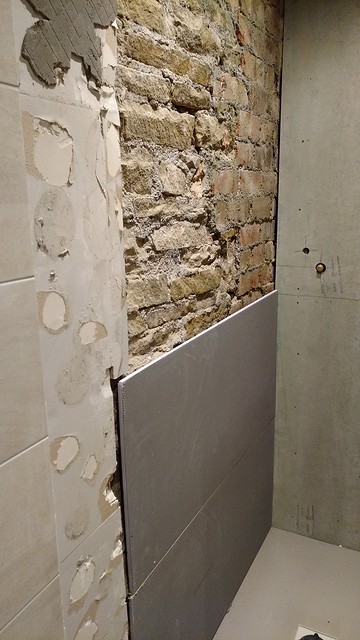 [/img]
I've done 2 bathrooms at home with Wedi board, quite easy to use. you need to use their formed shower base, and take care installing, tape the seems with special tape and waterproof tile adhesive. Good instructions on their website. Needs tiling over, but I quite like the tiled floor all the way through rather than and acrylic shower tray. Seems quite similar to BaNana's above. Provides quite good insulation itself.
Wedi
Seems quite similar to BaNana’s above.
Yes, I was trying to remember the brand he mentioned, it was Wedi. Although, in so much as he said he uses a slightly cheaper alternative that is just as good as Wedi (the industry benchmark brand I presume)
thanks guys. photos look good up there.
found another horror live shower feed rolled up underneath the bath. I've disconnected it now. I know the bathroom was refurbed in the last 4 years but somehow still has old wiring colours. must have reused it even though putting in a new light, fan and moving the switch.
wedi board is basically same as the stuff i linked to, there's quite a few different makes. use it on the walls instead of plasterboard as well then there's no need to tank all the walls.
nice and easy to cut and screw fix using the fixing washers. just done a job where the bloke said it was to expensive and got hardiboard instead for the walls, overall will have cost him just as much with the extra labour of fitting the hardiboard. its not nice to cut unless your cutting a decent size piece of a board.
After seeing many wet room woes. I would recommend a shallow tray instead of a wetroom, easier to install clean, less to go wrong and easier to drain. they do black and grey ones now.
Much easier to clean as well
Don’t forget to think about access points for drains etc. If something gets blocked up you want to be able to get to traps or rod a pipe without ripping out the floor or the ceiling
I got the impression a trap in a wetroom tileable tray is designed so you have access and can remove it all from above to get to the internals and pipe.
just been watching the wedi installation vids makes it look really easy. They even do a easy fit kit which the tray sits on, which given I want to raise the flood height is very useful. it did cross my mind that it seems very permanent and any issues would mean destroying it. given I seem to rarely able to get a compression fitting to seal first time I'm a bit worried about it. seems no way of testing drain is fully sealed before cementing it all down.
it's a bit pricey.
I'll be taking all.the tiles off and could do with the insulation so I think I'll be using tilebacker instead of plaster board.
DT78
Something else that's just come to mind from personal experience. If your wetroom and/or shower area doesn't have natural light, you need to make sure you get your lighting positions right. If you intend any sort of largish overhead showerhead it might cast a massive dark shadow from badly positioned down lights. All depends on layout etc, but caused me a problem so had to have extra down lights installed
looks like there is a local stockists for the board you linked Bigfoot I'll pop down there when I get a chance for some costings.
is it possible to tun the UFH under the tray or is that a bad idea?
thanks B.A.nana on to thinking about lighting. luckily / unluckily there is a large window which means natural light is ok, but limits where I can position the shower.
was planning on.using hue light strips but turns out they need a plug. if I'm redoing the ceiling I have a blank canvas.
another question if you have wall lights is there a easy way to install the cable, board then tile? I suppose you have to drill holes in the tiles before you fit them, feed cable through then glue.
I just had ceiling spots installed by an electrician, rated for wetrooms. Also he relocated the light switch and fan isolation switch outside the room (can't recall if that was a regs requirement for wetrooms, or he just did it for another reason)
UFH can go on top of the tray but its not something i've ever done.when your stood having a shower the tiles are covered in hot water so that takes the chill of them anyway. also you can't cover the wires in self levelling over the tray although you could screed over them with tile adhesive instead.
its as you say with cables, drill the tiles and feed them through as you stick the tiles on. if porcelain tiles get some decent diamond core bits for tiles and drill slowly with water, it can take a while to get through.
We live in (rent) a house with 4 wet room bathrooms. 1 is unusable for its purpost as the floor is like an ice-skating rink.
Make sure the flooring is suitable.
We were going to do a wet room ina similar sized en suite but were advised not to as it isn’t big enough and water would inevitably end up everywhere we didn’t want it. Instead we went half way with a slimline tray (as mentioned above) and a full length screen to stop spray ending up everywhere. The whole thing is on one level (the tray is only about 28mm IIRC and is a composite so very heavy duty - ie no plastic flex).
We were going to do a wet room ina similar sized en suite but were advised not to as it isn’t big enough and water would inevitably end up everywhere we didn’t want it.
The jury is still out for me, like the open plan, but get fed up with water all over. bought a long handle shower wiper but am now thinking about a glass door at the shower, which kind of defeats the original desire, but hey ho.
Everyone I have ever known who has had a wet room has said do not do it.
They look great when new, but over time they become more and more difficult to keep clean and end up looking just a bit manky.
By their nature water gets every where so end up having to dry everything.
Just get a walk in shower, all of the practicality without the hassles.
Fits level with floor tiles like this
And personally I much prefer walk-in showers with an open side rather than cubicles – mainly because I hate the cold sensation when stepping back out of the cocoon of heat you get in them.
If open plan (incl clear glass screened) I'd personally prefer a tiled shower floor that matches the whole floor, but it's all about personal tastes. Having said that, I've watched a pro tiler tiling a Webi style tray and it looked like a fine art and could easily look like a dogs dinner if even slightly out. The end result looks brilliant tho and it may well be quite straightforward with the correct tools, I wouldn't be up for doing it tho.
[img]  [/img]
the easiest way to tile the trays is when someone wants a mosaic or pebble shower floor as you don't need to cut the angles.
normally just set the floor out as a whole and then do the end and angle cuts for the tray with the wet saw. the saw blade width out of the tile gives you the grout joint.
i did one once that just wouldn't work out with the whole floor so i had to do the tray separate from the floor and made a feature of it with the way i layed the tiles. it took some working out and helped it was a big tray.
quite often do them as a wet room and then put one piece of glass in just to keep the bulk of the shower water over the tray. best option if its a smallish room.
Thanks for the feedback, I'm starting to lean towards a shower tray now one of those slate grey wet room look a likes, and tile up the rest of the floor / walls. It won't look quite as good as a full wet room but I'm a bit nervous about having a go for my first shower. We are going to have a dividing glass screen either way
When it comes to tiling, I've done one small, ackward cloakroom, cutting round central heating pipes, soil pipes and things like curved bit of wall and a protruding windowsill. I found it far easier than I expected, took my time with the prep/ levelling and templating. Only redid one tile as it could have been better, but tbh it was perfectly acceptable.
I found the wet cutter I bought off screwfix brilliant, only negative was it was a bit messy and noisy in use.
I've just spent £1k ordering half of what I need, not cheap this DIY. Still got to decide on shower/wet tray, tiles, lighting and buy all the tilebacker / insulation. I reckon £2k all in, which is more than I hoped, but that will be a total tear down, reinsulate, rewire, replumb. Knowing my luck I'll finish before it gets cold and well get a roof leak.
me again, another question for those with experience. pocket doors. is there a product out there which is kind of pre boxed and can be "slid" into an open cavity?
the wall was an external, so is load bearing on the main roof so i expect doesn't have a big enough lintel to open up the doorway, fit and the board back up again.
alternatively how good are those sliding doors that fit on a external sliding track? are they able to provide a decent seal to help with cold / humidity?
haven't a clue on the door side of things but your wet saw may have been good on ceramic but the cheap small ones really struggle if you try and cut porcelain or natural stone tiles. mine flies through anything and makes hardly any mess but costing over £750 isn't really an option for one bathroom.
Me again,
Underfloorheating - has anyone done this DIY? how likely are you to cause damage to the matt when you install? How robust are the mats?
I'm quite happy with laying the insulation and using levelling compound and tiling and even adding in a 13amp spur off the upstairs loop, just a bit worried about the mess if you finish tiling and find it doesn't work.... should you lay it, they wire it in and test it all works in situ prior to the levelling compound? Can you walk on them to do the levelling? Been watching how to's on youtube. Is the warmup replacement guarantee if it gets damaged in installation worth the extra cash?
I spent quite a long time on that ambient electric link, and whilst a good price for the matting and thermostat it is quite expensive for the marmox insulation and other bits and bobs.
And a question for anyone whose removed a ceiling before. From reading I believe there is a small possibility the original plasterboard may have had asbestos, as it was put in plaster. Is there a way to remove overboarded plaster with the least force (by that I mean not just smacking it with a hammer). I could leave it as the current ceiling is in good shape, but it means I can't insulate the flat roof, unless I pay £££s to have the whole roof replaced.
And based on reading / feedback we've gone for a shower tray with a view to build up the floor to the same level. I still plan to lay tilebacker and seal the whole floor area as I need to raise it anyway, just going for a tray now to be simpler if there are any maintenance issues.
Haven't had it installed yet (and am not going to DIY it...) but I'm getting Schluter Ditra underfloor heating in my bathroom (and one bit of wall instead of a towel radiator) and the install stuff for it just says to test it as you go. I can't see how you can fix it once the screed or whatever has set?
I don't think you do fix it, I think you have to dig it back out with massive faff and expense hence why I'm starting to think about getting it fitted for me to pass on the risk. Though it must be pretty robust or it wouldn't be fit for purpose
That ditra stuff isn't cheap - any reason why you went with it over a brand like warmup or even no brand kit?
It didn't seem much more expensive than other stuff I was quoted for (Comfortzone etc.) and I don't need much of it (5 sq m I think) so went with them as they're the only ones that seemed to specifically mention wall heating to (although I don't really see what would prevent you doing it with other makes). Tileflair stock it which is handy to as local (although they mentioned they sell it as trade only so don't apply trade discount to the quoted prices...)
i test the UFH for resistance with a multimeter, it should tell you what the resistance should be. test it before laying it, before self leveling and again before tiling. i must have done over 100 and never had a problem.
its ok to walk on it to put the self leveling down carefully and be careful troweling out the self leveling.
i would just go ahead and put on a dust mask and pull the ceiling down, i've heard about people saying asbestos could be in plaster but i've never heard it officially. if it is i'm ****ed as i've pulled 100's of ceilings down both plasterboard and old lath and plaster and years ago never even bothered with a dust mask on the plasterboard ones.
Looks like you can buy a cheap tester that rings an alarm if you damage the wiring
http://www.theunderfloorheatingstore.com/floor-damage-sensor
Decent prices on tile backer there too, though the mapei leveller is cheaper on screwfix. Pricing seems to be a lottery with all these sites.
I think it is a very low risk on the asbestos, but you read the horror stories, I'll probably suit myself up and cover the room and then bag it all in line with HSE guidance. If it was on the surface it is bound to the overboarding, I'll try to remove in big slabs with a pry rather than take a saw and hammer to it
i have seen someone use one of those but for the same price you could get this
cheaper than the one i have was but probably just as good unless you where spending a lot on one.
if you have somewhere near that stocks tilemaster i use this if i don't need more than 15mm
flows well and sets quick, although last month on a really hot day i wish i'd used there slower setting one
Luckily I already have a multimeter, and just reading the installation guide which specifies the resistance to look for. I might go for the little alarm though as it would be good to know if you break the circuit straight away.
The bad news is it looks like stuff is only guaranteed if fitted by a certified electrician - I suppose I could do the donkey work and get the sparky to connect and cert along with the lighting and fan. At a guess half a days work? £100 - 150ish?
I'll have a look at that leveller - I've used the mapei stuff on the cloakroom and it was pretty easy to use
yeah, i never touch the connection side of it, just fit the wires back to the box where the stat is going. never like going on a job where the sparky has fitted the UFH as they never secure it properly so i then have to go over it again sticking it down properly so it doesn't float up in the self leveling. hot glue gun comes in handy for that being careful not to touch the wire with the end of it.
haven't got a clue what sparkys charge, a mate does all mine at home and on jobs i leave that for the customer to sort out.
the mapei stuff will be ok, products of there's are generally good, just the tile shop i use stocks tilemaster products so that's what i use.
Still amassing all the materials, its a costly business.
Is there a usual pattern/number for downlighters in bathroom ceiling? currently family bathroom which is a bit bigger has 6 but unusure of wattage
I have read on forums there are now downlighters which don't require gaps with the insulation but my google skills are failing me - anyone used these and could link them for me?
If not the best I've found is these shallow downlightd which need 50mm clearance
https://www.screwfix.com/p/enlite-fixed-low-profile-led-downlight-780lm-white-12w/8595p
With all my UFH installs, probably 20-30 a year, I lay all the cables and matting, conduits and probes and connect up then get my friendly electrician to check it, test it and supply a cert. He charges between 150-200 usually but theres normally lighting/fan to do also, so 2 circuits.
I've not used an alarm, and never damaged one, as long as you don't mishandle them and work neatly they are very hard to damage. I test resistance before and after laying. having said that, it's always nice to turn it on for the 1st time and feel the floor warm up evenly!
I prefer to lay all the matting/cables then tape it down well, then do a tight coat of rapid level 30 levelling compound over the wires. wait for it all to set up, then do a proper levelling layer over the top of that using the spiked roller to finish to get it all nice for tiling. The 1st coat over the wires always leaves a wire or piece of mat that floats to the surface slightly.
Also worth thinking about at this stage is how you are going to transition from carpet, if you have one to tile. you end up with a good old change of level normally so std thresholds don't work so well. I use https://www.nationalstairnosings.co.uk/reducer-transition-for-7-26mm-floor-heights/ but they ain't cheap, or otherwise I plane up a bit of hard wood to make a ramped threshold.
thanks for that hadnt thought about texturing the co.pund to hrlp with tiling.
re the threshold I've actually got a 19cm step/drop into the room so I'm planning on raising the floor level as much as I can. Gone for 50mm marmox tile backer and will prob build up a subfloor under it with chipboard or ply not sure yet so hopefully the floor will be plenty insulated.
I have a few other bits and bobs for a sparky so probably try and get it all done at the same time
As an architect I have to say I would never recommend a wet room unless there was absolutely bugger all space (and I mean bugger all) or you were able to spend a fortune on a fail safe installation done by professionals, i.e not your regular installer. They are all very cool sounding and everything but have many disadvantages compared to a more 'normal' installation.
hadnt thought about texturing the <span class="skimlinks-unlinked">co.pund</span> to hrlp with tiling
the spiked roller smooths the compound, it doesn’t add texture. Self levelling is a myth, most levelling compounds need good trowel work then a spiked roller over them whilst wet to get the air out and to smooth off properly.
also important it to prime the surfaces before working, especially on cement boards as they will suck the moisture out of the compound or adhesive before it’s had time to work properly.
Ah, I understand, big learning curve. I've used mapei primer on the last floor I did with the levelling compound and it seems to be okay (well 2 months old so early days). I did do a bit of trowelling to get it across the floor, I assumed I'd mixed it a little too thick.
Where can I pick up a spiked roller? Is it called something different as its not appearing on good old screwfixes search.
When fitting a shower tray. Instructions say to lay on min 18mm ply but not what to fix it with for a suspended floor. It says cement for concrete. So if it is not specified would sealant be adequate? I plan to build up the remainder of the floor so its basically level.
I also can't see how even with a tray you can make the trap accessible? If it leaks, you are going to need to remove the tray, and if its cemented then that's not going to comeup in one piece.
(I've got a 28kg 1200x800 resin job)
unless you raise up the tray on a plinth or legs(which looks shit) the trap will never be accessible but thats never been an issue in the loads of bathrooms i've done. if its on an upstairs floor access is possible with a hole in the ceiling below.
getting a tray up in one peice is the least of the issues once the job is finished considering the tiles are also down onto the tray.
different trays say different things about fixing, one in my ensuite actually said it could be fitted with silicone but i'm not keen on that although a lot of plumbers do. most say bed on sand/cement, i used tile adhesive on mine, either will sort out the level of floors if they are out.
If you drop spiked flooring roller into google there’s plenty of options, it’s not an essential piece of kit but it helps.
re the shower trap, basically you can’t make them accessible. I make them up and test them plenty before installing the tray, if it helps, ground floor showers hardly ever leak, only upstairs ones 😉
you should lay the tray on a sand/cement mix according to instructions, but I always use tile adhesive as I have it in the van most of the time. Sand/cement is cheaper if you’re buying it.
As an architect I have to say I would never recommend a wet room unless there was absolutely bugger all space (and I mean bugger all) or you were able to spend a fortune on a fail safe installation done by professionals, i.e not your regular installer.
TBH I assumed the OP didn't really mean a wetroom in a true sense, rather that they wanted it all fully tiled floor to ceiling with joins / corners sealed to a wetroom standard so they could effectively have the shower more open plan without worry whilst still having the shower screened to contain most of the water. 3.7m2 is a reasonable size bathroom in my book and I doubted they'd be wanting to spray water everywhere.
Probably worth saying that this is what I did and I'm now having a door put on the shower. OP If you are intending open shower then consider the type and orientation of your floor tiles and where the water might run. You'll be surprised how far the shower water can spray and then spread. I went with narrow wood effect plank tiles and find that water accumulates inbetween the tiles in the grout groves (lowest point) and then makes it's way across the bathroom in the grout groove. Despite wanting a wetroom finish and open shower, I didn't intend water spreading across the floor everyday. or I came to realise it wasn't particularly desirable.
Yes you are right always was going to have a screen. was planning on a former but have now gone with a tray based on feedback. I plan to raise the floor up to get as level as I can.
I've gone for a 1200x800 tray with an 800 screen with a 300 flippy return thing bit like a mini door which I can choose to fit or not. I've also got the added complication of a window partially in the shower area so have a 400 screen I need to find a way to cut down (hoping a local glass company could do it for me....coulc be wrong...)
I plan to tank the area all round the shower. there is evidence of water ingress from the old bath / electric shower.
I also went for the electric flooring recommended above and marmox board. expensive and possibly over doing it for a shower room but I'd rather it worked.
and just to make sure it's about as hard as it can be I went with a concealed shower with body jets (just been reading up on pressure loops) and a concealed cistern wall hung toilet.
I plan to go for fairly large format marble effect tiles as I'm hoping it will make the room look bigger. I really like the wood effect but think they might make the room seem smaller.
i was going to mirror the entire top section of the wall but went for a demister / led all in one unit. might see if I can set it into the wall so it's flush
not decided on lighting and won't make a call on the ceiling insulation till I take the ceiling down.
I've also got to mount the soil onto a cast iron waste over an asbestos roof so no option to replace or move at this stage.
lots of problems to solve!
Why not put a stud wall in for the pocket door? Takes up little more room than a external sliding.
that's not a bad idea. it would mean on side of the door would be further out than the other but it probably wouldn't notice. hmmmm.
So, 2 days in and the strip out is complete. Bit knackered tbh
Heres the progress, suite out, all tiles and adhesive stripped, ceiling down and joists cleaned up:

(still can't work out how to embed)
The joists are 5 x 2 at around 33cm apart. So I'm going for 50mm kingspan which should give plenty of space for ventilation and hopefully I will notice the difference vs no insulation at all!
uncovered a chipboard vent hole in the wall where the shower is planned to go, behind this is a large airbrick. So I plan to build a vent from a ceiling fan to the hole and through to the airbrick(this will be boxed in as I've gone for a concealed shower. It will be a short run, but have 3 90 degree bends - hopefully this will be fine, well its better than what was there before.
The roof timbers look in good nick, but some blackening in places, possibly old water ingress. Certainly ceiling 2 and 3 were in good nick when I took them down. Original ceiling was a bit mouldy but still solid.
Whilst the roof is exposed is it worth painting any sort of waterproofing on the underneath ? i was expecting sheet ply to be honest not what looks like floorboards!
I also need to work out how to get rid of all the waste - I have a bathroom suite, 3 x 3.6m2 of plasterboard and approx 18m2 of tiles. Any idea if a hippo bag would do it? I have loads of people round in a few days so ideally need to get it shifted quick
Couldn't get the sheet materials delivered until the 15th so other than a bit of prep work the projects on hold till then