![]() You don't need to be an 'investor' to invest in Singletrack: 6 days left: 95% of target - Find out more
You don't need to be an 'investor' to invest in Singletrack: 6 days left: 95% of target - Find out more
[img]  [/img]
[img]  [/img]
jeez, how much did that cost?
I bet you could build another shed for the price of that. 😯
It will be used to run the tub and sauna, both with 32amp rating plus other electrics in the shed. It is over specced so I can use the new consumer unit to run stuff in the garage more safely as the present unit trips quite easy.
Future proofing and it wasn't that much more than 16mm which was just about okay for the tub and sauna
why not us a wood burner for the sauna? Doesnt have to be in the room, could be out in the main bit with some pipes and a heat exchanger in the sauna room.
That would be the true STW way but, with WCA's past form, I can only see that ending badly. Mind you, the amount of electricity going down that new cable would lend itself to a pretty scary outcome.
You are getting someone else to put that it, right?
I am getting a qualified and registered sparky to connect the house end, the consumer unit in the garage and the wiring to the isolator switch and the tub.
Once that is done we get the tub craned over the garage, fitted and commissioned.
Then I can finally get the rest of the walls and the roof up and make the place water tight.
Then we can get the rest of the wiring in place.
So slow at the mo
Make sure you get pictures of the tub being craned over (just not from underneath it 😉
Make sure you get pictures of the tub being [s]craned over [/s] christened.
[Wrong
Wrong
Wrong
Wrong
Wrong]
Not much of an update but a reminder that the shed gets craned over the garage tomorrow which should give some more interesting pictures.
Anyway, here is the new garage supply leaving the house
[img]  [/img]
Here it is buried under the garden. The white conduit is for the garden lights that were fitted ages ago. You can't actually see the cable as it is buried but it does give you the chance to comment on the leaves, uncut grass and unkempt borders
[img]  [/img]
Here it is coming into the garage and into the new consumer unit
[img]  [/img]
Out of the garage and to the isolator switches for the tub and sauna. The cable out has been left on the reel so we have lots of spare when the tub is dropped in place
[img]  [/img]
[i]Anyway, here is the new garage supply leaving the house[/i]
I love the label: "New Garage Supply" 🙂
Truck turns up
[img]  [/img]
Tub turns up
[img]  [/img]
Tub moved to the bottom of the drive ready for lifting
[img]  [/img]
Reversing the crane onto the drive
[img]  [/img]
[img]  [/img]
[img]  [/img]
[img]  [/img]
[img]  [/img]
[img]  [/img]
Stabalise the crane and unfurl the arm
[img] https://lh4.googleusercontent.com/Vkhki9c-2MhCoScSUsAycW-GvLF9pATE9fbIeF2F7FQ=w1358-h764-no [/img]
[img] https://lh5.googleusercontent.com/5PiGbHo2eK2EJCBxm8aFxo9g072RRCEZkbSsZLvndJI=w1358-h764-no [/img]
[img]  [/img]
Start lifting the tub before realising someone put one of the straps through the trailer and that was lifting too
[img] https://lh4.googleusercontent.com/NXAWq-JLI44A-U6gvOEIPOXfKrhR4q6nt0dCx3pGFEo=w338-h190-p-no [/img]
All clear now so up and over
[img] https://lh6.googleusercontent.com/ogRmW2b6DSy4J4bwo66ByouyCJRIXwErT3ttaLwkKgI=w1358-h764-no [/img]
[img]  [/img]
[img]  [/img]
[img]  [/img]
[img]  [/img]
[img]  [/img]
[img]  [/img]
[img]  [/img]
[img]  [/img]
[img]  [/img]
[img]  [/img]
[img]  [/img]
[img]  [/img]
[img]  [/img]
Crane leaving
[img] https://lh4.googleusercontent.com/jVyYWWgRxCKbNraGxST8kt_b-urFgKysVj5s8T_zo7o=w338-h190-p-no [/img]
[img] https://lh5.googleusercontent.com/Wl1-m6dOKoFywasIw_le30X148SCBArw5wWCaIxs2Mk=w1358-h764-no [/img]
[img]  [/img]
[img]  [/img]
[img]  [/img]
[img]  [/img]
[img]  [/img]
Cool set of photos!
When do the hookers and coke turn up?
'WCA Headquarters'? 😆
[i]WCA Headquarters'[/i] I couldn't afford a hollowed out volcano
😯
Was that driveway designed with getting an HGV down it, in mind?!
that sequence makes it look like you've had to bend the lamp post and gatepost 😀
wow
[i]Make sure you get pictures of the tub being craned over[/i]
WCA doesn't disappoint!
Another +1 for the WCA signage.
(Also: professional driver/crane-ists earn their money.)
100
Impressive skills by that driver
I'm sure the neighbours will be delighted when Dirk Diggler and his chums turn up for the opening ceremony 🙂
Are the Kegs of beer for the coke and hookers party? when do we get our invite?
Are the Kegs of beer for the coke and hookers party? when do we get our invite?
I can sell you front row tickets for £250 + £60 booking fee.
Paypal gift only.
Work meant I didn't get started on the shed structure until later than I wanted. I was happily working away when it started to rain. It was only when I got the tarpaulin over I realised it had gone all dark and it was time for beer.
[img]  [/img]
Hot tub in place with the cover over. Side wall now in place and large gap on the left where the sliding door will go
[img]  [/img]
Sauna in structure is good to go. Roof is deliberately lower than the main shed to intensify the heat inside.
[img]  [/img]
All wrapped up for the night (who ordered the wrong size tarp?)
[img]  [/img]
Finally dawned on me its a cunning plan to correct the errors made in youth.
What did you do when you finished work today?
I noggin'd my shed roof
[img]  [/img]
[i] its a cunning plan to correct the errors made in youth.[/i]
I have never made errors.
What has happened to me is a conspiracy by the Gods!
Any update for the weekend?
Good progress for a evening project.
I think you probably need to ask Southampton General Hospital that .....Any update for the weekend?
Sorry - bit slack on the updates as I have had family down for the weekend. Managed to get the board for the roof down and some of the cladding completed.
[img]  [/img]
[img]  [/img]
Not sure how one piece of cladding grew between being cut and being fitted but there is a bit of trimming to be done
[img]  [/img]
The green stuff is vapour wrap to stop the dampness getting in. I will need to fit this to the inside too to stop the steam escaping out.
You might also notice that the tricky last length of cladding beneath the roof hasn't yet been fitted. That should be fun as it involves cutting one 4.8 metre and two 3.6 metre pieces of cladding along the length and along the grain and ensuring a flush fit with the roof board.
The roof board then gets trimmed flush with the cladding and the rubber roof and edging is fitted.
Hoping to order the double glazed glass units today. Not looking forward to paying for 9 big windows though.
You might also notice that the tricky last length of cladding beneath the roof hasn't yet been fitted. That should be fun as it involves cutting one 4.8 metre and two 3.6 metre pieces of cladding along the length and along the grain and ensuring a flush fit with the roof board.
Borrow a table saw....
One here if you need it
Just come in for a rest after sawing the long lengths and Now I read this 🙁
Rubber roofing material
[img]  [/img]
Unroll and let it relax for 1/2 an hour
[img]  [/img]
Water based glue for the middle, evostick stuff for the edges
[img]  [/img]
Rubber laid and needs the edging fixing
[img]  [/img]
Can only admire your speed of work sir, well done.
How much was the rubber roofing?
About 350 for 3.6 by 4.8 roof with all eding and flashine and glue etc
rubber roof dot com
Their website is good AT WORKING OUT WHAT YOU NEED. pHONE AND ASK FOR A DISCOUNT. i SAve £60
If you can get some pics to show how you've gone about doing the edging that would be great ta.
granny_ring - MemberCan only admire your speed of work sir, well done.
Indeed - took me months!
Cripes! I'd have probably only had the holes dug for the footings by now! Great progress.
Took me about 6 months of half hearted weekend working to get rid of our pond (half sunken, half raised - about 4x2m in total), fill it in and stick some cheap slabs down to meet the existing patio!
I had better not show this to the Wife, or it'll confirm her suspicions that I do things incredibly slowly!
Limited daylight is slowing things down. Managed to seal the roof against the garage wall. Apply glue.
[img]  [/img]
Hammer fingernail
[img]  [/img]
Let the glue go off
[img]  [/img]
Stick it to the wall and cut neatly along the cut in the wall for the flashing to slot in
[img]  [/img]
Screw the flashing plates over the top
[img]  [/img]
Not too happy about the look of the corner seal but it seems to be set tight
[img]  [/img]
Realised it was a bit dark and came in for a beer
[img]  [/img]
More tomorrow if time and daylight allow
Managed to get the edge trim on during a brief lunch break.
[img]  [/img]
[img]  [/img]
Disappointed to see some pooling on the roof but pleased there are no leaks around the edges or corners. I did actually run trimming along the whole length of the roof, this is a part way through picture.
The next big tasks is to get the door runners in place and the doors hung. Not sure I am looking forward to that.
Is the roof pitch the same as the sketchup model on p1?
I'm amazed there's pooling at that angle.
The pitch is from sticking 30mm feathers on top of the rafters so it is 3cm drop over 3.6m which isn't great but it was damn tight to get it under the roof edge on the garage. Things sort of evolved from the Sketch up diagram when reality kept getting in the way.
🙂
Yup - I know that one 🙂
Too dark for photos today but :
[b]So Far[/b]
Roof finished.
Walls Finished.
Exterior treated with stain/preservative to get rid of the green tinge from tanalising.
Both sliding door rails fitted and tested.
Oak face ply for interior walls purchased and cut to size.
[b]This weekend (hopefully)[/b]
Door interiors paneled
Door exteriors clad
Doors hung
Wall next to the short door clad
Wall next to long door clad apart from where sparky needs to run the wires for sockets, although I might do that anyway just so I can get the wall finished.
That will leave two side of the shed finished, two to be plaster boarded and skimmed, the roof to be insulated, plaster boarded and skimmed and the sauna to be clad and wired up when the bits arrive from Estonia + the flooring to be sorted.
Remembered to take one picture showing the sliding door before I clad it. Both doors hung with interior panels fitted and yacht varnished. Small one clad and big one ready for cladding in the morning
[img]  [/img]
Also first time with 4 people in the tub. Discovered that you need a lower water level with more people in there. Will need to waterproof the floor.
The exterior is finished except for the cover boards over the door slider rails, some timber to cover the door edges and fitting the window glass. Glass doesn't arrive until the back end of next week and I am working (job work, not diy work) all week so I am not expecting much progress until next weekend.
Anyway, here are photo's and please imagine that the green vapour sheet isn't there.
Small door closed
[img]  [/img]
Small door open
[img]  [/img]
Large door closed
[img]  [/img]
Large door open
[img]  [/img]
Very nice!
(and fast!)
BTW - is that pampas grass on your front lawn? 😉
[img]  [/img]
you appear to have a little britain character watching you from upstairs!
Also first time with 4 people in the tub
😉
[img]  [/img]
lol
WCA - any chance of showing how you've done the sliding doors?
It it all just off the top rail?
And how does it slide past the brackets?
The sliding doors are the bit of the design that I most pleased with. They slide easily and the windows line up with those in the walls so when they are slide back you don't see them.
The whole door is just hung from the track on a set of wheels. Okay up to 200KG for this set but they do bigger ones if you need
[img] 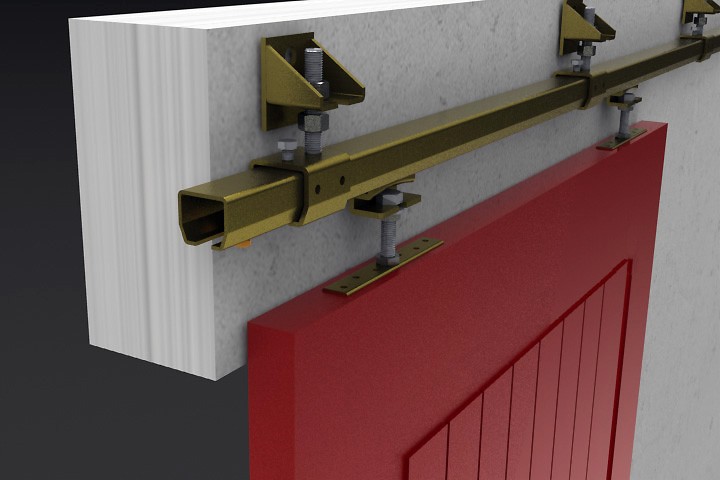 [/img]
I will be putting a cover over the top of the rail when I get a chance. Partly to hide it but mainly to protect it from the weather.
Why doesn't that cladding line up on the corner?
It does line up until about half way up when the t&g hit a hidden nail and didn't quite seat properly. Unfortunately I didn't notice until I got to the top. All the nails are ribbed so I would have to destroy all the cladding to be able to remove in.
With the doors shut the cladding all lines up so it only shows when both doors are open and only from the angle of the photo so I decided I could live with it.
As an aside, anyone here want to buy some armoured cable? I have about 7m left over.
Ta for the info - looks good.
Probably not suitable for my garden office though.
I am pleased with how well they fit but I definitely wouldn't recommend them for a garden office.
In the Love Shack you want lots of fresh air and open doors while you are sat in the sex pond.
Once you have left the building you want to be able to close it but still let lots of air flow to help reduce condensation and damp
Is there a planned sign on the outside engraved in slate "WCA Sex pond"?
Just remember to skim the surface off before use...
ebay for your cable - someone will have it
Might take the cable off you. Need to measure outside first. How much are you looking for?
There can never be too many shed building threads on STW.
Hugely impressed by your truck drivers skilz. AAA Coach drivers take note.
Space monkey: I will measure up how much i have. Price will be normal price per metre minus the STW mates rates deduction.
Just planning the wiring for the shed and thought I would check with you lot that I am going to put the right wires in the right place.
Requirements
1) A pull swith by the door to turn on/off two wall mounted lights
2) A double switch by the sauna to turn on a ceiling light and the sauna light
3) Three double plug sockets mounted around the wall
4) The sauna and hot tub are not shown on the diagram as they are sorted.
[img]  [/img]
a) I have the three plug sockets daisy chained together with no return. Is this okay?
b) I want the two wall lights to work together but separate from both the sauna lights and the ceiling light. Will it work as I have shown it?
c) How do I do the T in the wire to go separately to the 2 switches?
A) some sparks prefer that arrangement but you will need the right size cable. Probably 4mm. It's called a radial if you want to research.
B)looks ok
C)lots or ways. run two wires all the way back to the CU. Daisy chaining from one switch to the next. Use a junction box (needs to be maintenance free if hidden)
Weather wasn't great today but I made some progress.
We have electricity
[img]  [/img]
We have lights
[img]  [/img]
We have shitty weather
[img]  [/img]
But most importantly, we have (two) windows in!
[img]  [/img]
Big thanks to Hammy for the loan of the table saw, window sills were much easier. The panes are only temporarily fitted at the moment but will be siliconed in with proper interior window sills tomorrow
[img]  [/img]
Looking good. When are you christening it?
WCA. Just to say I have enjoyed your thread, thanks for sharing. I hope you have many a good evening in the Tub.
Just out of the tub. Lovely and relaxed.
I am now going to build a router table so I can make nice edges on the inner window sills
Given your forum name, those sockets look quite close to that tub....
Top work though, impressed with the speed.
All sockets are well away from the splash zone and mounted higher than normal to minimise risk. There is a waterproof socket behind the tub but that is fully sealed.
Great job. More importantly, what was the black car on the road?
How are you going to stop the windows getting steamed up, condensation surely will be horrendous?
[img]  [/img]
My day car and my toy car
1 = SLK AMG with extra supercharger and tuned to 585bhp
2 = One I designed and built myself loosley based on the 1957 Maserati 300S
Slide the doors open and the steam just disappears. It was lovely tonight with just the aqua-marine LEDs in the tub providing the light and both doors wide open.
Thankfully we are not overlooked and there is a strip of woods behind us so nice privacy.
Green vapour sheet has now gone so both side on that corner are fully open
[img]  [/img]
All windows glazed and exterior completed except for door rail cover.
[img]  [/img]
Doors open and the 'nearly finished' effect is ruined but the sauna and wood are arriving tomorrow
[img]  [/img]
And something you lot are unlikely to ever see, the view from the tub
[img]  [/img]
2 = One I designed and built myself loosley based on the 1957 Maserati 300S
Sounds much grander than BMW Z3 😉
And something you lot are unlikely to ever see, the view from the tub
You do know your web cam is freely accessible on the internet.....
[i]Sounds much grander than BMW Z3 [/i]
It is common practice for the master car designers to use slightly less glamourous donor vehicle...
🙂
Although I really did design the bodywork before I selected the donor vehicle. I chose the BMW for the 2.8 Straight 6 engine mated to an auto box (injuries mean I only drive aiuto's now). Build thread here if you are interested to see it develop from MS Paint concept picture to the show car you see : http://www.madabout-kitcars.com/forum/showthread.php?t=4253
[i]You do know your web cam is freely accessible on the internet.....[/i] That points towards the tub, not the garden 😉
Sauna wood and rest of the stuff should be arriving today. The plan is something like shown below.
[img]  [/img]
Yes, I know that you open the door outwards and walk into a bench but it is a removable bench and as most the time there will only be one or two people in the sauna it will be put on top of the other bench. If we get more people and want to use the second bench then we simply slot it into place.