![]() You don't need to be an 'investor' to invest in Singletrack: 6 days left: 95% of target - Find out more
You don't need to be an 'investor' to invest in Singletrack: 6 days left: 95% of target - Find out more
The base of our shower leaks where the grout has gone and I'd like to replace it with a one piece floor of if some kind. The rest of the bathroom is fine and we don't want to change the glass wall panels. Currently thinking of either custom sized corian tray made to the exact dimensions (which are helpfully not a standard tray size 😜) or a cuttable tray. I'm not keen on the idea of multilayer tanking seems and we don't have enough spare tiles anyway. Any suggestions of good manufacturers for either or ones to avoid?
Getting someone to do the work or even look at it has proved a pain so at the moment it is looking like a DIY job (I imagine it's either not a big enough job or more risky than a full refresh). Should I be aiming to get the new tray under the edge of the glass panels if possible? The short raised side I'd like to redo into something that can be removed as currently there is no access to the plumbing.
Floor size is 1460*950mm.
[img] 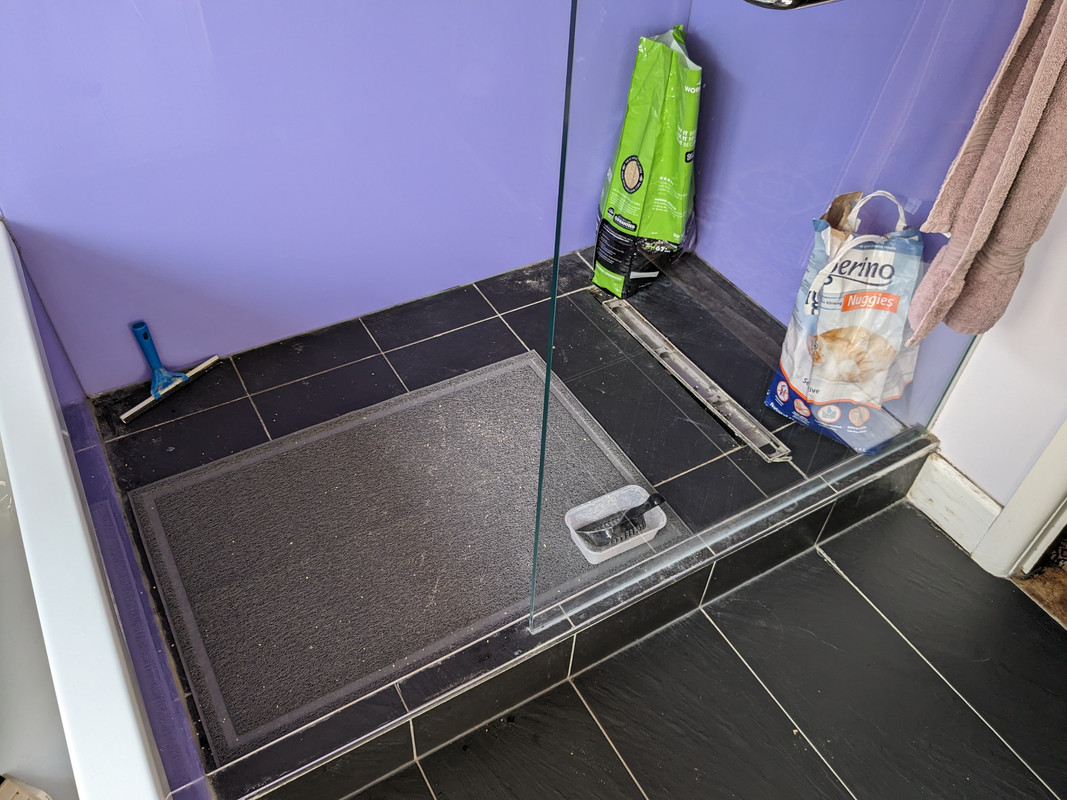 [/img]
For a moment I thought you had put a large chopping board in your shower! Then I realised it was a mat!
Are you able to dig out the grout and replace it with fresh grout or silicone?
I'm currently in the process of fitting an impey shower tray which one tanked and tiled should be great. I'm nearly finished after a year of being without!
I'll report back if my attempt leaks!
Yeah that's a cat litter tray mat. Since it leaked the shower has become a cat toilet! Luckily we have another shower.
I looked at replacing the grout, it looks to be a pig of a job, even with power tools. The other thing that puts me off is the tile nearest the drain in the middle moves underfoot. Makes me think any attempt to re grout would result in failure.
Hmmmm, grout in itself isn’t actually waterproof. It should have been tanked before tiling so even if the grout fails it shouldn’t let water through. Removing grout and not chipping tiles is a pita. I tried and failed. No reason you couldn’t have contrasting tiles on the floor though, maybe a mosaic so could avoid redoing the whole bathroom
However I would want to take the lot up and tank before I re tiled.
what is the sub base? Presume this is second floor so ply? If it’s original floorboards they could be knackered too by the damp
id probably get the whole lot out to see what I was working with. You should be able to reuse the screen if you can remove it
you can get shower wall laminate these days, I’ve not seen it used on the floor but can’t see any reason why not, other than slippy. But if your used to gloss tiles, then that’s not an issue!
when I did ours i replaced the floor with marine ply, used wadi tile backer sealed with acrylic and then mapei tanking. Then tiles and a one piece composite tray. Belt and braces I know….
I'm assuming there is tanking and that's also dead. The drain looks like the sort of thing I've seen with tanking systems. The shower base is raised so would assume a ply sub base. The only access (if you can really call it that) is from the bath end. You can't see enough to tell what is under the tiles. I took pictures and I think the actual floor is ok (leak was through hall ceiling).
White would work for a contrast as the whole sink top and bath is white. If going the tray route I'd be looking at white. The screen should be easy enough to remove. It's only held in by a U channel and ceiling support.
Our other shower has the laminate on the walls. It works and is easy to keep clean (Vs tiles). I'd not want it in this room. The glass walls of this bathroom are easier again to keep clean and also look better (even in the last owners colour choice).
I think your right. I need to get it up and see what's going on underneath.
You probably need to get under there to assess the state of the wood if there has been a persistent leak. And you can't do that non-destructively. My guess would be that the step is there to achieve sufficient fall in the waste pipe, but you can probably get an elevated tray to overcome that. Shower wall type panels could be fixed over the existing tiles really easily.
You could use glass again as a more expensive option.
If it's not tanked, or the drain has failed causing the sub base to rot/deteriorate and opened up some gap in the tanking then you need to reinstate the waterproof layer.
Yes a 1 piece tray might be ok, but without tanking that runs up the walls or is integrated with the wall tanking, then you're only going to be relying on a bead of silicon to stop water that runs down the walls from getting under the tray again.
Tear out time I reckon or you'll be chasing leaks and you'll end up tearing it out anyway.
We just replaced our leaking shower after drips of water through kitchen ceiling below. A joist needed sorting as had rotted through with the leak,so would suggest everything needs to come up to inspect before deciding next steps.
How do you integrate tanking with trays? Everything I've read in relation to tray installation has the tiles/paneling resting on top of the tray but not other tanking. So silicone from tray to wall as primary seal then a secondary seal between tiles/paneling and tray. I'd be aiming for this, getting the new tray underneath the existing glass wall panels. Definitely don't want to just push a tray up against the glass!
I'm hoping the glass on the bath side can be removed as that would give more access while working.
I’d want to pull the lot out and do the job properly, that’s why no trades are interested I’d say.
You need to get the tray under the wall finish to make it properly water tight, which you won’t achieve with the wall finish in the way.
I suspect you’ll find more water damage as it comes out, if tiles are loose, then there’s movement, incorrect installation or water damage any attempt to ‘re-grout’ will fail at some point.
ideally a shower should have the walls tanked to at least a meter, then the tray fitted and sealed to the tanked surface, then the wall finish applied and sealed again to the tray. This is impossible to do without it all being removed 1st.
I can see why no one would want to touch it, frustrating but not unexpected.
Redoing the wall finish makes it almost a full bathroom refit, I somehow doubt the glass panels will come off the walls in a state that they can be reused or leave the wall in a nice state. The same purple backed glass is used all around the bath (sides and walls), as the window sill, sink splashback and shelf above the sink, a few of these are complex shapes as well. Replacing all of that to get a colour match would be rather expensive. I wonder if it would be better just leaving it as a glorified cat toilet 😕 and using the other shower till we have budget to do the whole room.
the screen should be just screwed into the tiles and then silconed. it should be removable
is it second floor? it maybe easier to just make a hole in the ceiling to take a proper look and assess. I know it seems daunting and you don't want to mess another room up, but it's quite easy to cover up.
otherwise I think the lot needs to come out.
tanking you can buy a mapei kit with it all in. search on screwfix (well you could a few years ago)
The screen I'm not worried about, that looks easy to remove, there is a metal channel to the right which is screwed direct to the wall (not tiles or glass). Its the purple wall cladding, that is glass, the largest bit of which is 2000x1450mm. Other than the floor there are no tiles in the whole room.
Yeap 2nd floor, it is above the hall which is wood panelling. At the moment I'm think of taking the 5 side tiles off under the screen (along with whatever they are attached too) and having a look in that way.
As above. Check for damp no point spending money on something thats never going to be right
Rip the tray and floor tiles out and see what height you have to work with.
Remove the wall panels- likely just stuck on with silicone or foam. Use a cheeswire or similar to cut it out from behind.
Then reinstall with a proper tray and wall built out to suit the dimensions.
Didn't think of trying a long cheese wire. Nothing to loose if they have to come off one way or another. I have the glass carriers to hold onto the panels with.
Cheesewire idea is ingenious.
Pretty sure you’ll find the paint on the back of the glass will probably get damaged when you try to remove them, at least it has on all the ones I’ve ever removed.