![]() You don't need to be an 'investor' to invest in Singletrack: 6 days left: 95% of target - Find out more
You don't need to be an 'investor' to invest in Singletrack: 6 days left: 95% of target - Find out more
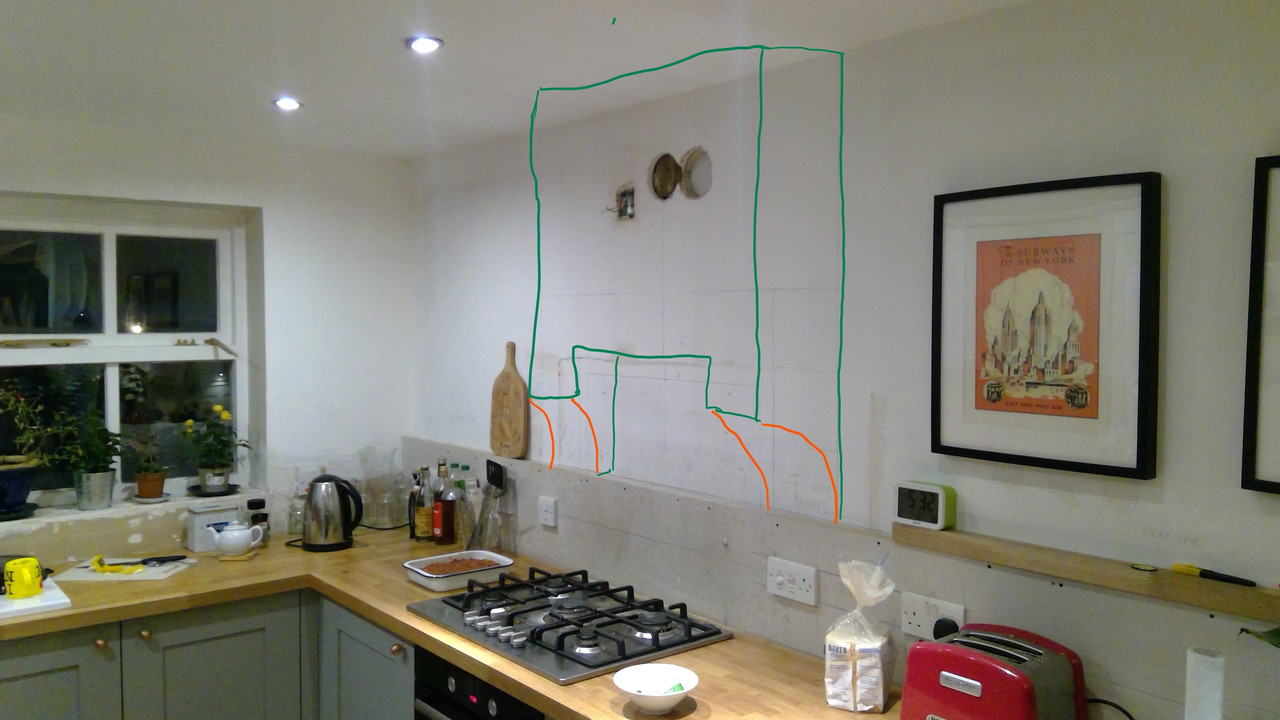
So this weekends project is to build a canopy over the hob in my new kitchen. The challenge is i dont want it to come all the way down to the worktop as these things usually do, rather i want to add a curve so it returns back to the wall (in Orange in the pic)
I'll be building this all in studwork and plasterboard then getting a plasterer to skim it when i'm done.
so the question is, whats the best (easiest) method of achieving the curve i need?
I would use some mdf to form the support for the curve and then face fix the plasterboard to it. Cut the back edge of the board so it will follow the shape.
I would check the distances require over your gas job both above and to either side as there a few regs in place. Also be careful fixing the stud work over those sockets !
BG Curveliner channel or build a simple timber ladder frame and overlay with a couple of thin plywood strips or bendy ply before final plasterboard layer. Glasroc Multiboard is best for bending.
Yeah do it like a skate ramp and skin it with thin ply.

check double check and triple check the regs for distances from hob and appliances to the unit you are building.
Can you get preformed arches that would do? You get them for doorways and the like
^
That's a good call - B&Q used to do an archliner kit, might be able to cut it in half to get two quarter circles?
Have a look at something like this. Made of mesh so just cut and fix, then the plasterer can cover them over. Easier than cutting plasterboard, and hoping to get all four pieces identical.
I built a very similar thing for our cooker, the curved bottom sections are constructed basically the same as re ramp post above. The sides are made from 18mm plywood as part of a cls studwork frame. The oak beam is just for effect.
The curved plaster board is just normal 12mm board with loads of cuts on the back to make it flexible. The plasterer used flexible plastic beading for the edge.
Here's a photo pre plaster
[url= https://i.ibb.co/jRLKz7t/20181207190733-noexif.jp g" target="_blank">https://i.ibb.co/jRLKz7t/20181207190733-noexif.jp g"/> [/img][/url]
[IMG] https://ibb.co/tXbfzyR [IMG]
And one close up of the curved bit
[url= https://i.ibb.co/c3vFt5D/20181207191936-noexif.jp g" target="_blank">https://i.ibb.co/c3vFt5D/20181207191936-noexif.jp g"/> [/img][/url]
Given that it is going over the hob even if the regs don't require non flammable stuff I wouldn't use wood. Get some metal studs, cut the legs of the "C" and bend. Get flexible plasterboard or use 8mm or whatever the thin stuff is and use several layers ( if you are careful you can out it onto bends by slowly pressing it into place.) Or use 1/2 or 5/8" and cut grooves about halfway into the depth on the backside, mist the paper with water and slowly press onto curve. Might consider putting some fireproof insulation or sheet metal across the bottom too. (Unless you are putting a vent in there.)
I'd go with the mesh arch formers, and if you can't find any the right size just make your own and tie the corners with wire. They don't need to be exact, the plasterer will be able to smooth the curve.
When I fitted my job extractor I was told the “regs” that apply are the instructions for the hob. This specified how close the extractor could be to the hob. As far as I know you don’t want extraction too close to a gas hob especially as it could change the flame or something.
I fitted mine as low as I could as my wife isn’t very tall but it look like it’s a lot higher than what you are planning.
Wow - brilliant help there guys. The instructions for the extractor say it should be 65 - 75cm from the hob was high was a little lower than I was planning visually. I’ll probablt go for around 80cm
The instructions are for minium heights, 650mm for gas hob, if you're about that, you're fine.