![]() You don't need to be an 'investor' to invest in Singletrack: 6 days left: 95% of target - Find out more
You don't need to be an 'investor' to invest in Singletrack: 6 days left: 95% of target - Find out more
How do I get photos of my paintings to look even vaguely professional - the photos, not the paintings.
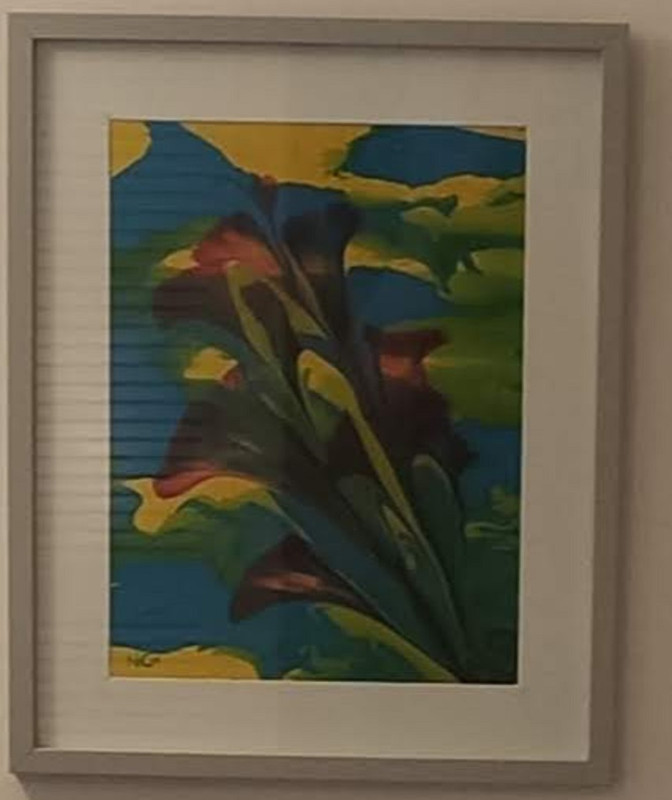
This is a deliberately bad photo but shows most of the main issues I face.
1) The frame does not appear square
2) Reflections - both from the electric light and the surrounding room if the light is off
3) Light difference left to right
4) Individual colours do not look correct
5) Contrast between colours is wrong - the red flower really stands forward from the background in reality
This one was taken with a camera phone but I do have access to a DSLR. I just want to understand what I need to get correct before I borrow it.
Dunno - but this thread come to mind!... 🙂
1)Take it out of the frame
2)Take it out of the frame
3)Photograph it outside but not in direct sunlight
4)Photograph it outside but not in direct sunlight
5)Photograph it outside but not in direct sunlight
1. Use a tripod!
2. remove from frame. Use two flash units mounted at 45deg to either side, remember the "angle of incidence = angle of reflection" rule from school? If it's an oil painting with texture to the paint then you may get specular highlights so add diffusers to the flash units.
3. Use an editing program and the white balance tool from that. Easiest is to have a white card next to the painting that you can crop out at this stage.
4. Again a photo-editing program.
Improve the surroundings.

Join a photography forum 😉
But to answer quickly:
1) The frame does not appear square
- Never use wide angle if you want things square. You’ll also usually get softer edges. Flat field or rectilinear lenses will give best results. I use a 50mm prime to photograph paintings. Still need to post-process/correct.
2) Reflections – both from the electric light and the surrounding room if the light is off
- Don’t photograph glass if you don’t want reflections. I photograph paintings for artist’s websites. They are un-framed when I photograph. I still sometimes get them done (especially if large pieces) by a professional archivist I know who has a medium format (digital back) setup. Appreciate this might not be your aim.
3) Light difference left to right
- You have a partial reflection of a dark (wall) on the right
4) Individual colours do not look correct
- You have a reflection etc. You didn’t set the white balance. Use a (usually white) reference and customise in settings
5) Contrast between colours is wrong – the red flower really stands forward from the background in reality
I’d have to be there. Again see white balance. Shoot RAW and correct in PP. Take a closeup reference shot of the colour and compare by eye to the preview on camera screen. Use that preview when post processing. Better still have the painting with you when P/P
Tripod. Remote shutter (or self-timer).
Here’s a guide:
https://expertphotography.com/photographing-artwork-tips/
for the reflections you need to remove the glass so you have a more matt surface.
For everything else - get Photoshop & learn how to use it!
Pop up light boxes may help with reflections too, but IANAP. Getting the camera in the middle of the picture, horizontally and vertically with a tripod will help too, there are tripods that allow you to do this hanging the camera over the picture lying on a flat background as opposed to being hung too.
*awaits thread about horrific Photoshop accident causing serious injury*
For the colour balance thing, a proper grey card is so much better than just hoping a piece of white paper is good enough and they're nice and cheap.
https://www.amazon.co.uk/Anwenk-Balance-Exposure-Photography-Calibration/dp/B01DPV5PUA/ref=sr_1_3
Take a photo of the grey one in front of the frame, then you have a 'reference neutral'. Shoot raw files then an app like Lightroom (which is available on phones too) will let you just click on the grey to fix the colour temperature, and thus all the colours.
Should say: no need for Photoshop, as that's overkill. If you want to use a 'proper' tool then I can't recommend Adobe Lightroom enough, it runs on desktops and phones/tablets these days.
Thanks.
Remove the glass. Easy
Photograph outside. Easy if it ever stops raining
Tripod. Easy as I already have one
Put a piece of white paper next to the picture as a reference point. Easy.
Use photo editor software to correct the colour balance and make the picture look square. What is easy, free and will do this?
^
Snapseed (free, although it will degrade image quality, and is dependent to a degree on your device)
GIMP (free, more like Photoshop)
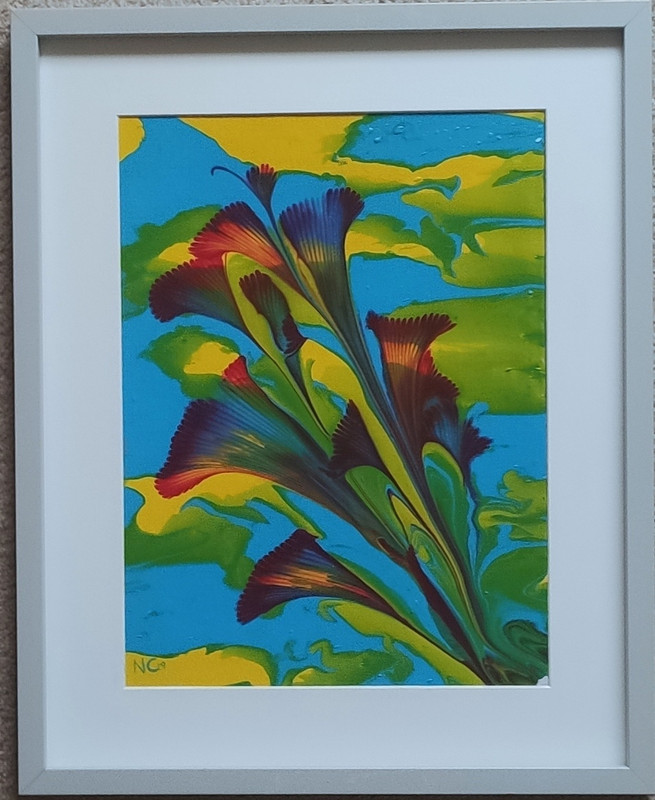
Glass removed.
Photo in natural light - bedroom floor by a big window as it is still raining.
Rested my hand/phone on the back o=f a chair to keep it steady.
Realised the picture surround was white.
Used Snapseed to balance colour etc.
Much better result. Thanks!
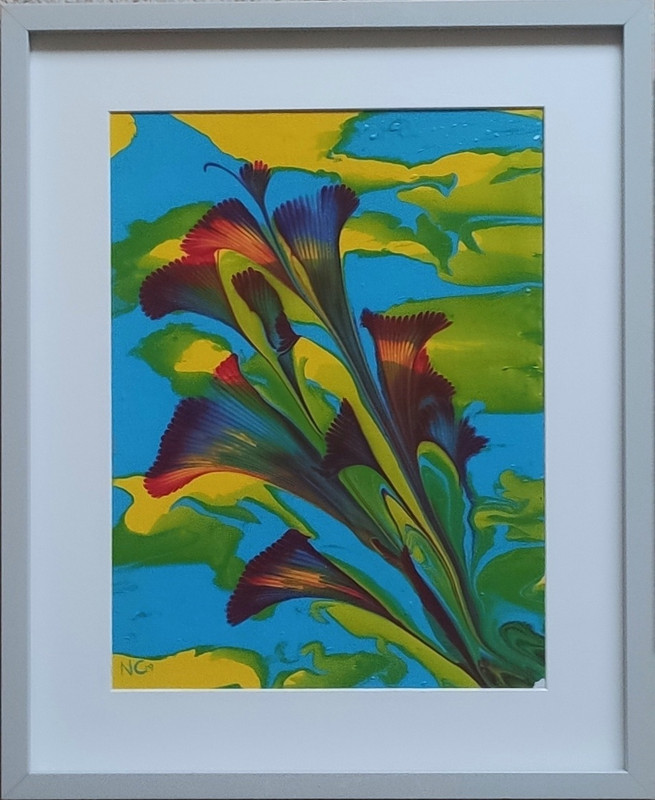
Great work! Snapseed also has rotation/perspective-correction 😉
(pro-tip: try and shoot as square as possible, but always pull back and leave enough room around the edge when shooting so you can adjust perspective/rotation easily in PP. Snapseed has a ‘free’ perspective correction mode which can help you tidy up that corner, but start with rotation and tilt, then tidy up marginally in ‘free’ mode if needed. then crop tight so the picture frame edge is the edge of the image.
Have to be careful in ‘free’ mode otherwise it can go terribly awry and look like an acid trip/Dali painting.
Thanks - wasn't sure what to look for to correct that.
EDIT - That makes it so easy it feels like cheating :-). Perhaps I should have spent more than a few seconds doing it and got it right but even so I am happy with the results.
OP, Don’t know what colour the mount board is IRL, but it looks grey/blue in that?
This is what I got in Snapseed using the ‘neutral colour’ tool in WB. It gave me a warm white.
It’s quite precise, so pixel-to-pixel might change the result* depending where you position the picker.. Also brightened the highlights and added minimal saturation boost and sharpening. How’s it compare to the original?
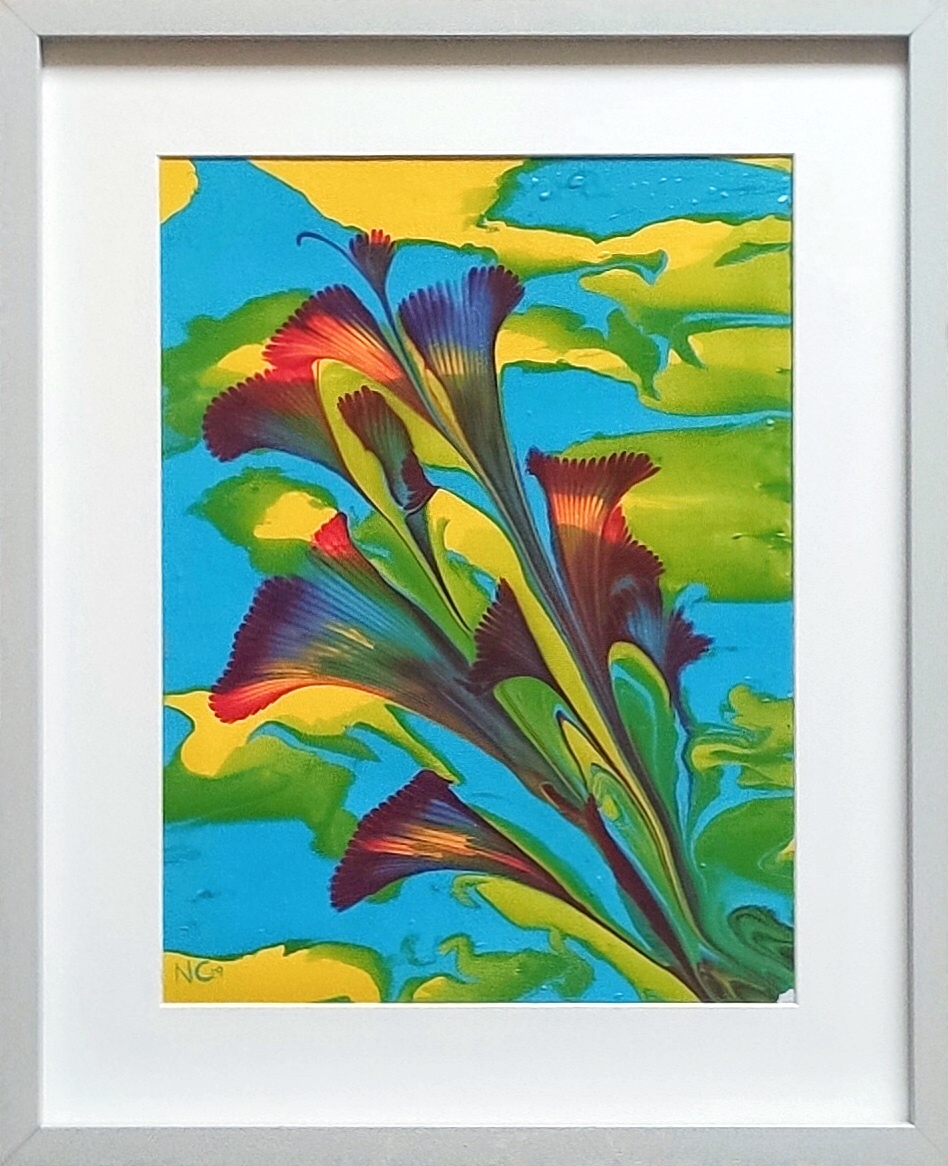
*Especially if your original has colour noise/is artifacted. Pretty much guaranteed with smartphones.
I agree about the mounting board looking blue in mine but the colour of the actual painting looks closer in mine than yours. I was looking at the painting while adjusting the whiteness to keep the paint looking right.
Thanks for your help on this. I am having to it on my phone as the Windows download doesn;t seem to work. It is okay but fiddly on the small screen
EDIT - Investigating Bluestacks to get it to work on PC
^ What lighting in your home or is that taken in daylight? Years ago I used to photograph works for a painter and we’d always take them outside in the garden on a bright overcast day as that seemed most representative of his pigments (to his eyes)! As a painter myself I drive the imaging bureau/giclee printer insane, I know. They are very polite 🤣
That was taken indoors, on the floor in front of a big window with no electric lightson. It is dyull and raining so didn't fancy going outside.
Oh the irony of trying to take digital pictures of paintings 🙂
You should try and sell the ****ers. i have spent the rest of the day setting up a website after my planned and paid for physical exhibition was cancelled. Hopefully I can sell something to cover the lost and the new costs.
https://www.nicksartstuff.com/
Check it out now and please give feedback here. I will be filling it up more over the coming week.
Thanks again to those who helped with the photo stuff
A circular polarising filter will reduce/get rid of reflection on the glass.
Lay the painting on the floor or table. Photograph from above making sure you dont cast shadows. A longer lens will help as it creates more distance between the subject and camera.
Alternatively, photocopy and save a digital copy.
Check it out now and please give feedback here.
Nice photos.
Disappointed by the complete lack of dogs playing snooker.
On colour balance, if you want an easy in-camera .jpg solution,
Take a photo of a blank piece of A4 in situ where you're shooting the picture. Go into White Balance on the camera, choose "custom" and then select that photo as reference.
A circular polarising filter will reduce/get rid of reflection on the glass.
+1 to that.
All the photos used were shot with the painting on the floor with a sheet of white paper next to them just using my camera phone. Snapseed to White Balance and then crop to close to canvas size and get rid of the paper. Perspective freehand then lets me drag the corner of the canvas or frame to the corner of the digital picture. Export and put on the website.
All down to the stuff I learned from you guys. Thanks!!