![]() You don't need to be an 'investor' to invest in Singletrack: 6 days left: 95% of target - Find out more
You don't need to be an 'investor' to invest in Singletrack: 6 days left: 95% of target - Find out more
Thanks to a wealth of information and help off STW, i'm getting nearer to stove installation. 🙂 Stockton 5 on order and heres how its looking so far...
[URL= http://i237.photobucket.com/albums/ff100/capoz77/20150103_114555_zps37de7729.jp g" target="_blank"> http://i237.photobucket.com/albums/ff100/capoz77/20150103_114555_zps37de7729.jp g"/> [/IMG][/URL]
[URL= http://i237.photobucket.com/albums/ff100/capoz77/20150106_234613_zpsff19032f.jp g" target="_blank"> http://i237.photobucket.com/albums/ff100/capoz77/20150106_234613_zpsff19032f.jp g"/> [/IMG][/URL]
Gas fire removed, capped and inglenook opened up, 6" twinwall flu installed and anti down draft cowl...
[URL= http://i237.photobucket.com/albums/ff100/capoz77/20150107_214429_zpsc9e42e71.jp g" target="_blank"> http://i237.photobucket.com/albums/ff100/capoz77/20150107_214429_zpsc9e42e71.jp g"/> [/IMG][/URL]
[URL= http://i237.photobucket.com/albums/ff100/capoz77/20150107_214450_zpsdf3f1834.jp g" target="_blank"> http://i237.photobucket.com/albums/ff100/capoz77/20150107_214450_zpsdf3f1834.jp g"/> [/IMG][/URL]
Thought the exposed brick on left pillar looked quite rustic
[URL= http://i237.photobucket.com/albums/ff100/capoz77/20150107_232357_zps451cb05b.jp g" target="_blank"> http://i237.photobucket.com/albums/ff100/capoz77/20150107_232357_zps451cb05b.jp g"/> [/IMG][/URL]
So got the bolster out 😯
[URL= http://i237.photobucket.com/albums/ff100/capoz77/20150110_202808_zps288ecd19.jp g" target="_blank"> http://i237.photobucket.com/albums/ff100/capoz77/20150110_202808_zps288ecd19.jp g"/> [/IMG][/URL]
Archway will need reseating/pointing, and bricks cleaning up, very loose around the area i've left a bit of plaster on...
[URL= http://i237.photobucket.com/albums/ff100/capoz77/20150110_210435_zps88738bbb.jp g" target="_blank"> http://i237.photobucket.com/albums/ff100/capoz77/20150110_210435_zps88738bbb.jp g"/> [/IMG][/URL]
Looking at some acid to clean the bricks up
http://www.travisperkins.co.uk/p/4trade-mortar-cleaner-5-litre/879453/3893581
or this light needle scaler ❓
http://www.hss.com/g/2411/Light-Duty-Needle-Scaler.html
Already I have to say the bare bricks look better than the levitating fireplace.
@mcmoonter the levitating fireplace has always been a thing of mystery since we moved in, just why 😆
Eeek! That arch doesn't look very well braced.
Great - but the three I did all had new steel added to supplement the wee supporting band that the brick arch is likely currently supported on...
It should be easy enough to get some thickish and wideish flat bar rolled to the arc of the arch to support it.
did a similar job on ours last winter, our arch was also in a similar state, all a bit wibbly wobbly (technical speak 😀 )
Cut yourself a timber former to fit inside the opening and support the brickwork. Remove the arch and some of the brick work above the arch (stop panicking, it is self supporting). Fit the former and rebuild your arch and the brick work above.
Mine was even more funnerer as I had to rebuild the left side column too 😉
I did the same thing in our new house...living room was the only room that was in a decent state and had a modern electric fire with granite surround.
I went at it with an SDS drill and we now just have an exposed brick builders opening.
The top of the opening was straight with a steel t bar as a lintel. A friend of mine (a builder) said the lintels never look strong enough but the brick work is 'all tied in' so holds itself up.
To be fair though, the mortar in mine looks in better condition.
I feel your pain!
[URL= http://i1259.photobucket.com/albums/ii543/wallahisme/Mobile%20Uploads/iphone/B7AB93DC-66BB-471B-BC88-7EC05D84FBAA_zps6gxfksya.jp g" target="_blank"> http://i1259.photobucket.com/albums/ii543/wallahisme/Mobile%20Uploads/iphone/B7AB93DC-66BB-471B-BC88-7EC05D84FBAA_zps6gxfksya.jp g"/> [/IMG][/URL]
[URL= http://i1259.photobucket.com/albums/ii543/wallahisme/Mobile%20Uploads/iphone/2DB1C010-4221-413A-BCE6-092F3BB9405F_zps9jwmzvj9.jp g" target="_blank"> http://i1259.photobucket.com/albums/ii543/wallahisme/Mobile%20Uploads/iphone/2DB1C010-4221-413A-BCE6-092F3BB9405F_zps9jwmzvj9.jp g"/> [/IMG][/URL]
@matt @mcmoonter theres a pretty sturdy lintel in situ, just needs the bricks repacking, the weight seems to spread quite well midway up and distribute the load down to the pillars
[URL= http://i237.photobucket.com/albums/ff100/capoz77/IMG-20150111-WA0010_zps8f77d479.jp g" target="_blank"> http://i237.photobucket.com/albums/ff100/capoz77/IMG-20150111-WA0010_zps8f77d479.jp g"/> [/IMG][/URL]
@flicker any pics of yours?
@mchamish are you fitting a log burner in opening?
@wolly can't believe the amount of brick packed in there to narrow it, was all breeze blocks inside mine. Looks a lovely arch, are you taking the rest of the plaster off and exposing?
No it's all been plastered over i had enough clearing up to do after opening it out. if I was doing it again I think id pay someone to do it sooty dusty mucky but over all very satisfying job
This:
[IMG]  [/IMG]
Turned in to this:
[IMG] 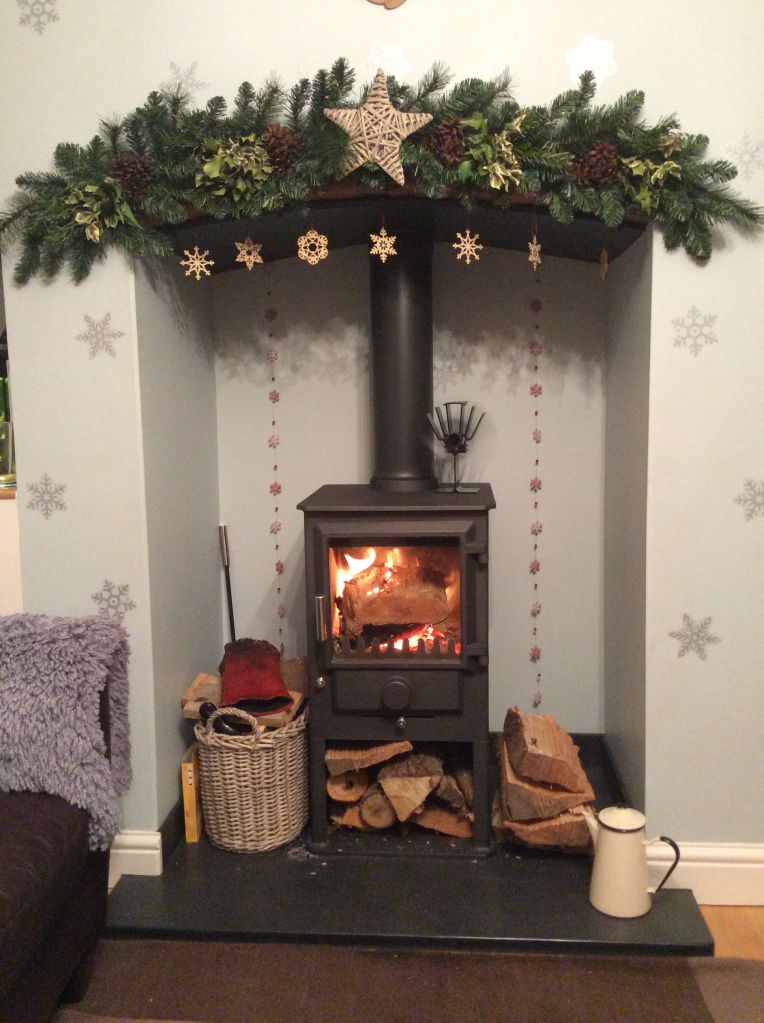 [/IMG]
Ok, if we're playing look at my brick arch I'll put this up again. This had no lintel at all but I figured it had been there getting on for 120-130 years so it wasn't going to go anywhere. Brick infill wasn't holding anything up but it was all engineering bricks so had to do about 8 runs to the tip so I didn't overload the car.
[img]  [/img]
Would have been nice to keep the arch bare brick but it was a right mess and we were limited on time, had to be moved in a month after this was taken and there was a lot of work to do elsewhere as well.
@bigblackshed think i've seen yours before on here, horse shoe on the brick arch you left on show? cracking little touch!
[img]  [/img]
There you go, we've got some shots of during too, will try and track them down.
The hearth is a single slab and took three of us to get in the house and in position 😀
Picked it up from a reclamation yard for £70, was originally part of courtyard from a local church yard, shade over 3" thick.
@flicker I like that! what stove? arch left on show perfect finish.
@wolly the soot does seem to settle as a fine mist in distant rooms 😆
@northernmatt the arch is the lintel, when built right, think church windows etc looks a good size inglenook
the stove is a Charnwood country four.
The original arch was laid out the same but flush. When we rebuilt it we set the bricks approx 40-50mm proud to allow for render/plaster and still leave the bricks faces proud.
The internal is lined with 12mm hardibacker as the rear brickwork was a mess and would have needed a lot of work to look right.
@flicker cheers, gets a lot of mentions recently the Charnwood C-4 and Country 4.
Great stoves. 🙂
[img]  [/img]
cruzcampo, here you go.
[IMG] 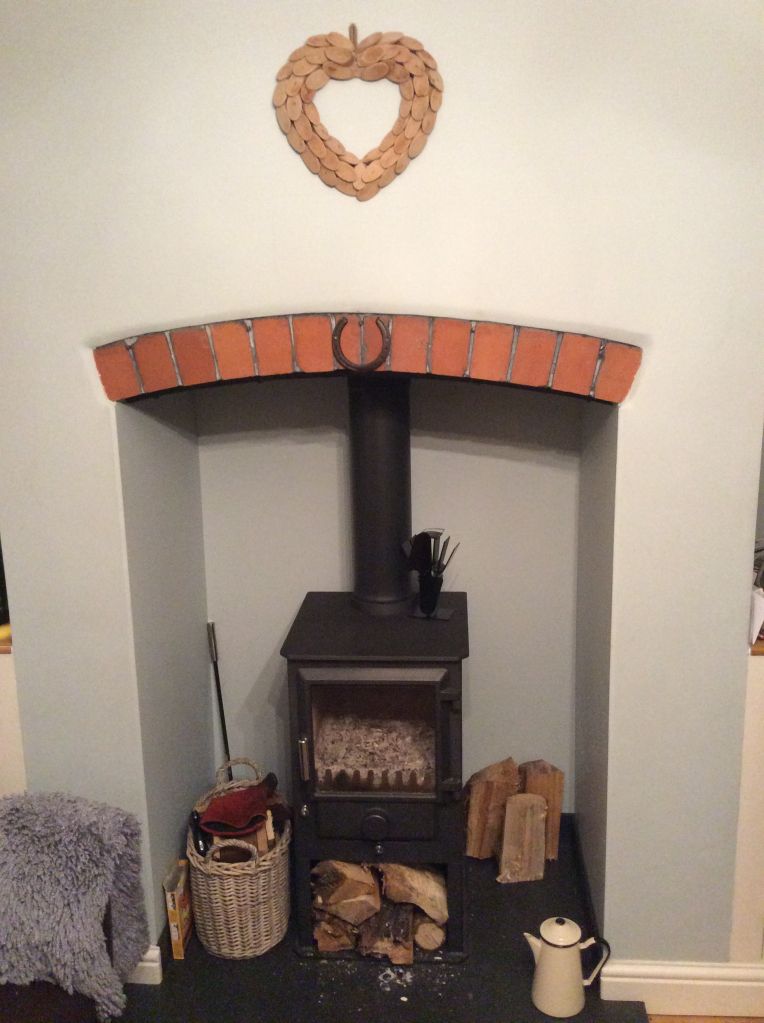 [/IMG]
The horse shoe was a wedding gift, to "catch good luck". Everyone on my side of the family has one.
cruzcampo - yep it's huge. It's an old miners cottage so would have been where the range used to be hence the size. Not got a stove in yet but as we don't need one with a massive output it's going to look a bit lost. I'm sure the missus will come up with some ideas of what sort of tat to put in there.
@ matt, looking at the pic pretty sure you'd have room to have a single row stack of logs at each end of the opening. Should be far enough from the stove to comply with regs?
Hope that isn't your gas pipe capped off in the photo with the brick pillar?
@mchamish are you fitting a log burner in opening?
Yeah, I think we've settled on a Stovax Stockton 5 with a riven slate hearth and bare brick in the opening. We have an original art deco oak mantel/surround that we'll restore and fit over the opening. I've just got to finish off the pointing then it's ready for the stove fitters.
We've opened up the living to create a through lounge, and we've knocked the kitchen wall down to create a kitchen diner. As it's now fairly open downstairs I'm wondering whether we should get a higher output stove...my only reservation is will it be too hot for the living room.
@bear, yeah that's the gas pipe capped off. In the middle of the left pillar, and pushes under the floorboard when i'm ready to install the hearth. Done by a Hetas qualified chap, you reckon its at risk of ignition?
@bigblackshed may get a horse shoe, looks very vintage 
@northernmatt the Stockon 5's are quite wide so should fill the space nicely, or the Stockton 5 midlines have a nice presence
[img]  [/img]
@mchamish, the fitter recommended 5kw for ours and said the Stockton 5 would be perfect, and we'd probably end up opening downstairs doors once its up to heat. Next door have a Tiger 5kw and find it heats upstairs and down very easily too.
I'm deciding between the Stockton 5 flattop and midline. Both multifuel with the smoke control kit. Make sure you get the MKII apparently over 20 improvements over the MKI.
Just gone through same process, from this
[img]  ?oh=0bbbc840d5625aa96558c4144296231c&oe=552CFB6B[/img]
A 30 year old stove, to this
[img]  ?oh=23a87f2cb6e34dbd8ae6f76f1caebaf1&oe=5537C7AF&__gda__=1428694299_66fbc5215c2e857910641e6a77237d9e[/img]
Just waiting on a stove
Like that finish what stone is that and which stove are you getting?
Looks supurb Dalesrider, that Morso was in great nick for its age too!
Any ideas on best product to seal the exposed brick with after i've had it pointed?
PVA?
That's what I used on ours.
@GR is that inside your inglenook? 5 water to 1 part PVA i'm reading
Yep inside. To be honest I can't remember what mix I used but think it was stronger than that.
Whats the sheen factor like? Want to bring out the brick colour which looks great when wet, but don't want too much gloss action 😆
I remember painting it on thinking I'd turned all the bricks white but it soaks in fine and I put quite a bit on too. Don't recall them being glossy, certainly aren't now three years down the line. 🙂
Cheers GR!
Pointer in today rebuilding the arch...
[URL= http://i237.photobucket.com/albums/ff100/capoz77/IMG-20150117-WA0015-1_zpsff5db0d8.jp g" target="_blank"> http://i237.photobucket.com/albums/ff100/capoz77/IMG-20150117-WA0015-1_zpsff5db0d8.jp g"/> [/IMG][/URL]
Bricks have come out really nice 😯
[URL= http://i237.photobucket.com/albums/ff100/capoz77/20150117_195736_zps7521bef3.jp g" target="_blank"> http://i237.photobucket.com/albums/ff100/capoz77/20150117_195736_zps7521bef3.jp g"/> [/IMG][/URL]
[URL= http://i237.photobucket.com/albums/ff100/capoz77/20150117_194837_zps379a72e0.jp g" target="_blank"> http://i237.photobucket.com/albums/ff100/capoz77/20150117_194837_zps379a72e0.jp g"/> [/IMG][/URL]
[URL= http://i237.photobucket.com/albums/ff100/capoz77/20150117_194729_zpsc96a1008.jp g" target="_blank"> http://i237.photobucket.com/albums/ff100/capoz77/20150117_194729_zpsc96a1008.jp g"/> [/IMG][/URL]
[URL= http://i237.photobucket.com/albums/ff100/capoz77/20150117_194709_zps1f998f89.jp g" target="_blank"> http://i237.photobucket.com/albums/ff100/capoz77/20150117_194709_zps1f998f89.jp g"/> [/IMG][/URL]
Very tidy, looks a really nice job that.
That's come up beautifully. What a difference!
Yes, good job!
Great job. Did you just remove the bricks that are out in the first pic, or did you go further?
Cheers. Its been pointed in lime mortar so in two minds whether I should seal it or not, likes to breathe lime mortar apparently, chap said to use linseed oil if I do.
@ononeorange just the bricks in the first pic, and the four that are resting on the arch in that pic.
What do the stove fitters attach the registry plate to? the arch or the inglenook sides
Angle iron further up the chimney where its level.
What do the stove fitters attach the registry plate to?
Mines on the steel arch "lintel".
[URL= http://i1276.photobucket.com/albums/y477/BigBlackShed/f0b7e422ace8145c873209797db6efa5_zpsa02056cb.jp g" target="_blank"> http://i1276.photobucket.com/albums/y477/BigBlackShed/f0b7e422ace8145c873209797db6efa5_zpsa02056cb.jp g"/> [/IMG][/URL]
Cheers Cruz. Great thread.
Wow, what a difference, keep the pics coming.
@GR @bigblackshed cheers, I think the lintel one would seal against stuff coming down the chimney more? or do you guys have vermiculite packed around the flue?
Some rather fetching mosaic tiles
[URL= http://i237.photobucket.com/albums/ff100/capoz77/20150118_132424_zps5c311bae.jp g" target="_blank"> http://i237.photobucket.com/albums/ff100/capoz77/20150118_132424_zps5c311bae.jp g"/> [/IMG][/URL]
and these don't even feel like a tile, entire half room furnished in them under the underlay, its got to be a 70's fad surely?! 😆
[URL= http://i237.photobucket.com/albums/ff100/capoz77/IMG-20150118-WA0081_zps28796077.jp g" target="_blank"> http://i237.photobucket.com/albums/ff100/capoz77/IMG-20150118-WA0081_zps28796077.jp g"/> [/IMG][/URL]
The brick hearth is complete, pointer was a true craftsman!
[URL= http://i237.photobucket.com/albums/ff100/capoz77/20150118_160458_zps92aa3534.jp g" target="_blank"> http://i237.photobucket.com/albums/ff100/capoz77/20150118_160458_zps92aa3534.jp g"/> [/IMG][/URL]
[URL= http://i237.photobucket.com/albums/ff100/capoz77/20150118_160416_zps0c123868.jp g" target="_blank"> http://i237.photobucket.com/albums/ff100/capoz77/20150118_160416_zps0c123868.jp g"/> [/IMG][/URL]
[URL= http://i237.photobucket.com/albums/ff100/capoz77/20150118_155848_zps37ed9760.jp g" target="_blank"> http://i237.photobucket.com/albums/ff100/capoz77/20150118_155848_zps37ed9760.jp g"/> [/IMG][/URL]
Need to decide how to finish the skirting off, either stop at the first hearth brick, stop at the inglenook edge with a cutout, or fill the side skirting in and leave without on front?
Pretty sure the fitters used something like [url= http://www.toolstation.com/shop/Construction+Materials/d210/Builders+Metalwork/sd2797/Aluminium+Angle/p65910 ]THIS[/url] to make an internal rectangle frame which is screwed/bolted around 2 bricks up from the arch then a rectangle of galvanised steel cut to fit and screwed to the frame if that makes sense?
Can do a pic tomorrow if you want and yes vermiculite around the flue, 5 bags worth if I remember correctly.
[img]  [/img]
Hope this kind of shows the idea!
Cheers GR looks a tidy bit O steel work that
Some nice work here!
Moving into a place next Friday with this. Coal fireplace in the middle of all that. No idea what's behind all the brick. It's quite nice, but not big enough for a stove, maybe not even with the inner, recessed brick arch taken out.
[img] 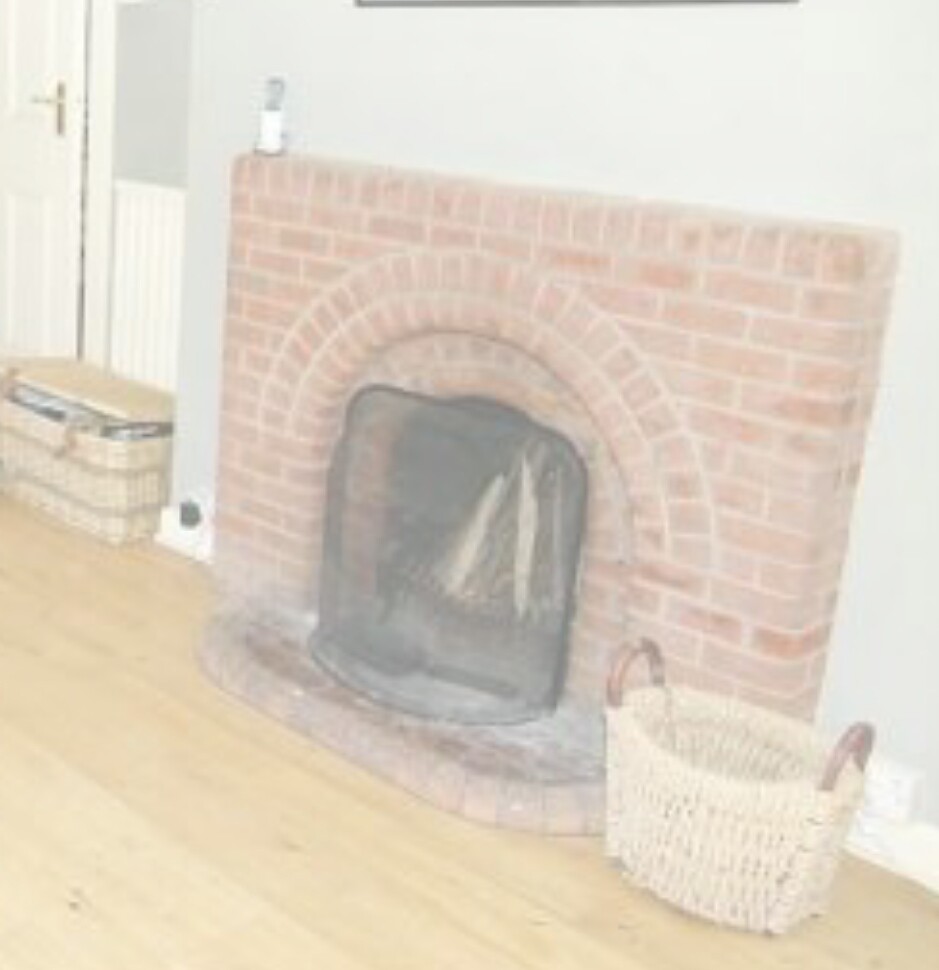 [/img]
You wont know until you look. 😉
It looks ok though.
Could be a large original builders opening that nedrapier, looking at how wide the alcove is to the side
Depends how old the building is. Might just be a square hole, might be an arch. To be fair a gaping hole will be better than that collection of bricks.
No, granny_ring! 🙂
The larger arch is 75cm tall by 75 wide, so still not really big enough for a 3/4kw stove, so Messrs Club Hammer and Cold Chisel will be doing some subtle investigative work.
Happily, there's another couple of building go nearby that were built at the same time (1930s) by the same people, so some friendly doorstep ping might win me some pointers.
Aha!
Check this puppy: http://www.amazon.co.uk/gp/product/B00KKC4OYG
Messrs Club Hammer and Cold Chisel might have to stand back and see what Messrs Drill and Endoscope can find out.
What with the fire surround, the drains, the chimney, the floor voids and the cavity walls, I think I might get my money's worth out of this! As long as I don't end up going endoscope crazy and swiss-cheesing my house to look inside things.
Looking forward to the vids LOL
Well yes if there's some neighbours that have removed the fireplace then ideal, get knocking!
A mate with a trailer helped me take our tiled fireplace out. There was a lot of rubble behind the fire inset and extra rows of bricks behind and on the sides for the inset. Glad he had a trailer. 🙂
Can I join in....??
With the horrible surround ripped off..
[img] 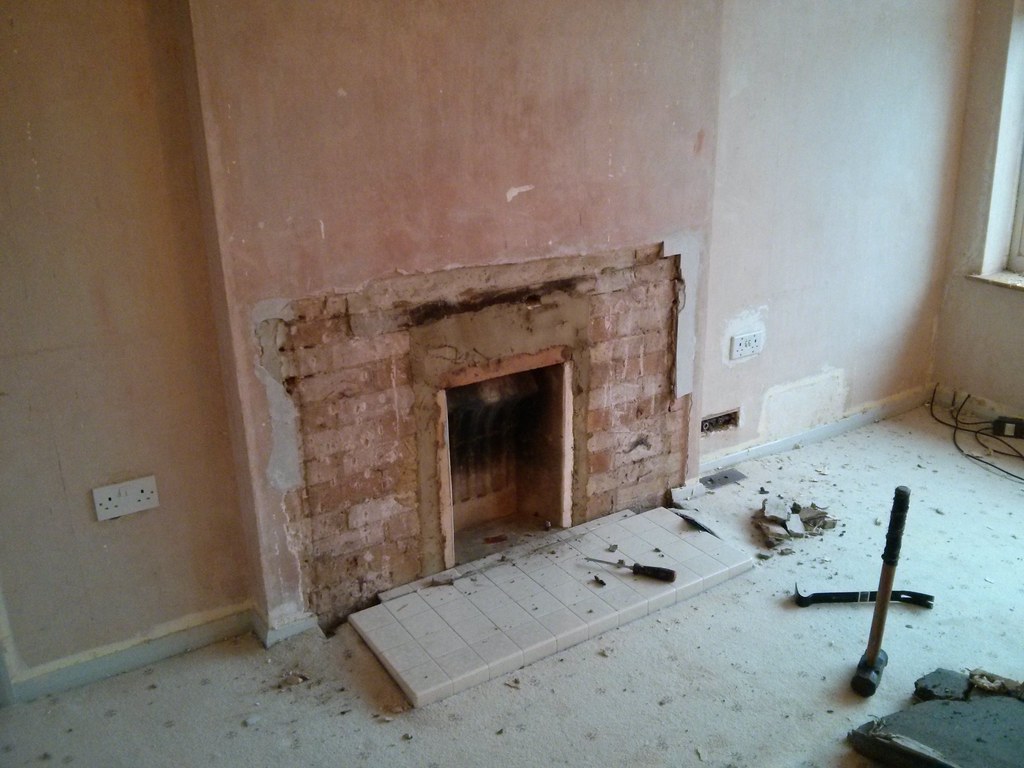 [/img]
Hammer time...
[img]  [/img]
Builder's fireplace, but with manky lintel
[img] 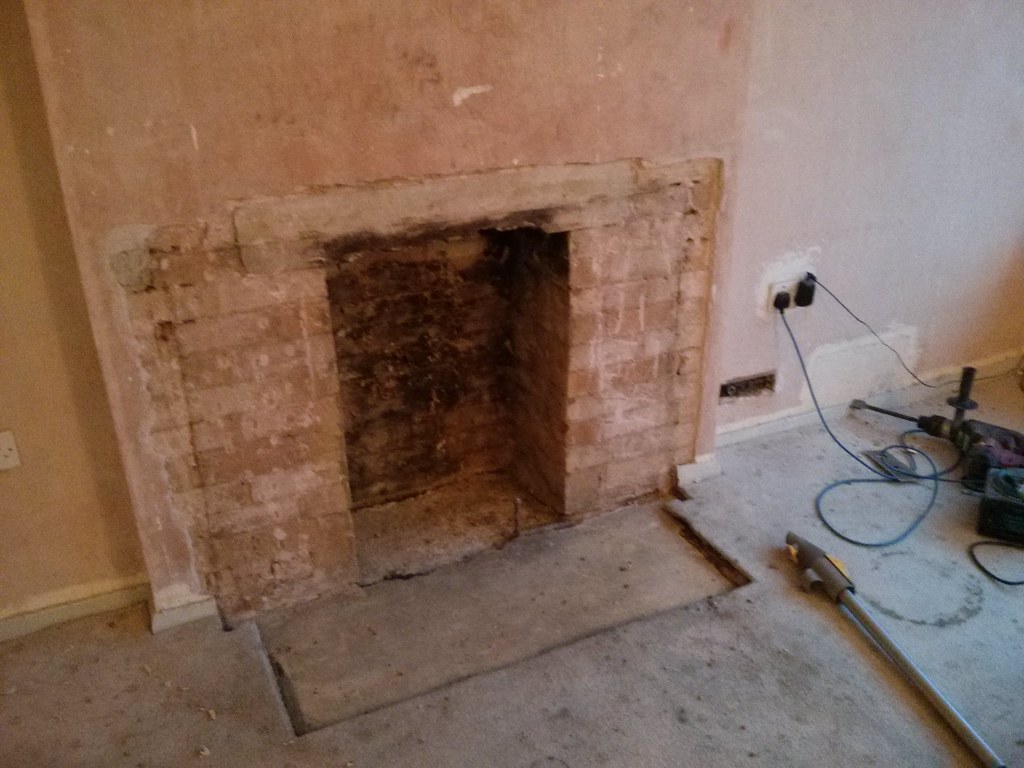 [/img]
[img]  [/img]
Lintel out
[img] 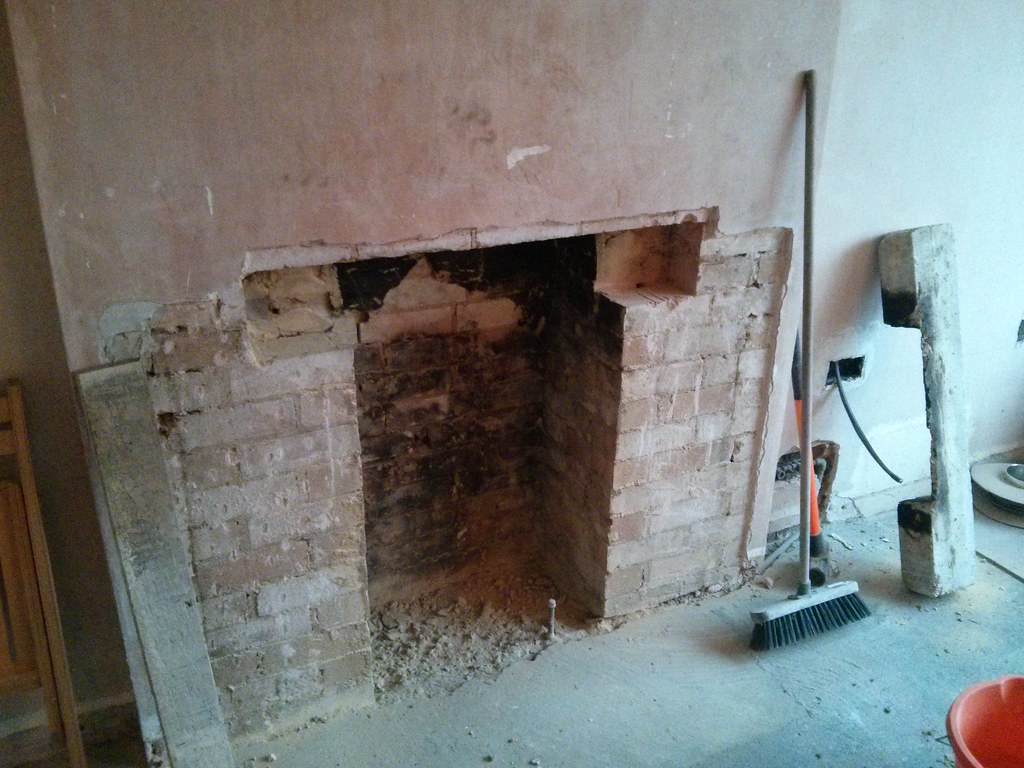 [/img]
New lintel in..
[img] 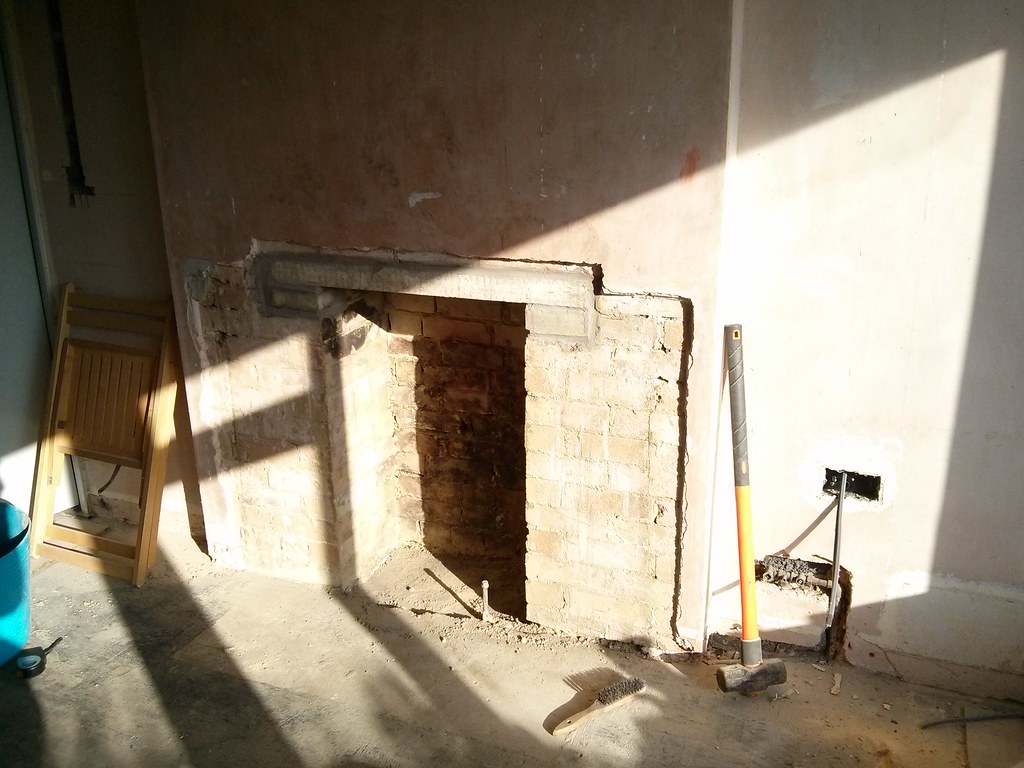 [/img]
Just need to fill the floor defect, line with 12mm hardibacker, and get a hearth!! (and rip out the gas piping...)
DrP
Are you dropping a liner down there?
The plan is to leave the chimney stack on the ground floor, and remove it from the second floor as we're having a loft conversion...We'll take out the bricks and have a twin lined steel flue/pipe.
I'll have a short length of liner from the 'floor above to the register plate'.
So yes!
DrP
Nedrapier, just rip that thing off!!
There's BOUND to be a decent builder's fireplace behind it!
Get yourself an SDS drill and get smashing!!
DrP
oh right that's different, not heard of flexi going into twinwall!
@DRP looking good! So on floor two there will be just a pipe at edge of room from floor to ceiling?
The twin lined will be 'in a stud wall' type thing, coming through a flat roof...
DrP
OP - how much was the flue pipe and how high does it go. Just taken the sledge hammer to one similar.
Hello DrP, I was thinking you'd be on here before too long! Very likely to be getting smashy, but now I've bought an endoscope I'll be blimmin well drilling holes in things and looking in dark places.
Didn't know about SDS drills until just now, and now there's another item on the shopping list. What did you go for? Happy with it?
@dales rider - did you put the glass in the cupboard doors? Similar built in cupboard here.
"boxelder - Member
OP - how much was the flue pipe and how high does it go. Just taken the sledge hammer to one similar."
Flue is ten meters long approx, but reckon they cut about a meter off, 6" 316 grade twinwall. The flue part of it, with chimney downdraft cowl, registry plate made in situ etc was around £900. Asked on here at the time of quoting and that seemed reasonable.
Just had me first fire! Any tips here would be more than welcome!
Went with 10 balls of scrunched up newspaper, 10 pieces of kindling, door ajar whilst it all fired up, closed door and waited for kindling to get a good fire going, then added a log. Closed the primary air vent on the bottom once fire had started, left the secondory air vent on the bottom at 50%, and left the top airwash vent fully open. Not much movement in the top airwash control, but guessing smoke control kit has something to do with that.
Hows it looking?
[img]  [/img]
[URL= http://i237.photobucket.com/albums/ff100/capoz77/20150127_214449_zpstwsp3jrf.jp g" target="_blank"> http://i237.photobucket.com/albums/ff100/capoz77/20150127_214449_zpstwsp3jrf.jp g"/> [/IMG][/URL]
[URL= http://i237.photobucket.com/albums/ff100/capoz77/IMG-20150127-WA0059_zpsauos1kpx.jp g" target="_blank"> http://i237.photobucket.com/albums/ff100/capoz77/IMG-20150127-WA0059_zpsauos1kpx.jp g"/> [/IMG][/URL]
[URL= http://i237.photobucket.com/albums/ff100/capoz77/IMG-20150127-WA0046_zps8no8e2vj.jp g" target="_blank"> http://i237.photobucket.com/albums/ff100/capoz77/IMG-20150127-WA0046_zps8no8e2vj.jp g"/> [/IMG][/URL]
[URL= http://i237.photobucket.com/albums/ff100/capoz77/IMG-20150127-WA0049_zpsgpo4hgwe.jp g" target="_blank"> http://i237.photobucket.com/albums/ff100/capoz77/IMG-20150127-WA0049_zpsgpo4hgwe.jp g"/> [/IMG][/URL]
[URL= http://i237.photobucket.com/albums/ff100/capoz77/20150127_215452_zpsvgfkuet0.jp g" target="_blank"> http://i237.photobucket.com/albums/ff100/capoz77/20150127_215452_zpsvgfkuet0.jp g"/> [/IMG][/URL]
[URL= http://i237.photobucket.com/albums/ff100/capoz77/IMG-20150127-WA0051_zpsvbahfqk2.jp g" target="_blank"> http://i237.photobucket.com/albums/ff100/capoz77/IMG-20150127-WA0051_zpsvbahfqk2.jp g"/> [/IMG][/URL]
Looks good. A few small fires with window open until the horrible burnt smell disappeared is what was in our handbook.
I've just opened up another one - massive sandstone lintel. Not sure what to do with it yet, may just plaster up and leave the space. 9-10 barrow loads of assorted rubbish, bricks and back burner came out.
Sorry not been on for a while been busy fettlng the stove.
granny_ring - MemberLike that finish what stone is that and which stove are you getting?
The stone is an Indian Sandstone, its very hard reckon its been subjected to a lot of heat and pressure. The stove I went for was a Firefox, a Chinese job which was damaged [I did a small repair £15] reduced from £560 to £250 which to be honest havingtaen it apart is all its worth.
WARNING TO ANYBODY BUYING A FIREFOX "DONT" UNLESS YOU GET IT CHEAP. THE QUALITY CONTROL IS NON-EXISTENT
cruzcampo - MemberLooks supurb Dalesrider, that Morso was in great nick for its age too!
I have had the first 2 days of running the stove had a local steel workshop make a plate which is fixed to the chimney using unistrut, 4 allen bolts to undue and the plate is out. I stuck a piece of fire proof cement board in first over the steel work to give it some protection from the heat, probably not needed.
[img]  ?oh=e20d6f1c434e21ca5e3482111a1526bf&oe=5563AF41&__gda__=1428580900_52a5521052d97c914b3ecc700d0defbc[/img]
[img]  [/img]
[img]  [/img]
boxelder - Member@dales rider - did you put the glass in the cupboard doors? Similar built in cupboard here.
Yes I glazed them myself, easy to do just take the panels out from the inside and use a small bead to hold the glass in.
Good job Cruz, can't beat getting stuck in and doing it yourself!
I did our in 2007, did the flue liner as well and got it all signed of for Building regs.
It was a great old fire but it started leaking in the bedroom so it had to go 🙁
[img]  [/img]
All gone..
[img]  [/img]
Repointed and the old fireplace surround tiles used to extended in to the hearth.
[img]  [/img]
Up the flue.
[img]  [/img]
While I was on the roof I re-beded the ridge tiles.
[img]  [/img]
Job done (this was 8 years ago and the house has new carpet redecorated etc.) this was how the decor was when we moved in so dont start 😉
[img]  [/img]
"granny_ring - Member
Looks good. A few small fires with window open until the horrible burnt smell disappeared is what was in our handbook."
Cheers, there was a bit of a odd smell with first fire, thought it may simply be smoke from opening the door putting in a log. How much smoke smell would you typically get once burner settled in? if any at all?
Shouldn't get any smell after the first few fires.