got some crappy single rads in our house, been in a few years, the house is still cold in winter (large open room) so looking at changing these 2 singles to doubles. if this goes well i may have a bash at bedrooms too altho theres probably only one other room that could do with a double.
my plumber mate who usually does our jobs is chocker for a few months so i thought itd be good to get another DIY skill under my belt. however, im aware that its not as easy as it looks. singletrack to the rescue maybe?
my mate says if i stick to the same sizes then it might just be a bit of pipework altering.
first things first. the two radiators. ive looked at screwfix (kudox) and also mr central heating (revive) and for the sizes i need it works out at about £220 for the two rads.
600 x 1200 and 600 x 1600.
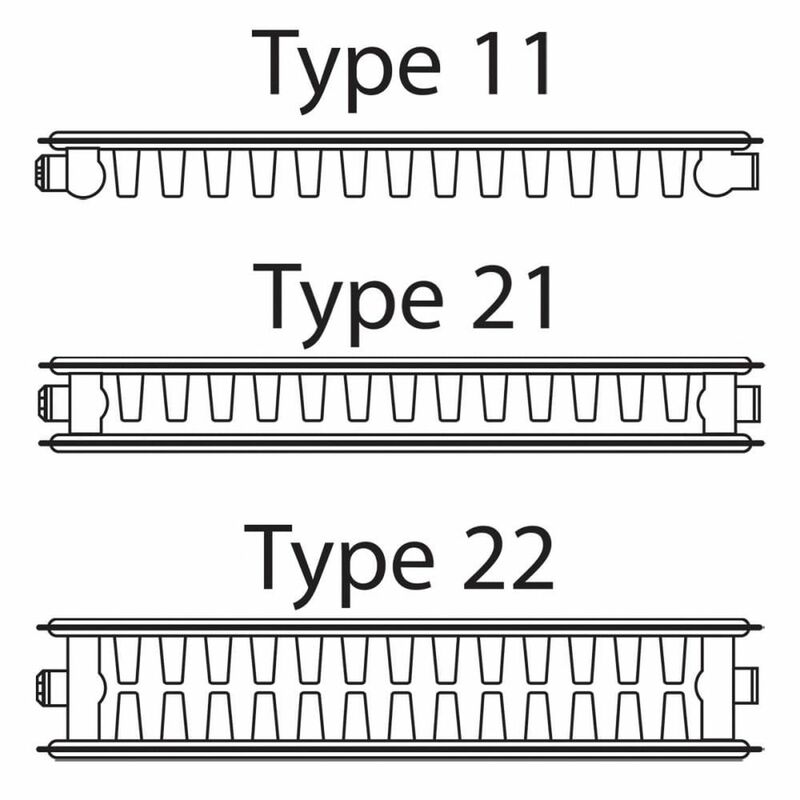
but then im seeing 'type 21', 'type 22', 'double panel plus', 'double deluxe' so i thought id bottom out the right radiators first please. could you advise from the sizes above, which rads i should plump for? any other places to look at too rather than just screwfix and MCH?
also tools. i assume ill need a pipe cutter. any other essential tools? recommended fittings?
theres no rush for this, it can be done over the next few weeks as and when i get time.
thanks
but then im seeing ‘type 21’, ‘type 22’, ‘double panel plus’, ‘double deluxe’ so i thought id bottom out the right radiators first please. could you advise from the sizes above, which rads i should plump for? any other places to look at too rather than just screwfix and MCH?
also tools. i assume ill need a pipe cutter. any other essential tools? recommended fittings?
If you are replacing the same size, all you need are spanners and some ptfe tape, drill and bit plus rawlplugs for the new brackets, plus bowl and some towels to dry the inevitable leak.
If replacing like for like it's pretty easy. I've done it and I'm pretty DIY incompetent.
Distance of the wall to the pipe is critical as that's not something you can't change without altering the pipework. If the one you are fitting is narrower you can get extenders if it's not much in it.
Other things to consider;
- It's very easy to twist a pipe enough to start it leaking at an existing joint when dealing with a stiff nut
- Radiators full of water can be bloody heavy - consider how you are fixing to the wall.
- It's bloody easy to drip nasty black radiator water over your carpets when shifting the old one around!
Yep, have two catch tubs and a bucket
roll carpet up / protect with plastic sheet and something absorbent on top (towels)
turn rad valves both off
Crack the connection on one side of the rad with a catch tub under
remove the bleed valve to allow air in
undo the connection further and separate catching all the dirty water, swap the tubs quickly chuck it in the bucket
once most is out loosely do it back up
Loosen nut on the other side
get two people, lift the rad gently (hopefully there is some give in the pipes to get it off the brackets)
lean it away from the wall, rotate onto the floor
Put something under the connections to catch the drips and quicky unscrew the connections
turn the rad upside down, carry outside to the pavement for the scrap metal collectors
Doing this turn upside down keeps all the manky sludge in the rad and stop you dripping it all over your house.
Now when you buy a new rad buy one narrower or the same width between connections
There will some adjustment on the new radiator tails, and you can get little screw in extenders to take any difference up.
Carefully measure out the brackets against where your connections are
hang and refit the the connections (use new tails and olives)
turn valves back on and hope for the best
Sometimes valves don't shut off completely, thats a pain.
Don't listen to wzzzz. If and when you're ready to remove the old rads make sure you drain the system. TRV's aren't designed to hold back pressure.
Pro plumbers can snatch rads but they have the skills to deal with any issues.
I did similar. The fittings between pipe and rad were different so had to fit a new TRV and whatever the bit on the other side is called.
Plastic pipe and push fit fittings make things like this so much easier. Spend a lot of time before you start taking anything apart making sure you have everything you need, everything has the right ends and is going to fit.
I didnt drain the system, so long as you're prepared to catch any leaks and ensure your boiler wont come on I dont see a great risk (but I am a gung ho cow boy).
thanks. from the diagram above it looks like type 22 will give out more heat. anyone got recommendations on which to buy and from where, for about the budget given in OP? it looks like one size is cheaper at screwfix, and the other cheaper from MCH. theyre not in view of each other in the room so i spose as long as theyre both white then they wont look odd, but just wondered if anyone had any other recommendations for me to look at.
and, whether draining the system or not, how do you ensure that all the air in the new radiator is removed? do you bleed them straight away or something?
thanks
IME it's fine, until it suddenly isn't... measure three times, move slowly and carefully. Start early in the day. Pick a warm month. Know where your local screwfix is. And whatever you do, don't panic on the outside.
Don't do it.
Any plumbing job looks simple and ends with water everywhere an unhappy partner and extra expense as you buy a dehumidifier to dry out the downstairs.
I like to think I'm relatively practical but plumbing is my nemesis.
If and when you’re ready to remove the old rads make sure you drain the system. TRV’s aren’t designed to hold back pressure.
Give over, you can just turn the TRV all the way to off (and the valve on the other end, obvs) and remove a single radiator without draining the system. I've done it plenty of times to decorate a room.
I did it, it was a piece of cake but then, I have flexible plastic pipes. I was even able to disconnect the rad without freezing pipes or draining, and the vacuum pressure kept the water from running out like a straw with your finger over the end. You have to trust the science (and the internet!) but it works.
You might find putting in a type 22 where a type 11 was previously that the room heats up more quickly than others (rooms). So ideally, you want to 'balance' everything out. That involves fiddling with 'yer valves until there is even warmth across the house. It's made easier if you have similar heat output/volume for each room.
Try this for size:
http://www.radcalcer.co.uk/
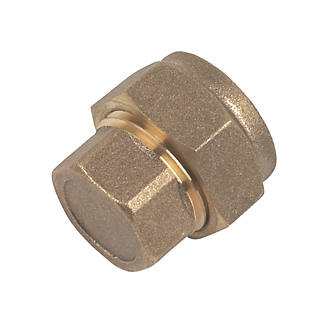
If you do decide to be a cowboy at least invest in some £1.19 blanking nuts for the TRV's - https://www.screwfix.com/p/flomasta-compression-blanking-nut-15mm/55441
Do you also need to make sure the boiler has enough capacity for the bigger rads as you are effectively doubling the size of the system?
The type 22 will probably be deeper with the valve holes further away from the wall. If the pipe work comes up from the floor that means bending it to the new position and / or lowering the rad slightly to enable that.
I’m quite happy bodging things (look on YouTube first for how to do it) but I’d be a bit reluctant to give radiators a go without the system drained first.
Don't forget to turn off the system
You might need a large Allen Key to install the pipe tails? I don't know what they're called, but the screw things in the bottom of the radiator that the TRV / other valve screws in to doesn't come with the new radiatos so you'll have to remove it from the old and put in the new.
They sell a specific tool but a very large allen key (12mm?) may work too.
Do you also need to make sure the boiler has enough capacity for the bigger rads as you are effectively doubling the size of the system?
ooooh good call. how do i do that?
If you do decide to be a cowboy at least invest in some £1.19 blanking nuts for the TRV’s – https://www.screwfix.com/p/flomasta-compression-blanking-nut-15mm/55441/blockquote >
ordered, thanks
Don’t forget to turn off the system
does this just mean turning off the water and making sure the boiler isnt calling for anything?
Cancel the order
Kudos trv valves come witj a zero out blanking cap
Some better ideas.
I work at Screwfix. I am not your std sales assistant, i know enough about what we sell to help people in a pickle.
Your boiler manufacturer will have the btu data onlime somewhere.
You need this as a start point.
Btu hr to kwhr is. 03 or 1/3 then move the decimal
T22 are superb for quick warm up amd output.
The btu of the Kudox rads are very good when compared to other brands or designer column or old school tube affairs
Kudox rads from screwfix also come with a free trv amd locksheild valve worth £24 atm iirc so a big saving
Drain the system
Use hosepipe on the swaged drain point
Open the bleed valves on the rads
Buy sentinel x100 inhibitor whilst your at Screwfix
Now your new T22 rads will be wider. So lets assume your ch boiler is man enougj and produces the same btu as your new rad collection.
You will need to move the inlet and outlet pipe a few cms. So you need to be able to solder copper. You cpuld use speed fit but i wouldnt.
Then probably easiest is long radius
15mm copper elbows to realign if bottom fed. Or Tesla radiator trv extension if wall fed.
Check if the old brackets fit. They won't of course so measures up drill and plug the new one onto the wall.
Get help to man handle the new rad into position as doms are 30kg plus
Connect up the trv and locksheild. Ptfe tape and maybe a smear of lsx or plumbers mait.
Tighten down and onto the next.
Yes, it means turning off the boiler but chances are it wont fire with 0psi in the loop as most newish ones are safety locked.
Add the inhibitor to a towel rail ad you can unscrew the bleed cap very easily and its vertical.
With your new rads you might need a brannan balanced rad thermometer so you can wind in the locksheild if you want to lower the flow in one room to pick up a few watts in another.
If you can, wait until summer.
Nothing worse than being under pressure to do something that you’re unfamiliar with.
You’re probably going to have to turn the heating off for a day (or more) while you work out what to do and solve somethings that you haven’t considered.
In winter you’ll be under pressure to get it all sorted, whereas in summer you can take your time.
Cancel the order
order cancelled. (or rather i hadnt pressed 'buy' yet as its still sitting in my basket with the radiators) 😀
Your boiler manufacturer will have the btu data onlime somewhere.
You need this as a start point.
Btu hr to kwhr is. 03 or 1/3 then move the decimal
we've got an ideal vogue C32. does this mean anything to you as far as btu goes, or whether it would be good enough?
Buy sentinel x100 inhibitor whilst your at Screwfix
pretty sure theres some stuff in the system already to prevent rust or whatever, do i still need this?
So you need to be able to solder copper. You cpuld use speed fit but i wouldnt.
i cant solder.
Ptfe tape and maybe a smear of lsx or plumbers mait.
ive got plenty of ptfe, never heard of the other two, do i need to buy some of this then?
Add the inhibitor to a towel rail ad you can unscrew the bleed cap very easily and its vertical.
wont the radiator be full of water, or are you assuming ive emptied the system?
If you can, wait until summer.
knowing me itll probably take me that long to get everything ready anyway, but i would like to learn this skill so ill probably try it soonish. anyways, probably better to order everything i need now, i expect radiator prices are unlikely to go down in price during the summer?
thanks for your help
Could be easy, could be a nightmare, I've done all the rads in our house, some were a doddle others a pig. Really depended on how much force the original plumber used tightening up fittings. In a couple of places the pipe had been crushed, meant I had to cut off the copper pipe and extend. Others I had to change pipework as we went from a single to double and that extra 20mm was needed.
Brackets didn't line up with existing holes so new fixings needed, whole house is plasterboard so needed some fairly heavy duty fixings, even the external walls are thermolite so drilling into the brickwork doesn't help.
Top tip, make sure you have some pipe caps if it all goes hideously wrong so at least you can cap the pipes and refill the system. You may not get as far as installing TRVs!
110,000 btu or britsh thrmal units. Using the stm vague guide roughly 36kw of potential output.
Or 11 rads at 10.000btu each
10,000btu is a big rad, a kudox t23 600 x 1000 is atound 6000btu.
Yes i had assumed ypu were draing the system
Yes i had assumed hou could solder copper
I assumed the rads were on 15mm coppper tails
Im thimking a plumber might be cheaper
You cpuld use speed fit but i wouldnt.
Can I ask why?
Heat
Heat cycling
Pressure changes during heating /cooling cycle.
Potential for misaligned joints if moving rad centers.
Catastrophic failures as opposed to abit of a weep at a join, its dumped the entire ch system on the carpet type of thing.
Very rare occurrance admittedly, but as i can solder and have access to a warehouse with alot of plumbing essentials in it I would go fixed. And im old and stuck in my ways and a luddite so not open to new fangled technologies
Conversion of btu to watts is not 3 to 1 but is really easy to remember as 3 fours are twelve or 3412……..
Give over, you can just turn the TRV all the way to off
Or remove the TRV head and screw on the cap that usually comes with the valve to hold the pin closed to avoid any problem with the temperature sensor. If there is space then compression fittings are reasonably easy for the non-solder confident to create a watertight seal. Also avoids any fire risk from a blow torch.
Can confirm that the Drayton TRV's offered free with Kudox rads are not supplied with either blanking nuts or a cap to hold the pin closed. Neither did they successfully hold back 1bar of pressure for me. But if you're replacing TRV's then the system is being drained regardless.
Belt and braces is PTFE and Hawk White (or similar) jointing compound, not Plumbers Mait or LS-K.
Ignore the comments about push fit above, my entire central heating system except for the last 6 inches to the radiator is push fit as are all the hot water circuits. As long as it's installed properly it's fine for hot water and a lot more tolerant of bad alignment etc. I think the copper radiator tails are purely for aesthetic reasons.
Cancel the order
Kudos trv valves come witj a zero out blanking cap
Can confirm that the Drayton TRV’s offered free with Kudox rads are not supplied with either blanking nuts or a cap to hold the pin closed.
hmmmm, mebbes worth sticking them back on the order for peace of mind then. theyre only a couple of quid.
Top tip, make sure you have some pipe caps if it all goes hideously wrong so at least you can cap the pipes and refill the system.
by 'pipe caps' do you mean the same as the above?
110,000 btu or britsh thrmal units. Using the stm vague guide roughly 36kw of potential output.
Or 11 rads at 10.000btu each
10,000btu is a big rad, a kudox t23 600 x 1000 is atound 6000btu.
dont understand any of that, but are you saying that my ideal vogue c32 shouldnt have any problems with the bigger radiators?
Yes i had assumed hou could solder copper
i have a blowtorch. i was also thinking that you get fittings these days that already include the solder and you just heat them up retrospectively, is this the case?
Im thimking a plumber might be cheaper
well my mate would charge 'mates rates' but hes not available for 2 or 3 months. and id be happy to pay him. but i just see it as a way to learn a new DIY skill for future. if i can get it done with a bit of hand holding from you chaps then id be a happy bunny.
thanks
Wait for your mate to become available; act as his labourer - look and learn, have a go under his supervision.
If you DIY and have a problem, what will you do and how much will it cost to resolve?
A plumber will have all the tools, the skills set and problem solving ability.
I’m pretty good at DIY plumbing and have done lots of jobs myself but I still am not a fan of changing rads for slightly different ones. There’s always an issue with the old pipes, once disconnected, needing cleaning up, sometimes needing trimming (difficult when you only need to trim a little). I have bought a lot of pro level tools over the years and when I did this current house up I got a plumber to change all the rads (they were being put in a different place), all I did was hang the new ones in the new locations and paid him to connect them all so I didn’t get any problems - glad I did as there was some tricky bends to put in.
From how you’ve described your skills and experience I’d wait for your friend to become available and help him do it to maybe increase your skills and knowledge if he is happy to work with you.
Not going to chime in with anything other than make sure that you have speedfit stop ends of the right size right next to you when you disconnect the exiting pipework!
As above though..... I'd wait for your mate if there's any alteration of the pipework involved. You might be able to remove the old rads and fit the new ones though which would reduce costs.
Oh and if you're fitting new brackets then measure lots of times to make sure they're level. I hung 7 rads prior to the (effing useless) plumbers coming to connect them to the system - I spent a lot of time making sure they were all exactly right because any mistakes are very much on show!!
Well the rad i bought and fitted 2 weeks ago (T22 Kudox , Drayton RT212 TRV ) had the blue wind down decorating blank cap as is clearly on show in this picture
https://www.cef.co.uk/catalogue/products/4879100-rt212-trv-with-15mm-angle-valve-and-lockshield
Your boiler is big , but you need to work out how many rads its supplying , and their size. We dont know if you live in Mcmoonter landed gentry country pile with 12 rooms, or a 3bed semi in Doncaster . If its the former you may struggle , if its the latter you will be too hot.
The removable caps are John Guest (probably ) speedfit blanks which are removable push fit. You simply push them on to the a peice of copper pipe, little pull to check its sealed and its done. If you attempted to fit a rad and ran into difficultie you could fit these , rechrge the system and turn on the boiler and have heat.
Yes, You can buy pre soldered fitting . Wire wool clean up the old existing pipework , some flux and heat till you see some solder appear at the end of the fitting,then stop heating.
Compression bolt down fittings might be better for you though . not as tidy but it will work.
And whats LS-K , LSX is a silicone hot/cold water jointing compund. agreed Fernox is better than Plumbers Maite in this scenario
As for push fit. I can only go by what the multitude of professional plumbers I see every week tell me. You may have had a perfect experience with your push fit in your house. I have it in my house. I have used it for 30 years in pub cellar work. Its great, but I sell hundreds of lenghts of copper to each roll of plastic speedfit pipe and I hear tales of woe regarding failed pushfit , not so many with leaking copper. Thats not to say they dont exist. Maybe they are accepted ,but its the emergency plumbers who come in trying to fix the failure who moan about it more.
AS i said, i am old and a luddite and I can solder copper street or Yorkshire fine. YEMV, and you are 100% entilted to your own opinion which is ace. Its not a black and white / right or wrong thing in any way .
by ‘pipe caps’ do you mean the same as the above?
Yes, compression fittings that you can use to cap an open pipe off.
If you don't need to move any pipes, it's not too bad a job.
I'd bite the bullet and do all the radiators in one go, it's less painful in the long run, and saves you a bit in scale inhibitor.
I'd also drain the system rather than faff around with trying to drain individual radiators. It's not really much more time, and is safer. Also full radiators are *really* heavy (empty ones aren't exactly light, either).
As for push fit. I can only go by what the multitude of professional plumbers I see every week tell me.
Every plumber I've had uses push fit by preference.
Oh, and if you're existing radiators are ancient, you might not need to move to double panel ones. Newer convectors punt out more heat than old cast iron ones. Perhaps the old ones are full of sludge, too?
I've skim read the topic, so apologies:
Have you checked (or can you) check the internal state of the connecting pipes?
At my mam's house it was a coal fire/back boiler and the entire system was clogging up - replacing the rads would not have helped much. I replaced the whole bang-shoot (soldered joints, copper) and it turned out great - and it was curiously satisfying too!
At our current rented house (gas boiler) the pipes are even worse and are very constricted.
If you can, wait until summer
- Sound advice if DIY!
Your boiler is big , but you need to work out how many rads its supplying , and their size. We dont know if you live in Mcmoonter landed gentry country pile with 12 rooms, or a 3bed semi in Doncaster . If its the former you may struggle , if its the latter you will be too hot.
3 bed bungalow, think its about 11 rads in all, none bigger then the two im changing in the lounge.
Oh, and if you’re existing radiators are ancient, you might not need to move to double panel ones. Newer convectors punt out more heat than old cast iron ones. Perhaps the old ones are full of sludge, too?
bout 15 years old, PURMO make. think they were probably the cheapest the plumber could find when we moved in and changed them all.
From how you’ve described your skills and experience I’d wait for your friend to become available and help him do it to maybe increase your skills and knowledge if he is happy to work with you.
Wait for your mate to become available; act as his labourer – look and learn, have a go under his supervision.
As above though….. I’d wait for your mate if there’s any alteration of the pipework involved.
ok ok i get it, ill wait 😀
just rang him, hes told me to get the radiators and we'll change them when hes got a saturday morning free. ive told him i want to do the work while he supervises and hes fine with that.
thanks for all the advice, appreciated.
update.
different mate of mine (non-plumber but his lads one) offered to help me, said it was a doddle etc, so we fitted them yesterday. really grateful for his help as he showed me tips that i wouldnt have known about.
happily it went easier than it might have done. he came with blowtorch and solder in case, but actually, the new brackets utilised the original holes, so no drilling needed. and the rads could be moved sideways on the brackets a couple of inches to fit original pipework, so no soldering needed either. as the rads are thicker tho, the pipework near the joint comes out a bit from the wall, but its all hidden by settees and the like so no-one will notice. gold standard would have been to put a bend joint in but i was happy enough to forego that.
so, 2 new rads with new TRVs.
one thing i was surprised at, and one of the tips he showed me..... the 'spindles' (for want of a better word) that screw into the bottom of the rads, and that the compression nuts tighten onto, dont have a 'stop'. if you carried on screwing theyd screw right the way into the radiators. so he recommended leaving the first thread bare (so as not to cross thread) and wrapping looooads of PTFE all around the 'stop' end so that you do actually get to the point where its snug and wont tighten any more.
learnt a fair bit, and i still havent had a go at soldering yet, but happy with the result.
thanks for all your advice, appreciated.
🤗
If that was me, there'd be another follow-up thread asking about how to deal with catastrophic water leaks!
Well done!
If that was me, there’d be another follow-up thread asking about how to deal with catastrophic water leaks!
well ive just checked the joints and all seems fine so far 🙂
now that i'm satisfied that its not leaking, i need to put some rust inhibitor or somethings in. we didnt do it monday in case it needed draining again and we'd have to buy more.
so, what would you recommend? one of the fernox jobbies (if so which number?), or another of my mates said he used MC1 or somethings.
thanks
I'd have still waiting until summer.
Have you had to rebalance the system? That's always felt like the black art to me - a simple rad swap is easy, break anything though and you need a plumber (or someone with skills) and avoiding breaking things (like kinking pipes when you discover that its way heavier than it looks!) is also where experience comes in.
Any of the kits will be fine, usually it's a flush then refill with inhibitor. Think I used MC1 or whatever it's called. One of them comes with a spout to add the contents to the rad which is handy if you don't have a filter to dump them into.
Have you had to rebalance the system?
no, dont know how to do this. my mate touched on it but said he was also a bit confused by it too so i need to read up on it.
i know you do it by turning that little knob/screw at the bottom to control the flow of water through it, but not exactly sure what im looking for.
for instance, once the rads were up, and the CH turned on, we felt the radiators, they felt fine/hot, but on touching the 2 pipes, one was hot, one cold still. and that was after 1 full turn of the screw. i didnt know what i was doing but opened it fully and it started gurgling a bit (water now coming through i suppose) and then became hot.
but i dont know why it was still cold with a full turn (yet the rad was hot), and i needed to open it fully.
Any of the kits will be fine, usually it’s a flush then refill with inhibitor. Think I used MC1 or whatever it’s called. One of them comes with a spout to add the contents to the rad which is handy if you don’t have a filter to dump them into.
thanks 🙂
well ive finally got round to finishing it (i hope), by putting the fernox in.
however, i just wanted to run it by you to make sure ive done it right?
as it stood, i had 2 rads changed, and whatever fernox was still in the system that hadnt been drained (i only drained the two rads that i was changing). so now i needed to empty enough water out of one radiator to put in some new fernox.
i used the bathroom towel radiator as it had a vertical bleed screw and nut, so easier to fill. i put a drain from the bottom out the front door and opened up the little screw at the bottom until water came out. i then thought that as a load had come out id have emptied enough to refill with fernox. but..... everytime i cracked the bleed screw water came out so obviously not.
scratchy head time, and common sense told me that every bit of water above this height in all of the pipes in the loft was still pushing down on it, so i had to isolate that one rad so it only emptied itself if that makes sense.
closed the isolation valve on the other side,and the little screw under the plastic cap (i guess they both do the same thing but not every rad has an isolation valve maybe?) and then opened it up again at the bottom. hmmmm....water still to the top of the rad, and nowt coming out the drain. scratchy head time again. must be the TRV. so i opened that fully and yep, out came the water. emptied a bottle of fernox in (after closing the drain of course).
opened the isolation valve and put the boiler pressure up to 1 bar again. i then went round every radiator in the house bleeding them. only one of them had a bit of air in, but bled that and now all the rads are full of water and no air (hopefully).
re-pressurised boiler to 1 bar again.
and thats it.
learning points are to isolate the radiator that youre draining first, or you lose too much water and itd take ages. oh and open the TRV or else it wont drain.
everything sound present and correct?
thanks for all of your help.
