![]() You don't need to be an 'investor' to invest in Singletrack: 6 days left: 95% of target - Find out more
You don't need to be an 'investor' to invest in Singletrack: 6 days left: 95% of target - Find out more
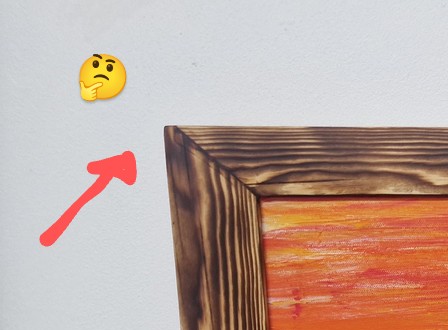
After many bad cuts with a B&Q jack saw while making picture frames I blew £30 on a Japanese Ryobi(?) saw from the local Axminster Tools shop. The guy in the shop told me that I 'must' make a magnetic saw guide and it seemed easy so I did.
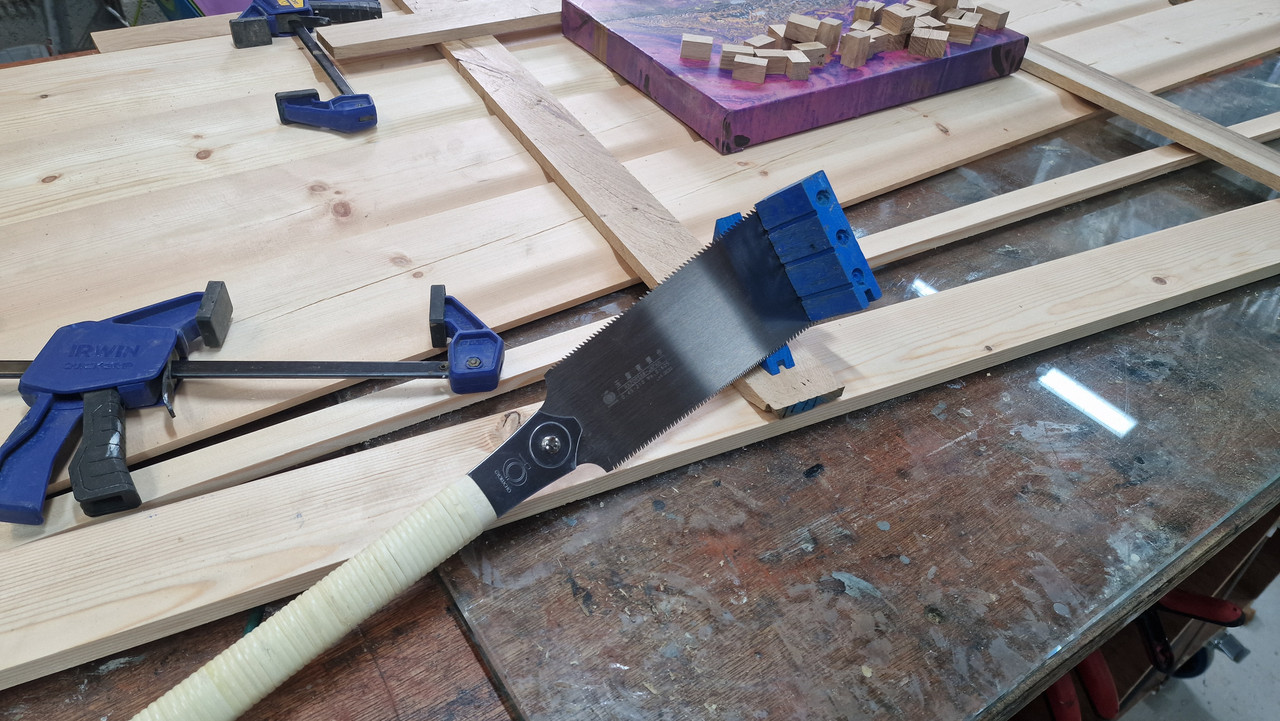
The saw guide is just a section of old flooring I had with three 10mm magnets countersunk into one face and many checks to be sure that the face with the magnets is exactly 90 degrees to the sides and the top & bottom faces. I rest the saw along the required cut line, the magnets stick the guide to the side of the blade and I clamp it firmly in place.
The great thing is that when I saw to saw, the flexible blade sticks straight and vertical to the clamp. This means that if my arm wobbles a little while sawing, which normally results in a wiggle in the cut, that is absorbed by the blade flex and the cut remains true.
I practiced by cutting some 3cm lengths of wood and they all turned out remarkably well with the cut ends displaying no saw marks and almost looking polished. You can see the consistency in thge set I have glued together at the bottom of the picture to make a picture frame.

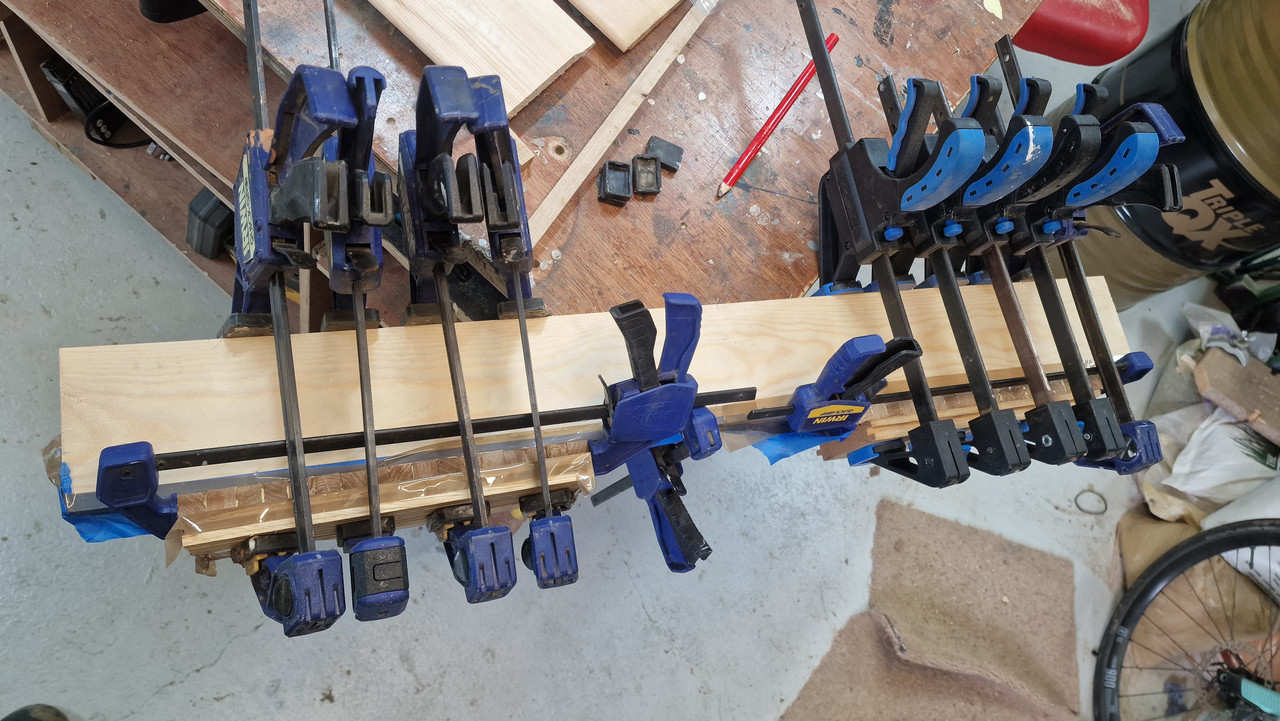
Making a picture frame out of these blocks is awkward as I don't have enough clamps, or perhaps the right type of clamp, to hold the blocks together while they glue. Perhaps I should show this picture of the 'Last thing you bodged' thread.
I am now seriously thinking of getting a Dovetail saw and makign the requisite saw guide for that to see if I can make dovetail joints without the 3" gaps.
Any other ideas for things that this saw lets me do are welcome. I am still stunned at the straight, square and smoothness of the cuts that are so easy to do.
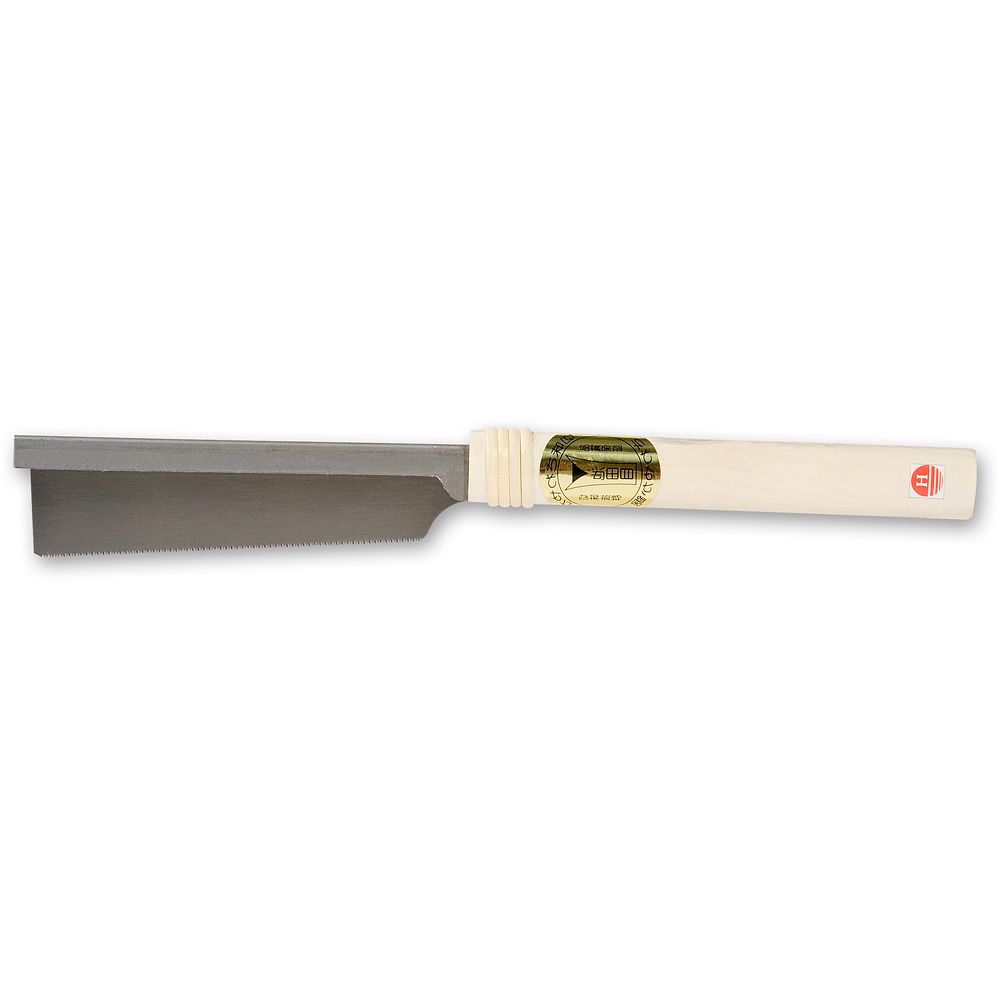
Yeah those pull saws are brilliant for fine cuts.
The guy in the shop told me that I ‘must’ make a magnetic saw guide
I don't know a single decent woodworker who bothers with such a thing. You don't 'need' it. Sure, it can be helpful as a beginner, but it's far, far better to practice sawing until you can saw a perfect straight line. If you still can't, use a machine. As for dovetails; again, practice. Practice practice practice. You will develop muscle memory which will enable you to produce consistent straight cuts, time after time.
The Ryoba saw is a great tool. So versatile. But also consider saws with a stiffening spine; this helps to prevent that flex. That's probably what's been hampering your efforts, if you've only been using a jack saw. They're good for rough cutting timber fast, but not for finer stuff. A decent dovetail saw is very useful, as the finer tooth count helps when cutting down the grain. I have one, a Veritas, excellent quality, but for very small work, I use a little Dozuki Japanese saw, which has the stiffening spine. That's probably my favourite saw, and the one I reach for most.
Japanese saws were a revelation for me when I first used them. Absolutely beautiful tools with an exceptional finish.
They really inspire you to take your time and focus on getting perfect cuts.
Everyone uses them differently, but I tend to stand fairly far back, slightly turned away from the work, legs akimbo, holding the saw right at the far end of the handle (away from the blade) and I point my index finger down the handle and really concentrate on getting an unhindered and arrow-straight swing back and forth of my arm, much like perhaps a snooker player might.
Those double edged ones are very handy.
If you're careful you can use them as a flush cut saw to take dowels or through-tenons to the surface or to be safe, put a sheet of paper under the blade and finally plane flush.
Lovely saws. Workshop Heaven do a nice set that covers all bases. I think you get a little flush cut version in the kit too.
It looks very much like your one but further away.
I don't know the last time I used a western style saw but its a minute. I have a folding version from Workshop Heaven without a 'back' (the reinforcing spine along the top) which I use for all sorts.
Pull saws can get away without a spine because the cut stroke is putting the blade into tension, not compression, hence why Western saws are generally much thicker.
Pull saws without a spine are very handy for deep cuts, panel cutting and cutting flush and cutting out rectangular holes etc.
When I'm on site I use a pull-saw by Irwin from Screwfix. It's brilliant actually. The blade detaches to store in your toolkit and it has no back either. Cuts very nicely.
Kayak23; seen these beauties?
https://www.workshopheaven.com/gyokucho-fugaku-folding-japanese-saws-set-of-3/
Great for pulling out if challenged by a rival gang of woodworkers...
Kayak23; seen these beauties?
I've got one of them but not seen the set of 3.
The one I have actually isn't a very fine cut so I don't use it for fine cuts.
I imagine that's covered in the set mind.
Great for pulling out if challenged by a rival gang of woodworkers…
I use my cordless track saw on these occasions 😂
Other than for storage, any reason to go for folding saw over non-folding?
I agree about learning to saw rather than relying on saw guides which is why I cut so many of those bloody little blocks. Later ones were freehand but saw guide makes it fool proof though - at least for my level of fool.
Other than for storage, any reason to go for folding saw over non-folding?
Not unless you need to carry them about to different places really.
I agree about learning to saw rather than relying on saw guides which is why I cut so many of those bloody little blocks. Later ones were freehand but saw guide makes it fool proof though – at least for my level of fool.
There's nothing 'wrong' with using such a guide, but to be good at woodworking, it's good to learn good techniques. Kayak's explanation of his sawing technique is an example of how someone has learned the skill of using a tool effectively. I find that very often, it's actually easier to just grab a hand tool, than setting up a machine. For example dovetails; yes, you can buy expensive jigs to use with routers, and yes, you will (with a little practice) be able to produce perfect dovetail every single time. But for all the time and expense involved, you can produce near identical results by hand. Which is far, far more satisfying. I'm not a total luddite, machines have their place. Nothing beats a track saw for a clean, straight edge along a board. Taking weeks to chisel out something a router can do in seconds, is folly. But producing a clean, crisp dovetail with no gaps, entirely by hand, is a true pleasure. The reward is as much in the doing, as the finished product.
I agree about hand tools and machines each having their place. I certainly wouldn't want to have built the cabin in the garden without a table saw and chop saw.
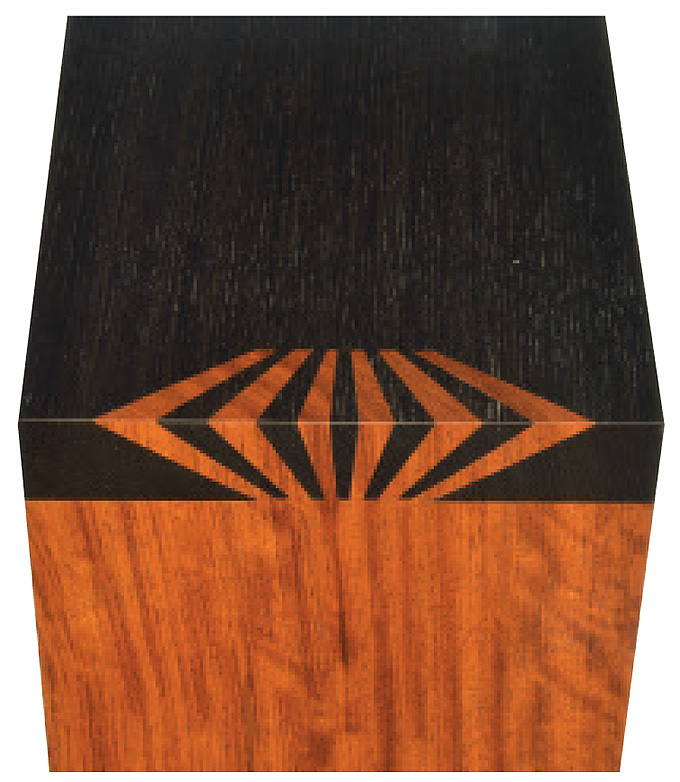
After the excitement and revelation of this saw I have a Japanese dovetail saw on my Christmas list. I have no real use for it as I can't imagine using too many dovetail joints making picture frames but that doesn't stop me needing one. I think I will be able to incorporate some 'arty' looking joints into the work, possibly something like these:
After the excitement and revelation of this saw I have a Japanese dovetail saw on my Christmas list. I have no real use for it as I can’t imagine using too many dovetail joints making picture frames but that doesn’t stop me needing one.
Dovetail saw is basically just a term for a fine-toothed saw, usually relatively small and with a back/spine.
Not exclusively for dovetails.
It does usually suggest its for small carcass dovetails though.
The dovetail saw will be great for all sorts of finer joint work.
If dovetails are what you're into, then there's no reason they can't be incorporated into picture frames in plenty of creative ways.

The image below for instance is a dovetail sure, but the size of it with more cutting along the grain is perhaps more suited to a tenon saw.

I don't think I've ever had a saw specifically called a dovetail saw but I've cut plenty of dovetails in previous roles. I actually much prefer a longer saw than most dovetail saws tend to be as I personally find a longer stroke helps me to maintain straighter cuts. The cut I get is beautifully fine anyway with the regular saw.
It's a bit like pumping up a bike tyre with a mini pump versus a regular sized pump.
Whatever saw is the most comfortable in your hand is likely to be what you'll use the most and get good results with.
For me, that's this.

I don't really like Japanese pull saws.
I can cut straighter and considerably faster with a western saw. I do have a z saw and the cut is something else in terms of finish but other than that I tend to leave it in its case.
I don’t really like Japanese pull saws.
Plenty of people don't. Great to have a choice. I love them but I don't think I could ever get on that well with a Japanese style plane that also cuts towards you.
Plenty of people don’t. Great to have a choice
Completely agree. Never tried a pull plane, I have pulled planes when needed.
I love a wooden plane as the get longer though. Light and fast with a bit of tippytappy adjustment.
When I said a dovetail saw I simply meant a fine toothed saw with a stiffened spine, pretty much what you are showing in the photo. If I do get one I will try the frame designed you show - or something similar I am sure.
I reckon that 2nd design would look good with the dark inlay design shown in the video I linked to. I need to get some contrasting wood I think as Oak and Pine don't really set each other off enough.
No, probably stick to hardwoods.
Oak and walnut is a classic combo.
Oak and cherry is good.
Or oak and oak with the contrast being in texture or a treatment such as fuming for example.
Rabbit hole innit.
Just get cutting before getting fancy pants. 🙂
A few I styles I have tried so far
Burnt Pine trying to hide the 45s by not aiming them at the corners.
A load of others from Gallery I am beginning to put together

From Top Left across
1) Raw bark (Col du Turino)
2) Plain Oak 45 corners (St Michaels Mount)
3) Top and Bottom Flat Bars in Sapele(?) (View over thew Reeds)
4) Overlapped Corners (Wild Camping)
5) Alternating butt joints in Oak (Clouds over Moorland)
6) Burnt Silver (Borderline Madness)
Bottom left Across
7) Alternating butt joints ?? Wood (Flowers against the Sky)
8) Striped butt frame Oak, Stripe of Pine, Sapele(?), Stripe of Pine, Oak (Walking in Autumn Puddles)
9) Top and Bottom Raised bars in Oak (Green Abstract)
10) Alternative butt box frame in Oak (1st Holiday in Provence)
11) Alternating butt joints in Oak (Alfa)
I will post up a couple more on this thread when I have finished them.
Oh Wca, Wca, Wca...
You've mitred the corner but cut/planed the rails narrower than the stiles meaning the mitre doesn't hit the corner.
We're not angry, we're just disappointed 😉
You’ve mitred the corner but cut/planed the rails narrower than the stiles meaning the mitre doesn’t hit the corner.
Pretty sure that was the idea?
trying to hide the 45s by not aiming them at the corners.
Oh OK. Apologies Wca.
Fair enough 👍 😂
Highlights them for me I guess.
Play to your strength and mask your weaknesses 🙂
I deliberately showed that pic at full size so you could see the bodge/dodge
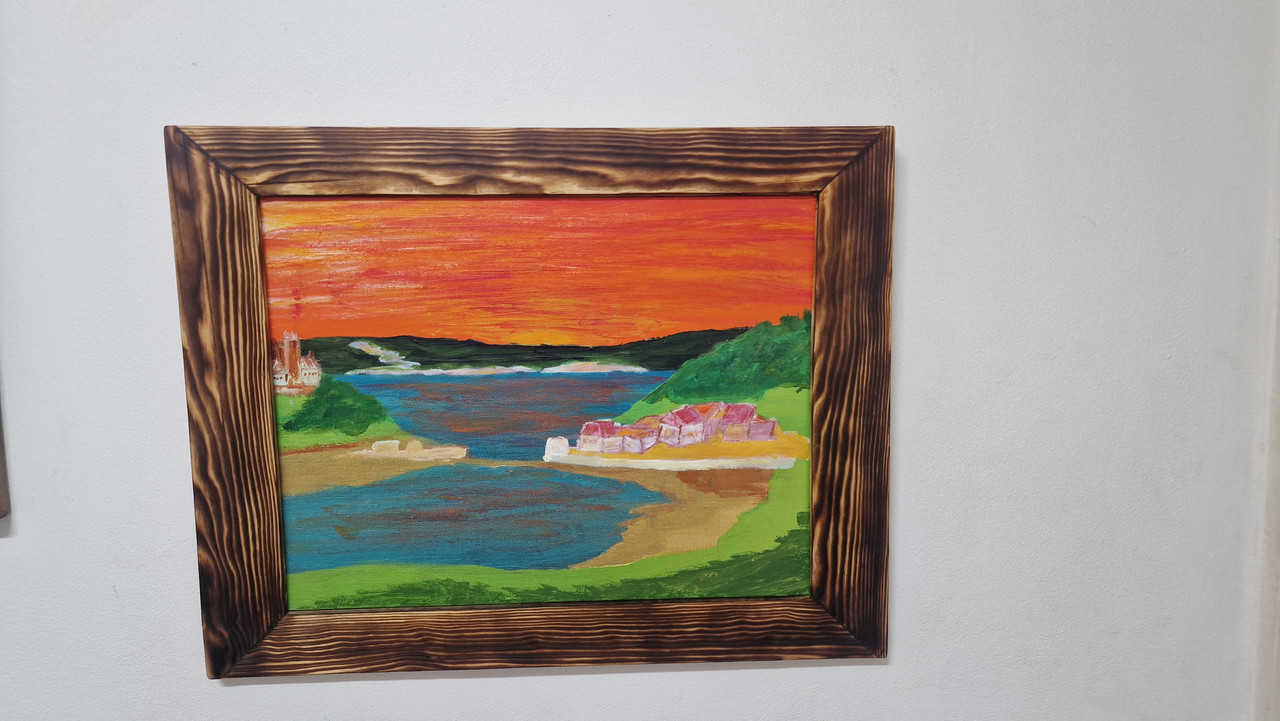
Anyway, this evenings cock up was making sure I had enough frame material by measuring the oputer edge of the painting instead of the outer edge of the frame. Each time I cut the Mitre I lost a section of wood and guess what happened when I got to the final length. I have a patch glued up and drying now ready to be 'blended in' tomorrow.

Mind you, the mitres were a lot tighter* using the Japanese saw and my home made saw guide
*just resting in the photo which is why they still look gappy. Much better when pressed together
This is my favourite, the ice bear Ikedame dovetail saw, though I use it for cutting tenon shoulders and the like. I'm on my tenth or something. not too expensive really and lasts a couple of years hard use.
Just dont even have a slip and cut yourself with it 😆 😳
<h1 class="page-title"><span class="base" data-ui-id="page-title-wrapper"> </span></h1>
We’re not angry, we’re just disappointed
I'm not disappointed; I'm angry and upset. 😢
Doesn't work for me, that. Just looks amateurish, in my honest opinion. Some of the others look good though. I like the top and bottom 'rails'. I hung a large mirror in the kitchen using a similar tactic, although my rails are hidden behind. Used a 'French Cleat'/split batten system. Gravity is your friend.
Dovetail saw is basically just a term for a fine-toothed saw, usually relatively small and with a back/spine.
Not exclusively for dovetails.
Yeah. A Dozuki can be used for dovetails, but the key is in having a relatively stiff blade for front to back accuracy, I find. And a good technique is to always knife cuts, then chisel out a groove on the waste side. This helps the blade to find its groove, literally, and you get a really nice clean edge. I use a Japanese marking knife, which has a bevel on only one side, which aids crisp clean accurate marking and cutlines.

These are available left and right handed.
For the price of two of them you could get a double bevelled o1 "David Charelsworth" marking knife from Philly Planes.
Not as chunky as a Ron Hock knife but every bit as sharp.
For the price of more than four of them you could get a double bevelled o1 “David Charelsworth” marking knife from Philly Planes
FTFY. (£8.50 or less, v £39)
But well worth the money!
[I] Just looks amateurish, in my honest opinion. /I]
It is amateurish, I am an amateur. It does, however, look a lot better that the sticking out points that were there before. Also, you can't see where I trimmed the bit on the inside of the frame where it pointed to far inwards. Just for the record, I do actually agree with you and Kayak regarding this frame and if you look, it is not featured in the gallery. Just trying to recover what I could from some bad cuts.
Anyway, you are buying the painting and getting the frame for free.
I don’t think I could ever get on that well with a Japanese style plane that also cuts towards you.
I've tried those, and other wooden planes. All I can say is; thank heavens for modern technology. All that tap tap knock knock palaver. I've done my planing by the time someone has set one of those up.
I do actually agree with you and Kayak regarding this frame and if you look, it is not featured in the gallery. Just trying to recover what I could from some bad cuts.
Fairs.
But well worth the money!
Hmm. I'm not so sure, and that's from someone who has spent a fair few quid on bits and pieces. That's into workshop jewellery territory for me. A tool has to earn its keep; A Veritas or Lie Nielson plane, for example, is a good investment as it will give its value back in use. Knives like that are more 'things I'd like if someone bought me one as a present' type thing.
Speaking of planes:
https://www.axminstertools.com/bridge-city-hp-12-dual-angle-smoothing-plane-106529
🤯
For the price of two of them you could get a double bevelled o1 “David Charelsworth” marking knife from Philly Planes.
Not as chunky as a Ron Hock knife but every bit as sharp.
Double bevel knives dont cut right up to the edge of the ruler/square, so it isnt as accurate a set up. Single bevel as with that nice one Kayak has allows that, as long as you use the correct handed.
I made a left hand single bevel out of an old planer blade with an oak handle glued on. Being hss it can take an excellent edge but isnt some funny difficult to resharpen metal
Speaking of planes:....
I cant see how bridge city can charge that for a plane, especially compared to LN, which makes expensive, but proper made tools that do see plenty of use. Plus its too young a company to look to charge those figures. Seems too artisan like the low cut t shirt and no socks brigade.
Single bevel as with that nice one Kayak has allows that, as long as you use the correct handed.
Not me. I'm not that posh 😉😂
I actually tend to use a scalpel. I know it's not the right thing what with having a bevel each side etc but I can usually make it work OK. It's in how your angle it away from the work.
I used to always get a snapped hacksaw blade or other suitable bit of flat Metal, old 150mm rulers can work well, then flat down one side, grind a point and a bevel on it (or a double angle point) wrap it in tape where you hold it and crack on.

I used the blunt blades from my electric jigsaw as they were already about the right length. Oooh, I am almost a pro 🙂
It is amateurish, I am an amateur
This is irrelevant, whether or not you get paid for it. I'm an 'amateur' in that respect. 'Amateurish' is perhaps the wrong word in this context. It just looks a little 'not done properly', but then that's entirely subjective anyway and probably wrapped up in convention and snobbery. So don't take it to heart too much. I meant no offence, I was just trying to provide constructive criticism. Forgive me if it came out wrong. You know yourself, your next effort will be better. That's all that matters. Crack on and have fun!
Double bevel knives dont cut right up to the edge of the ruler/square, so it isnt as accurate a set up
I think it means it's got two bevels, but on one side of the blade, meaning you can use it left or right handed, no?
I cant see how bridge city can charge that for a plane, especially compared to LN, which makes expensive, but proper made tools that do see plenty of use.
It's ridiculous. Use a nice Veritas, Lie Nielson, Clifton, or on a smaller budget, even the Axminster Rider and QuangSheng planes, over say a cheap Irwin Record job, and you can see and feel the difference. Nothing about Bridge City tools makes me want to buy them; they offer nothing the other brands don't give you. A bit like Leica cameras; exquisitely made, sure, but they don't take any better pictures than Canon, Nikon or Sony etc. I'd quite like it if someone bought me this though:
https://www.axminstertools.com/bridge-city-mt-1-multi-tool-104569
Seems too artisan like the low cut t shirt and no socks brigade.
And trousers that are too short; what are they doing, waiting for floods?? And little knitted hats that are a bit too small, like your nan used to make. Where do they even get such clobber from? Charity shops in Bethnal Green I think.
Actually, on the subject of 'workshop jewellery', I have this:

https://www.axminstertools.com/veritas-deluxe-mk-ii-honing-guide-set-101262
Now, I know many people prefer to sharpen freehand, and it's an expensive bit of kit, but I've actually found it to be a revelation. I get better results than with any other system; it has neat little tricks like being able to hone a secondary bevel just by turning a dial. The wide roller is much better than the little narrow wheel most other designs use. I'm sure lots of people would scoff at it, but it works for me.
Hand sharpening stays with you forever the stance, hand movements nothing tops the feeling. Ive used all sorts of set ups you name it even saw doctor equipment.
Huge fan of pull saws also btw
Hand sharpening stays with you forever the stance, hand movements nothing tops the feeling
It works for some, but not for others. I learned to sharpen freehand. Tbh I got quite good at it. But using the guide system gives me consistently better results. And I find I actually need to sharpen less, probably because the edges are honed more accurately. AndI find my stones wear more evenly. That said, I will sometimes quickly give a chisel a quick rub of the stone, freehand, if I'm just doing 'rough' work. To each, their own.
So much Japanese wood joint porn on youtube!
Lovely. Saw some examples of such joints at a mini-exhibition at Japan House last week:
Love Japanese woodwork. Some of it gets far too intensely anal for me though! It’s a whole different philosophy that perhaps we in the West don’t ‘get’ in the same way. Utterly fascinating though.
I think it means it’s got two bevels, but on one side of the blade, meaning you can use it left or right handed, no?
Yes I see what you mean, but I believe those are called a vee pointed edge. Double bevel is when the blade is given a ground angle on both sides.
The single bevel as with Kayaks knife allows that flat side to rest directly on the edge or the ruler/square.
Its like when you cut veneer using a scalpel. It you hold the blade square to the veneer,running along an edge, as with doing bookmatched etc cuts, it sits 1/4mm away from it and natural hand movement can make that edge move inwards and outwards from your straight edge. This can result in the cut being anything but straight. Which is why if cutting veneer its best to hold the scalpel at an angle so the actual bevel of the edge rests against the ruler/straight edge rather than the flat of the blade
Must take a huge amount of skill and experience and patience.
every time ive cut a vaguely jointy joint, ive tried to avoid it being baggy, so ive cut it as precise as i can, but on offering it up its a bit too snug, but its also stuck.
Wont seat fully, but no possible way its coming apart without breaking either.
And making some demo joints or fancy furniture is one thing, but having the patience to do the hundreds of joints required for buildings?! madness.
never tried a demo joint mind you, everything iv ever fiddled with has been to make something, so the joint is a bit secondary.
got plenty of scrap wood though. Might have a play some time.
Yes I see what you mean, but I believe those are called a vee pointed edge. Double bevel is when the blade is given a ground angle on both sides.
The single bevel as with Kayaks knife allows that flat side to rest directly on the edge or the ruler/square.
The double edged knife only has bevels on one side of the actual metal. The other side is completely flat. So it's like a single edged knife, but with two edges. You flip it over to use your other hand. The flat side is still flat to the workpiece.
every time ive cut a vaguely jointy joint, ive tried to avoid it being baggy, so ive cut it as precise as i can, but on offering it up its a bit too snug, but its also stuck.
Wont seat fully, but no possible way its coming apart without breaking either.
It takes quite a bit of practice to learn the 'feel' of a joint; if it's too tight, look where it's tight, and remove material at that point. Tiny tiny tiny. Of course, different woods behave differently; some may allow for a very tight fit, others might just crack. Also depends on which way the grain is oriented etc. Bear in mind pretty much all these videos showing perfect fit joints, are heavily edited, and a lot of work is done off camera to make it all look so perfect. You don't see the outtakes and the mistakes. My fear when doing the 'proper' piece is, no matter how much I've practiced and done a trial run with scrap, this one could still go wrong. Particularly stressful if you've worked a lot on a piece of wood and it's 'too late'/impractical to start again. Yes, it's great to get well-fitting joints first time, but to me, a really good woodworker can rescue a mistake too. Because shit happens. Wood is a natural material, every single piece, every tree, is unique and has its own properties. Even a piece that's from the same tree, even an adjacent cut plank or board, that can be very different to the next.
And remember; if it's too tight, you can always remove material. You can't put it back...
" My fear when doing the ‘proper’ piece is, no matter how much I’ve practiced and done a trial run with scrap, this one could still go wrong. "
9 times out of ten the practice piece ends up being better than the real thing so I don't bother any more...
If it's good you've saved some time. If it's shit you have some more scrap for ron...
never tried a demo joint mind you, everything iv ever fiddled with has been to make something, so the joint is a bit secondary.
Got plenty of scrap wood though. Might have a play some time.
Sunrise dovetail.
I've been looking at it for years but yet to have the courage/patience to actually try to cut one.
Go for it! The colour contrast will hide any eff ups..
9 times out of ten the practice piece ends up being better than the real thing so I don’t bother any more…
If it’s good you’ve saved some time. If it’s shit you have some more scrap for ron…
Generally, my fears aren't realised. It's good to stress a little; keeps you sharp. My mistakes tend to come where I've not concentrated sufficiently. And if the success of a piece rests on one/final joint, then the penalty for failure can be quite high. Especially given the price of good timber these days. You wouldn't want to have spent hundreds on some nice Walnut or something, only for the whole piece to be ruined by a lapse in concentration.
I’ve been looking at it for years but yet to have the courage/patience to actually try to cut one.
I can admire the skill involved, but again, that's into that intense anal level that is way beyond any practicality. A nice dovetail looks good and serves a practical purpose. That above is just madness.
Of course, different woods behave differently
Probably doesnt help that all my "furniture" is made of CLS, cheaper than cheap white wood.
[i]Of course, different woods behave differently
Probably doesnt help that all my “furniture” is made of CLS, cheaper than cheap white wood.[/i]
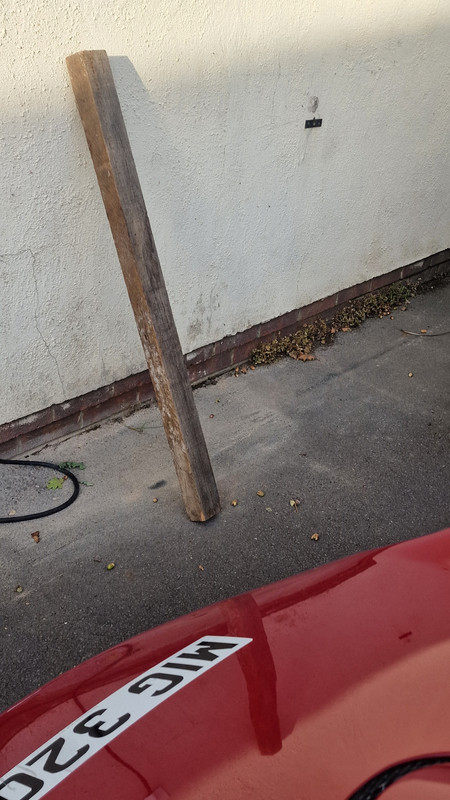
I am claiming that excuse too. All mine is taken from the scrap bin at the local wood mill and most starts of looking like the stuff below before I take it to the table saw. None of this buying fine wood for a poor bodger like me.
CLS isn't great, but what I think it is actually good for, is beginners. Because as well as being cheap, it's actually quite tricky to make anything decent from it. It's easy to cut and shape, but the inevitable twists, warps and splits that occur present a good challenge. It's hard to cut nice crisp clean dovetails with it, for example. But that can help hone skills; if you can make something useable with CLS, then moving to more expensive woods can actually be quite refreshing. Think of it as the hill you need to climb, before you can enjoy the descent.
And watch out for that ****ing resin. Gets everywhere, super sticky horrible stuff, gums up tools and machines, it's a bastard.
All mine is taken from the scrap bin at the local wood mill and most starts of looking like the stuff below before I take it to the table saw. None of this buying fine wood for a poor bodger like me.
Using stuff like that is fine. See if you've got any wood reclamation yards near you; I used to live near one, and it was a great source of stuff like little bits of Teak, Oak and even Mahogany. A lot of it came from old railway carriages that had been stripped for scrap. Boatyards can be another source of small pieces. Some woods, such as proper Mahogany, you can't get 'new' any more, so reclaimed stuff is pretty much you only source. But use the cheap free stuff to practice with; most people, myself included, start out by wanting to 'build something', but learning the basics, such as good sawing technique, is invaluable if you want to be able to make stuff that's decent and looks good. That piece you've got there looks like a great planing practice piece. Give it a thorough check for any nails, screws, staples or other foreign bodies that can really ruin your tools though. There's a reason most timber yards won't even consider planing/jointing up anything other than 'new' wood.
Our local reclaim yard basically just has scaffold planks, broken down pallet wood and a few other odds and sods. I have been a dozen times and only found one or two pieces worth having and then they decide to charge retail prices for it.
I have a cheap and already knackered electric plane that I can use to take the outside surfaces of the stuff I do get. this generally removed the grit and surface stones and exposes any screws and nails that I missed when looking. All more time consuming but the wood is close to free so I can't really complain.
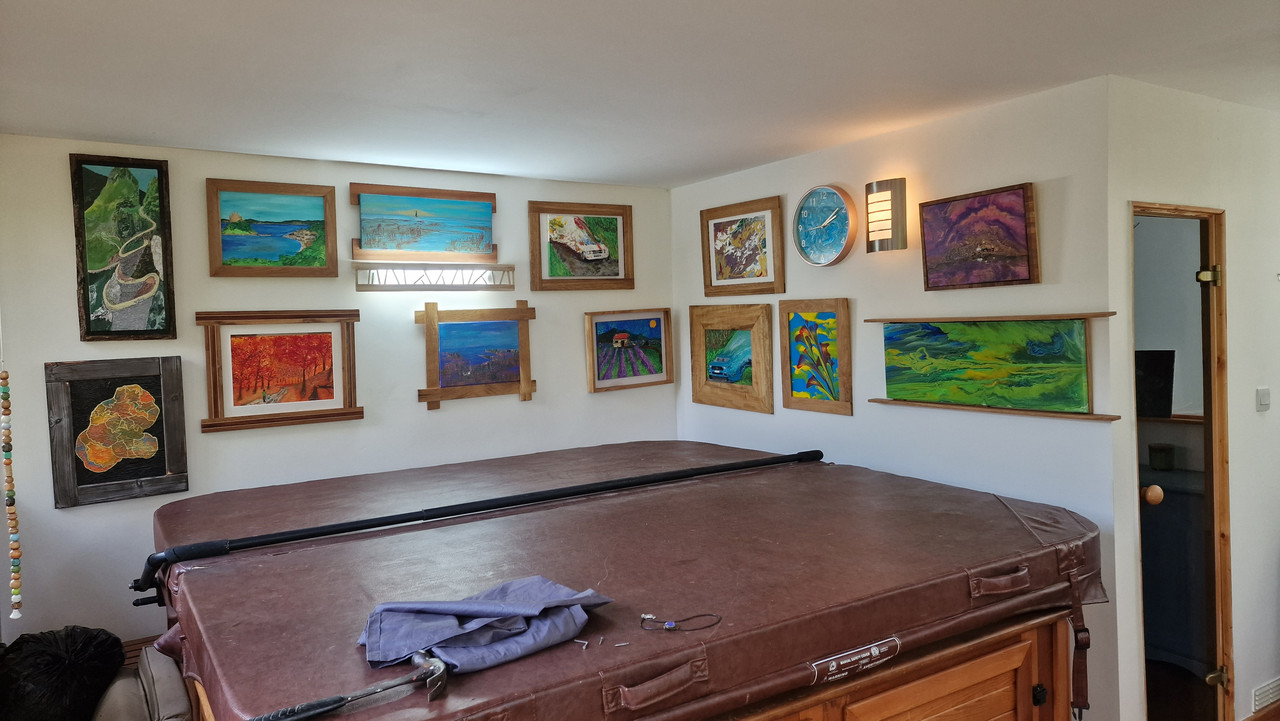
The wood for all of these frames and both of the shelves and the table has cost me £45 so good for learning and making.

I can admire the skill involved, but again, that’s into that intense anal level that is way beyond any practicality. A nice dovetail looks good and serves a practical purpose. That above is just madness.
Oh yeah totally. In industry unless you're self employed and commanding £30k for a cabinet of exotic timbers you have to make money based on a time/cost/hourly rate type of set up, and extreme joints like that would take too long to complete that you wouldn't actually be able to make a living at it.
For retired folk or when you're at college and utterly mad with it.
I like WCA's stuff because its simple and practical. And theres always a chance of some provided excitement in the form of a bloody accident to raise the eyebrows and tut at 😆
I like Matt Estlea, because although he's quite young, he has a pretty down to earth, relaxed and realistic approach to things, and his tool reviews seem pretty honest and objective. And for those wondering why one would pay many times for a tool over a cheap one, this is a great video:
TL;DW: it took him many hours of hard work, involving a lot of experience and knowledge, to get it anywhere near a decent plane. And even at his very reasonable £30ph rate, it still ended up costing not far off what a top quality plane would cost. And is still a bit crap. There's nothing wrong with cheap tools (well, maybe this one is to be avoided!), and a bad workman and all that, but there's a reason why good tools cost money, not least the bit about them not being made with exploited labour etc. I started out using cheap tools, like most people, and yes, sometimes you can get a cheap tool to perform extremely well, but as the OP of this thread has learned, moving up to better tools makes a big difference.
The wood for all of these frames and both of the shelves and the table has cost me £45 so good for learning and making.
Money well spent! You simply can't put a price on learning a skill.