![]() You don't need to be an 'investor' to invest in Singletrack: 6 days left: 95% of target - Find out more
You don't need to be an 'investor' to invest in Singletrack: 6 days left: 95% of target - Find out more
I have been pretty much stuck indoors since the start of February when I had the ankle operation. Being on a pair of crutches really limits what you can do as you cannot carry anything. The fact that it has rained every day since the operation is also quite depressing. We finally got a couple of dry(ish) days so I thought I would start a new project.
The new project had to be quick to complete and not involve much lifting any carrying or lead to much future time commitment. I had seen some Americans doing something called Rain Gutter Gardening which basically involved sticking a hose pipe with a float valve into a rain gutter to keep it filled with a constant depth of water. You then place buckets with holes in their bases and a wicking material inside and put your plants in the bucket. The capillary effect sucks the water out of the gutter to water the plants as they need it and the hose pipe and float valve top the water back up. Connect the other end of the hose to a rain but and all you need to do is plant the crops and then pick them when ready. That seemed easy enough to me.
This can be done cheaper but re-using old material and quicker by having two working legs but this is how I did it. Feel free to copy or improve.
Get a rain but. This is a small slim one as I was working on a narrow bit of patio at the side of the house. Not the perfect place but there was a convenient down pipe and the wife wouldn't let me ruin the main garden.

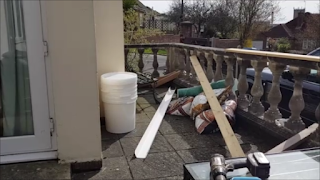
Once I had the rain but in place I had to gather all of the other material. Ideally you would do the building in a nice open area and then move the result to the final planting site but my lack of mobility prevented that. In fact, if you look through the pillars you will see my truck parked on the drive. All of the materials were picked out of the boot and thrown over the balustrade into the pile that you see.
Looking at the picture from the left the materials you will need for this project are:
- Some food grade plastic buckets. Mine are 30 litre buckets sold for home brewing as this seemed the cheapest way to get new buckets in the UK.
- 3 metres of square based white rain gutter from the local DIY store
- 4 metres of green capillary matting from a local garden centre
- 150 litres of potting compost. It must be potting compost and not general purpose compost to work apparently. I actually had to buy an extra 100 litres to fill the buckets. I wonder if they were 40 litre buckets instead of 30 litre?
- 2 x 3 meters of treated timber about an inch thick and a little taller than the white guttering.
- 2 end caps for the gutter so the water stays in place.
- Somewhere in the picture there is a float valve. I bought mine from a local fish and aquarium store but they are way cheaper on eBay from China. In fact I think everything I bought locally would have been way cheaper on eBay from China
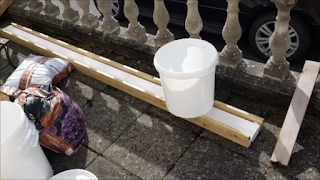
- This is a quick shot to sort of show what we are aiming for. The wood goes either side of the gutter and the bucket sits on top of the wood. There is a hole in the bottom of the bucket and the plants suck up the water they need. How hard can it be?
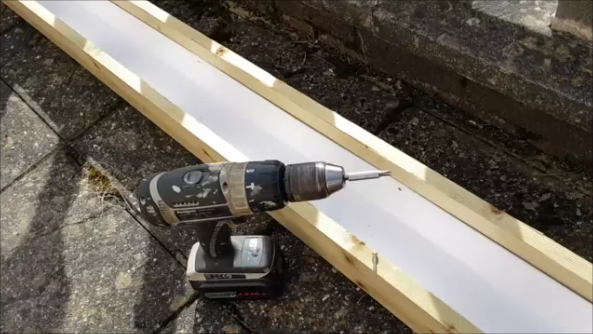
- First use some short screws to fix the wood to the gutter. I out mine about every 50 centimetres or just over a paving slab apart. The aim here is to keep the wood from falling over when you put the buckets on it and stop the gutter flaring out when filled with water. Make sure your screws are shorter than the thickness of the wood otherwise you will have lots of nasty spikes on the outside of the trough

- The water float was probably the trickiest part for me. This is because I bought an aquarium float valve rather than the cheap Chinese ones which meant it was designed to work with small bore pipe rather than hose pipe. S small bit of bodging later and it was fitted. There is a clear plastic bracket I found in the garage that is screwed to the wood I put across the top of the trough. Because this is only held with one screw I can alter the angle and thus the height at which the valve shuts. If you try this, make sure you can adjust the height or be very sure of the water depth you want.
 </p>
</p>
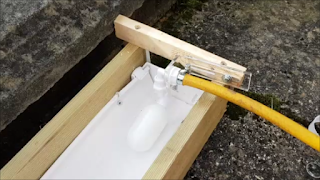
And here is the float valve in action letting water from the water but fill the gutter. This is a pretty dumb thing to do at this stage as I spent the rest of the build with a gutter full of water sloshing around..- I drilled some holes in the buckets. The ones around the sides are for 'air pruning'. This is meant to prevent the plants from getting pot bound roots as they avoid the holes. Sounds a bit like Elvish magic but it is easy to do so why not. The one at the bottom is my bottom hole (tee hee!).


The holes in the side are small diameter drilled with my nice expensive hole saw bits but they weren't really big enough for the hole at the bottom so it was off to B&Q. The hole saws I bought previously were for work on the car and were £10 - £20 each so I was not looking forward to buying another one just to drill five holes. Imagine my delight when I found a set of sprung steel holes saw bits for just £3.70! They are flimsy and probably have the cutting hardness of bean curd but they should be able to cut five holes in the buckets before breaking (they did).
<p class="separator" data-blogger-escaped-style="clear: both; text-align: center;">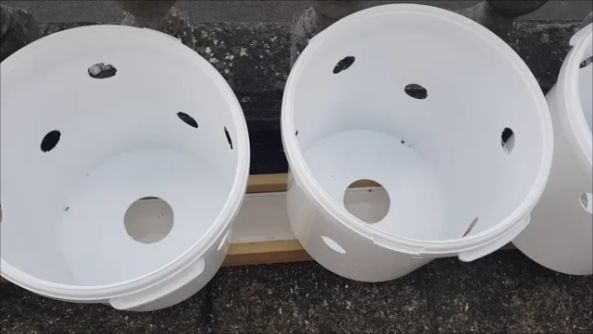 </p>
</p>
I bought the capillary matting from a long roll and that was cheaper than the individual packs I saw. The roll was 60cm wide so was taller than the buckets. I cut the slits in the bottom so it would cover the bottom of the bucket as well as the sides.
The Americans recommend using 'net cups' to fit through the bottom of the buckets. I couldn't find any small round ones so I improvised. My oversized knackered ankle means that a lot of my socks split at the ankle seam so I picked five failed socks and they became the holders for the soil that would poke into the water gutter.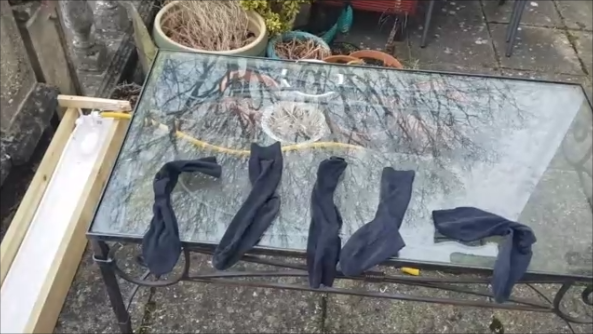 </p>
</p>
Here is a sock filled with potting compost.
# </p>
</p>
Here is the same sock shoved through the hole in the bottom of a lined pot. Notice how those slits cut in the mat allowed me to fold the flaps across the bottom of the bucket. Hopefully that will draw in the water. Also note that the fabric covers the air holes so the dirt wont fall out.
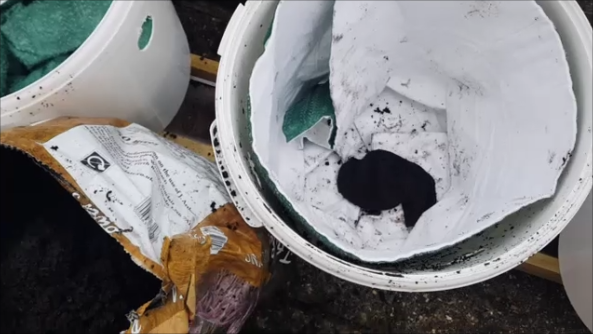
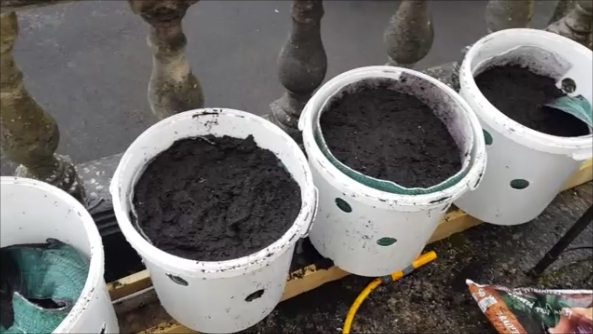
Here are the buckets in various states of fullness. It is important that you soak the potting compost as you fill the bucket so it is sodden throughout... Otherwise the dry layers will stop the capillary action. It is messy but trying to soak all that compost after you have filled the pot will not work.
 </p>
</p>
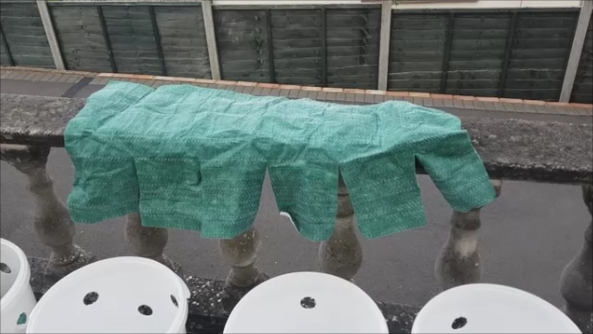
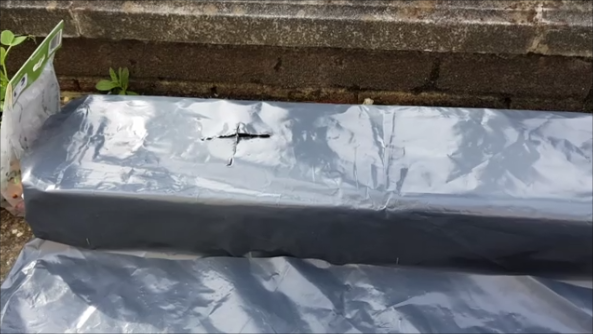
After filling the gutter with water and loading all the pots with dirt I remembered that I should have covered the gutter with plastic. This is partly to protect the wood but mostly to stop it becoming a mosquito farm. This was simply black plastic rubble sacks stapled to the wood and the spare cut off and removed. It only takes a few minutes (if you haven't already filled the gutter and placed a load of heavy pots on top)
 </p>
</p>
And here we have the planted buckets. I added some extra plastic liner around the top of the buckets, cut from the bags the compost came in, as the matting didn't quite cover all the holes. There are a mixture of plants in there including onions, mange touts, chard and tomatoes. The pot on the right is over planted so that the chard stay small and can be used as salad leaves...
 </p>
</p>
Now we just sit back and wait, enjoying the irony of creating a self watering garden system when there have only been four dry days so far this year.
I will try to remember to post pictures each week on the main blog to show progress..
Really interesting post; I love stuff like this. A multi basket auto irrigating hanging basket setup is about as far as I’ve got with it though 🙃
Phew... I thought that your SexPond™ had sprung a leak.
Phew… I thought that your SexPond™ had sprung a leak.
Self-sealing - rather like a tubeless setup
Barfs.
A week on and the soil is staying damp*
[url= https://farm1.staticflickr.com/792/26580415807_2b4072443b_c.jp g" target="_blank">https://farm1.staticflickr.com/792/26580415807_2b4072443b_c.jp g"/> [/img][/url][url= https://flic.kr/p/GuPzza ]20180414_141639[/url] by [url= https://www.flickr.com/photos/89686376@N04/ ]WCA![/url], on Flickr
*possibly the capillary effect or possibly because it has rained every day since
Still moist after a couple of dry days and the plants are definitely growing.
[url= https://farm1.staticflickr.com/897/40889388634_0053b52183_c.jp g" target="_blank">https://farm1.staticflickr.com/897/40889388634_0053b52183_c.jp g"/> [/img][/url][url= https://flic.kr/p/25ifNFd ]20180421_115536[/url] by [url= https://www.flickr.com/photos/89686376@N04/ ]WCA![/url], on Flickr
Now is the test, it’s scorchio! 😎
Ace!
Soil is moist just below the surface. Haven't touched them at all since planting but I might have to put some sticks in to support the peas and tomato. Damn hard work this gardening 🙂
A thin layer of pea gravel over the soil in pots will stop much of the evaporative losses.
We use bark chippings to keep the soil moist in hot weather. Whole garden is wired up with micro bore drippers...
Dripper for each shrub / tub...
[url= https://farm8.staticflickr.com/7352/13965793758_3a3d50ec1a.jp g" target="_blank">https://farm8.staticflickr.com/7352/13965793758_3a3d50ec1a.jp g"/> [/img][/url][url= https://flic.kr/p/nh7kVy ]Drip feed for each plant[/url] by [url= https://www.flickr.com/photos/brf/ ]Ben Freeman[/url], on Flickr
Multiple distribution points
[url= https://farm6.staticflickr.com/5311/13965793448_4df8128e7b.jp g" target="_blank">https://farm6.staticflickr.com/5311/13965793448_4df8128e7b.jp g"/> [/img][/url][url= https://flic.kr/p/nh7kQd ]1st distribution point[/url] by [url= https://www.flickr.com/photos/brf/ ]Ben Freeman[/url], on Flickr
Whole thing on a timer....
[url= https://farm8.staticflickr.com/7349/13965800050_666ff3ec3e.jp g" target="_blank">https://farm8.staticflickr.com/7349/13965800050_666ff3ec3e.jp g"/> [/img][/url][url= https://flic.kr/p/nh7nN3 ]Timer[/url] by [url= https://www.flickr.com/photos/brf/ ]Ben Freeman[/url], on Flickr
Who thought gardening could get so geeky. Loving it. Look forward to the first "what tubes for irrigation" thread.
Reminds me of the chilligrow

They produce excellent results, but you need to top them up. Yours doesn't need topping up I assume due to the rain butt.
One difference is that the chilligrow comes with fert to add to the water, once the nutrients in your soil have been used up you may need to consider adding some feed somewhere?
Is there an app for gardening?
Yours doesn’t need topping up I assume due to the rain butt.
That's right butt! [/welsh] 😀
We've got springs in the garden. 4,000l/day. Ish
I've spent considerably more time, money and effort to stop my garden being automatically watered than you guys have on having yours automatically watered!
Rain butt keeps the water topped up so no taps or timers. This also means the plants only draw the water they need rather tan getting it every X hours regardless.
I might add feed into the rain gutter so the nutrients stay topped up.
I think this would also work well with just a water butt that you topped up every month or so. One water container could 'feed' several gutters placed close by and you wouldn't need hoses trailing across the garden from the taps.
definitely trying this this weekend - we have a large polytunnel at our allotment - its a pita some nights to get up there n water. this might just solve that first world problem!
Smudger, can you put gutters at the bottom of your polytunnel sides? you could use rainwater as the first feed-in to the watering gutters, then the low-level float to trigger top up from the water butt.
Not fully self watering, but I do something similar for starting seedlings off. Cotton wick through the bottle lid into the water reservoir.
[url= https://farm1.staticflickr.com/841/40937112534_496733382e_z.jp g" target="_blank">https://farm1.staticflickr.com/841/40937112534_496733382e_z.jp g"/> [/img][/url]
>This also means the plants only draw the water they need rather tan getting it every X hours regardless.
You can get timers which have a moisture sensor, so only come on if the soil is dry....

https://www.gardeners.com/buy/watering-timer-with-moisture-sensor/8588509.html
I just switch ours off when it's raining a lot. Not switched it on yet this year as its been such a wet spring so far..........
Moisture sensors, electronic timers.. technology gone mad I tell you!
Plastic gutter and a float is all you need. It is ideal for the allotments. Fill the water but on a Sunday, go home, have a beer. Pop back at some point to do some weeding and top up the water butt again. There are buried systems too if you Google...
I have been away for the week so have no idea what the weather was like but it doesn't seem to matter, my plants still grow.
[url= https://farm1.staticflickr.com/957/40857179215_186a28d23d_k.jp g" target="_blank">https://farm1.staticflickr.com/957/40857179215_186a28d23d_k.jp g"/> [/img][/url][url= https://flic.kr/p/25fpHWp ]20180428_133124[/url] by [url= https://www.flickr.com/photos/89686376@N04/ ]WCA![/url], on Flickr
Peas need pea stick for support and we had our first batch of chard. Soil still damp in this scorching heat
[url= https://farm1.staticflickr.com/866/28059479568_ce16fa679a_c.jp g" target="_blank">https://farm1.staticflickr.com/866/28059479568_ce16fa679a_c.jp g"/> [/img][/url][url= https://flic.kr/p/JKwaGu ]20180506_164810[/url] by [url= https://www.flickr.com/photos/89686376@N04/ ]WCA![/url], on Flickr
Plastic gutter and a float is all you need. It is ideal for the allotments.
Talking of allotments, what happened to the fish?
Totally fascinating thread. Inspirational.
I’m about to embark on turning the bottom half of the garden into terraced raised beds to grow some veg with bodgy jnr.
So far i’ve been clearing old shrubs and reading a lot of stuff by Bob Flowerdew.
[i]Talking of allotments, what happened to the fish?[/i]
It was the son in laws allotment. When the daughter and he split, he got the fish so I am not certain. They were doing okay the last time I saw them but that was over a year ago.
[i]I’m about to embark on turning the bottom half of the garden into terraced raised beds to grow some veg with bodgy jnr.[/i] - You can build the rain gutters into the ground and then have the buckets on top. They don't need to be buckets even, the clear plastic storage boxes for clother under the bed etc would work fine for anything with shallow roots like most salad crops. Might be an issue for carrots though. Google Rain Gutter Gardening and listen to lots of Americans talking about how they have done it.
Still growing. We had some more chard - griddle pan sprayed with a little olive oil, drop the leaves in and sprinkle salt on. flick the leaves over as soon as they start to wilt and serve warm. Very nice
[url= https://farm1.staticflickr.com/825/40248240580_065a7f0d09_c.jp g" target="_blank">https://farm1.staticflickr.com/825/40248240580_065a7f0d09_c.jp g"/> [/img][/url][url= https://flic.kr/p/24jAKGq ]20180512_115903[/url] by [url= https://www.flickr.com/photos/89686376@N04/ ]WCA![/url], on Flickr
Very interesting, thanks for posting. I've been wondering if I could do something similar, but buried under my lawn/desert.
Here is a sock filled with potting compost.
It's quality content like this that keeps me coming back here 😀
I used one of those 'weeping hoses' under our upper lawn which was laid on only a few inches of dirt on top of a patio. It worked brilliantly until people walked on the lawn and squashed the pipe. I would not recommend under lawn watering IF people are going to walk on the grass and if they don't walk on the grass then how are you going to mow it?
Onions are OK, Chard is going mad, Carrots continue Peas starting to flower and Tomato doing its own thing
[url= https://farm1.staticflickr.com/981/42185519912_4be393dd39_c.jp g" target="_blank">https://farm1.staticflickr.com/981/42185519912_4be393dd39_c.jp g"/> [/img][/url][url= https://flic.kr/p/27gMPmd ]20180520_151017[/url] by [url= https://www.flickr.com/photos/89686376@N04/ ]WCA![/url], on Flickr
Update and How To video
[url= https://farm2.staticflickr.com/1747/27492114117_0b5292cb78_c.jp g" target="_blank">https://farm2.staticflickr.com/1747/27492114117_0b5292cb78_c.jp g"/> [/img][/url][url= https://flic.kr/p/HTogHx ]20180526_115147[/url] by [url= https://www.flickr.com/photos/89686376@N04/ ]WCA![/url], on Flickr
Struggling to keep up with the chard. The peas have gone mad and everything is growing like crazy in this sunny weather.
My total effort has been to plant it and eat it. No watering or weeding, in fact I have spent more time taking the phots each week than anything else......
Forgot to post the Saturday morning update so here it is with a couple of follow ups
[url= https://farm2.staticflickr.com/1757/28667930038_79f8692d45_c.jp g" target="_blank">https://farm2.staticflickr.com/1757/28667930038_79f8692d45_c.jp g"/> [/img][/url][url= https://flic.kr/p/KFhCPQ ]20180603_192118[/url] by [url= https://www.flickr.com/photos/89686376@N04/ ]WCA![/url], on Flickr
Everything is growing madly and the mange tout were ready already.
[url= https://farm2.staticflickr.com/1751/27649072827_68061d1cbe_c.jp g" target="_blank">https://farm2.staticflickr.com/1751/27649072827_68061d1cbe_c.jp g"/> [/img][/url][url= https://flic.kr/p/J8fJ5c ]20180602_192325[/url] by [url= https://www.flickr.com/photos/89686376@N04/ ]WCA![/url], on Flickr
First bit of maintenance since I planted anything
Sick of bloody chard I pulled it out. Not as good for salad as lettuce and not as good cooked as spinach. Don't fall for the lure of the coloured stems. Also, I found a slug and pulled a carrot to see how they were doing, nice and carroty surprisingly.
[url= https://farm2.staticflickr.com/1743/28667930358_a04d7fe43e_c.jp g" target="_blank">https://farm2.staticflickr.com/1743/28667930358_a04d7fe43e_c.jp g"/> [/img][/url][url= https://flic.kr/p/KFhCVm ]20180603_192126[/url] by [url= https://www.flickr.com/photos/89686376@N04/ ]WCA![/url], on Flickr
Thinking of planting some herbs in the gaps left by the chard. Also not sure what to do with the tomato. The main branch snapped under its own weight so might put some sticks there and tie it. That was Mrs WCAs suggestion so probably will happen as she does actually know stuff like that unlike me
Loads of mange tout now and the courgette on the end has put on a growth spurt. First tomatoes beginning to form and something has been eating the bean leaves.
[url= https://farm2.staticflickr.com/1759/40879629760_3672f6e3c1_c.jp g" target="_blank">https://farm2.staticflickr.com/1759/40879629760_3672f6e3c1_c.jp g"/> [/img][/url][url= https://flic.kr/p/25hoMGL ]20180609_104950[/url] by [url= https://www.flickr.com/photos/89686376@N04/ ]WCA![/url], on Flickr
Looks good! My beans have struggled this year, I don't think the weather has helped.
I like your self watering idea, I might do something similar for the existing pots on the patio.
Ive just bought an irrigation solar powered watering system for the green house so we'll see how that goes.
The beauty of my system is that it need no power, just a rain but to supply the water.
I am contemplating putting a small channel reservoir around the edge of the upper lawn with tiles over the top covering the water but removable when you want to rest a flowerpot so we get self watering flowerpots too.
[url= https://farm2.staticflickr.com/1739/42642181742_d172842e59_c.jp g" target="_blank">https://farm2.staticflickr.com/1739/42642181742_d172842e59_c.jp g"/> [/img][/url][url= https://flic.kr/p/27Y9k13 ]lawn[/url] by [url= https://www.flickr.com/photos/89686376@N04/ ]WCA![/url], on Flickr
Just measured it up to see how practical it would be. Turns out I would need to build some locks into the channel to cope with the slope so that's a non-starter
I’ve just built this in the greenhouse, about to plant up the tomatoes which is all I plan to grow this year. Will post pics, but need to get the plants potted up and situated on the planks before I do - need to hide my crap joinery and plumbing with plants!
Build supports for the plants to climb. Mine have all fallen over each other because I didn't. Lesson learned
here goes then.......
edit: hmmm - image posting help? trying to post image from one drive? trying to post from onedrive

the finished project, along with a self watering chicken trough. enough room in the greenhouse for about 12 plants, various varieties. will post updates as the summer goes on.....many thanks for the inspiration!!
also, i could cut the grass, but its not a lawn, its a free-range chicken run!

That’s a bit embarrassing - the photos showed up on my pc when I posted at lunchtime!

can anyone else see that pic above?
Yes - it looks similar to this one of mine
[url= https://farm1.staticflickr.com/928/41599920951_f42868c565_z.jp g" target="_blank">https://farm1.staticflickr.com/928/41599920951_f42868c565_z.jp g"/> [/img][/url][url= https://flic.kr/p/26o3tbp ]4 Float Valve[/url] by [url= https://www.flickr.com/photos/89686376@N04/ ]WCA![/url], on Flickr#
yup - great inspiration there - I've made a 'U' shaped trough in the greenhouse......


so I've chucked some salad leaf seeds in the smaller pots, and am trying a cucumber on the right - apparently they don't like their roots being wet all the time but thought I'd give it a go.
doing it in the 5 x 3m polytunnel will cost about £200 so we're holding off till next spring to set that up.
Very good. I planted about 5-6 chard to use as either salad or spinach substitute and within weeks we were both sick of the stuff, it grew that well. Courgette and tomatoes seem to be putting on a growth spurt right now and the mange toute are giving us a couple of good servings each week.
I am pleased that it has worked so well, it really is zero maintenance other than picking.
I will probably start thinking about what to replace the summer crop with and plant with a bit more planning.
I am also wondering about some Growmore fertiliser granules into the gutter to slowly dissolve and get absorbed up. I think I will wait until I clear out the peas and carrots first though.
I am also wondering about some Growmore fertiliser granules into the gutter to slowly dissolve and get absorbed up.
interesting - I had a similar thought about some liquid fertiliser we have but worried about the application - its very neat and i wasnt sure about the distribution in the gutter - the granules would be easier to distribute evenly.
Do you still have rain in your water butts to keep this going?
Mine rain but ran empty about a week ago so I just refilled it from the hosepipe and it is now about 3/4 full
Yeah same - we have three Waterbutts but the one feeding the SWG and the chicken feeder has been topped up twice.