![]() You don't need to be an 'investor' to invest in Singletrack: 6 days left: 95% of target - Find out more
You don't need to be an 'investor' to invest in Singletrack: 6 days left: 95% of target - Find out more
We had a shower which leaked and caused no end of damage.
So, we paid a local plumbing company to come and replace it (after fixing the damage downstairs).
Now that new shower is leaking. There's a 3-5mm gap between the shower base and the waterproof wall thing which was kind of filled with silicone sealant. The shower base itself seems pretty solid, but the wall will move a mm or so if you press it.
My suspicion is that water is getting around the top of the shower tray - you can feel dampness underneath it (it's raised off the floor by a few inches).
So, oh wise and wonderful STW, can I, for the sake of a simple life, carefully fill in the gap with sealant, or do I need to get back to the plumbing company.
I'd prefer to sort it out myself so I can go back to using the shower!
(This is *after* I've removed all the old sealant).
If you've found the leak then there's no reason you can't reseal it.
But bear in mind that it has to be REALLY clean and free of any old sealant and dust/muck as silicone sealant (I'm assuming that's what was there, and what's going back) doesn't adhere to old silicone sealant.
(This is *after* I’ve removed all the old sealant)
No you haven't! Go back and remove all of it. Rub an old dry towel on wet wall and shower trat to remove residue.
Use a good quality silicone sealant I use Dow Corning 785. get a smoothing tool if not confident doing it by hand.
A gap that size I'd fill it 1st with Silicone, dont fill too much and leave a recess allow to set and do top finish seal.
Did you see the shower base before it was put in? When ours did something similar I found out the it had a 25mm high lip on the side and back outer edge, so wasn't actually allowing water to fall off the edge of it.
If yours doesn't, I'd make sure I chose sealant wisely and got one that flexed as needed. Not sure what to use tbh but there may be builders on here that can advise.
How solid is the base when you stand in it? Ours creaked and groaned so I bolstered the base by installing some feet as below.
Don't bank on the tray being absolutely solid. :o( Get your eyes down beside that gap and have someone else put their weight on the tray next to where you are looking. Any flex or movement and the sealer won't last long. (From bitter experience)
D.
Personally I'd be looking at a complete reinstall done properly with tanking. That is a horrendous bodge IMO. there should be a seal behind that so you are not just relying on a bead of silicone. Even if the silicone fails which it will with the movement you have there should be no way for water to get thru. I have recently installed 2 bathrooms with showers over the bath. Firstly the walls were done in waterproof plasterboard. then tanked with brush on waterproofing. then a seal applied to the edge of the bath which was then pushed tight against the tanked wall, then tiles sitting down onto the edge of the bath, then a bead of silicone. Bath also properly supported on 2x4 timber so it cannot move.
I think the shower tray is pretty well supported - it's resting on a wooden support which goes all the way round (seems like it's not marine ply though since it absorbs water nicely) but it also has 4 quite solid looking support feet, similar to the one posted above.
I'll give it a go with resealing it, but then I think I might have to agree with TJ - take out the waterproof board stuff and start over and do it properly. It's probably not actually that hard to do.
This is why you should always do your own DIY - at least then you know where the bodges are hiding!
You don't need to tank the walls if you are using a wall panel system. The panel is 100% waterproof. Ideally you should have a proper lip seal at the bottom of the panel though. Something like this: 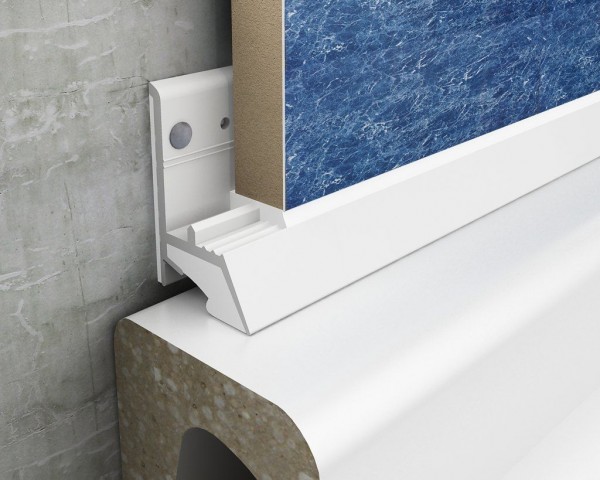
That'll be a chunk of work to change it though. I'd start with a 'repair' as bruneep described. A decent quality silicone pumped deep into the gap then a second load over the top making a nice bead. Then keep an eye on it
The tanking is belt and braces for sure. A seal like that is good but its still relying on the silicone to some extent hence tanking so if it fails then it does not destroy the wall as well
I don't understand why shower trays are made with flat tops. All houses move slightly with the season and seals never last. I found a tray with a raised lip all round and dropped the waterproof walls inside the lip.
Top tip, before applying the new sealant, load the shower tray with several bags of sand. Not all shower trays are equal and some flex more than others when stood on and showering.
Whilst digging out the existing sealant and squeezing new sealant in is the most straightforward and easier approach, from what you've implied, there is too much flex in the panels too, so for a proper peace of mind fix, I'd be looking to rip it out and start over from scratch. But then again, my philosophy is 'Do it right, do it once'
EDIT: If any moisture has got under the exposed edges of the shower panels, then they are likely to be foobarred as they are basically a mdf core and in short time will start to swell and delaminate. Typically, a bottom edge channel needs to be used for these type of panels, although they can be fitted without and with a 3mm caulking or sealing gap. For this, the shower tray and panels need to be 100% solid, with no flex present.
HTH