![]() You don't need to be an 'investor' to invest in Singletrack: 6 days left: 95% of target - Find out more
You don't need to be an 'investor' to invest in Singletrack: 6 days left: 95% of target - Find out more
Apologies for the dullest topic of the day, but anyways.
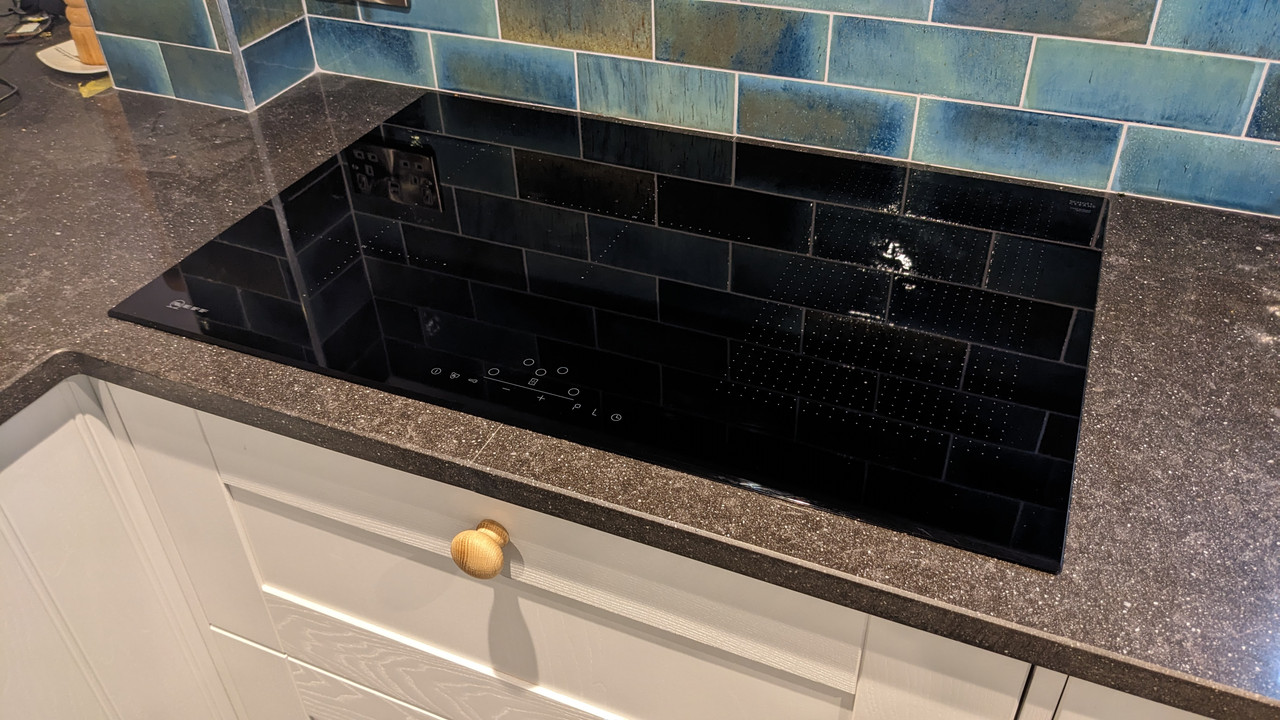
Long story short, we've had 30mm quartz worktops installed, and they needed a joint. I was very reluctant to go with the design due to a joint being at the front of the hob, but was reassured multiple times that the joint would hardly be visible, due to it being filled with colour matched epoxy.
I wasn't happy with how they were after the installation. Joints are level and flush, but there's a micro bevel that seems like it's there to be filled.
Installers came back today and basically said it's as good as it will get.
I'm trying to work out if I've fallen for salesman bullshit, if I had unrealistic expectations, or if it should be better.
As I say, joints are perfectly level, it's whether or not they should be filled that I'm not sure about.
[url= https://i.postimg.cc/ts3k20bB/PXL-20230908-221845971.jp g" target="_blank">https://i.postimg.cc/ts3k20bB/PXL-20230908-221845971.jp g"/> [/img][/url]
[url= https://i.postimg.cc/wyf0LhzH/PXL-20230908-221851199.jp g" target="_blank">https://i.postimg.cc/wyf0LhzH/PXL-20230908-221851199.jp g"/> [/img][/url]
[url= https://i.postimg.cc/21RTQksq/PXL-20230908-221857898.jp g" target="_blank">https://i.postimg.cc/21RTQksq/PXL-20230908-221857898.jp g"/> [/img][/url]
[url= https://i.postimg.cc/5jrstqpS/PXL-20230908-221908139.jp g" target="_blank">https://i.postimg.cc/5jrstqpS/PXL-20230908-221908139.jp g"/> [/img][/url]
[url= https://i.postimg.cc/KRgJ3kHS/PXL-20230908-221947808.jp g" target="_blank">https://i.postimg.cc/KRgJ3kHS/PXL-20230908-221947808.jp g"/> [/img][/url]
I don't work in Quartz but it looks OK to me. If it was a laminate I'd do it dead flush because a) the bevel would go through the laminate into the chipboard underneath and b) the material is soft so it can (and must) be routed cleanly and easily. But for oak and harder material a slight bevel removes the possibility of any slight chips.
That looks pretty good to me. It could be filled slightly better, with both grey and black filler to blend it in, but it looks to be an excellent joint.
unrealistic expectations?
Yes - looks fine to me.
Looks fine to me too...
But, it's always going to bug you now!
Looks pretty neat to me. Take your point that you aren't 💯 happy but as has been said, no bevel = chipping out
If it was mine I'd rub some black shoe polish on a rag and then feather it across the joint. Try it first on the underside to be sure
Looks fine, although it would be good to see a zoomed out shot for context...
Thanks all, I'm genuinely open minded to this. I think basically I've fallen for sales patter, and that bothers me almost as much as the joints (there's one down the middle of the hob, and one through the middle of the tap hole) 😀
I expect the bevel is necessary to prevent spalling and chips.
Obviously it's not the same environment but my block paved drive has spalled around the edges as the edging blocks have no bevel (they are tumbled style) and the standard beveled blocks have square edges where they are cut to meet the edges. If the edging blocks had a bevel it wouldn't have happened.
Just looked at our Silestone worktop (in the hob is the right place for the join by the way.... it's less noticeable there) and there's zero bevel.
Maybe not all worktop companies are the same?
https://photos.app.goo.gl/sazyUQsPhgTkBJSJ7
Looks fine to me. This was ours recently at the front of the hob. 
Thanks all. I shall now be grumpy at the salesperson.
Zoomed out view
[img]
 [/img]
I would not be happy with that at all. The joints are in bad places IMO and the joint is far too noticeable again IMO. Both are going to fill with crap.
I'm more concerned with the colour clash between the work top and the splash back.
We need to see the whole kitchen now - hob stuffed in a corner!? 😳
Maybe it's the material that requires a bevel?
If I draw my fingernail across a joint in our Silestone I can hardly feel it - but it's a different material.
The joints are in bad places IMO
Where should it be then - out in the open so you can see the full join rather than just a few inches either side of the hob?
(edit: If you meant Stingmered's joint then..... erm, yes that's a little odd but it depends on the layout I guess)
<p style="text-align: left;">A good slop of dark gravy and its gone forever</p>
Where should it be then – out in the open so you can see the full join rather than just a few inches either side of the hob?
IMO yes. Where it is is a dirt trap and its very obvious. Same with the other joint being thru the tap hole. JOints should be in places where there is low usage and out of the way
Just an opinion. I have never fitted stone worktops but I have fitted a few kitchens
It was the only place really as the worktop run exceeds the max length. But genuinely, I’ve never even thought about it since it was installed. I only added the picture because I was stood by the hob cooking when I was reading the thread. In the grand scheme of things, who gives a toss? My kitchen looks great and works well.

Needs colour matching not a single colour, you need to match the darker grey on the worktop (acrylic paint) then a fine art paint brush and follow the fleck pattern.
I specialise in "masking" stuff.....
Colour match doesn't look amazing but I guess it wasn't the fitters choice? If it is someone like Wren then they ship a kit with their worksurfaces.
It's an ok job. I've seen better and worse. I think people are right about the bevel.
There's some good info here which might give you an idea what to expect
https://www.integra-adhesives.com/
All comments my own opinion. Don't really do this type of coloured adhesive. I'm more structural.
see I was told having a joint by a cutout was a bad idea because it means the area has less material to support / likely failure point.
so I went for a join mid counter full width. you can see it because the patterns are different but only if you look for it. no bevel like yours.
Looks fine to me, ours is in the same place. One of the main reasons for the joint there is because it can crack so easily otherwise, especially during transport and installation.
FWIW our joint doesn't pick up any more dirt than can be wiped away with a cloth.
Needs colour matching not a single colour, you need to match the darker grey on the worktop (acrylic paint) then a fine art paint brush and follow the fleck pattern.
I'd agree with this.
TBH the join is too noticeable. I'd have expected a butt joint, no bevel. Cannot for the life of me see why in a dark top they used a white filler.
One of the main reasons for the joint there is because it can crack so easily otherwise, especially during transport and installation.
So to make life easier for the instalkers they put the jpins in places unnaceptable to me. I am very picky about this stuff tho i fully accept
Looks good to me. We have a large granite worktop in u shape which has 2 large joints.
I have a white quartz worktop. There is one joint without a bevel. doesn't look as neat as that.
I also have a 2.4x1.2 m island. all one piece which looks great.
can't understand why they even suggested a joint there. my old kitchen had a similar set up and the joint was to the left of the hob.
can’t understand why they even suggested a joint there.
Because its easier for the fitters
I'd be more worried about the joint on the taps...
I'd be a bit annoyed how low the filler is from the surface as it just makes wiping down the surface more faff, the filler could have been a better colour to but that will probably darken naturally over time thanks to all the crap that will get trapped on it...
For clarity, the epoxy used is dark, it's a mixture of dust from a house renovation still selling and lighting that make it look light.
Regarding why there: there's a 60cm unit to the right, and then a butler sink. Original design had join just at the tap, but as mentioned above by others, the supplier was concerned that with this design and a peninsula to the left,(it's not in a corner, that's a vertical steel where there was a wall) there would be too much stress on the small bridges surrounding the (800mm) hob, and there was a very high risk of it cracking during transport or install. I can very much see why this is a problem, so agreed to a redesign.
And as for the kitchen layout - that's all on me. Small kitchen, various obstacles, various influences dictating placement of certain items.
Just go and look out that big window. Kitchen looks lovely.
I'm paranoid about stuff, if there isn't much support underneath that joint I'd be getting a L shaped bit of rebar and glueing it in just to strengthen the area.
I did it with our hob cut out. There is no joint there, but the material left is a 4-5cm and had a full width draw unit underneath with no other support at the front.
I had images of my kids climbing to get to the biscuit time and the thin section cracking. Apparently it could be refilled and finished but I'd rather not risk it!
Second the lovely kitchen. Love the funky window at the end. Bet that wasn't cheap!
Mine has a length of box bar supporting the full span of thin section worktop. There’s no chance of it snapping.
That window… yeah it wasn’t cheap, could have had it in sections but I insisted it was one piece. Looks out over the hills so wanted an interrupted view. The glass alone weighed north of 250kg. It’s a nice space to be in though.
looks a bit crap to me.
Maybe its normal.
We went with Corrian (or a knock off spanish version, actually), and its great. They gave us the "hole" for the sink as two chopping boards, but he said keep hold of one of them, and in the offchange you damage the worktop, they can core out a hole and use the cutting board as a repair patch. You wont be able to tell its been done, because it blends together so well.
You can see (or more, you cant see), where the deep 40mm face surface, has been bonded onto the thinner 10-20mm worktop, it is indeed totally seamless.
The sink is seamlessly bonded in too. Zero crease or notch to accumulate dirt.
Its noice.
Like this, but this is off the web.
