![]() You don't need to be an 'investor' to invest in Singletrack: 6 days left: 95% of target - Find out more
You don't need to be an 'investor' to invest in Singletrack: 6 days left: 95% of target - Find out more
I work for a college on a furniture making course.
We are currently in the process of making a really exciting commission for an outdoor bench for a country park which one of the 2nd year students won a competition to design and make.
The design is essentially like a series of 12 square-edged posts 150mm square mounted together 4 across and 3 high with spacers between.
The square part of the bench runs about 3 metres, then after that, each post runs a further 3 metres approx but tapers down into twisty, spindly, tentacle-like shapes.
Imagine a squid having a bit of a lie down and you get the idea..
Our issue is, although very experienced in cabinetmaking, none of us really have much experience with large-section green timber construction. The bench has to be constructed without screws, glues or expensive fittings etc. Think of it as everything has to come from the woodland.
[img]  [/img]
[img]  [/img]
[img] 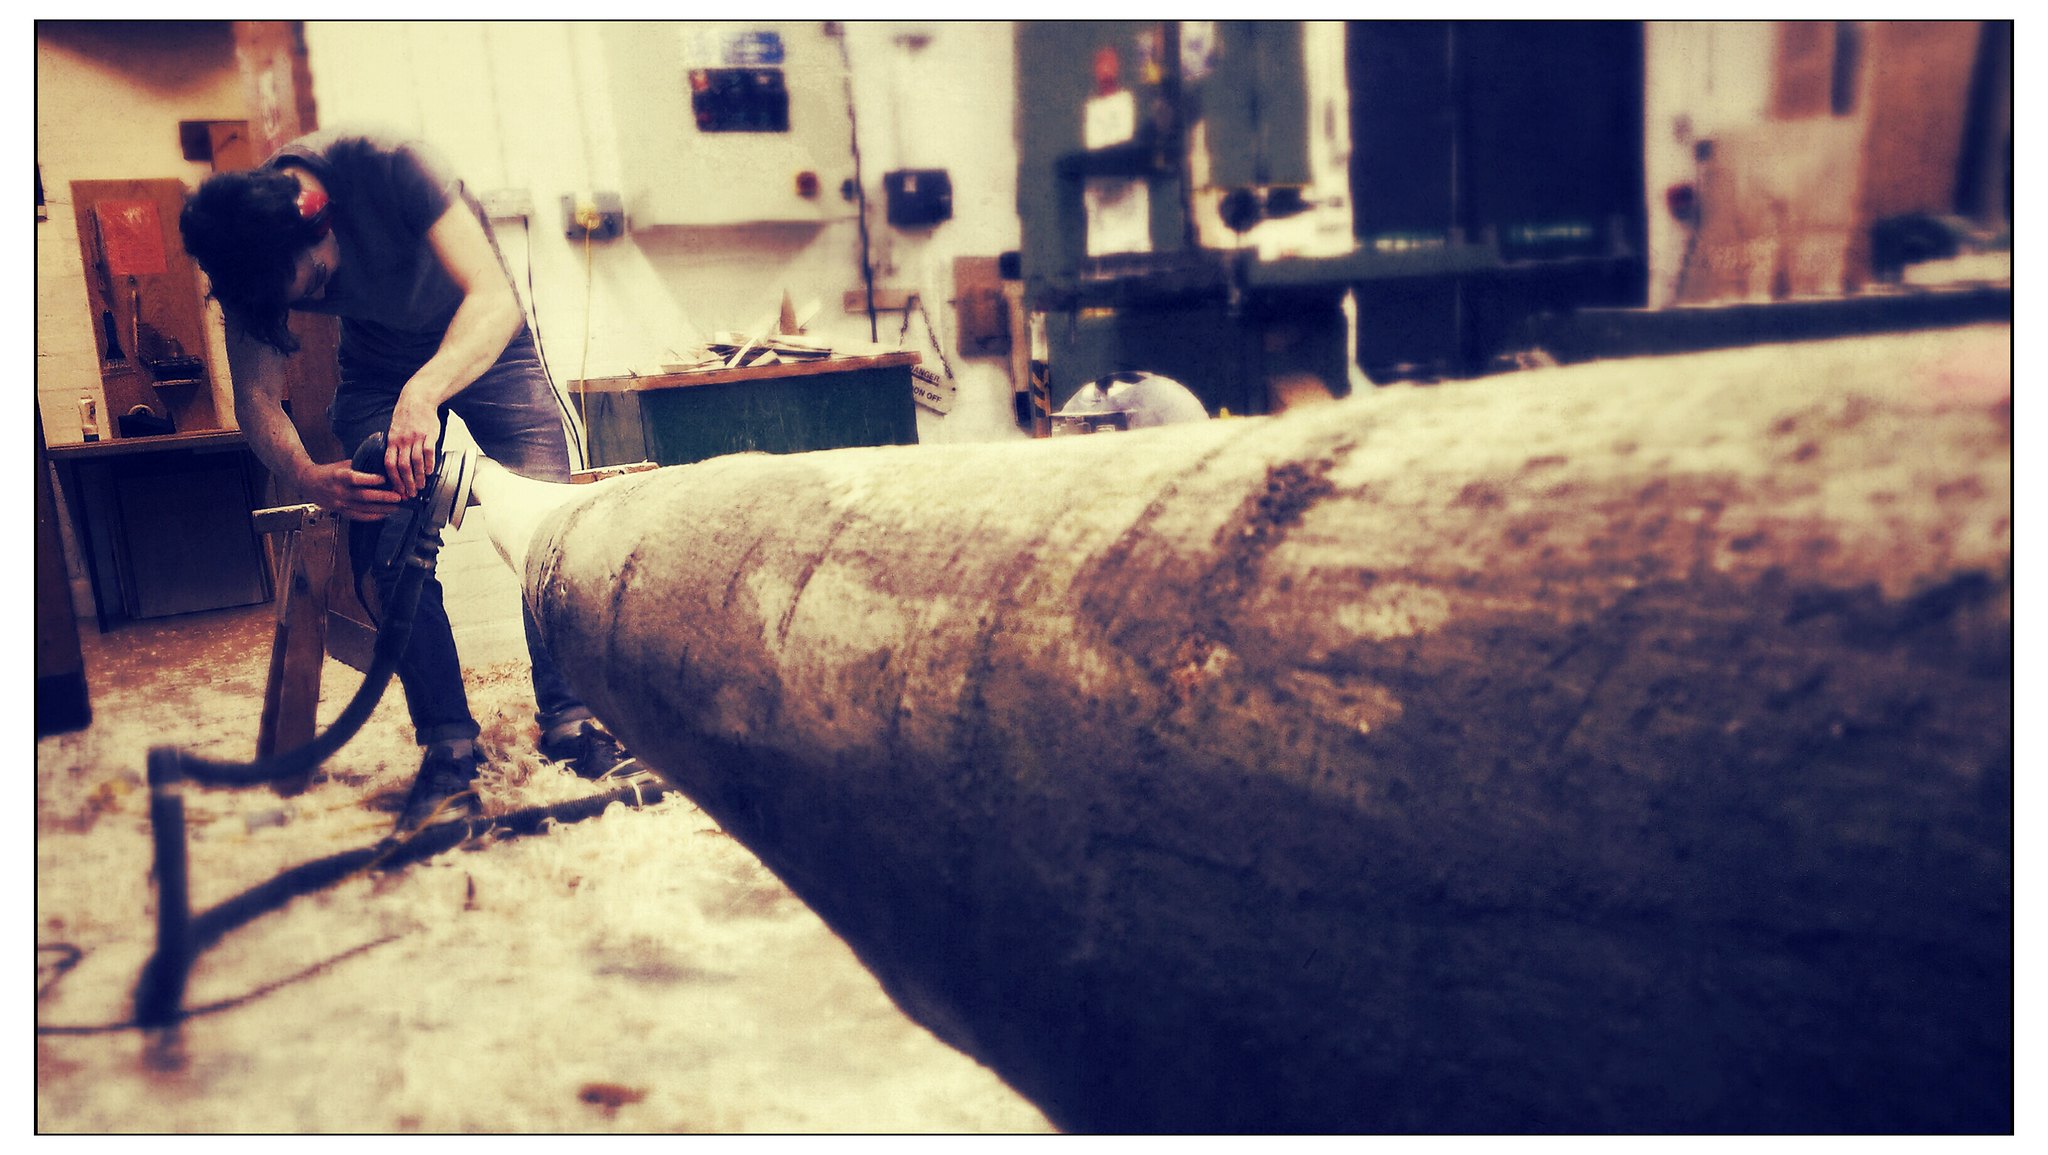 [/img]
A small model(does not show full height of layers)
[img]  [/img]
So....what we are needing to do is to join these long, spindly tentacle sections to the main body of the piece. As you can imagine there will be some significant overhang. I'm not even sure this overhang will work due to the weght, but anyway, we'll see.
Does anyone have any recommendations for joining the ends? I was thinking a halving joint or a scarf-joint with green pegs driven through and perhaps wedged either side...?
[img]  [/img]
Anyone have any thoughts..book recommendations? People to approach for advice?
I know there are some woody types on here so thought I'd ask.
Thanks.
Yep, that's me!
Having read and re-read your post kayak, I'm still not with you entirely, however I would suggest that due to the weight of these benches, your basic scarf is going to struggle a bit with the overhang. There are of course many other types of scarf and I'll try to source the best publication for you. Unfortunately, I've lent my books and as per, forgotten who to and they have not been returned.
Alternatively, where are you? I'd be happy to pop over to discuss if you're reasonably local to me.
[url= http://www.amazon.co.uk/Timber-Frame-Construction-Building-publishing/dp/0882663658/ref=sr_1_2?s=books&ie=UTF8&qid=1362040790&sr=1-2 ]one good relevant book[/url]
[url= http://www.amazon.co.uk/Timber-Framers-Workshop-Construction-Traditional/dp/188926900X/ref=sr_1_3?s=books&ie=UTF8&qid=1362040848&sr=1-3 ]Another good relevant book[/url]
Sorry not to be of more direct help, but without a drawing of what it is you want to achieve, it's a tad tricky for me to recommend a specific joint.
Just bear in mind that the strength will come from both the shoulders of the joint and the pegs. These should be dry (i.e. not so green as the beam stock) and the bores will need to be 'draw-bored', i.e. offset by circa 1/8th to draw the joint together.
Looks like a fun project and I'm loving the tentacles!!
Hi Slackalice. Thats brilliant.
We are in Leamington Spa, at Warwickshire College.
I didn't have any decent pictures of the model at the moment but essentially, we have 3-metre sections of square, which we need to join to approx 3-metres tentacles, which start square and then taper down into spindly bits.
I can come up with some better drawings and/or photographs if you think you could help. That would be fantastic.
The square section timber is freshly felled Sycamore and the tentacles are Ash, also green.
I understand what you mean about the seasoned pegs and the offset. Some methods translate across to the cabinet shop.
Thanks for the book recommendations too. I may be able to get our library to get them in.
It would be good if you did happen to be nearby but if you wouldn't mind me running a few ideas past you then that would also be great by email or whatever.
🙂
I,m on the south coast, so a little too far for me to pop in methinks! However, will do all I can to help by email - my addy is in my profile, so please drop me a line.
A line sketch with dims, scanned and mailed to me would be fine and probably enough to get my head around what you want to achieve. In some ways, I'm wondering whether the timber use could be swapped, i.e. use the lighter Sycamore for the tentacles? It might also work better for shaping too, as the Ash may want to split out as it inevitably seasons.
Once I have a sketch, I can do likewise with some suggested joints and mail back to you if that would help.
Can I have your job please??!!! 🙂
Thats great Slackalice, shame you're on the southcoast.
Basically, the timber choice was dictated to us by the park by what dimensions of trees they had knocking about. Otherwise it makes perfect sense what you say.
I have spoken to the student this morning and he has some better drawings at home which I will get hold of and send them your way if I can and hopefully you can help us out. That would be awesome.
Most of the shaping we have done already. It's pretty hard work but basically we are holding these huge logs and freehanding them through a band-resaw into curves, and then shaping them further with powerplaners and an Arbotech and sanding. Seems to work ok but as you say, they could potentially split.
This is the sort of thing I think we may have to do initially..
[img] 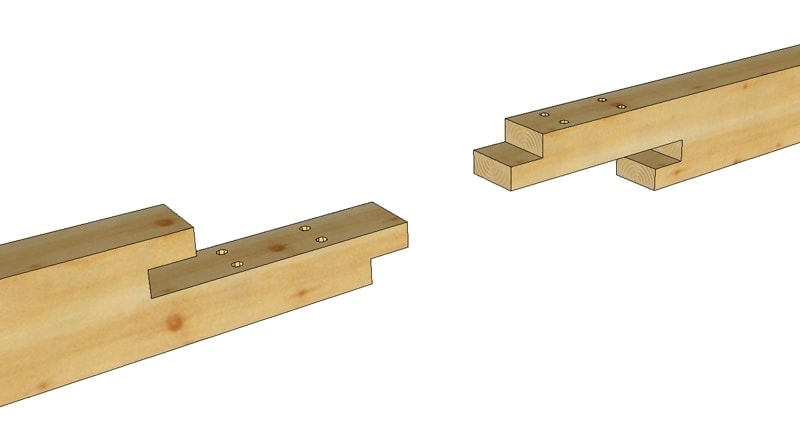 [/img]
Not only do we have that joint to do, but also we have the perhaps more basic task of joining each square section post to the one below it with a spacer/gap between to allow rain to fall away. Maybe you can help there too? 😀
I'll get hold of some more stuff and send it your way. Really appreciate this thanks.
Looks like an interesting project (keep us updated!). Not sure I can add much with the current info and am probably way less of an 'expert' than you are after. One question though on the 'tentacles' - are they effectively cantilevered from the square section, or do they rest on the ground as they appear to in the model? It would seem to make a big difference to the work that the joint would need to do.
Also I wonder about the aesthetics of the thing - jointing at more or less half way along the whole and inevitable differences as the ash and sycamore dry, plus the way in which the join should appear (as well as function). It will be difficult to make a join between the two species that 'reads' with the same flow that your model does both short and long term. Might not be a problem but maybe worth thinking around. Obviously the fact that your lengths are already cut (and shaped?) may well limit your options in terms of what is jointed to what and the positions of the joints etc...
One reference book that I think I used to find really useful (and still enjoy reading just for pleasure) is Klaus Zweger's Wood and Wood Joints. The English version was reprinted recently so you might be able to find a copy online or get your library to borrow it - it's pretty expensive (but worth it IMO).
Thanks for that bajsyckel, all helpful stuff. I think you are right in terms of joining and different shrink rates etc.
I reckon in the big schem of things it won't matter too much as it will obviously be outside and weather and generally get nibbled by squirrels etc so a few mis-aligned joints shouldn't matter too much.
You are right though. The tentacles are effectively cantilevered off the main body of the piece. I hope it'll work.
Here is a couple of shots of his model, though the model does not show the gaps between each post that are now in the design to allow for rain to pass.
[img]  [/img]
[img]  [/img]
If you imagine that model as about 6m long and more. The tentacle parts need jointing to the square parts...
Ah! thanks for the pics of the model, I can see exactly what you're trying to achieve and I reckon with some judicious staggering of the scarf joints, they will not need to be quite so complex as your second image.
As far as spacers between the sections, do these need to run both vertically and horizontally? Either way, I would have thought some continuous batten, machined from your Ash stock would do the job. If that was of say 60mm x 60mm, perhaps a rebate could be cut into the sections and the batten fixed with a simple peg, flushed off to hold them in place and also prevent any lateral movement?
Bajsyckel raises some good points, especially regarding the whole leverage/cantilever effect and forces, so the trick will be how to secure the square end of the bench to the ground support (presuming the bench will sit upon something? Dunnage like?). Or will the bench be resting completely on the ground? The latter obviously makes it easier to balance!
Forgive me if I know enter grandmother and eggs territory, but the trick to ensuring the security and aesthetics of the scarf joints will be to lay-up the 2 bits of Ash and Sycamore to be joined so they are perfectly level in the horizontal and vertical. Use a boat level for your vertical rotation and make a small rebate to ensure the level sits flat and also this ensures you check levels in the same place each time you need to set up after trying your joints. Chalk line on the floor will also be invaluable and will help you level up from that to make sure the beam stock is aligned and as straight as it's ever going to be.
It will then be a case of scribing your shoulders, ideally, you will want to set the pieces up so they are overlapped and you can transfer your scribe lines with your straight edge.
I'll stop here and tootle off to think about the joints.... I dont think you're going to need to be too fussy over them except for the one's on show, but I'll need to draw some stuff out.
Laters 🙂
Hi Kayak23,
Where abouts will this be located after it's finished..forest floor, concrete courtyard etc?
Do the tentacles start immediately after the joint or is there a ' run-on ' of a meter or so before the tentacles start to narrow?
tymbian - MemberHi Kayak23,
Where abouts will this be located after it's finished..forest floor, concrete courtyard etc?
Do the tentacles start immediately after the joint or is there a ' run-on ' of a meter or so before the tentacles start to narrow?
Hi, the bench is sited in a woodland and should be laid down on some sort of gravel/shale base to allow for drainage I'm told.
I reckon we have on average about 700mm before the poles start to narrow. I was thinking that it wouldn't be the end of the world if the joint was made, and then cut as part of the taper anyway, providing not too much is taken off.
Just a little update.
So far, we are trying to do the very simplest joint we can and are trying a halving joint on a spare square section timber.
It will of course be harder in the rounder tentacle parts.
We were thinking that we could have the joint running vertically instead of horizontally to retain more 'meat' to resist the forces of the cantilevered tentacles...
The halving joint.
[img]  [/img]
Banging in the pegs(broom handles for the practise joint)
[img]  [/img]
Sample joint cut, fitted and pegged.
[img]  [/img]
One issue we have is what pegs to use and where to get them. We need hardwood seasoned pegs. I've looked online and you can get them but cost is pretty high for the amount we need. If anyone can suggest an alternative that would be grand...
The practise joint as it is, is strong as hell I'd say. What are your thoughts on the strength of that considering the cantilever/overhang, anyone? Its about a 400-500mm lap.
Looks fun and I'm a bit jealous of you as I sit behind a computer screen. My thoughts are that making a workable joint isn't the difficult part given the dimensions of the timber, and that depending on how much meat is being shaped off with your arbtechs then a pinned joint like your sample there could work OK (assuming that it's oriented the way I imagine it to be, it will be strong with that lap but only in certain applications).
However, I'm not sure I am with you on the location of the joint relative to the supports, and making a joint that is still strong in a cantilever is tricky. And the fact that it's green means that more complex joints of the sort you might have adopted in dry timber to combat this doesn't help either. Then the reality is that the tentacles will likely sag over time given their length unsupported (though that might not be as bad as it might seem). That said – and looking at an earlier post – do you mean that you have 700mm to the 'tentacle side' of the joint before they are shaped? If so can you support or pin the tentacles (discreetly obviously) on the tentacle side of the joint before the cantilever. That could help reduce some of the issues before anything else.
Still looks good and I'm sure you will get something to work...
RE the pegs – what timber and dimensions are you looking for? square or circular section? And quantity? If you can't find any anywhere I could see if I know somewhere that could help out...
Speak to Brian at [url= http://www.hectorandcedric.com/ ]Hector and Cedric [/url] - I am sure he could offer some advice if you ask nicely...
We had great fun building this a few years back...
http://www.flickr.com/photos/matt_outandabout/sets/72157602693997043/
RE the pegs – what timber and dimensions are you looking for? square or circular section? And quantity? If you can't find any anywhere I could see if I know somewhere that could help out...
We are looking for a hardwood that's fairly resistant to weather. Oak I suppose is ideal.
It needs to be seasoned, about 25~30mm in diameter and I'd guess at about 10 metres or so considering all the joining we have to do.
I've seen some timber framing pegs for sale on eBay which are actually hexagonal, but they cost a bomb.
I think the tentacles will inevitably sag over time but that's fine I think. Personally, I'm a little worried about kids climbing on them, falling in and hurting a leg or something. Hopefully it'll be obvious that, that's not a good idea.
Matt_outandabout, that office project is fantastic. What a great project to do.
Kayak
Apologies for my absence, its been really busy here, however Ive sketched out the scarf joint I believe will work for you. Have you got an email addy I can send the scanned image to?
As for pegs, go to Coyles Timber near Bath, they will do you 3/4" drawn oak pegs, they work out at less than a £1 each IIRC.
If you dont have an email I can send the sketches to, Ill try and post them onto flickr or the suchlike and get them onto here...
Gosh.... potentially Mac's really are very good!!
[IMG]  [/IMG]
Oooooh!!! It works! Im loving my new iMac!! much easier than a PC its gotta be said 😀
Im still gobsmacked as to how easy that was to scan and post!! hey ho. Im sure that would have taken me much longer on my old PC with much associated swearing....
Ok, to try and explain my sketch.... I havent put any dims for the length of the tenon but I reckon a man of your calibre will be able to work that out and you'll have a 'feel' for what is going to be the right length, possibly circa 250mm/10"? Tenon and shoulders I would suggest are 1/3 - 1/3 - 1/3, i.e. 50mm/2" each.
As you can see, the shoulders are cut at 45degree's, this will increase surface area to be loaded and increase cantilever effect. These joints are commonly used (albeit slightly different) in wall plates and some sill plate applications.
I suggest using no more than 3/4" dia drawn pegs (as mentioned above) and obviously, dont forget to draw-bore them (approx 1/8" offset to bring the tenon stock (malke) into the mortice stock (female).
Any comments, questions or suggestions, please let me know. I have an easier day tomorrow!
Cheers
ooops, forgot to mention possibly the obvious, the tenon is to be cut onto the tentacle beam stock.
Presumably you will cut all the scarves before shaping the tentacles?
Just found Coyles Timber phone number: 01225 427409
[url= http://www.coyletimber.com/coyletimberproducts.asp ]Coyles Timber Products[/url]
Nice looking project, I won't offer anything for the jointing method, my craftwork is rather more agricultural and my approach would have just been to find a decent 6m length to mill rather than join two 3m pieces. That sycamore has some nice colouring in it.
We make pegs for our gate making from seasoned oak off-cuts, skimming them down to size before hammering them through a 1/2" hole in a bit of angle clamped in a vice, but guess you'll want a bigger dia. and that will need a big mallet and a strong arm / bench. Small woodland crafts set-up could churn them out easy enough, but the closest one I know is a social enterprise in West/Mid Wales. Coyles look convenient.
Glad to see everything is ' coming along nicely '. There is some good advice above. Slackalices's joint looks spot on as it would stop the joint ' opening up ' ie. the two pieces of stock moving away from each other.
I asked previously as to where the tentacles start as I'm think you need to minimise the gravitational/ cantilever effects on the joint. I'm gonna think out loud for a minute...Longevity...I take it you'ld like this to last as long as possible. Standing water will kill this quicker than you would want so locking 12 pieces tightly together won't be ideal and a small gap should be left longitudinally vertically and horizontally between each piece. Sanding a slight cuvature into the top face on each will aid water run-off and machining a drip-edge on the underneath of each piece would stop water creeping along underneath and staying damp. The principal being rain would run off the top piece, drip onto the underneath piece, then run off etc etc. The complete piece should be raised off the ground....so dig a rectangular hole into the forest floor ( I know...you might get dirty ) 3.5m long x 0.7 m wide 0.6 m deep and stand/ support 4 rows of 3 posts each, 160mm apart in the width, 100 mm x 100 mm x 650 mm long so that 100 mm protrudes ground level. The posts need to be at 0.5 m, 1,75 m and 3.5 m from the beginning of the piece. You're gonna have to be pretty accurate with the placing of the posts and direction of the tenons ( explained later ). Fill the void with a anguler type gravel/ stone ( Type 1 works fine and locks together and compacts really well ) This is the drainage you require. A top each post that you have buried is a tenon 20mm wide 50mm long 70mm high. in the center of the tenon is a hole to take a peg. The bottom row of your 150mm posts need to morticed 20mm wide, 50mm long running along the center of the piece at 0.5 m, 1.75 m and 3.5 m ( the 3.5 m mortice is after the join in the tentacle piece thus supporting it ). The mortice needs to run all the way through the piece. Two holes are drilled into the piece one being the same height as the peg hole in the tennon ( the second hole to take a second peg later see )The bottom 2 center pieces 6 meters long can now be fixed into place. Place the mortices of the center two pieces onto the tenons of the middle two rows of buried posts and peg.
Second Row....Again cut 12 pieces of stock 100 mm x 100mm x 150 mm long and cut a tenon as above ( 70 mm high 50 wide ) from either end ( this leaves a 10mm collar ) drill the center of each tenon to take a peg and place this connection piece into the mortices in the bottom middle two rows of your bench ( this is where the second hole comes in ) the 70 mm tenon sits above the other 70 mm high tenon ( with a 1 cm gap in the middle of the stock ) Peg. Now fit the two bottom ' outside edge ' pieces onto the tenons and peg.
...and repeat, connection pieces as above, 3rd middle row then second outside row then the third and final outside row. Please note all four pieces of the top row only need to be morticed 70mm deep so that the tenons ( tenii ? ) can't be seen . the only visible fixing methods to be seen are the ends of three pegs on the outside three rows.
I hope you can follow this...it's only a suggestion and i do tend to over think things but it has to work or there's no point.. I just need to work out how to stop the top 4 pieces moving apart. this will then tie-in the whole bench...
I've a headache..
sleep....
sleep.....
Blinkin flip! Thanks everyone. What awesome help! 🙂
Just got in and seen this, had a quick scan but it's late so will have a proper look at work tomorrow. Really, really grateful for all this help.
I phoned round a few places about pegs and was put on to Coyles timber as it happens.
They seem quite reasonable on price but if we can help it, we are trying to make it free as ultimately the student has to pay for extra non- woodland materials from his prize fund.
We have loads of Iroko worktop from the old science labs. I've seen octagonal pegs made. Does the panel think Iroko pegs would work if we machine them up? Its got fairly good weather resistant properties so I thought...
I've not any real world experience in using seasoned pegs to hold green stock. My logic says if you put the finished piece out in the ' Summer ' the green timber will want to dry/ shrink around a peg thats not shrinking/ drying. I'd hate this to split the stock. Why can't you use a green peg out of the same material as the stock at least this way any thermal or moisture affect will cause the peg to shrink/ expand at the same rate as the stock..
As before, just thinking out loud.
Yeah I think the whole idea is that the seasoned peg will expand and the timber around it shrink, to lock the joint.
It's fairly inevitable that cutting away such heavy sections will release some tension, particularly as we are largely using branches as the tentacles which usually will have more tension built in.
We have had a couple split already but hopefully have enough that we can allow a few to do this....
Slackalice, thanks so much for the drawings. Makes perfect sense what you say about the cantilevering forces.
I reckon the joint is pretty feasible, I'll take it in the workshop today and maybe we'll have a go at one.
The main problem we have is trying to cut the vast majority of the joint on a bandsaw when you have 3-4 metres of heavy and bendy tentacle to support and limited room! 🙂
A few of the tentacles shaped
[img]  [/img]
Making our own wooden pegs from Iroko
[img]  [/img]
[img]  [/img]
Looks amazing, not often envious but the weather...
What an amazing thread
I can't offer anything to what's been said, after all I'm only a Pattern Maker. Would love to see some pictures of the finished item
Once more what great community spirit you’ve all shown
Opps sorry first line was from a different thread. Doh
Hi there!!
Just got in from another favourite shopping trip.... Axminster Tools!! I've had fun!!
Regards cutting the joints, personally I'd go for skil saw and big mortice chisels for the tenon and if you've got a chain morticer to get the flesh out of the mortice, the joints wont take long at all. Doing them on the band saw will be border line dangerous and it's only a few cuts with a 9" circular saw.
Remember that you're dealing with big heavy section stuff, so forget about your cabinet making tolerances for these joints. So long as you scribe the shoulders correctly and use the chisels to those scribe lines, the rest of the joint (i.e. the bits that don't show) wants to be loose, as in 2 -3 mm loose. Otherwise youll spend most of your time and effort trying to separate the joints after trying them for the first time! Although you may have already worked that one out!!
Your thoughts re dry pegs in green timber are good re shrinkage/expansion, the strength of the draw-bore mortice and tenon joint is is the peg. Ive personally never used Iroko for pegs (probably because it's quite expensive! It's also quite short grain and may be prone to shattering while you're thumping them in with your club hammer. If you have no oak, I would be tempted to use the Ash and if you're all about doing it yourself, then here's some info on shaving horse's and plans for making one. All you need then is a drawknife and a willing student...!!
[url= http://www.greenwoodworking.com/ShavingHorsePlans ]shaving horse plans[/url]
Just got in, so in need of a cuppa. Cheers
I'm deeply envious of your machinery!! Mr Wadkin??!!
Trying to cut the joints you detailed slackalice but struggling a bit with the size and logistics of such massive and unruly timber... This may take some time... 😕
[img]  [/img]
[img]  [/img]
[img]  [/img]
[img]  [/img]
[img]  [/img]
NIce one Kayak!! Looks like you're getting there! I'm liking your jigs too.
Thinking about it, you'll be able to use the same approach for the female/mortice. I can imagine it will take some time cutting the joints as you are, however as you know, the first one or two are as much finding out how-to missions, so they will get quicker. In oak framing, it's all mortice and tenons, scarf's et al and quite frankly, we pay attention to the shoulders and the seen bits, so tend to go at them with big skill saw and bigger butt mortice chisels with a 4lb hide/hide Thor mallet 😀 . Great anger management stuff 😀
Just remember to allow some tolerance in the joint! Either hollow the cheeks of the tenon or the inside of the mortice, whilst keeping to your scribe lines. Apologies if I'm teaching you to suck eggs.
It's going to be a great looking piece of functional art.
Hi Slack
What do you mean re. seasoned peg + green timber = good or bad. Kayak has already had stock split without having any pegs in.
Tim.
Hi Tymbian
My understanding of using dry pegs in green timber is good. As the green stock dries out and shrinks, it contracts around a seasoned peg (i.e. the peg has already done it's shrinking and is hammered in tightly). It follows that as the green stock seasons, the joint strengthens.
As I mentioned in one of my earlier posts, the stock will split as it seasons anyway, especially as the tentacles are being made from ash, which has a tendency to split. I don't believe the integrity of the draw bore joints will be compromised by the splitting, in fact as you probably know, one of the best ways to arrest a split is to drill a hole at it's narrowest point.
I have seen split tenons in really old frames that I've dismantled for repair/restoration and from what I've learned so far, these have occurred to either a knot in the tenon, or excessive movement in the frame.
Does that help answer your question?
Tim too
Tim three, if we're counting.
Opinion in the Land Rover at work today was that we would just cut down a bigger tree to avoid joints.
Yeah! Bigger trees will work!!
But what about all those pegs?
Bigger trees would work for sure, but we are working with what is available for us, plus any bigger and I don't think we could physically lift and work them. They'd have to stay put and we'd go to them, and we can't do that, especially as we don't have chainsaw training etc...
We are essentially trying to do big scale work with furniture making sized tools..
We have altered the joints we are trying to achieve a bit as they were proving overly complicated for what we are trying to do.
We now have a halving joint, with a mitred shoulder at one end, and a square shoulder at the other. Hopefully this will resist the forces ok and hold together.
As someone suggested above, the short grain of Iroko is not ideal for the pegs. It's actually quite brittle and we have had one or two split and crack.
Banging the pegs through the joint.
[img]  [/img]
One of the joints with some blending in done with a power planer.
[img]  [/img]
Blending in the jointed components.
[img]  [/img]
tell him to do his shirt up before he does himself a mischief in a power tool!
Good point. Crazy kids...
I'm not so keen on the half lap joint. I'm sure it will support the weight, but it wont prevent the parts separating as well as a mortise & tenon. Needs must I suppose.
In my ignorance I have used pieces of brush handle to make dowels before. They are seasoned, the right size, have a long straight grain and are readily available. I didn’t have any oak either.
Great project. Love following the thought process.
I hope the tentacle end can take the weight of a person, because I know my boys would want to run straight down it!
I share your thoughts on the half lap really beaker2135. I think the problem is we are not really set up to cut these joints as well as we'd like, we are finding our cabinet making tools a bit limiting.
I borrowed a small electric chainsaw which has made some aspects easier.
We took the elements of what slackalice was saying about resisting the cantilever forces but simplified it.
To address the potential for the joint coming apart, we have added extra pegs at all different angles, thinking this would create some sort of mechanical lock of sorts. Hopefully we're right.
Detail of angled pegs
[img]  [/img]
View of side of one joint
[img]  [/img]
A few tentacles starting to come together
[img]  [/img]
You can just about see here the mitred shoulder we have kept on the halving to resist the cantilever.
[img]  [/img]
I know nothing about wood, but am loving this thread 🙂 can't wait to see the finished product..
Hey Kayak, those joints are looking very tidy. I'm not convince about the angled pegs though, sorry. I see your thinking with the half-lap scarf's, however, you're asking the pegs to do a lot in terms of both longitudinal and lateral strength - if you get my drift? The tenon would take care of resisting the lateral movement, leaving the pegs to work solely on resisting longitudinal separation.
May I ask? Do you have a skill saw / circular saw? The joints I detailed would be much easier to cut with one. Preferably a 9" saw that will give you a 75mm depth of cut, so by turning the tenon stock by 180 degrees, the tenons can be fleshed out in very short time, 1st cut set at 50mm for one side of 45 deg shoulder, turn stock over 90 deg and with max depth, rip cut full length of tenon on both sides of cheeks. Turn stock 90 deg and reset to 50mm for the other shoulder cut and then turn again with max cut along cheeks. Finish cheek cuts with hand saw and job done.
The mortice joint could be done in the same way, except with a series of longitudinal cuts and remove the slithers with a broad chisel and then use a chisel to remove the final bit at the end to your scribe line, unless of course if you have access to a chain morticer, in which case it will be even quicker as you'll be able to take the flesh out up to the 45 degree shoulder.
Looking good!!
I know what you're getting at slackalice. The tenons or in fact any part of the joint on the square stock was not a problem at all.
When you come to the logs however, it is incredibly difficult to take a reference from anything.
Every one is a different size, diameter, length, plus obviously they are all a few metres long.
We found trying to cut two parallel 45 degree shoulders, square to the tenon/mortise and a further one and then marry up all six was....... Not really happening. You can't just invent what is 45 degrees either as there is no reference. You have to try to sight an imaginary line running through the two components and imagine a plane to estimate 45 degrees off.
We then found digging the waste out of the mortise was very hard as our chisels are way too short. We do have a chain mortiser but can't mount the logs on it as they would foul on surrounding machinery. Plus the mortise needs that 45 degree shoulder in it anyway, not vertical.
All in all, for the amount and variation of what we're dealing with, and the time constraints, we thought we might get away with a halving, albeit with 45 degree shoulders. I'll maybe have more of a think about the separation thing but I'm thinking angled pegs will certainly help....... Maybe 🙂
Nice updates and I think it will look good once it comes together. I'm not 100% convinced by how the joints will bear up over time, or of the angled pegs value, but know exactly what you mean about sometimes being limited by space, tools and the material and having to get something that works [i]done[/i] as best you can with what you have and it looks like a good job with something of a learning curve to it.
It's all progressing well though - it's really a shame you don't have more full lengths to work with (it's not like they are high value so shame they couldn't have offered more) as it would have been a good/fun exercise to work through a series of jointing techniques as a sort of experimental/ "educational" process.
Still looking forward to the next update...
Thinking out loud here....
You know how on big packs of plywood etc and packing of large items you get those tensioned steel bands?
[img] 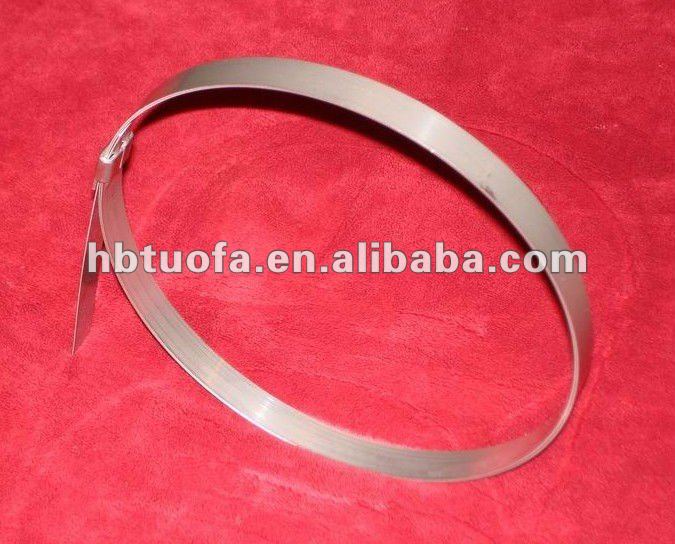 [/img]
Compromise?..... Could work/help...
kayak - loving this thread - looks great and the idea is unique! I have no help im afraid with regards to joint strength..infact i have a question for your cabinet making skills.. can i be cheeky and ask you some advice?
email should be in profile..
Morning kayak! With irregular shaped beam stock, the datum's or reference's can be determined by snapping a chalk line along the length of the stock on each quadrant. Whilst not exactly 90deg from each other, they will aid your efforts. Alternatively, you can square off the section of stock that will receive the joint and as it looks like its the ash tentacles that are proving difficult to mark out, these are the tenons, so squaring off need only be done to the upper and lower surfaces.
It's much easier to spout forth from here - 100 miles away - so please forgive me if you've already tried the above!
Likewise, trying to explain how to cut the mortice with the chain morticer and still achieve the 45deg angle is easier for me to show, rather than explain in type written words, so sorry for my deficiency there!
I would not use the bands, nice idea however, they kinda take away from the whole natural wood feel that this has and will have. Instead, I think the joints will be fine so long as you stagger them. It's only the top beams that will be really vulnerable, as the lower layers will be supported by the layer above, no? In which case, use the mortise and tenon joints for the three top beams. You also have the spacer battens, so is it possible to use these as some form of structural rigidity? I mentioned in one of my previous posts that these could be 60x60mm and rebated into the beams and located with pegs themselves. It maybe that with some positioning, they can also provide a measure of support after the joints?
I'm loving the look of the tentacles you've fashioned already, the end result will look unique and stunning and I'm really quite envious!!
Have a great day.
You could run some of this through with washers to spread the load and then countersink and put wooden plugs on the surface so they just looked like the pegs.
[img]  [/img]
I would not use the bands, nice idea however, they kinda take away from the whole natural wood feel that this has and will have. Instead, I think the joints will be fine so long as you stagger them
I know what you mean, but actually the student was talking about using some sort of banding here and there as a decorative 'addition'. A bit like a tribal armband sort of thing... Not sure, anyway, if we see that it's a problem then I guess it's an option.
Maybe we'll try another Mortise and Tenon joint soon then now we've got a bit more confident...
This is something I did many moons ago at University where I used stainless steel wire and bound the foot joint of a pair of tables to add decoration but also to add strength and rigiity...
[img]  [/img]
I do like the use of stainless steel with natural wood! Those tables look gorgeous!
From aesthetic view, I see the value of the bands.
I was involved in a frame a few years ago where we used 3/4" dia s/s pins instead of oak pegs in some of the more visible joints (I also remember there being a Grand Designs where a similar approach was used too). The effect was lovely, though could be a bit much if they were used in all the joints!
Chopping out the waste on a mortise/bridle component.
[img]  [/img]
Little bandsaw jig we made. The component rests on the 'cradle' so that in theory we have some sort of square, mitred shoulder cut with the inside of the bridle as the reference 'plane'...
[img]  [/img]
Pegging a finished mortise and tenon joint.
Slackalice, don't know if you can see but the joint has it's shoulders on opposite mitres. We thought about it and thought the shoulder at the furthest end of the post would resist the tentacle dropping, the the opposite shoulder would resist it lifting in its cantilever...
The nearest face there ends up as the top face.
[img]  [/img]
Blending the joint in on the bandsaw.
[img]  [/img]
Getting there..
[img]  [/img]
The mortise and tenon joint takes significantly longer to do with significantly more head scratching... 😀
I'm loving the look of the tentacles you've fashioned already, the end result will look unique and stunning and I'm really quite envious!!
Here, here, wish I had a 'proper' job still. I really miss the thrill of turning something 2D into a 3D object for the first time. It's is immensely satisfying
Thanks again to you all for such an intriguing thread
Hear, hear, wish I had a 'proper' job still. I really miss the thrill of turning something 2D into a 3D object for the first time. It's is immensely satisfying
If only the pay was as satisfying for 'manual' work as it is for office-based... 🙄
But yeah, my job is fun sometimes... 🙂
This is what it's all about! Great thinking about the reverse / opposite mitred shoulders - that's border line genius! I'm gonna remember that one!
Your 2" butt mortice chisel looks like one of my framing chisels and certainly man enough for the task. Out of interest, what angle do you sharpen it to? I've found around 35deg works well for heavy work like that. Along with a big heavy mallet!
The bandsaw jig looks like an inspired bit of work too and probably reduces the number of people needed to lift and hold and guide the beam stock through.
Your joints are looking very tidy, how much draw are you finding works well for these?
Nice work there kayak, looks like you're getting the measure of the job in every sense.
kayak or slackalice - would it be ok to contact you with regards to a project im trying to draw up? Just to get your opinion - wont take long.
i see SA has an email in profile - can i send one out ok?
cheers!
Hi scotia, no probs, mail away. I'm in all day today, waiting for Parcelfarce to collect a return to CRC...
The "..it won't take long..." always makes me chuckle tho!! 😉
Hi Scotia, yes of course contact me.
I couldn't find your email in your profile though unless I'm missing it..
ok i'll send a mail then 🙂 yeah i prob shouldnt have put the shouldnt take long bit in.. 😉
ok so i cant see my email either! its andrew*dot*gunstone*at*gmail*dot*com
Thought I'd look in on this to see if it's progressed. Any news?
Yeah it's Easter break so the students are not here.
The student doing the bench has also had to catch up on some curriculum obligations too so there has been a bit of a break.
I'm not complaining actually as It's hard work! 😀
Back to it after Easter though. We have some catching up to do...
Good stuff - looking forward to seeing it in it's proper home.
*Update*
Back after the Easter break to something of a disaster to be honest.
Virtually all of the tentacles have now split, some worse than others.
🙁
Where this is in big section I guess it won't matter too much but if this is happening further on down the taper then obviously it presents a problem.
Bit of a nightmare to be honest after all the work we've put in.
The tentacles were all outside so have had whatever the Easter weather threw at us, but I guess they were going to go whatever.
Releasing tension by cutting bits away like that in an uneven manner such as these twisting tapers must have been the doing of it.
[img]  [/img]
[img]  [/img]
Below is the worst one, which actually started to split weeks ago..
[img]  [/img]
My first thought [s]was to chuck it all in the skip!!![/s] was to go back to what I was talking about before with the metal bands tensioned around in various places.
[img] [/img]
It would be a shame as they are not so in keeping with the whole thing but I suspect would be a fairly ok compromise. Can't see what other options we have at the moment really and a bit gutted and hissed off with the whole thing..
😕
This is what we need, but can't find anything like it in the UK to hire or buy...
One of the places we sell fencing blanks to uses steel bands, as do a few of the others actually, could be worth a try of local fencing suppliers or mills for a borrow, or at worst may have to take the material to them.
We and quite a few others use fabric straps which probably aren't of as much use (or clean looking) but suit our requirements.
Are these for round packs though? There are loads who do steel strappers for flat-faced items, but can't find any for round section as per the video above.
It's been very dry in the cold spell. With the change of weather some of the shrinkage may revert part-way, don't rush into any action.
Yonks ago I used 'band-it buckles' which work on steel straps. A quick google suggests they are still available.
Yonks ago I used 'band-it buckles'
Ah thanks Slowoldgit. They are available, though the tool is £190!!!
If I could hire one it'd be great.
I agree with you regarding the weather, but I suppose part of the problem is the timber will continue to expand and contract...Not sure how we get around that. 😕
Mmm, not sure. The bundles of stakes are round, but rather larger curves of 1m dia. minimum, so probably what you mentioned.
In previous job, marquee king poles had steel reinforcement rings top and bottom, installed just like pick-axe heads, slide to fit on taper.
oh man - that's a shame.
Hope you find a solution.
Good luck!
First little try this morning with the stainless steel strapping tool we got. Hopefully this will help, as you can get a fair bit of tension onto it.
The clip 'heads' will be sited underneath, and the ends are actualy not sharp as I can run my hands over them pretty roughly.
[img]  [/img]
[img]  [/img]
The student is still working on essential coursework and so we've not started into the bench again properly yet.
Fixing the clips with the tensioning tool
[img]  [/img]
Closing the clip-ends.
[img]  [/img]
We're managing to get a pretty good amount of tension onto the bands, and we are then securing them with two screws each so if the wood shrinks the band should stay in position until it expands again..
Could you apply some additional clamping to close the splits a little before you put the strapping on ? - then release the additional clamping and as the wood recovers it'll tension the straps a little more.
Yeah it's a good idea. Those bands of three we put together, each successive one makes the previous one a tiny bit looser, but in reality, the wood is incredibly strong and very, very difficult to close the crack up at all!
Hmmm, the wood is going to do what it wants really, especially with the Ash you're working with. Even when I've made masts and spars from straight-grained spruce or fir, they can still split in places, although not to the degree you've got there!
I wonder if you treat these splits as you would in any other wood? I.e. drill a small dia hole at the end of each split to prevent them from getting longer and possibly running the full length of a tentacle causing it to tear apart?
In days of yore, splits in spars would be filled with linseed oil putty and then varnished over to prevent/minimise water ingress. From your pics kayak, it doesn't look like putty would be an option as some of them look to be quite sizeable. However, the modern equivalent would be WEST system epoxy or SP epoxy resins and again, I'm wondering if a resin mix with some micro fibres (or better still, same coloured dust from your sanding operations) and a bit of colloidal silica towards the narrower ends of the splits would help to stabilise them and reduce the potential for them increasing. This does carry a risk that the wood may well start splitting along another part of the grain...
Another alternative if the epoxy approach deems too rigid, would be Sikaflex caulking.
If none of the above appeal, then my other thought at the moment would be for you to apply liberal amounts of a boiled linseed oil and white spirit mix 50:50 to the tentacles as soon as they have been shaped and sanded. This will slow down the drying out process and whilst will not prevent the natural splitting arising from the tension, it is more than likely the splits will not be as violent.
Thanks Slackalice. All good ideas. I've been looking into the epoxy idea but I think the cost would be astronomical, to fill all of those gaping splits.
I've done some very small-scale filling of knot holes etc with pourable resins and the problem of it running out of very fine cracks is always a bad one. I imagine it would be much worse on a split like this where you can't see all the little exits it may have.
I think preserving the area like you say perhaps with Linseed may be the way to go. We only have limited budget on this. In fact, aside from the wood itself, all other things we need have had to come from the students actual prize money(£400) which seems unfair, but we don't want to have to eat into that too much. I guess the compromise will be longevity, but may be they'll sponsor another prize in a few years and off we go again!
Little update.
We have done the bulk of the jointing and most of the banding, both structural and decorative. It all looks a bit stark at the moment but once it all starts to weather down I reckon it'll look rad.
Starting to lay the components out very roughly to get a sense of scale and position. Nothing is fixed in terms of final positioning yet. We think that rather than decide now and number up everything, we'll go to site and lay it out as we go.
The ends of all the components are yet to be squared off yet. It'll look much neater when done.
[img]  [/img]
The tentacle section leading into the square section. The square section will be longer than this. We need more timber as it turns out...
[img]  [/img]
[img]  [/img]
[img]  [/img]
So, once we have some more timber we can crack on with making more square section. We then need to figure out the dimensions and therefore the gaps between each component with the bearers we use. We need to figure out how we are going to 'unify' the whole stack on site as obviously there are a lot of cantilever forces going on here.
Currently we are working our way through squaring off the ends of all the components... Big stuff!
Looks fantastic! Bigger/longer than I imagined.
That bottom-front piece looks superb.
We need to figure out how we are going to 'unify' the whole stack on site as obviously there are a lot of cantilever forces going on here.
I think we are going to use 'Landscaping screws' which are used to screw railways sleepers together, to tie the whole thing together on site. 250mm long should give a good bite. Though we may only use them in the lower layers where they won't be seen. The top layer we could perhaps peg on with the dowel method we've used for jointing so far.
[img]  [/img]
Spent several days last week waiting on collection of more sycamore logs so that we could make more square section. Once that was done we could have a go trying to lay it out initially. Nothing is fixed at this point, just chocked up.
[img]  [/img]
[img]  [/img]
[img]  [/img]
Pictured here a bit longer than it will actually end up. We have to wait until we're on site to cut all the ends down. He has not decided yet on having a straight and square cut at the end or to angle it or whatever...
It's over 30 feet long there and looking pretty imposing in the flesh already.
[img]  [/img]
[img]  [/img]
If you look at his original model, it has some sculpting to the edges, softening them and introducing more curves and waves. This is something we plan to do on site with a combination of chainsaws and anglegrinder discs etc.
[img]  [/img]
He is currently toying with the idea of creating a sort of back rest that would rise up near the tentacle join and flow down, curving into the square section...
Personally, I quite like the simplicity of it currently but I'm sure whatever he decides will work very well.
We've got all that to sort out, we have some massive screw bolts to join it all, and all this while counting down the days to the end of year show/exhibition in June which I have to set up and build and a workshop full of second year students starting to get frayed nerves.... 😯
It's all good though...
By the way, if anyone commutes through Leamington on the train to Birmingham. As you pass the park and then cross the viaduct and river, look down to the right of the train and you'll probably see this monster evolving out the back of our workshop. After that, Coombe Abbey park this summer. 😀
A lady and a pug testing out the bench. The pug seems to approve.
[img]  [/img]