![]() You don't need to be an 'investor' to invest in Singletrack: 6 days left: 95% of target - Find out more
You don't need to be an 'investor' to invest in Singletrack: 6 days left: 95% of target - Find out more
You're very welcome 🙂 Van's looking good!
So, er, yeah, bit behind on the updates - this lot coming up was February half term...
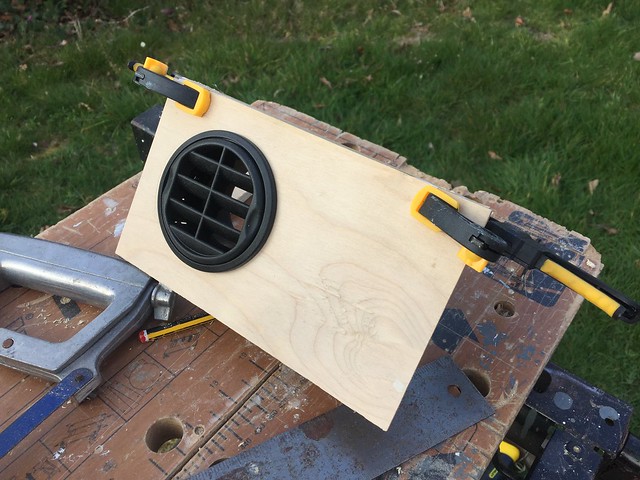
Next step was an overhead unit above the sliding door to contain the switch panel, amp, a couple of speakers and a wee bit of storage. There are a few constraints here - it has to fit all that stuff (duh) but also not be too obtrusive - if it sticks out into the van too far then we'll bang our heads on it when we get in. Which would be bad. Always keen to make life difficult, I went for an angled face, as seen in this Mark 1 former:
[img] 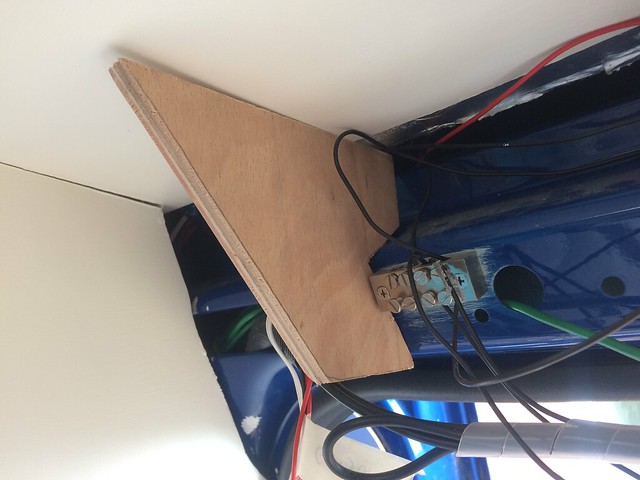 [/img]
Seemed to work, so added another one:
[img] 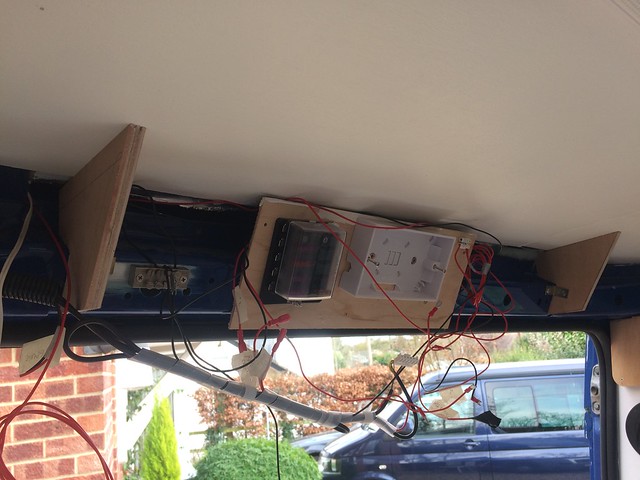 [/img]
Here's a first pass at the main structure:
[img] 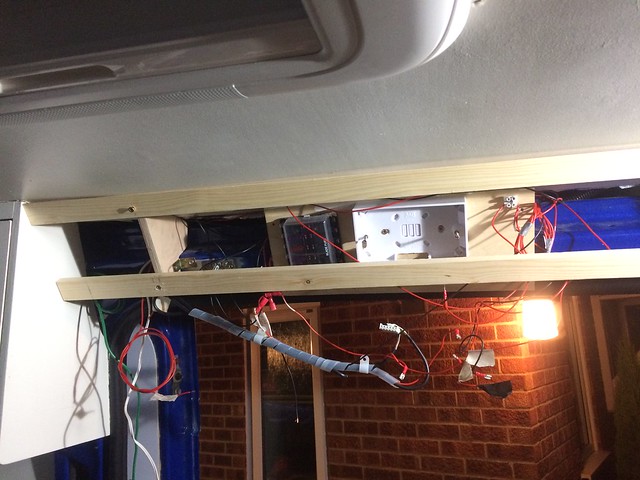 [/img]
The ply formers are attached to the van and the ends of the unit will be supported by the kitchen at one end and the bulkhead at the other. Added more framing:
[img] 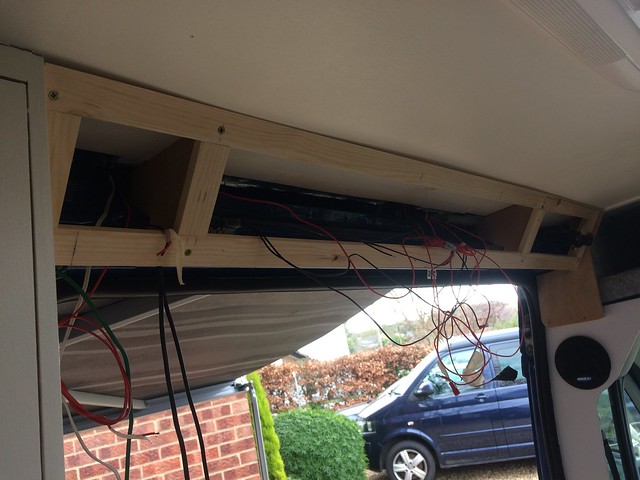 [/img]
...and took out all the old junk, leaving lots of dangly wires. Lots of them got pulled into the locker over the kitchen, to which I've moved the left-hand fusebox and earth point for convenience:
[img] 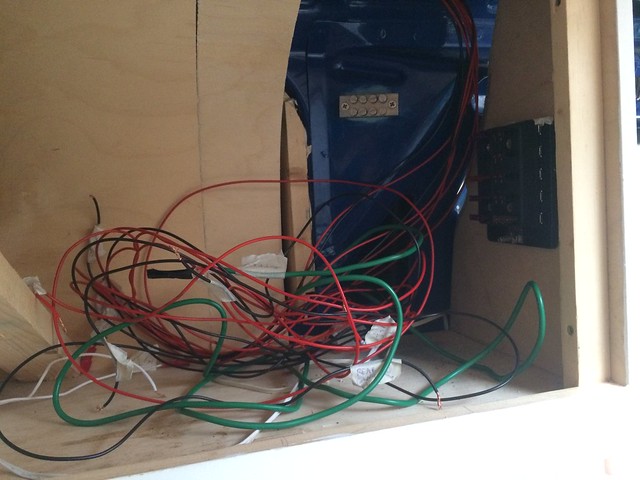 [/img]
Considerable amounts of untangling, tracing, trying to remember what goes where and labelling later, it's looking a bit tidier:
[img]  [/img]
The green wire is the feed from the batteries (there's another (bigger) fuse at the other end), a bunch of lights and things are fed from this fusebox. There's another identical one under the seats on the other side of the van which runs a load of other stuff. All the returns go to the metal connection block, which is just screwed to the bodywork with the paint sanded off underneath.
Current state of play:
[img] 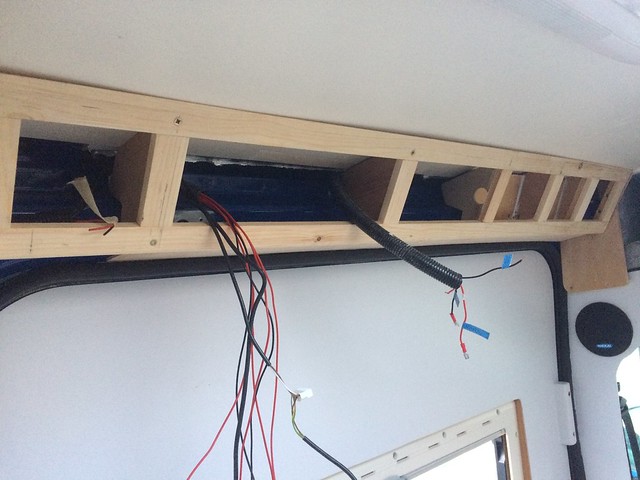 [/img]
There are (removable for maintenance) ply panels to go on the front of this - from left to right they'll be speaker, switches, amp, cubby hole (with USB sockets in the side for phones), second cubby hole, speaker. Getting that lot all lined up will be entertaining.
In other news, I've made a start at boxing in the base of the rear seats. Now reasonably well practised at routing the corners off bits of timber:
[img] 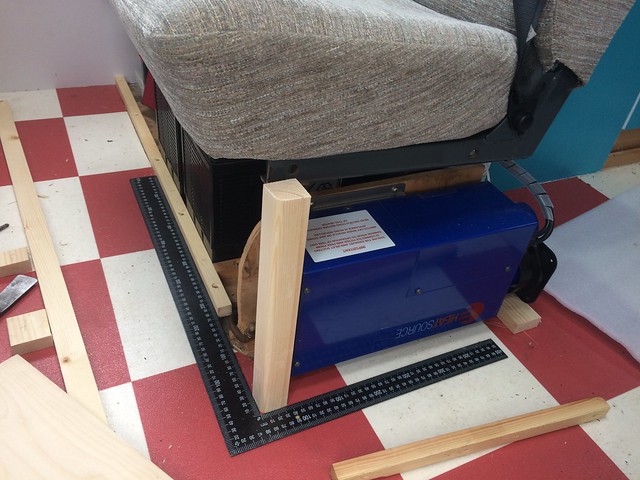 [/img]
Incorporated into the structure is an additional support for the fold-out bed flap, that's been a bit saggy across the seat frames. This ought to sort it:
[img] 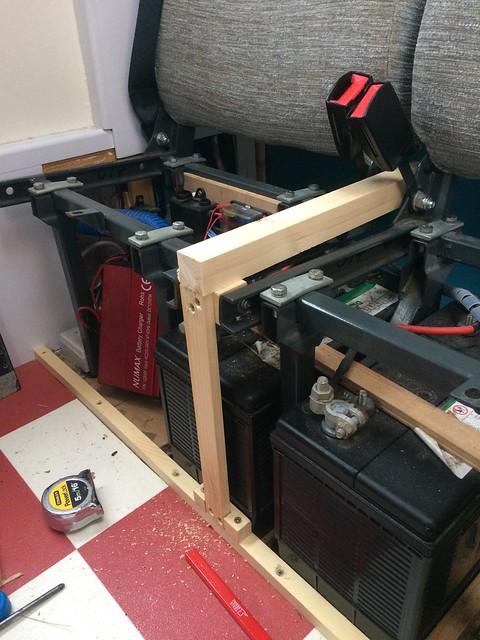 [/img]
Sits neatly between the seat bases when they're in place, which has the added benefit of making it significantly harder for children to drop pens/tiny toys/crisps down between the seats...
Hacked out a piece of 4mm ply to offer up:
[img] 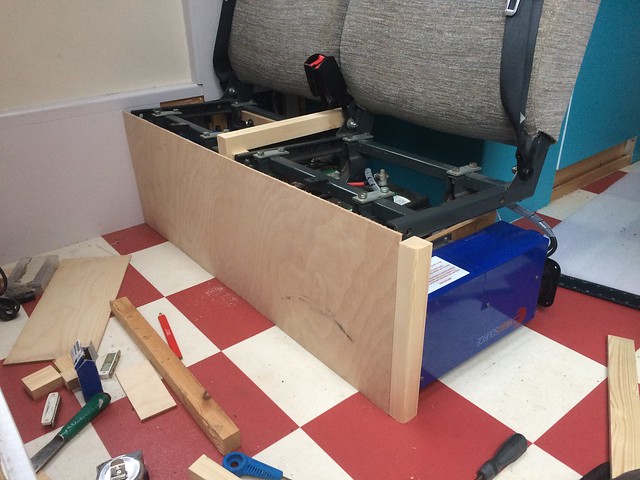 [/img]
Slightly tediously we need access under the front edge of the seat bases for the handwheel bolts that hold them down, which meant cutting this bit out:
[img] 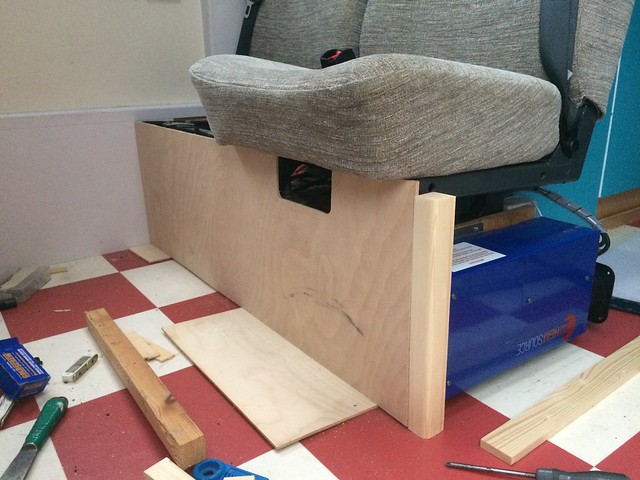 [/img]
although that's also useful as a handle to detach the panel with - it'll be held on with magnets eventually. Given that the batteries, mains charger, solar controller, heater, split charge relay, fuseboxes etc are all under the seats, access is definitely required.
Having done the same for the other seat and made a start on the frame around the side, the rear seats currently look like this:
[img] 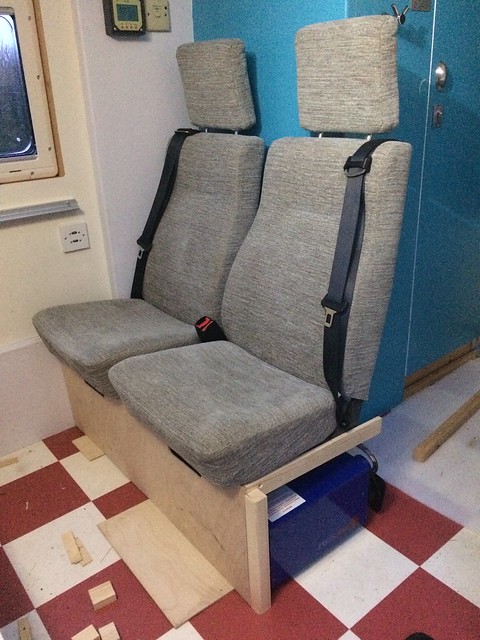 [/img]
which is quite a lot neater than before. Onwards!
Good stuff Mike!
MOAR.
Picking up from the most recent instalment, here's some more switch panel. One of the little cubbyholes is intentionally phone-sized, so I put a USB socket in there to charge same:
[img]  [/img]
Popped a speaker into one end:
[img] 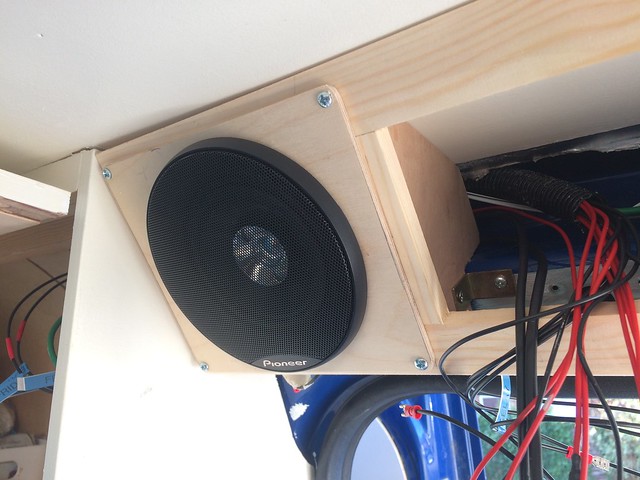 [/img]
Connected up eleventy bazillion wires to the panel:
[img] 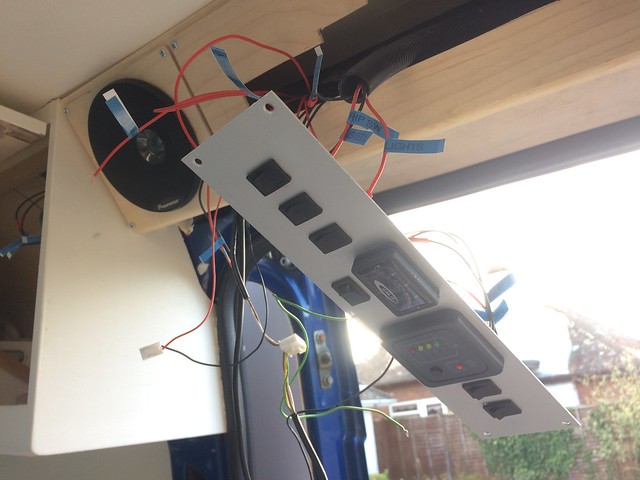 [/img]
And screwed it into place:
[img] 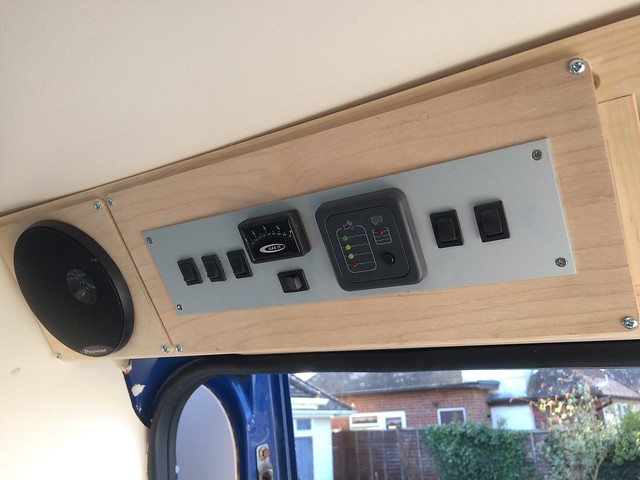 [/img]
But from where is the music coming, I hear you cry? MAGIC. Actually, merely sufficiently-advanced technology. Hidden inside the panel there's a 12V-to-USB gizmo powering a Bluetooth audio receiver connected to the amplifier, so we can stream music from phones or whatever:
[img] 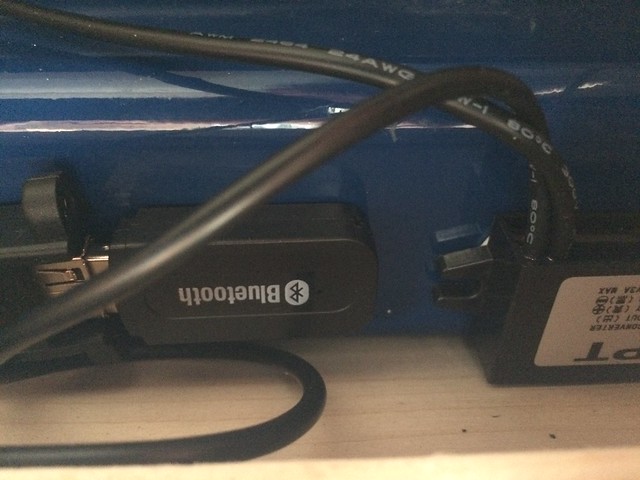 [/img]
Mount the amp, panel to finish the front of the storage cubbies, other speaker, DONE:
[img] 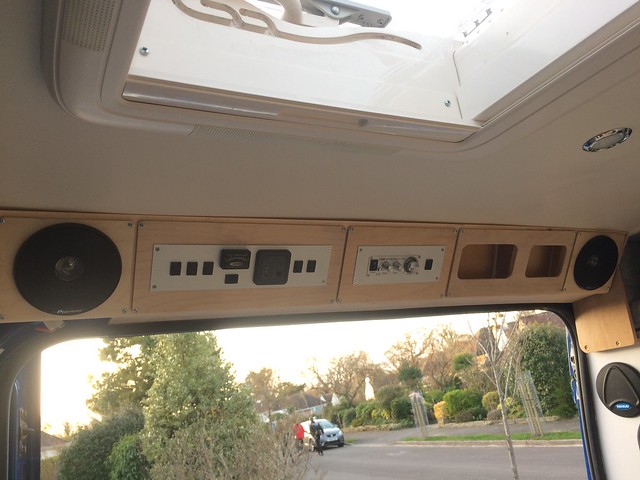 [/img]
(apart from filler and paint, obvs).
In other news, various maintenance jobs have forced themselves upon us. The wipers have been iffy for ages because the motor's been gradually dying. Buying a motor turned out to be only slightly cheaper than getting a motor with new linkages attached, and I suspected that all the bushings were pretty weary, so got this:
[img] 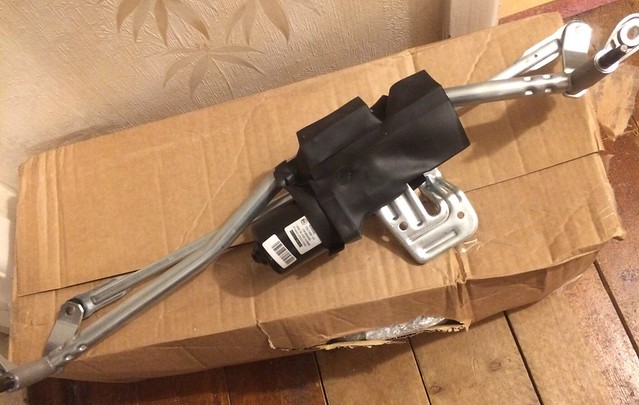 [/img]
which turned out to be most entertaining to replace, necessitating the removal of all this lot:
[img] 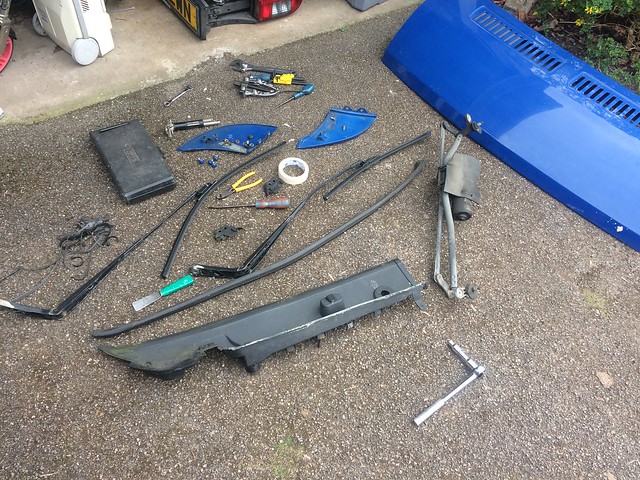 [/img]
and leaving the van looking like this:
[img] 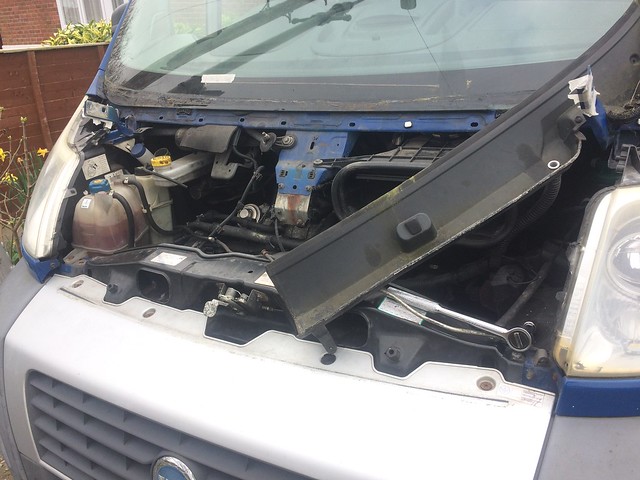 [/img]
Still, got there in the end, all works. I don't recommend removing and refitting a Ducato bonnet singlehandedly if you can possibly avoid it 🙂
More soon!
Awesome. One day. One day
Honestly, no updates for months and then three in 24 hours. I spoil you, I really do 🙂
Ages ago I was boxing in the rear seats. Made the end panel to cover the heater:
[img] 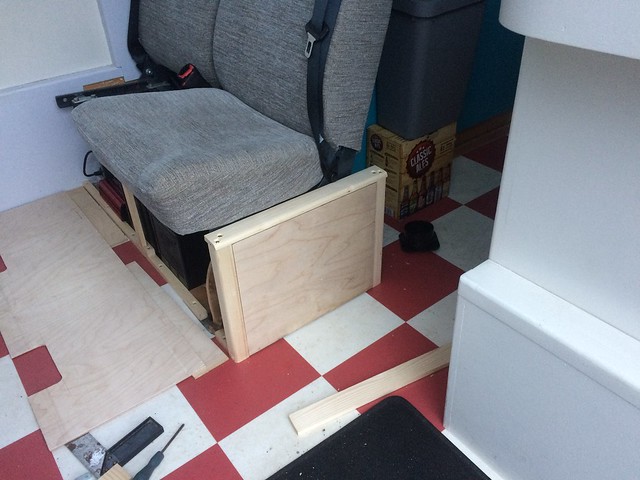 [/img]
It's on magnets so it can easily be popped off for access if necessary:
[img]  [/img]
All put back together it looks like this, which is rather neater than before:
[img] 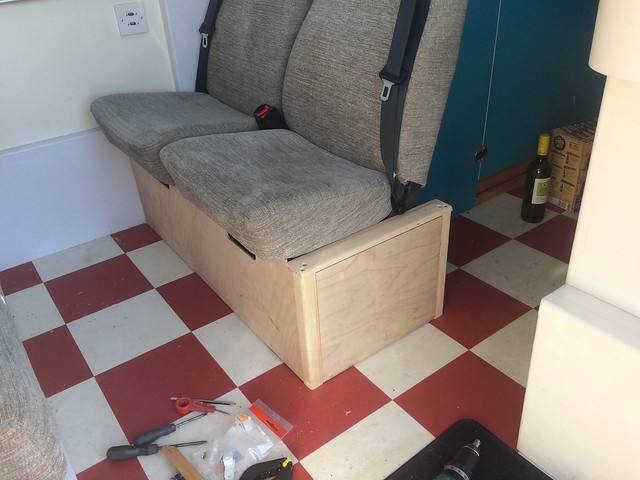 [/img]
Bunged another USB socket in the top for on-the-go tablet charging:
[img] 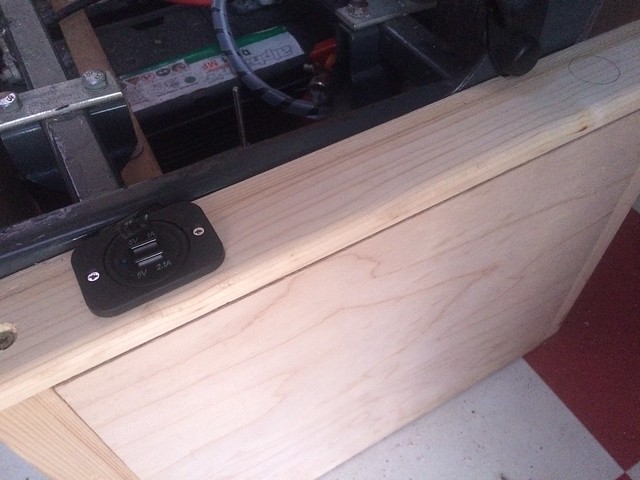 [/img]
Up until this point the storage under the fridge has just been open shelves. An actual door would be a bit obstructive (has to open into the aisle), we thought about drawers but they're a faff to make. And then had this idea - make a frame:
[img] 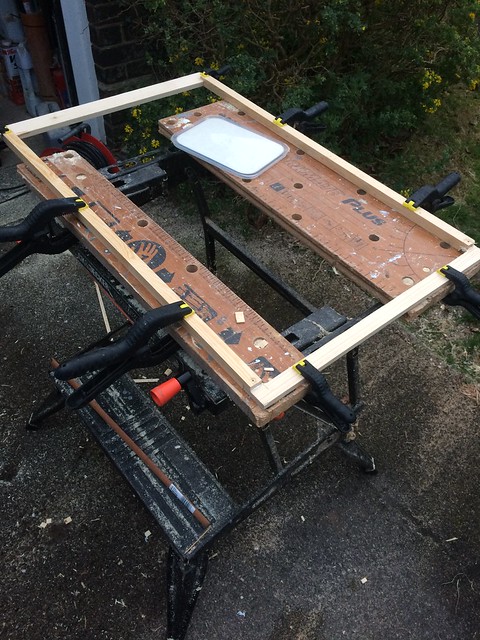 [/img]
Persuade a handy parent to get busy with some canvas, zips and a sewing machine and presto:
[img]  [/img]
When parked up, unzip, roll it up and secure with magnets thusly:
[img] 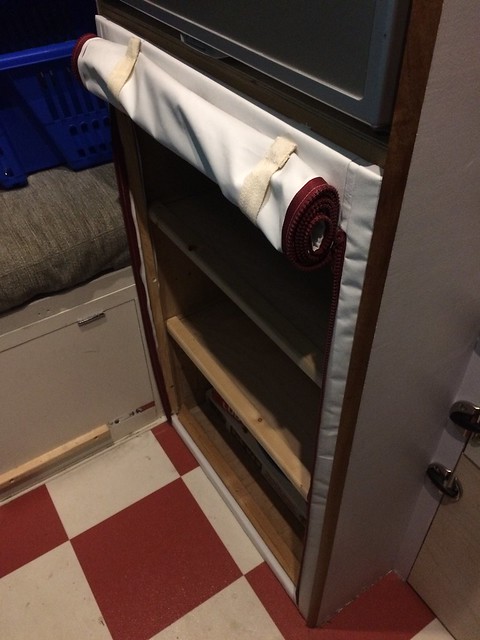 [/img]
And another "mend broken thing" job - replaced the increasingly-battered passenger mirror housing, that had definitely been bounced off a few too many hedges. Again, right old faff to take apart, especially as a previous owner had at some point stuck it all together wit PU goop:
[img] 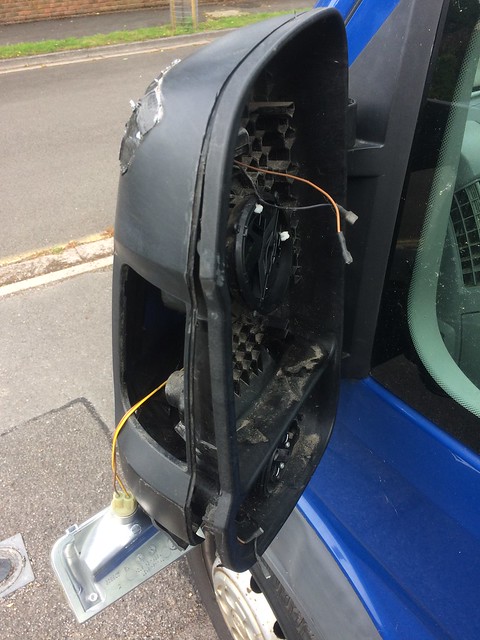 [/img]
but much tidier when done:
[img] 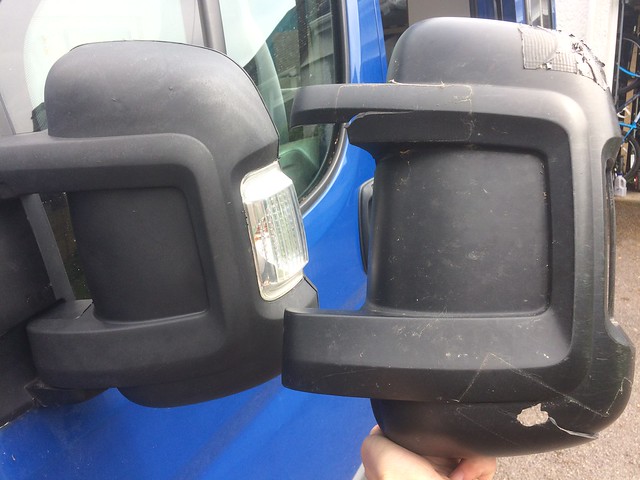 [/img]
They're not original Fiat housings, pattern ones off eBay, but for £12 for both sides I'm not complaining 🙂
Also replaced the centre roller on the sliding door because it wasn't running very smoothly. Can't think why:
[img] 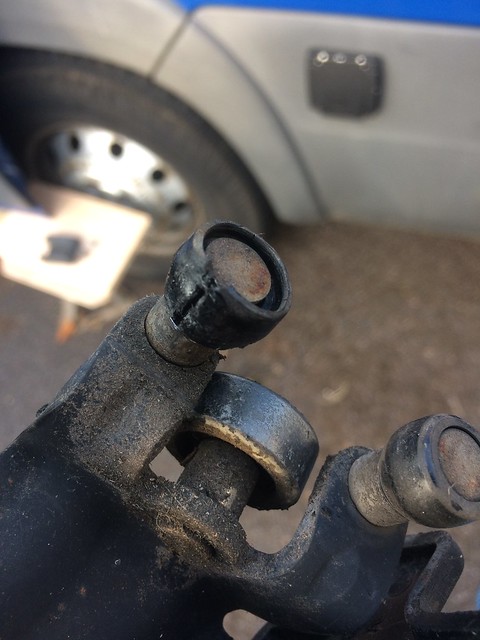 [/img]
And discovered the frankly astonishing bumper-restoring properties of linseed oil, which I found a bottle of in the garage:
[img] 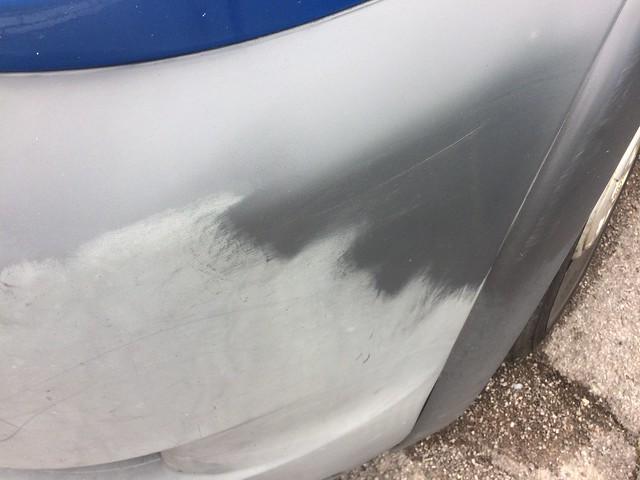 [/img]
I also replaced the broken radio aerial, but I didn't take any pictures of that on the grounds of extreme dullness 🙂
Wow - 3 update posts - you really are spoiling us!
And next, an impressive milestone - ripping out a load of perfectly good stuff that we'd already done and doing it again, only different! Actually not the first bit that's been done twice (one of the rooflights has been in and out more times than the hokey cokey) but one of the biggest...
We had an issue with the boot space, in that the lower pair of bikes sat on the boot floor, blocking access to the under-bunk space and ending up with loads of stuff stacked against/wedged in amongst. This was inconvenient. Remember the rather lovely shelf I spent ages on? Out it came, and in went some lengths of shelf track that I had lurking:
[img]  [/img]
You can probably see where this is going - add brackets, pad appropriately, hang bicycle off them:
[img]  [/img]
And in the lower position, two up:
[img] 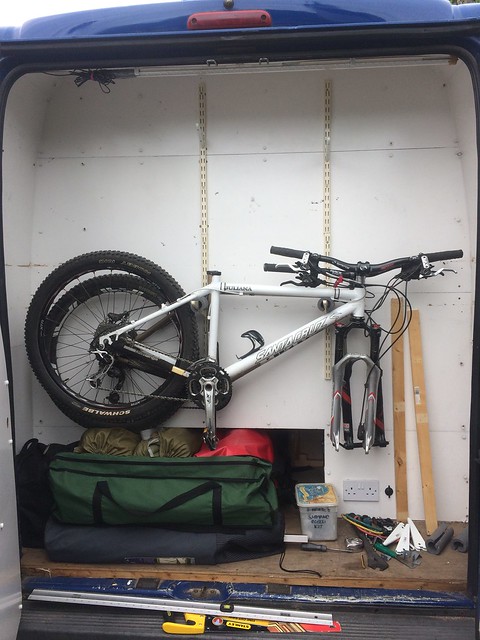 [/img]
Doing it this way means (as is hopefully clear from the picture) that the bottom of the boot is completely clear, so long things like chairs and inflataple SUPs (which are the new things that we have to accommodate, but they're a bit more compact that the inflatable kayaks that we used to carry, so that's a win of sorts) can be packed lengthways under the bunk.
Keen-eyed observers will note a handy-looking space over on the right. To capitalise on that I embarked on making a suitable unit:
[img] 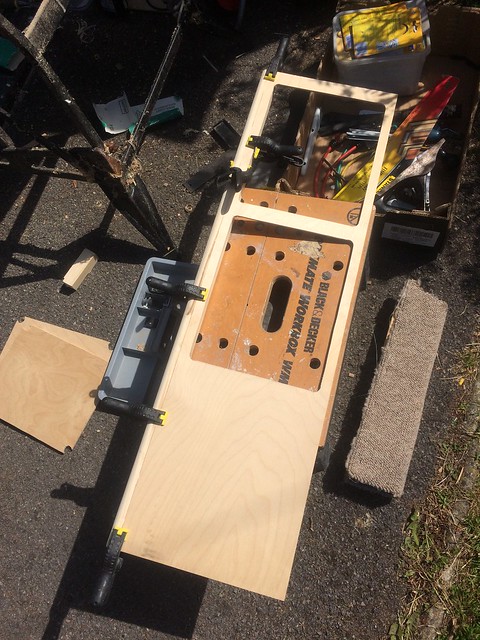 [/img]
But before completing that, we finally got around to putting down flooring on the, um, floor. GLUE:
[img]  [/img]
FLOOR:
[img] 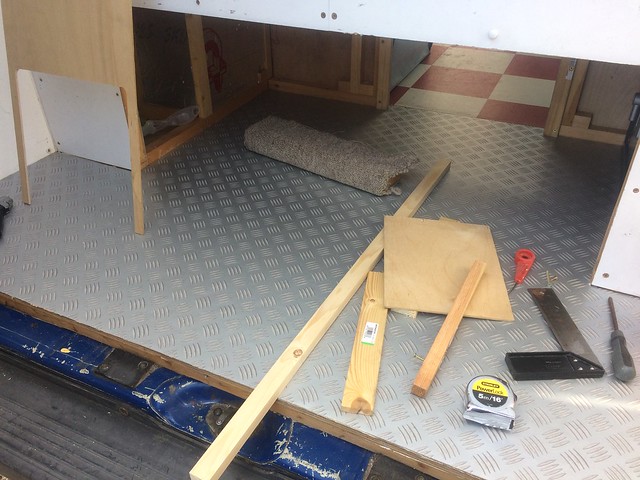 [/img]
Tidy. Then I could finish the shelvy thing (recycling some bits of the old shelf in the process):
[img] 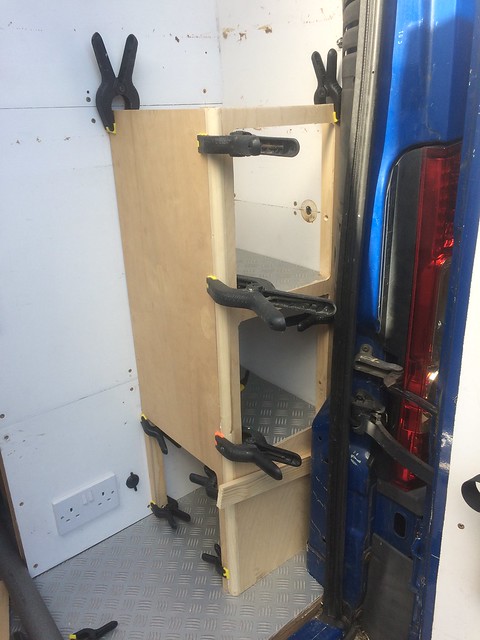 [/img]#
And without all the clamps once the glue had set:
[img] 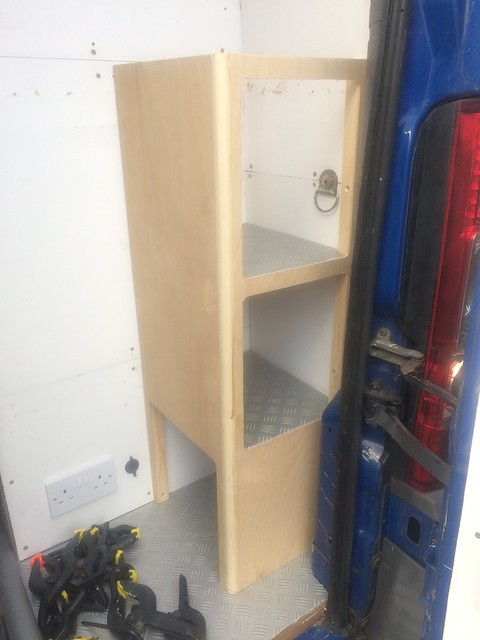 [/img]
Ending up with this:
[img] 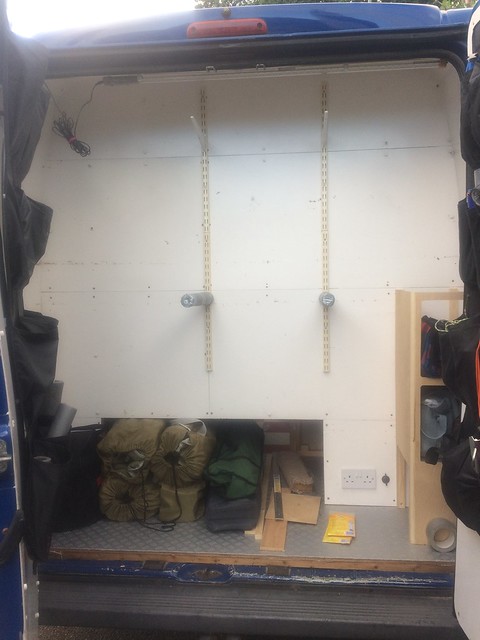 [/img]
Just in time to experimentally load up ready for Mayhem:
[img] 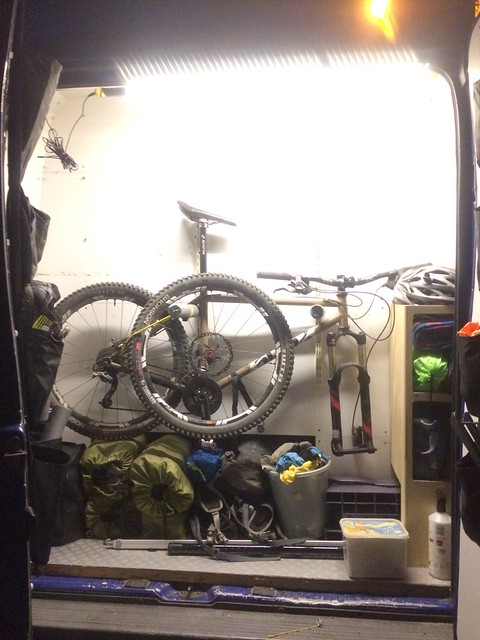 [/img]
Worked fine with one bike (as you'd hope, really). Finished off the threshold with a length of alu angle:
[img]  [/img]
You may notice a New Hole - there was a space behind a wheelarch that was accessed from the side, which wasn't that handy, so it now isn't:
[img] 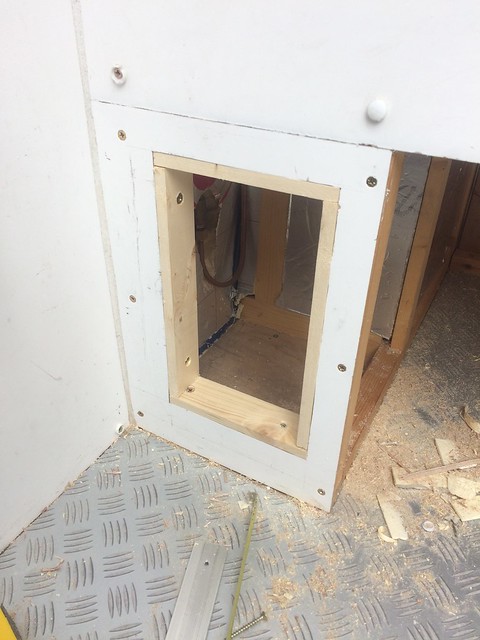 [/img]
And clearly post-loading. Not quite as terrible as it used to be with that quantity of stuff in it:
[img] 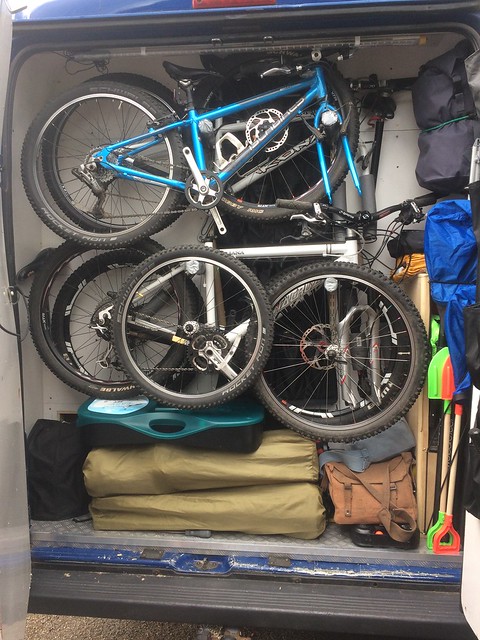 [/img]
Other dull-ish stuff: Finally filled in the previous gap at the bottom of the kitchen drawers with, imaginatively enough, another drawer. Although it's a big one, because (a) more useful for pans and stuff and (b) one less drawer to make 🙂
[img] 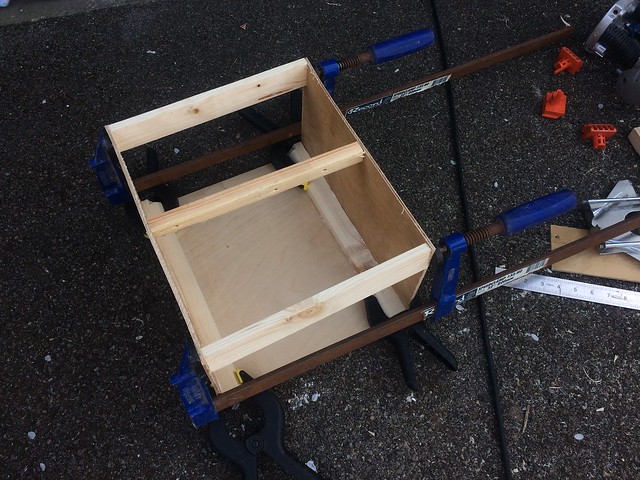 [/img]
Nearly finished:
[img] 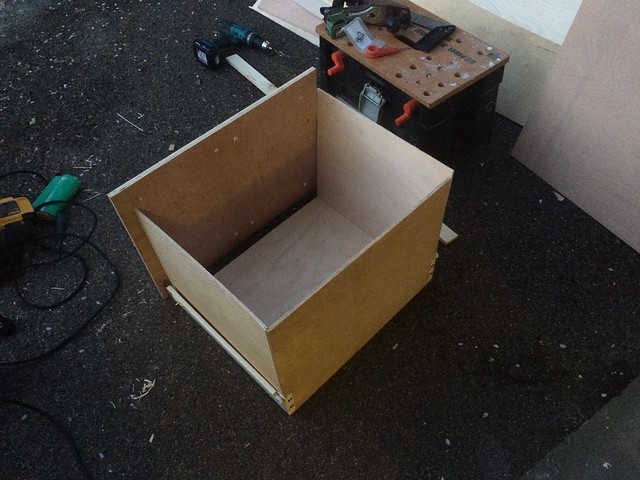 [/img]
Finished, apart from a handle:
[img] 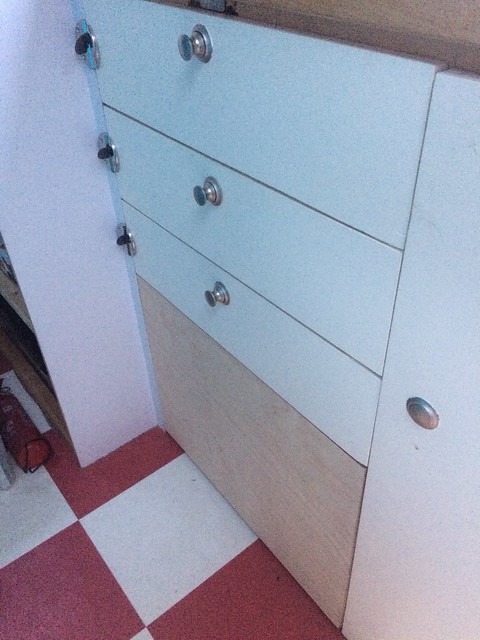 [/img]
Spectacular dullness: Made a bin. Or, more accurately, a housing for an Ikea plastic bin:
[img] 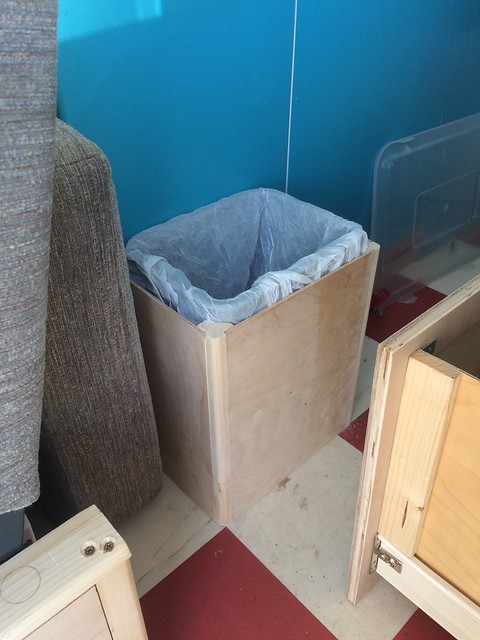 [/img]
You've all seen this technique, but here it is again just because:
[img] 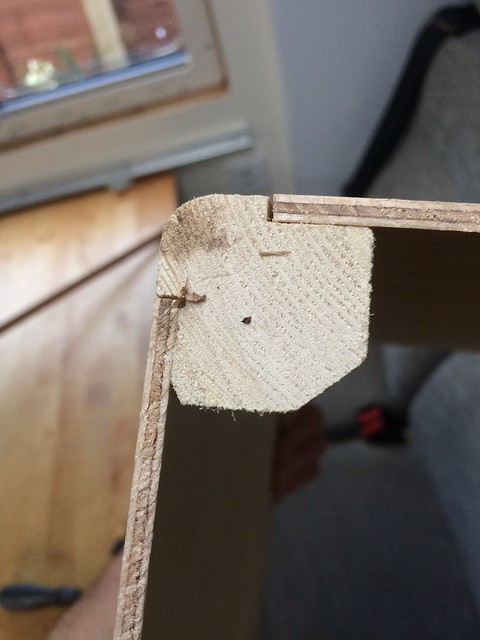 [/img]
And with a hinged lid (prototype, better to come):
[img] 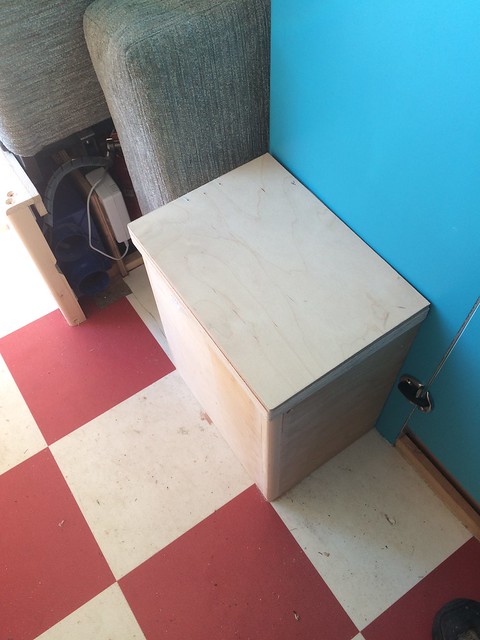 [/img]
And next, an impressive milestone - ripping out a load of perfectly good stuff that we'd already done and doing it again, only different! Actually not the first bit that's been done twice (one of the rooflights has been in and out more times than the hokey cokey) but one of the biggest...
We had an issue with the boot space, in that the lower pair of bikes sat on the boot floor, blocking access to the under-bunk space and ending up with loads of stuff stacked against/wedged in amongst. This was inconvenient. Remember the rather lovely shelf I spent ages on? Out it came, and in went some lengths of shelf track that I had lurking:
[img] [/img]
You can probably see where this is going - add brackets, pad appropriately, hang bicycle off them:
[img] [/img]
And in the lower position, two up:
[img] [/img]
Doing it this way means (as is hopefully clear from the picture) that the bottom of the boot is completely clear, so long things like chairs and inflataple SUPs (which are the new things that we have to accommodate, but they're a bit more compact that the inflatable kayaks that we used to carry, so that's a win of sorts) can be packed lengthways under the bunk.
Keen-eyed observers will note a handy-looking space over on the right. To capitalise on that I embarked on making a suitable unit:
[img] [/img]
But before completing that, we finally got around to putting down flooring on the, um, floor. GLUE:
[img] [/img]
FLOOR:
[img] [/img]
Tidy. Then I could finish the shelvy thing (recycling some bits of the old shelf in the process):
[img] [/img]#
And without all the clamps once the glue had set:
[img] [/img]
Ending up with this:
[img] [/img]
Just in time to experimentally load up ready for Mayhem:
[img] [/img]
Worked fine with one bike (as you'd hope, really). Finished off the threshold with a length of alu angle:
[img] [/img]
You may notice a New Hole - there was a space behind a wheelarch that was accessed from the side, which wasn't that handy, so it now isn't:
[img] [/img]
And clearly post-loading. Not quite as terrible as it used to be with that quantity of stuff in it:
[img] [/img]
Other dull-ish stuff: Finally filled in the previous gap at the bottom of the kitchen drawers with, imaginatively enough, another drawer. Although it's a big one, because (a) more useful for pans and stuff and (b) one less drawer to make 🙂
[img] [/img]
Nearly finished:
[img] [/img]
Finished, apart from a handle:
[img] [/img]
Spectacular dullness: Made a bin. Or, more accurately, a housing for an Ikea plastic bin:
[img] [/img]
You've all seen this technique, but here it is again just because:
[img] [/img]
And with a hinged lid (prototype, better to come):
[img] [/img]
Thats the biggest double post, ever 🙂
Give those brackets a good test, I had six bikes hung on my dining room wall using the same method, however, you might find everything in a tangled mess after a couple of good speed bumps makes those brackets lift out of the uprights!
Ah poop, how did that happen? Pfft.
Yes, they do tend to jump out - bikes are strapped down for transit, it did 2,000 miles up to Scotland and around the Hebrides without an issue 🙂
For old times' sake, cut yet another hole in the side of the van. Decided that the bottom bunk was a bit dark and dingy, so:
[img]  [/img]
[img] 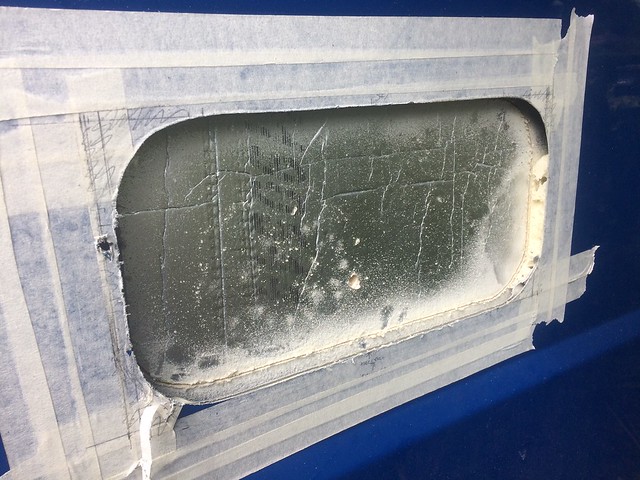 [/img]
[img] 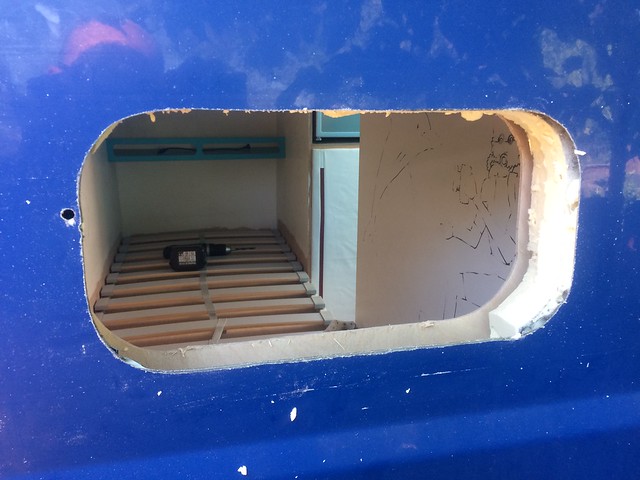 [/img]
Yes, there's a hole in the wrong place, yes, it got sealed up, yes, it's hidden by the flange of the window, no, it doesn't leak etc.
[img] 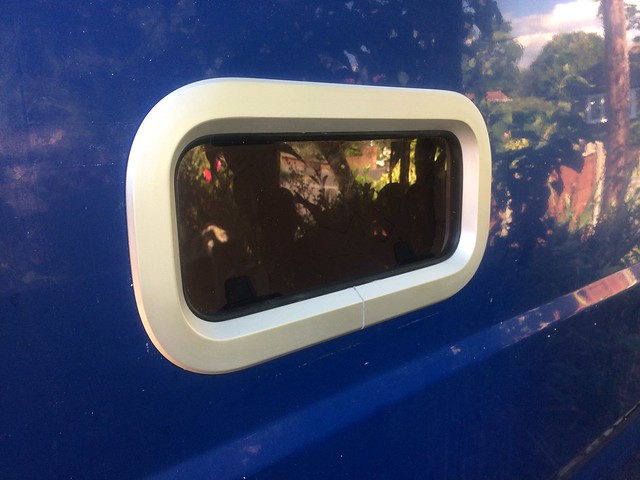 [/img]
[img] 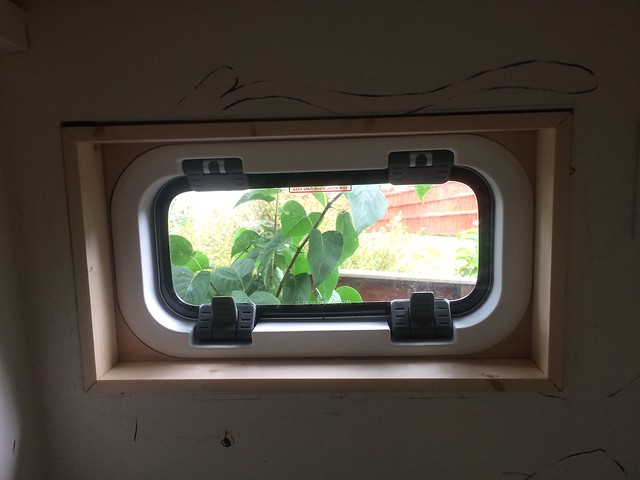 [/img]
In a departure from the other windows, this one's actually a Lewmar yacht window. Made up a little curtain for the inside which I don't seem to have a picture of.
Also sorted out the overhead lockers a bit, with bungees inside to stop stuff tipping out when you open a door and mini gas struts so you don't have to balance the door on the top of your head:
[img]  [/img]
[img] 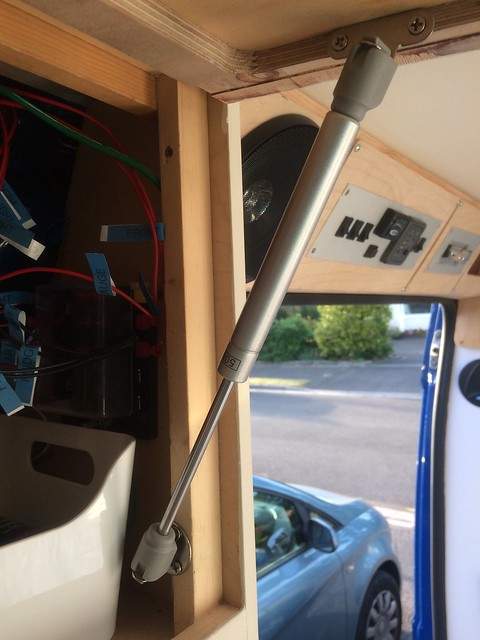 [/img]
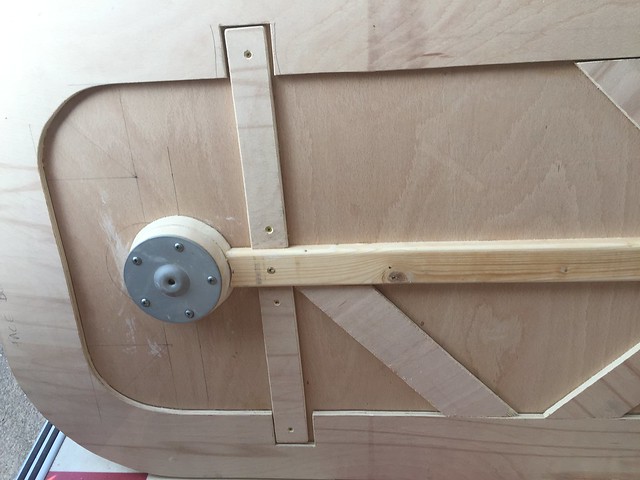
And while fiddling with gas struts, decided to split the top bunk bed base into sections so we can move the whole thing out of the way and give the kids a bit more headroom if they want to sit and play games/read/whatever:
[img] 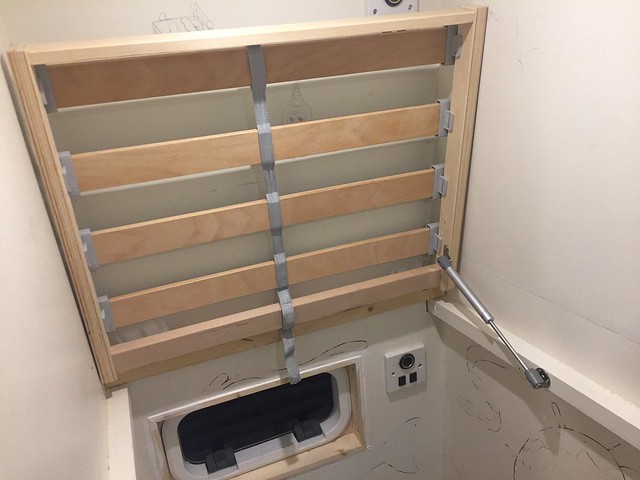 [/img]
[img] 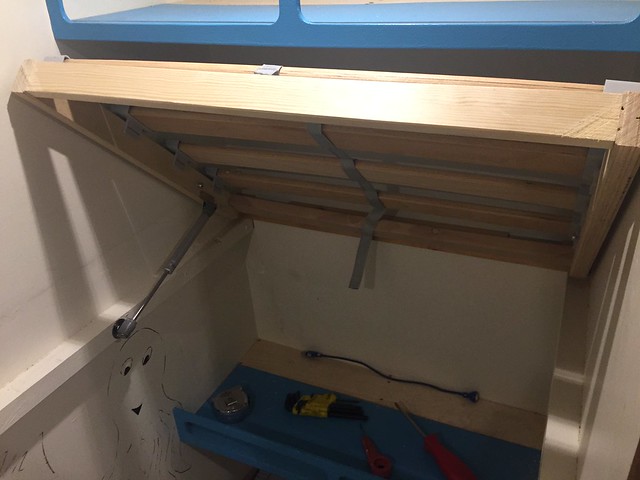 [/img]
Few more bits to come 🙂
Awesome stuff
In this thread. Bl00dy brilliant.
This is great, love reading it and would love to do the same one day!
Do it! 🙂
The forum update has really made it hard to find threads like this again.
Thankfully I've now bookmarked it!
Good stuff Mike!
I've just obtained a van (same dimensions as yours), so I thought it was time to read this thread from the beginning for the 20th time.
Unfortunately, my eldest son has grown to be 6'2" so all my original plans don't quite work any more 🙁
STILL GOING!
A few random odds and ends. Finished boot threshold with alu angle, this would probably be better with the edge of the floor rebated so it sits flush but whatevs.
[url= https://live.staticflickr.com/1761/28058618127_0a2f0948c9_z.jp g" target="_blank">https://live.staticflickr.com/1761/28058618127_0a2f0948c9_z.jp g"/> [/img][/url]
Made a couple of washroom shelves from uPVC cladding, the L-section stuff upside down to make a handy lip:
[url= https://live.staticflickr.com/4311/35173714054_a48d99b75f_z.jp g" target="_blank">https://live.staticflickr.com/4311/35173714054_a48d99b75f_z.jp g"/> [/img][/url]
[url= https://live.staticflickr.com/65535/33859335898_01758d5a66_z.jp g" target="_blank">https://live.staticflickr.com/65535/33859335898_01758d5a66_z.jp g"/> [/img][/url]
Moved the coat hooks:
[url= https://live.staticflickr.com/4311/35173708454_699c15f402_z.jp g" target="_blank">https://live.staticflickr.com/4311/35173708454_699c15f402_z.jp g"/> [/img][/url]
Spent a bit of time finishing off the bottom edge of the speaker/amp/switch console thing. CAD:
[url= https://live.staticflickr.com/1762/42209447374_96a91c76ed_z.jp g" target="_blank">https://live.staticflickr.com/1762/42209447374_96a91c76ed_z.jp g"/> [/img][/url]
3mm ply:
[url= https://live.staticflickr.com/1805/41117613780_ef579ea076_z.jp g" target="_blank">https://live.staticflickr.com/1805/41117613780_ef579ea076_z.jp g"/> [/img][/url]
Another bit of ply to fill in:
[url= https://live.staticflickr.com/1787/42026249755_cdf8e00e0a_z.jp g" target="_blank">https://live.staticflickr.com/1787/42026249755_cdf8e00e0a_z.jp g"/> [/img][/url]
Needs filler/sanding/paint, but not too shabby:
[url= https://live.staticflickr.com/65535/32793014837_09a9fc92ca_z.jp g" target="_blank">https://live.staticflickr.com/65535/32793014837_09a9fc92ca_z.jp g"/> [/img][/url]
Covered one of the remaining bits of exposed metal:
[url= https://live.staticflickr.com/65535/40769844873_dcd1327ac4_z.jp g" target="_blank">https://live.staticflickr.com/65535/40769844873_dcd1327ac4_z.jp g"/> [/img][/url]
Knocked up an insect net using a doorway net from Aldi and some magnets:
[url= https://live.staticflickr.com/65535/40769845383_dddf6f8be8_z.jp g" target="_blank">https://live.staticflickr.com/65535/40769845383_dddf6f8be8_z.jp g"/> [/img][/url]
[url= https://live.staticflickr.com/65535/33859335488_b45e2fb672_z.jp g" target="_blank">https://live.staticflickr.com/65535/33859335488_b45e2fb672_z.jp g"/> [/img][/url]
Added some neatness above the fridge:
[url= https://live.staticflickr.com/65535/33859332588_81defce5a2_z.jp g" target="_blank">https://live.staticflickr.com/65535/33859332588_81defce5a2_z.jp g"/> [/img][/url]
Then went to the Hebrides for three weeks:
[url= https://live.staticflickr.com/884/42878974562_a4c0049fb9_z.jp g" target="_blank">https://live.staticflickr.com/884/42878974562_a4c0049fb9_z.jp g"/> [/img][/url]
Nice!!
👍
👌
Would you mind posting a few wider angle pics of the insides? I'm really interested to see how it is all looking.
Chapeau sir!
Mirror dinghy represent!
I still remain utterly staggered by your work, Mike.
Mirror's gone now...
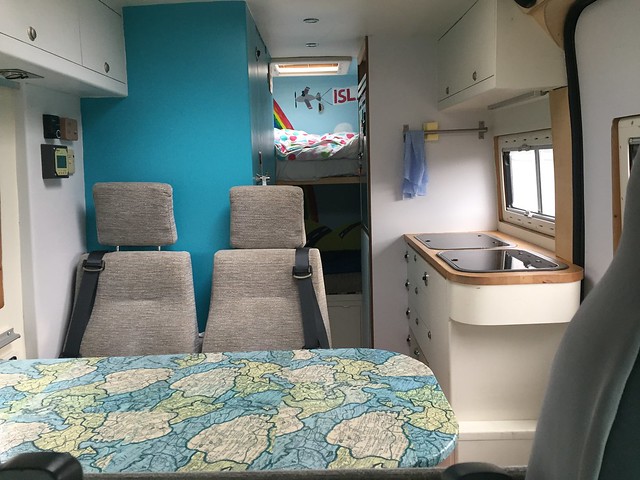
Here's the interior as of now:
[url= https://live.staticflickr.com/65535/47683404562_668170e562_z.jp g" target="_blank">https://live.staticflickr.com/65535/47683404562_668170e562_z.jp g"/> [/img][/url]
Wow!
Holy crap that's awesome. Far too many posts to scroll through, are there any other recent photos showing the overall layout for sleeping/living/etc?
It's back!
As I'm doing mine now, I keep coming back to this thread - almost daily. You've no idea how helpful it is!
Just received the LPG tank to fit underneath and working out how to arrange batteries/heater/etc above it.
Impressed with the fit of the timber over the metal side door frame, very tidy.
You can figure out most of the layout from the pic above. Here's how the front double bed folds out:
[url= https://live.staticflickr.com/7587/16722121638_8796a6a94c_z.jp g" target="_blank">https://live.staticflickr.com/7587/16722121638_8796a6a94c_z.jp g"/> [/img][/url]
You can see the bunks at the back, behind there is 500mm of space inside the back doors for bikes/stuff.
Mike, about to embark on a similar journey. We've decided our C.A.T. (Concept Activity Trailer) also known as a Caravan although brilliant isn't convenient enough. We've used it loads but think a Camper as the next step will be a bit easier. (no need to pay for storage, fetch from storage, towing is a ball ache). Only downside seems to be no separate vehicle when at a site.
https://singletrackmag.com/forum/topic/i-want-a-caravan-thats-not-a-caravan/page/6/#post-6458709
So looking for a H4L2 (or L3 but they are fugly) Ducato / Relay / Boxer.
We're looking at a very similar layout, usage, two kids, although our kids are a bit older. Probably wouldn't do the garage as what we have at the moment the bunks hinge up and we put the bikes under the bunks when traveling and outside on site. It's what we've got now, bunks and seating area that makes the main bed and it works well for us.
I think what I'm asking is any regrets, things you'd do different, stuff you'd add if you had to start a fresh.. Wondering if a L3 high roof might allow a drop down bed that could be left made up.
We're taking the C.A.T off to France soon then it will be up for sale and search for a Van will start September.
If you've not seen them "The Restoration Couple" on youtube did a van from a similar base (no toilet/shower though), but allows it to still work as a practical van when not camping. Uses the nifty Ford folding rear seats too.
8've got and L4 H3 Ducato and at 6'2" appreciate the extra headroom. It also provide twin bunks with plenty of bootspace and big bike storage.
My eldest is getting too tall to sleep sideways in her bunk and has a tent for when we are on site.
I can't fit sideways and so our bed is longitudinal.
Its looking amazing! Quick practical question. We also have a gap between the two halves of our Mini Heki. Do you have a plan for what to do with yours?
I can see how a H3 would be useful but I'm only 5'11 and they do look a bit Beluga Whale-ish

Hi Mike. Just wondering how your linseed treated bumpers are looking, silly dates on STW mean it could have been anything from 366 days to 730 days ago! My Iveco has acres of black plastic so once I go to the effort of getting it back to black, it would be nice to know I don't need to repeat it every month 🙂
Hot air gun is the thing to use on bumpers. Go easy though!
Linseed will wash off eventually.
I bloody love this thread.
Couple of hours of my holiday well spent. Lots of great ideas To “borrow”.
Thanks Mike_D
This is one of the best van build threads, on any site, ever
@Mike_D
Wondering what to clad my rear doors in, and see that you used a coated ply.
I've found 2.5mm PVC sheeting at a reasonable price, but I can't find something like you used.
Do you have any links or good search terms?
It's this stuff: https://magnummotorhomes.co.uk/shop/wallboards/wallboards-wallboards/white-hard-glaze-pack-of-4/
Thanks Mike!
Also - I'm just getting around to specifying the kitchen. Just read that you'd swapped your fancy fridge for a domestic one - what model did you go for in the end and is it quiet enough? Are you using the Victron 500W inverter?
Cheers!
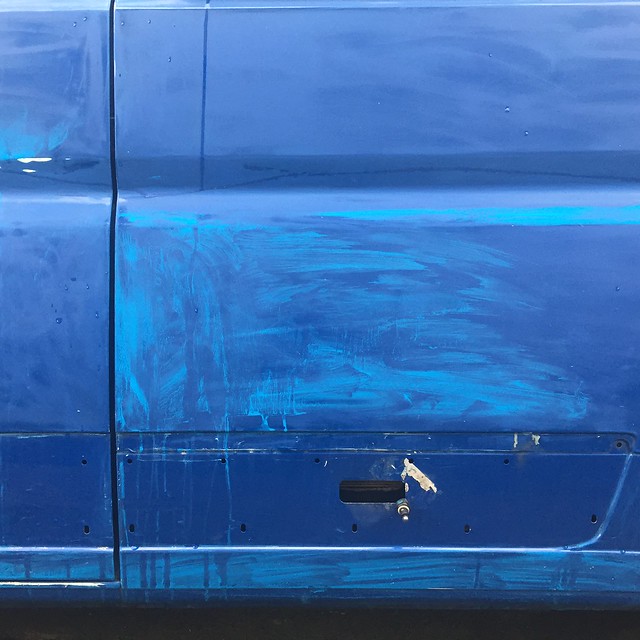
Hello! Long time no post. Some updates - going back a little way here but we'll catch up. I think we'd just come back from the Western Isles. Had builders in so parked the van down the road for a bit, which someone clearly didn't like:

Somewhat of an arse, especially having deliberately parked it not outside anyone's actual house. Cleaned that up, then three weeks later:

Keyed for 6m along one side. Marvellous. Touched it in while hatching a plan, but not much happened for a while except for some maintenance jobs like sorting the connector to the cabin fan resistor pack that melted (they do that, if you have one of these vans and the fan only works on full speed, check this):

The following Easter we adapted the bike racks as ski racks:

And drove to the Alps:

Upon return progress picked up again a bit. The fridge wasn't working too well in hotter conditions so added a vent:
Complete with a fan tucked inside in case it ever got _really_ warm:

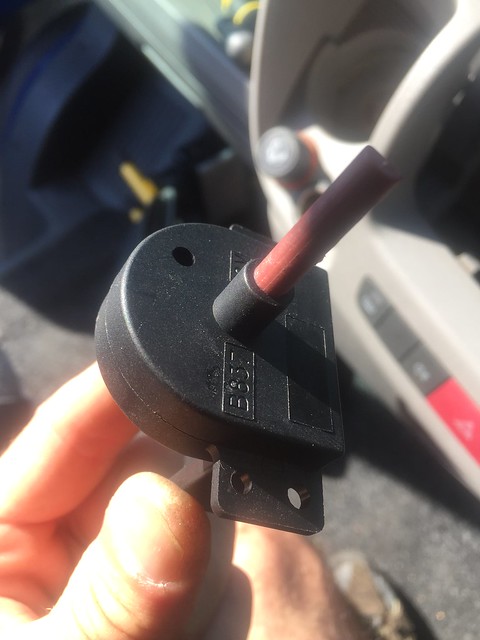
And the fan broke again but this time it was the switch, which meant doing this:

Taking all of this off:
To access this:

And swap it for a new one:
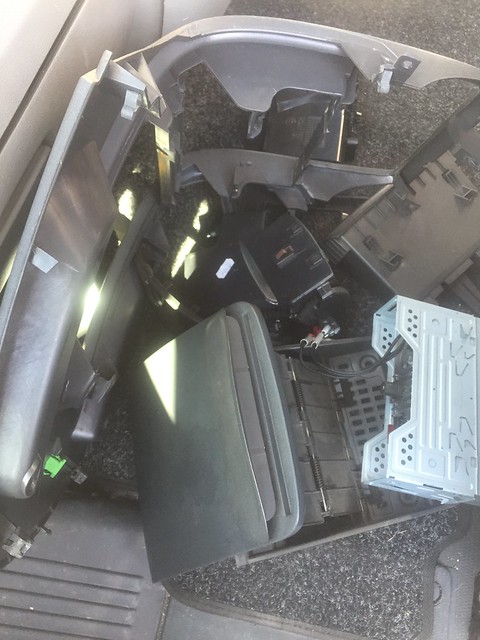
And in the next instalment we dismantle the other half of the dashboard as part of Project Cruise Control:

Cruise control was fun. It's a retrofit kit - later models of van either have it already fitted, or adding is a case of adding the control stalk and turning the feature on in the ECU. Ours was a bit more involved. Needed access to the dashboard fuse box and steering column:
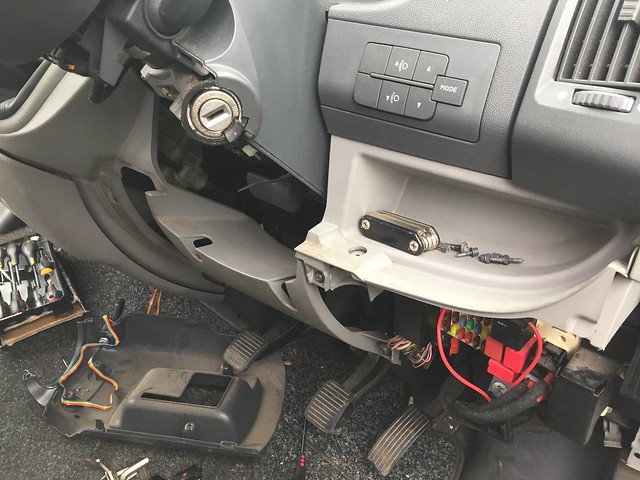
There's a little control box to hide away somewhere - this little space near the fusebox did nicely. Needs wiring in to power and a vehicle speed signal (which you can pick up from the loom nearby):

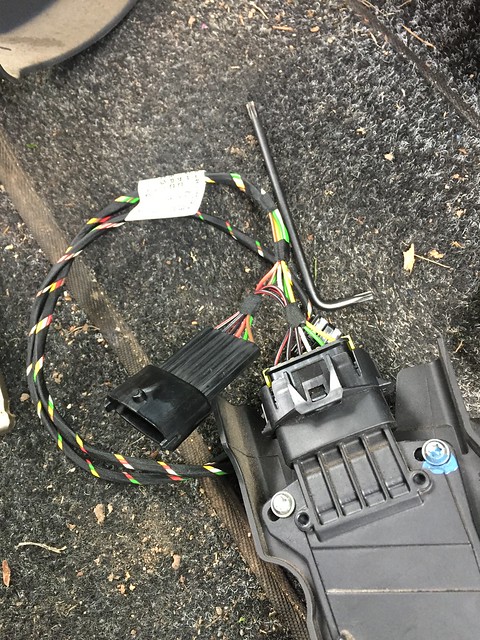
It also needs to talk to the pedals. There are extra wires to connect to the brake light switch behind the pedal, and to the clutch, so that if you press either of those the cruise disengages. And so it can actually control the speed, there's a piggyback harness that sits between the throttle position potentiometer and the ECU so that it can make the ECU think that the accelerator pedal is in positions it isn't and you can take your foot of it. I'd hoped this would just involve pulling a plug, adding the harness and putting the plug back, but the top of the accelerator pedal assembly is way up behind the dash and no amount of James Herriot-style rummaging was going to do it. So I took it out:

Plugged in, put it back:
Then there was just the control stalk to fit and connect. There's a handy space on the steering column shroud below the indicator stalk, so drilled a hole and put it there:

End result is, I think, quite tidy - almost factory:

Best of all, it works really well - absolute boon if driving, for example, the length of France. Recommended.
That's quite some effort to fit cruise! Respect. I very much doubt I'd have the patience for that.
Cruise control is something that is top of the criteria list for me.
I cant believe your neighbours.
Who ever done that wants a slap
A lot of people pass through on foot, I can't be sure it was someone in the street. Like I say, it wasn't parked outside anyone's house - there's a stretch at one end with a tall hedgerow that always has half a dozen cars parked along it, it was there. It all worked out, as the paintwork was becoming increasingly badgered anyway, of which more later 🙂
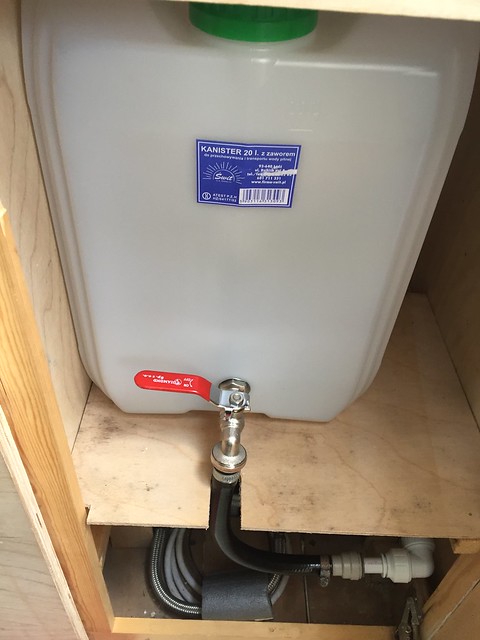
Some other odds and ends. This bit must actually pre-date the skiing - we were concerned about the underslung (and uninsulated) water tanks freezing (although it was Easter, so not crazy cold in resort) so arranged an auxiliary tank inside the van. There was a handy space under the sink (usually full of cereal boxes):

Got a 20l container and a tap, and arranged some new pipework under the shelf (which is where the pipe from the tank underneath comes in and where the pump lives). We now have a stoptap on the main tank feed, a Y piece to a second stoptap and a short length of hose with a threaded fitting to attach to the container under the sink. So if we're likely to be somewhere very cold, we can fill the container (by lifting it out and carrying it to a tap), turn off the main tank, connect the hose and turn it on. Worked well, just had to fill it more often.
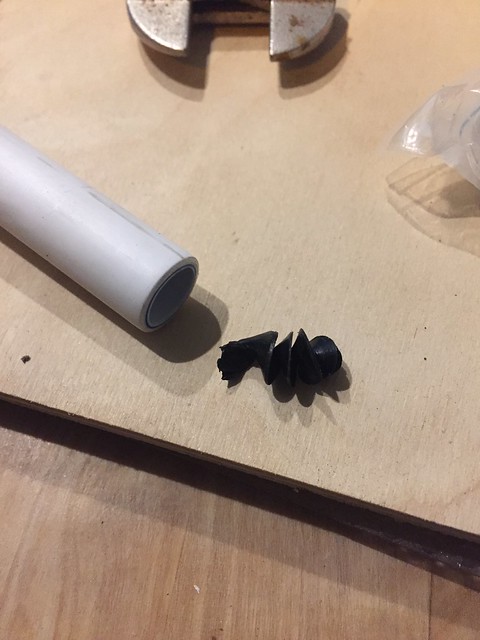
As an aside, when I was messing with pipework this little clump of plastic swarf (which must have come from the tank) fell out, which explained why the water flow from the sink tap had been a bit erratic - the swarf must have been constantly bouncing off the filter in the pump. All much better with it out:
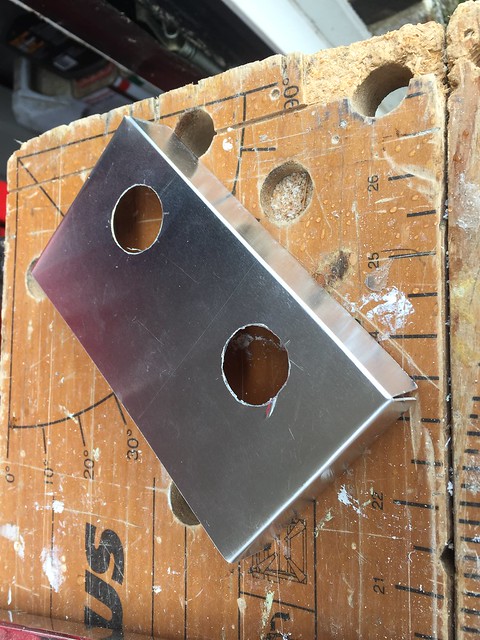
Waste water was dealt with by leaving the drain tap open with a bucket under it. Oh wait, we couldn't fit a bucket under it and the tap wasn't very accessible so rebuilt all that too. Wanted to bring the drain taps out to the sill rather than having to rummage for a tap at arm's length, so made up a bracket from folded aluminium:
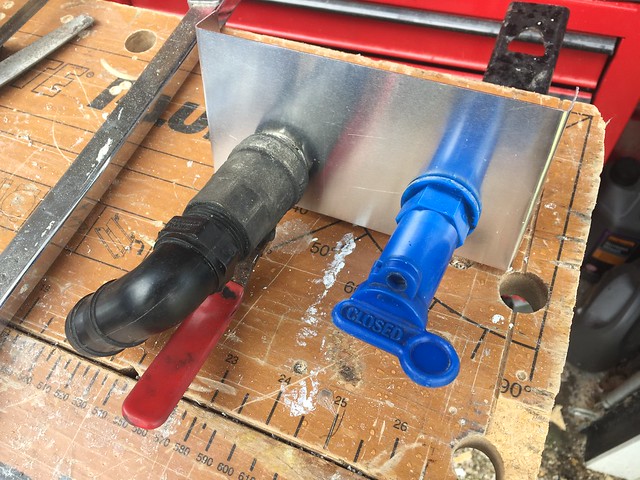
Offer up the taps (lever valve for the waster which gets emptied often, plastic tap for the fresh which gets emptied rarely (or rather, it often empties but via the taps inside...)):
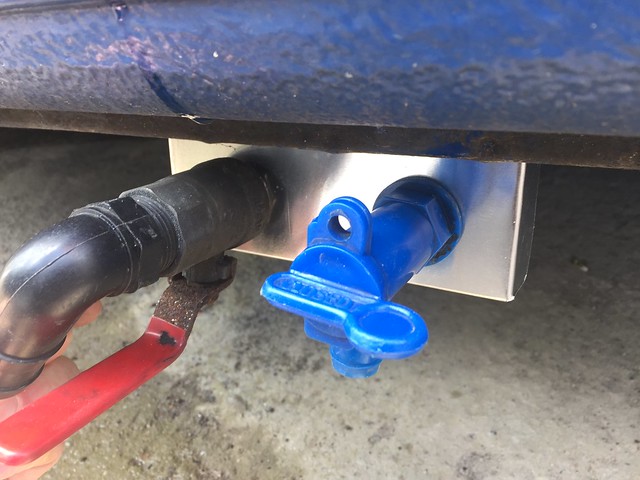
Drilled (and cleaned up and painted the edges of) two small holes in the sill flange, Sikaflexed and (stainless) bolted the bracket on:

And taps. Much better - easily accessible and they don't stick out from the side of the van:
We knew we'd be parked on Tarmac in resort, so finally got around to fitting the awning leg brackets that came with the awning in 2015 and had been lurking in a box of bits ever since. Holes, rivnuts, Sikaflex, stainless bolts, bosh:

What else? Oh yes, heat. We have a heater, but there was only one outlet. We had a grand plan to use the boot space as a drying room - there's a mushroom vent in the top, so we just needed to get some heat in at the bottom. So got a diverter valve for the heater outlet and a load of trunking to split off another outlet:

(Also seen here the actual proper heater outlet that got made, rather than the hot air just coming straight out of the end of the heater into the van:)
Heater duct through the bottom corner of the washroom, which meant pulling out the plastic shower tray (which had cracked anyway, so no great loss). Put another T in here so there's also an outlet in the washroom itself:

And finally routed to an outlet in the boot space:

(Low-wattage tube heater also fitted in case we found ourselves on a hook-up). Then just had to pop a hanging rail in and:

Worked pretty well, slightly to my surprise. Then again, it's a 2kW heater so maybe not that surprising. And yes, we did travel with a sealant gun, you never know when you might need one...
This is all pretty awesome. Out of interest, what's the gross weight up to now? I'd be a bit concerned about breaching the GVWR of the van
I don't have an up-to-date unladen weight, which is something that needs doing. We're under 3.5t laden (people, food, clothes, bikes, couple of paddleboards, camping kit etc) but it's close. We took a canoe on a roof rack to France recently and that was enough to make a couple of the autoroute toll booths reject our tag, so I suspect we'd managed to drift over on a couple of occasions (some of them have weigh-in-motion systems on the drive-through lanes). The van itself is a Maxi with heavy-duty springs and big brakes, we could replate it to over 4t just with paperwork, but it's easier to travel with less water in the tank and leave stuff we don't need at home. It's built very light, everything that looks solid and thick is hollow. I should probably also take the towbar off, which we never use and I suspect is about 30kg.
The worrying ones are all the recycled pallet wood/solid oak worktops/cast iron stove jobs...
The worrying ones are all the recycled pallet wood/solid oak worktops/cast iron stove jobs…
Don't forget the belfast sink, tiled kitchen and cladded ceiling 🙄
Great to see you back Mike, the original and best "VanLife", and best thread on here. I have to admit a slight addiction to those YouTube VanLife types, not in an " I envy your van and life choices" sort of way, but more in a " how the hell do you make a living ?" sort of way. Then the penny drops.....hundreds of thousands of hits on their channels, and monetise them, makes for a half decent living.
Actually, check out Foresty Forest, a laid back and quirky Canadian, at first living in a people carrier with his fat bike, but now he's actually got a van. Strangely addictive.
Some more interior finishings off... The plastic shower tray in the bottom of the washroom cracked, and we'd pulled it up to fit the extra heater ducting, so we rebuilt the washroom floor using more PVC-faced plywood and corner joint strips. Some trial runs with offcuts showed that this would be suitably waterproof:


Some sections of PVC from the building plastics place to finish off:

Much better (this pic from before everything was siliconed up properly - did finally add the bottom threshold for the door, though...):
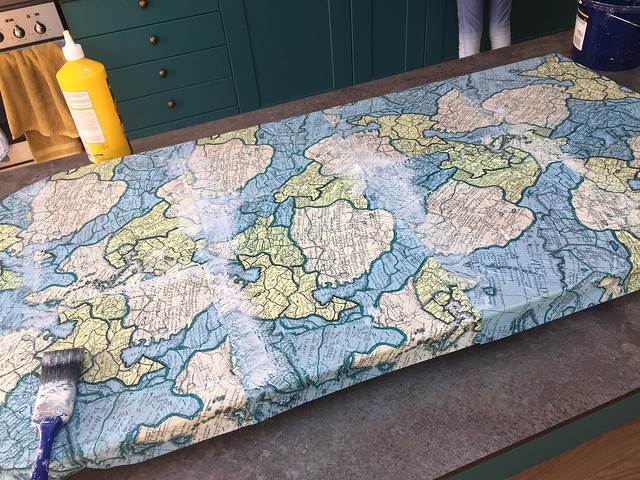
We also had an issue with the table, which looked great in its beech woodblockness but was really too heavy to comfortably lift in and out of its home behind the front seats. So made another one from 12mm ply, which by itself would be too flexible but with some strategically-placed extra pieces of ply underneath is plenty stiff (and about half the weight of the previous one):

The plain look was a bit dull so we covered it with some map-style paper and a couple of coats of varnish, which has proved hard-wearing so far:
After all of which the interior was looking something close to finished, bar a few unpainted bits. Er, and some bits you can't see from this angle. Anyway:
Meanwhile outside the demands of growing children and the resulting phone/tablet charging meant that a bit of a power boost was required, so found space for a third solar panel:

...shortly before taking all of them off again, plus a load of the exterior plastics:

Because it was time to do something about the paint...
Absolutely amazing build mate. We're living in a Rollertean TLine 590 currently....really love the look of your van though.
Ooh, nice. Clever vans, those, you get a lot into not much length. The extra width of a coachbuilt makes a big difference.
Yeah so we're finding out. From our limited experience, the extra width really does make a difference driving wise. I drive a lwb Sprinter box van at weekends for work now. It's longer than the motorhome, but the motorhome feels like a lorry in comparison due to the nearly 30cm extra width.
It does make it very comfortable and roomy for two plus a dog to live in mind!
Oh aye. I was referring to the space-inside difference but yes, a coachbuilt certainly has a bit more "road presence" 🙂 The low-profiles are a lot sleeker than traditional overcab coachbuilts, a lot more of them around now than there used to be.
ooh - an update! Good stuff Mike!
I'm starting to get far too anal with mine. Just working on a set of drawers has taken 3 weeks!
Trying to make it all lightweight.
Lightweight is good! But also time-consuming. Anyway, another update incoming!
So the van was starting to look a little tired, not just because of the vandalism up-thread but also because Ducato paint is notoriously not the finest and was beginning to flake off in places. We looked briefly into resprays but the cost was fairly alarming. We'd always had a bit of a soft spot for satin/matte finishes on vans, so with the aid of a massive thread on one of the classic VW forums we painted it on the drive. Got rid of all the flaky bits and rubbed down:

Sanded back and primed some particularly bad spots:
And then set to with paint. We used satin finish Rustoleum Combicolour in a custom colour mix - Brewers decorating supplies will do any colour your want as long as it's got a RAL code. Followed the instructions on the Club 80-90 Rustoleum thread (Google it, it's super useful) regarding thinners and application and over the course of a long weekend got to here:

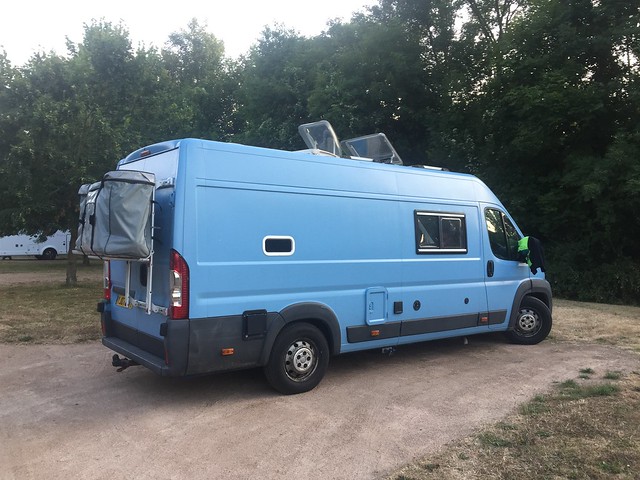
Which is a massive improvement. And also still nominally blue so we didn't have to do any DVLA paperwork 🙂
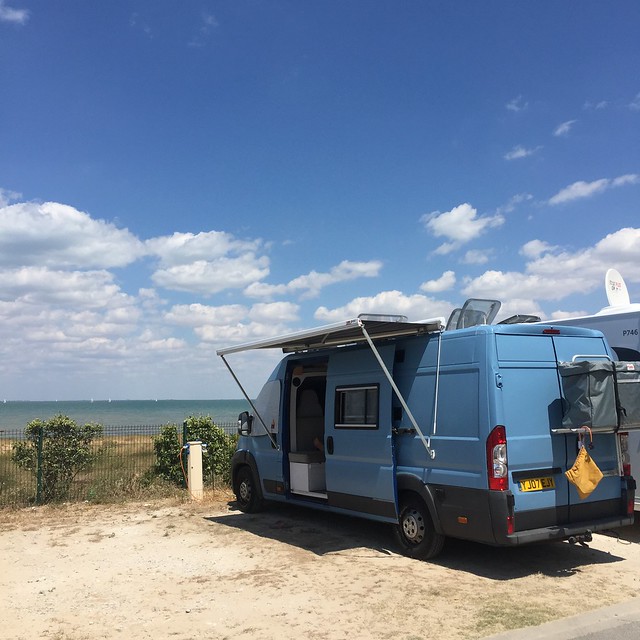
Just dropping in a holiday snap - Île de Ré, July 2019:
Oh, and waiting for Le Tour a couple of weeks later 🙂
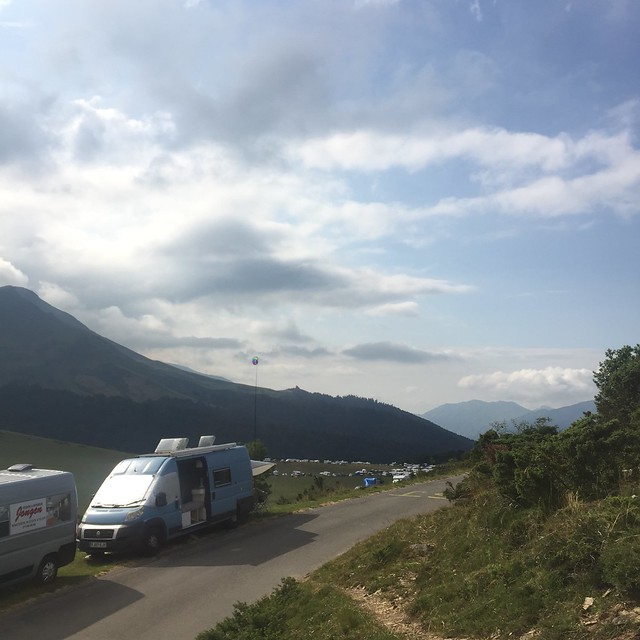
Actually this is a better Tour pic, it's got bikes in it 🙂

did you spray or roller the rustoleum? I've potentially got a classic T2 van to paint soon (once i've repaired the rear gutters/roof)
Foam rollers (and foam "brushes" for the fiddly bits). There's a knack to it but you can get a good finish (and can be done shiny if you like).
That looks proper smart
Really like that blue!
See an awful lot of older Ducato/Boxer/Relay vans with flaky paint work. Almost always blue.
Fortunately white doesn't seem to suffer so much.
Was thinking of foil wrapping my van once it's bought/done (assuming it's white), but I really like the finish on yours.
Was thinking of going for a earthy light green/brown.
Yeah, the blue ones do seem to be particularly bad for it, although I've seen a fair few "white" ones that are down to primer over large areas (particularly the roof above the windscreen). It's one of the things that makes me nervous when people just glue solar panels to the roof - they're probably extremely well stuck to the paint, but the paint isn't necessarily very well stuck to the van...
Is that the same blue as Singular uses? It's really rather nice. I was idly thinking of doing the front triangle of my Process 111 in something similar to the finish on your van. I suspect Ducatos and 2104-era Konas are painted in the same factory.
Don't know if it's exactly the same (and I've forgotten the RAL code) but it's certainly in the same ballpark. Tempted to use some of the left-over paint to do my ancient Cannondale hack bike which is now about 40% bare metal 🙂
Ooh - give it a go! I always thought it would look good on fat tubes as well as slim steel ones. I'm looking at a light matt blue front triangle, matt black rear end, but I keep havering over blue or a sort of pale olive green with a bit of orange. My paint skills are fricking awful - I'm going to have a rummage in that thread you mentioned up there.
But back to the van - it just keeps getting better and better. Seriously impressive.
That blue is lush - well done for having a crack at it!