Which part of the cockpit?
The canopy. I frosted it.
Ah. You'd have a job on scratch building a replacement for that 🙁
You could genuinely mistake that blackbird for the real thing, except that it needs massive chicken strips.
What do you use for the metal effect on the exhaust?
Ffs northwind, I've just looked back through the whole thread, looking for pics of an ace looking SR-71...
The exhaust came like that - built very much out of the box
The wonderful people at Airfix have sold me a new canopy for £3 including delivery. I shall endeavour not to destroy this one with chemicals.
Also, I take back what I said earlier about the kit, but if you are building the undercarriage I would ignore the instructions and try different methods of assembly before committing yourself to glue and finding that A) It won’t fit inside the nacelle without a bit of trimming, and B) If you are going to follow the instructions to the letter you need to grow an extra hand.
Some tremendous looking aircraft there nairnster! Very impressive!
And liking the the Honda JD! 😉
I'll have to do some more photos. There's a Honda CB750 (Superdream shape), '67 Ford Mustang and numerous others that I haven't got round to photographing yet.
BTW I am never ever doing another sailing ship. Fr**ging in the rigging indeed 👿
I have an SR71 on the go didn't take many pictures as I went though.
It's the Italeri 1/72
[URL= http://i177.photobucket.com/albums/w201/geordieboy_2007/Modelling/20150103_210945_zpsbpz0mghe.jp g" target="_blank"> http://i177.photobucket.com/albums/w201/geordieboy_2007/Modelling/20150103_210945_zpsbpz0mghe.jp g"/> [/IMG][/URL]
Needed loads of filling and sanding on the fuselage joins
[URL= http://i177.photobucket.com/albums/w201/geordieboy_2007/Modelling/20150103_211056_zpslewowfbb.jp g" target="_blank"> http://i177.photobucket.com/albums/w201/geordieboy_2007/Modelling/20150103_211056_zpslewowfbb.jp g"/> [/IMG][/URL]
Its languishing in need of the rest of the decals and then some weathering
[URL= http://i177.photobucket.com/albums/w201/geordieboy_2007/Modelling/FB_IMG_1489652297199_zpsfku8vepr.jp g" target="_blank"> http://i177.photobucket.com/albums/w201/geordieboy_2007/Modelling/FB_IMG_1489652297199_zpsfku8vepr.jp g"/> [/IMG][/URL]
No pictures, but my lightening is coming along. Getting the front fuselage with the air intakes and cockpit assembled was a right bastard, but it's done now.
Anyway, painting. Any tips for getting the best brush finish I can on large flat parts like wings? I'm not going the airbrush route. Obviously normal rules of painting apply, thin coats and strokes in the same direction. What about a very light sand before the final coat? Anything else?
Make sure you wash all the parts/sprue in soapy water before building the model. This definitely helps with paint adhesion I have found.
I brush paint all of mine, good quality brush makes a huge difference. I don't do any sanding specifically for paint prep. Brush strokes in direction of airflow, lighter colours first etc. It takes practice and you will get better with each model.
Tamiya 1:12 Honda CB750F:
[img]  [/img]
[img]  [/img]
[img]  [/img]
Nice^
I've just spent the last hour messing about with the weathering on a Mosquito. Will post up a picture when it is done.
Indeed, that's brough back a load of memories @john_drummer. I had the same kit (cos I had the bike) and never quite got round to doing it. The bike decided that it didn't like oil in the 3rd lane of the M40. We spent rather a long time stood right by a Cadbury's World sign waiting to be rescued. Mssed a wedding in the process...
I tend to do cars & motorcycles in showroom condition straight OOB. AFVs do get some weathering and ideally some crew, possibly even a diorama. I have a nice WWII France street scene involving a Churchill MkVII, some Tommies and a local farmer with a bottle of wine in 1:35
Grubby Mosquito.
[img]  [/img]
[img]  [/img]
Went a bit OTT with the filth. I'll have to tone it down on the next one.
Nice spinners 🙂
Thanks. The cockpit was a little nerve wracking at the second attempt too.
I'm doing a BF109E, Spitfire MKII and finishing the Stuka for my lad's Battle of Britain ceiling thing, then I'm doing an EE Lightning. I need to sort out my weathering technique for that as general smears of crap won't look great and i'm wary of using silver paint, as experiences with it so far haven't given good results. .
I put dirt around the fuel fillers on the Mosquito. I was quite pleased with that in a sad sort of way.
For the Lightning I'd use Tamiya XF16 Flat Aluminium. It's an acrylic so thinned / cleaned with water if necessary, and quite thin so use a big brush and load it up well
I've been having a few problems with the Lightning. The cockpit doesn't fit properly, had to do a load of trimming to get the fuselage halves to meet at the front. The top of the seat now sits a bit high so the canopy won't fit correctly. I'm going to have to try and get it out to do some more adjustment. 🙁
Any views on Tamiya aircraft kits?
I have my eye on one of these.
http://www.jadlamracingmodels.com/tamiya-60720-tornado-f3-1-72-aircraft-model-kit/
I've got a pile under my drawing board that need to built at some point...
Westwings Skylark - Semi Scale RC half built
1:32 Revell Phantom that is just Massive!
1:24 Airfix 109 - Got all the Eduard bits for this too, So far I've got as far as making the engine almost scale and cutting out the fuselage to have an open panel - On the field sort of look.
RE: Tamiya - The Tamiya 1:48 is a classic I've built a couple, they are a far better than Airfix which are a little shit really if you take off the rose tinted glasses.
The Tamiya Tornado F.3 is the Italeri mould, not up to the full Japanese standards but ok.
The Tamiya 1:48 Sea Harrier is most definitely not up to their usual standards. I'm sure it's an Airfix imposter
[img]  [/img]
Just taken a punt on one of these because:
1) As a child of the 80's I have a thing for Soviet planes.
2) It was 13 quid.
This is getting a bit silly now. I've got three on the go with a completion rate of one a week and a backlog of about ten.
Somehow I have ended up with a landing craft.
[img]  [/img]
I will never build this.
Ever.
Gah. Another “melting” incident. Using a big lump of filler as nose wheel ballast has turned the radar dome on the Lightning into something that resembles a jalapeno. When/if it dries I’ll try and rescue it. If I can't it is a £7.95 lesson on my model building learning curve. No point in trying to buy the three spare parts as they will cost more than the kit itself.
This has however made me find that self-adhesive lead weights are available. And it was best to destroy the Lightning rather than the more expensive Mig-29 and Su-27 that are next on the production line.
How do you “brush painters” do the darker areas round control surfaces and panel lines?
How do you “brush painters” do the darker areas round control surfaces and panel lines?
Underpaint black then bring it to light.
(Games workshop style)
I use this almost on everything apart from large surface/panel and unless I'm painting flesh in which case I underpaint white and then send the shadows to dark using artist inks.
(Apologies if thats teaching you to suck eggs)
Nah. All tips welcome! I'm coming back to this after a 30 year break.
juanghia - MemberUnderpaint black then bring it to light.
(Games workshop style)
Nothing gets brought to light games workshop style, it's ENDLESS DARKNESS
Meh. The Lightning is ruined. Shit.
Can't you make it look like it's been shot up at the front, and is going down in flames from your lad's ceiling? 😀
It's a shame, as I was waiting to see if you had the same cockpit problems that I did, or if I'm just as lame at building these things now as I was years ago.
I did do a test to see if it went together before I ordered a replacement. It did. 😀
I'll finish the Lightning and let my lad have a go at building up the other one with the warped radar dome and fairing. I'll pinch the pilot though for my Su-27.
Went a bit OTT with the filth. I'll have to tone it down on the next one.
Lots of practice dry-brushing various combinations of paint and inks appropriately thinned and layered, and keep it subtle! It has to replicate the way it actually happens on the aircraft while in service; the plane starts off all clean and shiny, but flying causes oil, exhaust gasses, dirt and dust from the air itself to build up in very thin, faint layers, accumulating over many hours of combat flying, so instead of trying to dry-brush fairly dark paint in a thin layer, you have to gradually build up very thin layers of very thinned dark ink or paint, just kind of 'sneaking up' on it, gradually adding more layers where the staining is naturally going to be darker, inline with the stub exhausts, behind the gun ports and shell ejection ports, etc, and building up very thin layers of thinned silver along all the leading edges of flying surfaces, prop blades, etc.
Loading the brush, then wiping a fair bit off on scrap card, or paper* by brushing like you'll be doing on the model, then brushing on the model!
It's a time-consuming process, but it pays off if you don't rush it; many hours modding and painting AD&D figures teaches you that, they're a lot smaller than an average plastic kit!
*Old phone directories are very handy things to use for this, you can mix paint in small amounts on a page, wipe the brush to get the dry-brushing just right, then rip the page off and bin it after each session.
I've still got one of the really thick ones, with the heavy board covers, from when I used to paint AD&D figures and pin-stripe/sign-write friends cars and bike helmets, very handy thing to have. 😀
Coming at this from a the model railway world, (not airfix i'm affraid but i guess its all the same) i really would recommend humbrol weathering powders. its early days at the the moment and still experimenting but i'm liking them. I mix these up with water and apply as a generous wash over the pristine paintwork. then when dry i wash off the excess with either a tissue or a cotton bud. You can also apply them neat as a dust to the model and move them about. Again excesses can be washed off. Then when happy set them with a spray coat of varnish. The results so far have been rather pleasing. furthermore over the course of a couple of days they seem to tone down and have a very subtle effect.
There are some humbrol channel videos on youtube that i would recommend. As ever they make it look very easy but do give you some ideas to practice with. I knocked up a painted panel of plastic and practiced on this before i attacked the real thing.
I use flory dark dirt wash.
Revell Stuka.
Was a little more restrained on the weathering, just adding exhaust muck and something behind the guns.
[img]  [/img]
[img]  [/img]
[img]  [/img]
I've been having a few problems with the Lightning. The cockpit doesn't fit properly, had to do a load of trimming to get the fuselage halves to meet at the front.
Just spent 2 hours trimming it down. What a bastard! There are 4 raised lumps from where the fuselage halves were ejected from the mould that prevent it going together. I had to sand down the sides of the air intakes too and it still needed some filler. The fairing over the instrument panel didn't fit either. Got there in the end but whoever was responsible for the QC on that wants beating with a stick.
I've got another one to build too! Shit! I managed to rebuild the bit that I melted with filler by comparing it with the part from the replacement kit. It looks OK and only I'll know that it is a bodge.
Getting 4g of weight in the nose was a PITA too. I've got some lead wheel balance weights, but had to hack saw them up to get them to fit in. Can't say I'm having much fun with this one.
his popped up on my FB feed, I think the attention to detail is incredible.
Harry, you need some [url= https://www.deluxematerials.co.uk/gb/rc-modelling/83-liquid-gravity-5060243900470.html ]Liquid Gravity[/url], it's not lead, you can pour it into tiny crevices to add weight. I use it for model railways, decent stuff.
Ah yes, that's my next job. Build has progressed precisely nowhere since I came back from my weekend away, I may do a bit later.The fairing over the instrument panel didn't fit either.
Must resist the urge to buy that [url= https://www.airfix.com/uk-en/shop/themes/spitfire/supermarine-spitfire-pr-xix-1-72.html ]new Spitfire kit[/url], just in case I don't finish this one!
You can trim a load off the panel because you can't see it anyway when the fairing is on.
Once I'd got that on I found that the canopy fitted perfectly though. I was getting a bit sick of it by this stage at 00:20 this morning.
I got that Spitfire for Christmas. My lad is making it and doing a reasonable job of it too.
tthew...
Check this out! http://www.jadlamracingmodels.com/airfix-a50173-battle-of-britain-75th-anniv-gift-set-1-72-aircraft-model-kit/
Ooh, that'd see me right through the winter, (even if started it over Easter!) Bookmarked.
That 262 is stunning
john_drummer - MemberHave a look here: http://www.britmodeller.com/forums/
Mike who runs Britmodeller used to ride mountain bikes & started the now defunct ChesterMTB website. Sadly he has a long term illness that has stopped him from riding 🙁
Damn ... that BoB 75th Anniversary Box Set has sold out now ... 🙁
That Me-262 really is impressive! I've just been reading about the Me-262 in Len Deighton's book 'Fighter'.
That Me-262 video is utterly amazing! I just sat watching it with a big stupid grin on my face.
[img] 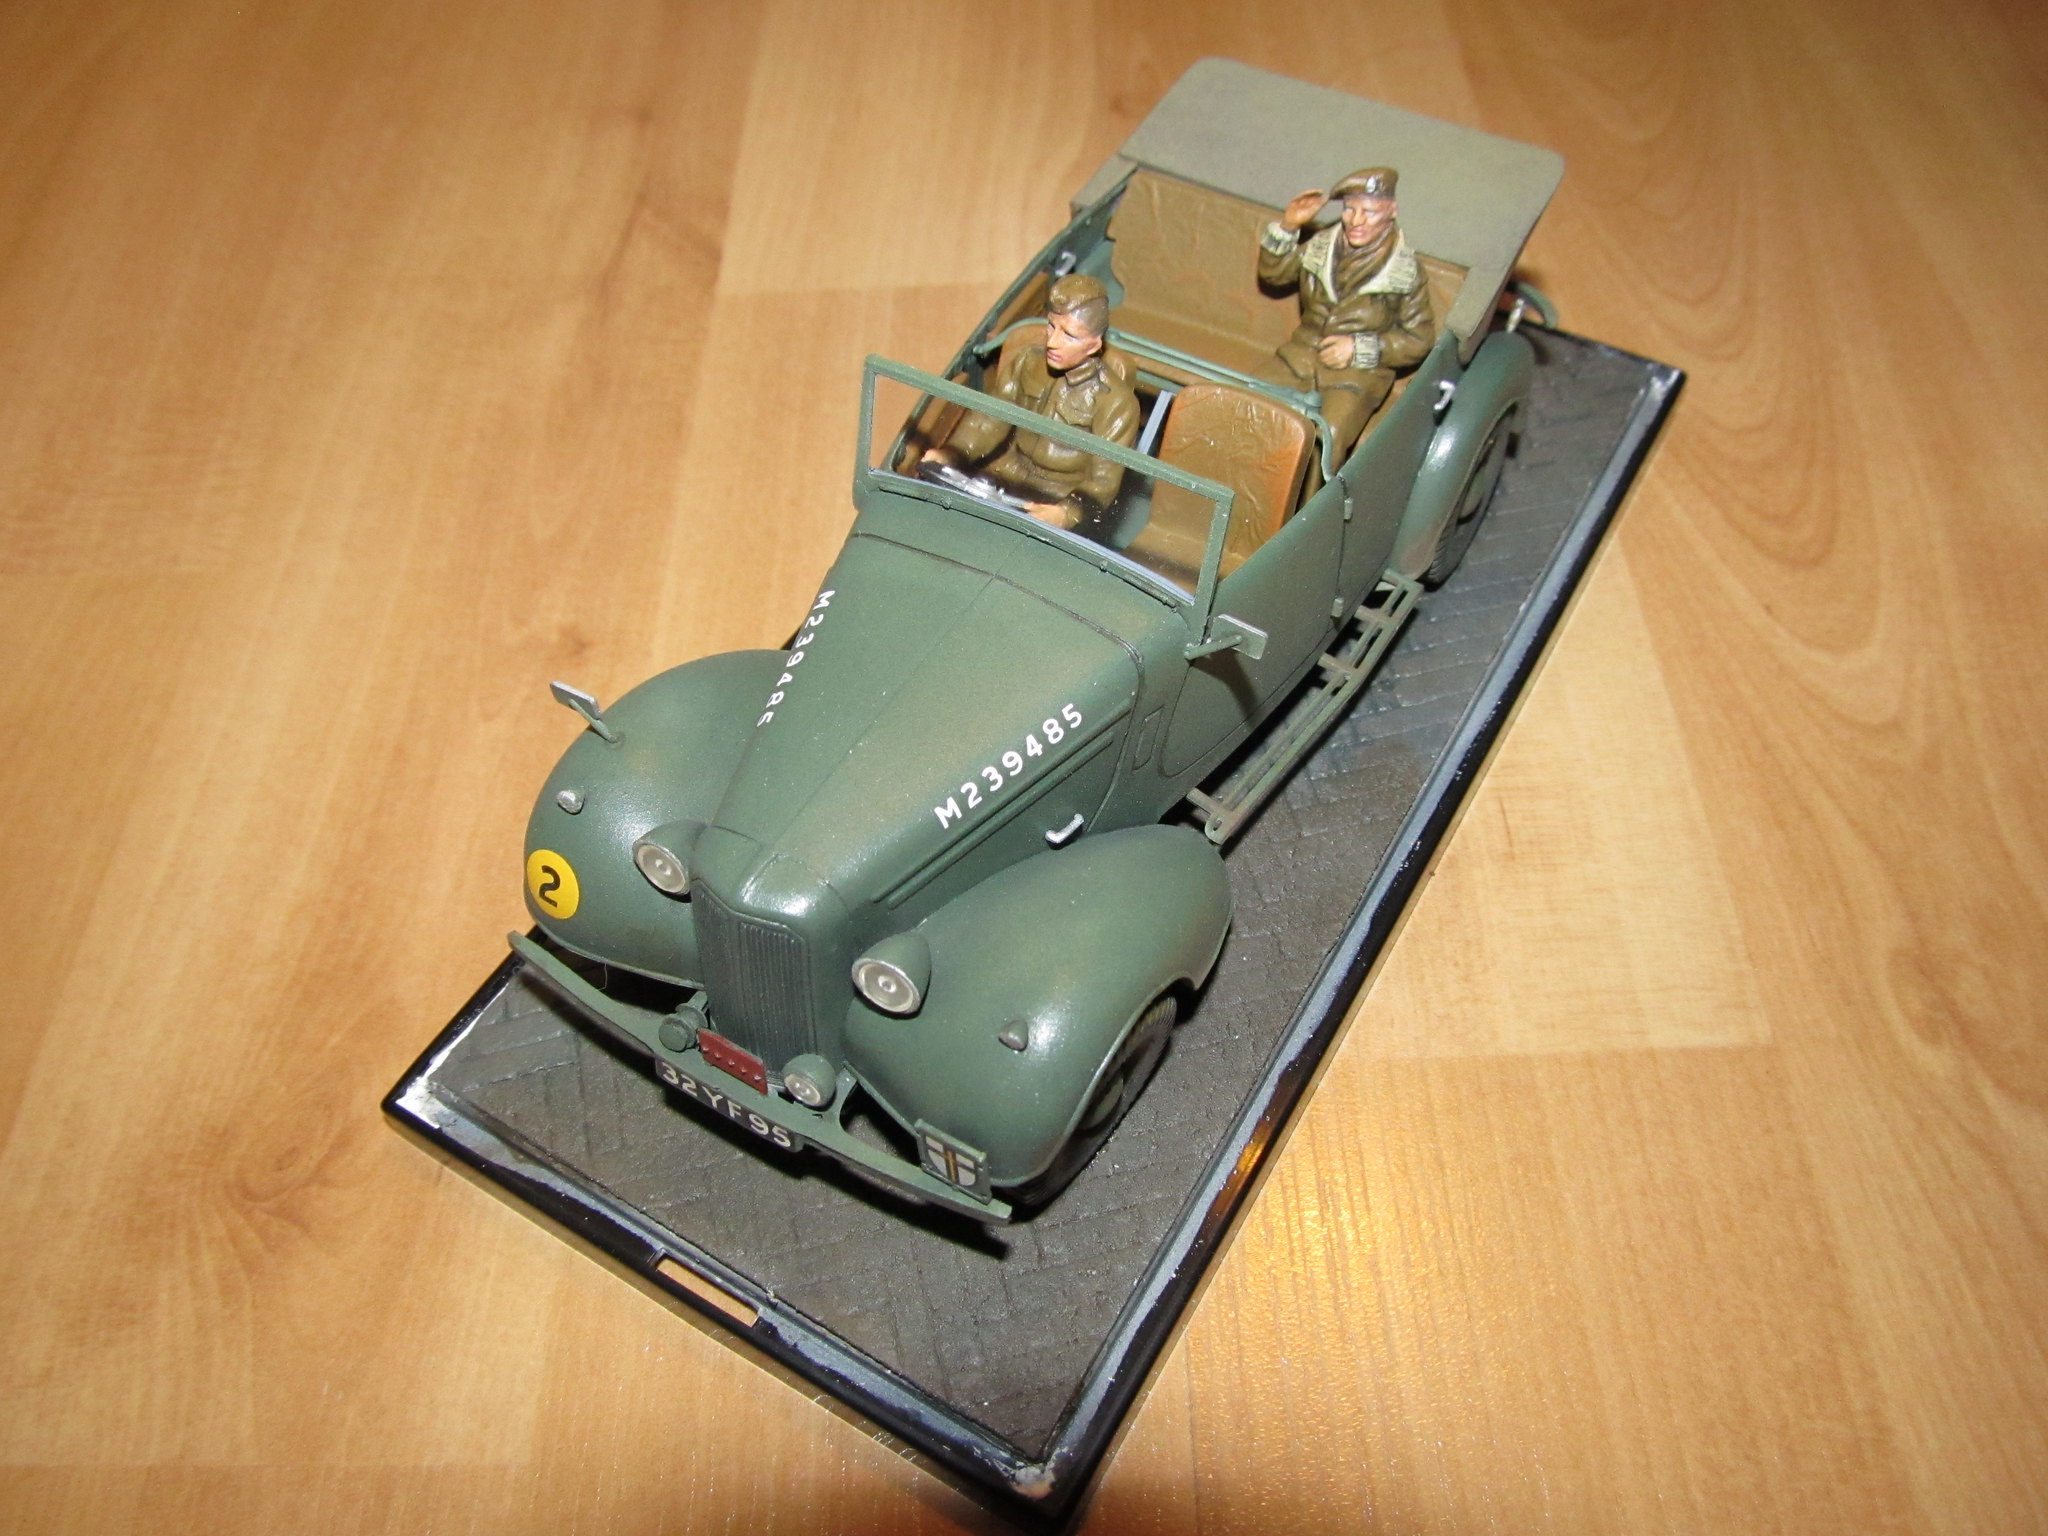 [/img]
Slight change of subject matter for me. Been a long time since I made anything with a wheel at each corner.
Just got one of these.
[img] 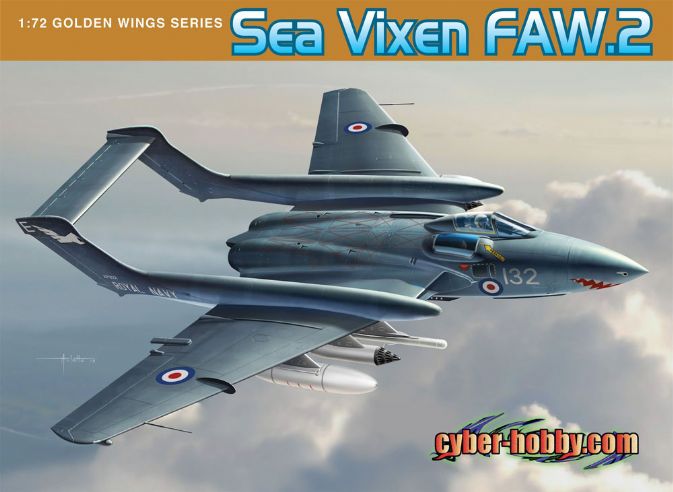 [/img]
It is on the build list after I've finished the Lightning and done the SU-27.
PSA.
[url= http://www.jadlamracingmodels.com/revell-de-havilland-mosquito-1-32-aircraft-model-kit-04758/ ]1:32 Mosquito[/url]
Seems like a lot of kit for the money but I don't know how good it is.
Moulds date from 1971 but are supposed to be ok. Nothing like the quality of the Tamiya kit but that is hugely more expensive. Lots of after market bits available now that can be used to bling it up though and for £15 seems pretty good.
That's going to be a big 'un
I did Revell's 1:32 Beaufighter a few years back, raised panel lines rather than recessed 🙁 huge thing. 1:48 is as big as I like to go for aircraft, but for multiple engined jobs I think I'll stick to the smaller scales
My lad (9 years old) said "Where will you put it?". I stepped away from the BUY IT NOW button.
The Sea Vixen arrived today. The instructions are comically shit and the ejector seats are too small. But I knew this before I bought it.
I'll pack the seats up and I've downloaded the Airfix painting and decal instructions.
Well thanks guys. I am probably going to have to buy the Tamiya Mossie. 🙁
Lightning.
[img]  [/img]
[img]  [/img]
[img]  [/img]
Not a happy kit to make TBH as the air intake assembly is too big for the fuselage halves, so a lot of cutting and filing was required.
I experimented with ink washes for weathering for the first time too, and I'm quite pleased with the effect.
This, however, is my proudest kit achievement yet.
[img]  [/img]
Spitfire PRXIX made by my lad with some guidance, but not a lot of actual hands on help, from me.
[img]  [/img]
[img]  [/img]
It is his first kit.
Liking the 'Lightening' very much HTS ... what ink(s) did you use for the washes?
Was this Airfix's 1/72 lightening? I don't recall any major issues with the fuselage - was yours 'warped'?
Good effort with the Spitfire PRXIX by your son.
Some acrylic washes from the local model shop. French stuff for military vehicles at £2.75 a bottles. I used a “dark tone” and a “light tone” with various mixes of the two. The light one looks like an oil leak. Washed it on and wiped it off. I then gave the whole thing a matt clear coat to flatten out any variations in the paint and to tone the decals down. I also did some different shades in the green on various panels and control surfaces.
I used it to re-weather the Mosquito from further back in the thread too. It now looks like it has crashed in a swamp, but the effect is more realistic. I painted on some silver to look like exposed metal around the pilots’ door and some of the panels on the wing and bomb bay whilst I was at it.
The Lightning is the 1/72 F.2A. There are various mould ejector pin “lumps” on the inside of the fuselage halves that interfere with the (pointless) intake tunnel assembly. I had to cut them off and still needed file off a lot of material from the intakes. If you don’t there is a gap of about 2mm when you put it all together. Tthew further back in this thread has had the same problems.
Due to my ineptitude (I knackered the radar and fairing by melting them with filler, but rebuilt them using the second kit as a guide) I’ve got another one to build, but I’ll wait a bit before doing it. My lad wants it, but it will put him off for life. He’s doing a Messerschmitt ME109 next. It is as easy to make as the Spitfire but with a more complex paint job.
Next up for me is an Italeri SU27-D Sea Flanker. The kit is a bit of a shocker. It goes together OK but there are several bits that you just glue on without any slots or guides to get the position correct. Also, they have been a bit liberal with the truth when it comes to the accuracy on the kit. It is meant to be a naval Sea Flanker with canards behind the cockpit, but it looks that they have just taken a regular Flanker and added a couple of extra wings to stick on and chucked in an arrestor hook. The canard detail is completely wrong as they don’t attach directly to the fuselage in real life but to a fairing. This suits me however as I can leave the canards and the hook off and paint it up as a SU35 with a better camouflage scheme.
The nose landing gear will be wrong, twin wheel naval spec rather than single wheel air force, but not as wrong as the version with the canards.
I think this one will be all about the paint job.
After that it is the Sea Vixen with its appalling instructions that I’ll bin. I’ve downloaded the Arifix ones and I’ll wing it from them.
Italeri SU-27D Sea Flanker finished as an SU-35.
The kit was quite frankly rubbish. Rubbish to the extent that I will avoid Italeri in the future, which is a shame as they do a load of late Cold War stuff that I would have bought.
Anyhow... The canards on the Sea Flanker were just wrong. So wrong in fact that I didn't put them on. By ditching the canards, the arrestor hook and the naval emblems and changing the colour scheme I ended up with this.
[img]  [/img]
[img]  [/img]
[img]  [/img]
[img]  [/img]
That's nice. Still not finished mine. Might have a crack later.
That 262 video is fantastic, the casual way he does the camo with an airbrush, and the fine stuff like hydraulic lines, the night radar antenna, just everything, really.
Love the SU-35 too, terrific aircraft, and as a big fan of all sorts of exotic camo patterns, the 'dazzle' camo used on various Russian planes is wonderful, works beautifully on that model.
I'm still struggling with the bodywork on my Tamiya Mercedes 300SL. Tried Tamiya rattle can paint. Too much too quickly 🙁 strip it back especially where it had run / pooled
plan B, decant the paint from the rattle can & use in my airbrush. Not enough decanted, rattle can empty, not prepared to buy another 🙁
Plan C, Revell Aquacolour (tried & tested for me) 99 Aluminium plus 01 Clear gloss. Nearly there, needs a couple more coats of clear but I'm about out of patience at the moment. I think I need to box it & come back later, when my mojo returns.
In the meantime, I have a 1/6 scale Cylon Centurion to build...
I haven't made a model in years, but the local hobby shop had an Eagle in the window.
An Eagle Transporter from Space 1999. 😯
How much and where?
I'm in Hobart, Tasmania & it was $118Au.
I think it was an Ertl kit.
Tasmania eh? Might be a struggle to get to after work.
Tasmania eh? Might be a struggle to get to after work.
That'd be a devil of a commute.
Veal? Anyone?
HtS has lured me into this model making malarkey. I spent £40 on stuff at the weekend.
Tasmania eh? Might be a struggle to get to after work.
Bring your bike & stay a bit longer.
Great Paintwork on the 'Sea Flanker' HTS ... is that all done with a brush?
Tamiya Luftwaffe 'Ace Pilot':
[img]  [/img]
Have any of you tried casting components in candle wax with model filler?
Next on the production line is a rather nice looking Cyber Hobby Sea Vixen FAW2*. The kit looks good but the ejection seats are too small, to the extent that the pilot’s head is below the level of the cockpit sill. A bit of googling indicates that the seats are nearer 1/100 than 1/72 so they are about 5mm too short. I could pack them up, but then they would look like high chairs.
My plan was to take the ejector seats from a Vampire that I’ve got in my stash and make a wax mould of them in a tea light, then cast some new ones in Revell filler.
I will experiment first on a random spare part to make sure that the hot wax doesn’t melt the original component.
Has anyone tried this?
[edit]I’ll try moulding with blu-tac too, but I don’t know how it will distort or how much detail will be lost.[/edit]
*I’ve done a bit of reading about the Sea Vixen. The number of aircraft lost in accidents was appalling.
Many losses were on low level “Glow Worm” night training missions that involved illuminating a target then flying a “race track” pattern for the attack run, where the pilot got disorientated and flew into the sea. Apparently there was a weapon selection switch somewhere behind the pilot’s left elbow that meant he had to twist his head whilst making a 180° turn at 450 kts and 500ft. The second crew member sat in the “Coal Hole” had a very limited external view, so there was no additional set of eyes to warn the pilot that he wasn’t level. 50+ men were lost doing this. Today there would be an outrage, but in the 50s and 60s it was hushed up.
[url= https://www.seavixen.org/seavixen-operational-roles/night-glow-worm-attack ] Glow Worm Attack[/url]
Great Paintwork on the 'Sea Flanker' HTS ... is that all done with a brush?
Thanks.
Yes, all done with a brush. It took forever!
I like your German pilot. He looks very "German".
Loving this model thread...
Once I've caught up with my non-starter hobbies of woodwork & wheel-building I might get a model to build....first model I ever built was a Handley Page Victor & the favourite was a Sea Harrier, that my brother knocked from the ceiling with screwed up bits of paper while he was revising for his A-level geography exam (the git).
Bit of an off-topic, hopefully not stupid or rude suggestion....harry_the_spider does your camera have any exposure compensation? Your models look great, but the images are coming out a bit 'grey' (your camera is under-exposing a bit because of the white background). If you have exposure compensation (+/- button) it might be worth setting it to +0.7 or so for the pics to brighten them up a bit....?
My camera is rubbish and I live in a gloomy 19th century cottage in the north of England, so light levels are always poor. If I use a flash it looks even worse!
Never had much luck with home 'casting' - seems like you need something either under 'pressure' (injection mold) or very hot liquid (lead) in order to pick out the detail.
Ok for diorama stuff like bricks etc but not for small detailed parts. Would be interested to hear though if someone has had more luck!
After my Sherman build I restarted a B26 Marauder, that stalled after a few days as I got bored with it. I decided to start an old kit from the pile, this is a Dragon mid production Hetzer that's going to be an 'out of the box' quick and dirty build. Only the base coat was airbrushed, the green and brown was brush painted and deliberately left rough as it will be heavily weathered.
This is my first attempt at the german 'ambush' colour scheme.
Loads more work to do on this yet so it looks like a 5 year old child has painted it at the moment! 😀
[url= https://c1.staticflickr.com/5/4181/33729763954_e1ffe28d20_c.jp g" target="_blank">https://c1.staticflickr.com/5/4181/33729763954_e1ffe28d20_c.jp g"/> [/img][/url][url= https://flic.kr/p/TozRGo ][/url][url= https://www.flickr.com/photos/147925126@N05/ ][/url],
[url= https://c1.staticflickr.com/5/4185/34531431636_a9f5851fae_c.jp g" target="_blank">https://c1.staticflickr.com/5/4185/34531431636_a9f5851fae_c.jp g"/> [/img][/url][url= https://flic.kr/p/UBqByY ][/url] [url= https://www.flickr.com/photos/147925126@N05/ ][/url],
[url= https://c1.staticflickr.com/5/4194/34442477901_4dfcef4cb7_c.jp g" target="_blank">https://c1.staticflickr.com/5/4194/34442477901_4dfcef4cb7_c.jp g"/> [/img][/url][url= https://flic.kr/p/UtyGHT ]2017-05-10_01-45-22[/url][url= https://www.flickr.com/photos/147925126@N05/ ][/url],
Never had much luck with home 'casting' - seems like you need something either under 'pressure' (injection mold) or very hot liquid (lead) in order to pick out the detail.
I’ll give it a try tonight with a blu tack mould if they have it in Tesco on the way home. The filler I have isn’t particularly viscous, so I’ll see how it goes.
I shall post some (gloomy) pictures.
I can buy a couple of resin seats for £2.99 but I object to paying £3.50 postage because I’m such a tight wad.
Interesting paint job on the tank. Were they trying to hide it in a sweet shop?
Here’s a weird cammo fact… My lad has partial red/green colourblindness so he gets some, but not all of his reds and greens mixed. On the flip side cammo doesn’t work with him. Specifically he can see female pheasants extremely clearly at some distance whilst the rest of us in the family have no chance even when they are only a few feet away. It is his superpower. How odd.
Harry_the_Spider - MemberI shall post some (gloomy) pictures.
I feel bad now.....
Interesting paint job on the tank. Were they trying to hide it in a sweet shop?
It was supposed to replicate the dappled effect of light shining through trees.
Here’s a weird cammo fact… My lad has partial red/green colourblindness so he gets some, but not all of his reds and greens mixed. On the flip side cammo doesn’t work with him. Specifically he can see female pheasants extremely clearly at some distance whilst the rest of us in the family have no chance even when they are only a few feet away. It is his superpower. How odd.
When my brother-in-law was in the Coldstream guards I asked him how they got on with him being colour blind, he said the army liked it as he could pick out stuff in the tree line that normally sighted people couldn't. Reading your post made me think he was talking sense. I've disbelieved him for 37 years! 😀
Hasegawa used to make some nice model kits when I was modelling 30 odd years ago (bloody hell, just worked that out, jeez I'm old!)
