Thanks John, I did use Humbrol Decalfix on the Corsair but it left a funny residue on the gloss coat (Revell clear gloss spray). I normally use thinned Humbrol Gloss Cote but cleaning the jar on my airbrush is a bit of a chore. Will experiment with micro set/sol next...
Microset and sol are good, but sol in particular seems quite aggressive on clear coats so take it steady. I think leaving the clear coat to really properly harden (a couple of days) can make quite a difference to how it is affected.
I think the residue disappears once you’ve got the final clear coat (Matt or gloss) on, although I could be wrong
Well I have to say I had no idea there was such a subculture devoted to painting oil drums until I started on these for my Storch diorama! 😀
I’m calling these nearly done subject to a matt varnish and a little dry brushing of shiny bits.
Lots of people seem to go for elaborate oil stains and rust finishes, but I’m pretty happy with these for an hour or so’s work.
[url= https://i.postimg.cc/P5QWhH06/11-CE637-C-4-A0-F-4-F16-9-CD4-9-C07-B20-E8-ED3.jp g" target="_blank">https://i.postimg.cc/P5QWhH06/11-CE637-C-4-A0-F-4-F16-9-CD4-9-C07-B20-E8-ED3.jp g"/> [/img][/url]
Nice !
Great thread, but let’s be honest isn’t it basically just one giant miniature humbrol-brag?
I’ve long been di-curious, but fear that I’d start something that would have no end. For instance - take a trucker. I’d want to do the trucker so it was lifelike. But then a truck. And then a road. And then the litter, etc. Then a small bridge with a river, some Himalayan balsam along the banks, a few oil drums bobbing around. A grass snake. A riverside-pub with a large beer garden. Punters. A few cyclists. A pair of buzzards wheeling about overhead. An e-bike parked by an old Morris 1000 van. In short, I can’t seem to stop imagining, so I’m guessing that it would be dangerous to begin!

(May remain as a lurker. May risk starting out with a small Triumph TR model that has been on the shelf for years)
humbrol-brag
Chapeau sir.
I had my first frustration last night. Trying to assemble the (fiddly) fuselage on the Corsair one tiny bit I dropped. Found it. Was trying to sand it down pinned in the tweezers and it pinged across the room. Lost. It's only cosmetic but IT WON'T BE THERE. I emailed the Hobby Boss UK importers in the hope they have a spare. Arse.
This Corsair has been a bit all consuming. I've put pressure on myself to up my game and been paying a bit too much attention to some of the awesome builds on Britmodeller. It's going to take a little while if I'm going to get to anywhere near that standard and probably some frustration along the way. The whole point of this was quality time with Freester Jr. Which the Corsair isn't.
After my frustrations last night I took a deep breath. We've got a nice easy 1/72 P47 awaiting some glue and paint. I've got a nice easy P51 awaiting a start.
I'll keep chipping away at the Corsair in my own time when Jr is in bed. I'd kidded myself that I could brush paint to a high standard like Owen from Quick Kits can, but I'm beginning to hear the call of an airbrush if I am going to up my game... 🤣
@Freester - Check out a poster called Plastix on Britmodeller who brush paints all his builds, his results look airbrushed.
Freester - interesting you mentioned Owen at Quick Kits - my lad has been getting into modelling and recently discovered his channel.It's great but he's not posted anything for a year or so. Any idea if he changed channel or just got disillusioned by the low effort to reward ratio and gave up? Or, given the timing, got bitten by Covid?
G
@speeder no I don't actually know.
He did an update in Aug 2019
but did a few more videos since then.
Who knows, Covid, stress, got a job?
I think he went to university.
That’s his modelling career over for the next 30 years then!
This came up in my YouTube feed and I thought you STW modellers might like a bit of inspiration from the 2021 IPMS show in Telford. Really incredible amount of people out there modeling to a fantastic standard
Full disclosure. I have never had an Airfix kit. I got one of those Aldo specials for 4.99
I thought Tamiya 1/10 scale was finnicky...
[img]  [/img]
As daft as it sounds, salad cream can set like concrete once the vinegar evaporates. (I got that from the BBC’s ‘that’s life’, many moons ago).
Maybe mixing it with curry powder is one way to achieve a realistic patina.
I know I'm really double posting my WIP on Britmodeller but finished 5 coats of hand brushed Revell Blue / Anthracite enamel mix, thinned with white sprits. Unmasked the wing tips. Happy with the straight lines and the detail remaining. Not perfect but an improvement on my previous model...

Feeling a bit better about things now gotta keep cracking on. Black for the top fuselage in front of the cockpit now masked and one coat applied. Going to think about gloss varnish where the decals are going to be applied...
That Corsair looks good, the brushwork is very fine.
Great finish on that Corsair! Looks like enamels are the way to go when brush painting.
[img]  [/img]
Spitfire nearly done. Great, just what I need. Another money time sapping pastime.
Granted this kit cost 4.99 from Aldi so I'm not expecting much but the acrylic paint is very thick and dries very fast.
If you were going to make a good job of it would you use thinners or a different kind of paint?
Great, just what I need. Another money time sapping pastime
yup tell me about it.
f you were going to make a good job of it would you use thinners or a different kind of paint?
I'm no expert. From all the reading I've done. Thinned lacquers with an airbrush seem to be the perfectionists method.
However first things first. I would recommend you thin your paint. I didn't for my first model and it looks not unlike yours (admittedly I use enamels). There's a guy on Britmodeller who gets superb results with a paintbrush and acrylics. You can use water or there are specific acrylic thinners. Better too thin than too thick the first coat may look awful / see through / non existent but keep applying thin coats when the previous has dried...
Having done those Airfix starter kits with a brush, then yeah, the paint does need thinning and mutiple coats - but water works reasonably well with those little pots. I did try thinning them with AK acrylic thinner and they are better again with that, but I was trying to do the kit with just what was in the box as part of the Airfix 'starter kit challenge' so was staying away from the airbrush, etc. Found that the metallics in those kits are awful and are pretty much translucent even when not thinned, so needed a heap of coats to get a uniform finish. The black waters down well to do a wash in wheels wells etc, even if it's a little grainy - but was just seeing how far i could do with the basics.
A dash of water or an alcohol based thinner will sort it out. A wider brush too.
Spitfire nearly done. Great, just what I need. Another money time sapping pastime.
My guest bedroom is home to a Specialized Stumpjumper frame and approx 40+ 1/48 kits awaiting being built.
Granted this kit cost 4.99 from Aldi so I’m not expecting much but the acrylic paint is very thick and dries very fast.
If you were going to make a good job of it would you use thinners or a different kind of paint?
Humbrol / Airfix acrylics are a bit hit and miss. Humbrol do an acrylic thinner, or you can thin with water, but the paints themselves can be lumpy and grainy, personally I wouldn't bother with them.
I am a huge fan of Tamiya acrylics, I find them far easier to work with than Humbrol acrylics. The range of colours isn't as extensive as you get with other brands like Humbrol etc, however the paints mix extremely well, so it's relatively easy to get the shade that you're looking for. For a Battle of Britain Spitfire you'll need XF-21 (sky) for the undersides, XF-81 (RAF dark green) and a blend of XF-52 (flat earth), XF-49 (khaki) and XF-3 (yellow) in a 2:2:1 mixture to get RAF Dark Earth. A tub of X-20 thinner lasts for absolutely ages too, I think that I opened mine in January and seven models later I've used about 20% of it, even with using an airbrush to spray paint thinned to a 1:1 ratio.
I realise that at approx £1.75 per bottle, the potential outlay on paint is quite expensive when compared with a £4.99 kit, but believe me it's well worth it.
I also highly recommend Vallejo acrylics too - Vallejo range here. These are thinned with plain water and are easy to use, but paint can be expensive at approx £2.50 per bottle. Their range of colours is mind boggling though.
If I was brush painting I’d lay down an undercoat from a rattle can, from memory Halfords do a suitable one. Look to britmodeller for advice. I’d then be applying multiple, thin coats of my paint of choice, thinned with their thinner or distilled water. A good quality brush also helps.
My preferred paint is Vallejo. They have painting tips on their website. I only brush paint the small parts as I could never get a finish I was happy with so I bought an airbrush, but that’s an investment.
Tamiya acrylics are hard to paint without leaving brush marks, I add a cheap acrylic retarding fluid (readily available from The Range) and this helps level off the brush marks.
I am in the process of brush painting a Spitfire Vb using the Revell Aqua Color range - when thinned (with tap water) they give a very good finish. Edited to add - wider flat brushes make all the difference and very cheap too.
I'm currently putting together an Airfix 1/48 P-51 Mustang. It'll be my fourth attempt at this kit, I always fall flat on my face trying to get a natural metal finish. All of my attempts thus far have been complete arse.
The key to a convincing metal finish is in preparation, the surface of the model must be blemish free and unsightly seam lines will completely ruin it. The Airfix Mustang is annoying in that the plastic is not exactly finely cast, so the seam lines around the lower fuselage are quite prominent and will need to be neatened up.
So far, I've used brush on superglue to fill the gaps in the fuselage seams and I'm in the process of using fine sanding cloths to smooth the superglue. The plan is to assemble the wings and fuselage, clean the model with a lint free cloth and rubbing alcohol to ensure good adhesion with the primer layer. The primer layer will help me spot any areas that need filling, before that layer too is polished with the fine sanding cloths again.
Wartime P-51ds had aluminium lacquer painted wings and a bare metal fuselage, while elevators, ailerons and flaps were also left in bare metal. I'm using Vallejo Metal Air acrylics, hopefully I won't balls it up but I'd be grateful for any advice from anyone who has successfully completed an NMF build here!
Oh and I'll need to account for the black and white invasion stripes on the underside of the aircraft, decals won't do so I'm going to mask and airbrush these. There's so much that could go hideously wrong...
Rommel…looking for his next fuel delivery perhaps?😀
[url= https://i.postimg.cc/XYCMLN7w/35-FC6460-555-E-4190-837-F-4943-DFA4-CAB2.jp g" target="_blank">https://i.postimg.cc/XYCMLN7w/35-FC6460-555-E-4190-837-F-4943-DFA4-CAB2.jp g"/> [/img][/url]
[url= https://i.postimg.cc/9f56n3rs/8311-B8-DA-511-A-4-BE3-B97-A-80-C8-CD2-BF57-A.jp g" target="_blank">https://i.postimg.cc/9f56n3rs/8311-B8-DA-511-A-4-BE3-B97-A-80-C8-CD2-BF57-A.jp g"/> [/img][/url]
[url= https://i.postimg.cc/PxdBdmb4/870-E33-BC-BC11-4-C59-9-B29-0-AD3-A0-D75570.jp g" target="_blank">https://i.postimg.cc/PxdBdmb4/870-E33-BC-BC11-4-C59-9-B29-0-AD3-A0-D75570.jp g"/> [/img][/url]
Thanks! Full disclosure I cheated by buying a mat and some pre made grasses, but I’m mainly interested in the aircraft so it just adds a bit of context.
When I was searching for ideas it seemed that every Rommel figure I saw was accompanied by Jerry cans or fuel barrels!

Main painting done really pleased how this has come out considering it's hand painted. A bit of touching up to do then a coat of gloss and decal time!
@PJM1974 I have a 1/72 P51 and Thunderbolt. Both Have some metallic finish on them. Not sure if I'm dreading or relishing the challenge with the hairy stick!
Well that looks great so far Freester. I really must have a go at hand painting something again one of these days.
Evening, apologes if this has been asked many times but google kicks up too many conflicting opinions on various sites and forums, do you prime before airbrushing? and if so, with what?
I've used halfords grey plastic primer before brush painting with ok enough results but airbrushing is a new one for me. Thanks for any help or tips!
Yes. A primer coat isn't just there to key the plastic, it's bloody useful for helping to spot anything that requires a bit of filler or sanding. I tend to prime in RLM grey (simply because I've stacks of it), then I'll add NATO black along panel lines etc before adding colour coats.
Do please share pics of WIP!
Yes always prime. Grey plastic primer is fine - as PJM says it will help to highlight the areas which need further filling/ sanding…. Practice, practice, practice is the main thing with airbrushing. Paint to thinner ratio, combined with getting the right air pressure are the main things. Usually I aim for semi-skimmed milk viscosity, and anything between 18 and 22 psi on the old compressor, but really you’ve just got to practice and find what works for you..
@PJM1974 wrt NMF I got an email from G Force models the other day... Suggesting metallic paints should be painted over a gloss black finish. I'm going to try this.
Here are a few tips to get the most out of the metallic paint.
Metallic paints always look best when painted over a Gloss Black surface as this really helps to make the paint shine.
...snip tries to sell gloss black primer...
A normal mat black paint will help here, it just wont cause quite the same amount of shine as the gloss black, but this can be a very useful effect!
Why not try changing the type of black paint used under the metallics to create subtle differences in its final appearance? With some of the finish having more of a shine than others this can create interesting effects & variation to different parts of the model.
Some pics from the Corsair - black section in front of cockpit done.

Some fiddly undercarriage stuff done.

Coat of varnish (Humbrol Enamel Gloss thinned with Humbrol Enamel Thinners) done. Really pleased. Ready for decals...

PS Jr is going to be getting a 1/72 Lanc, Me 109 and Sea Vixen in his Xmas sack.
I've requested the Hobby Boss 1/72 Wolfpack VF1 F-14.
Good stuff! Which Sea Vixen?
Good stuff! Which Sea Vixen?
The Revell British Legends FAW2
Oooh.
Looks like a re-box of the Cyber Hobby one that I've got.
https://www.scalemates.com/kits/revell-03866-havilland-sea-vixen-faw-2--1316268
A little more progress last night. Underwing and starboard decals fixed. Photos taken while still wet but I had a quick look before work this morning they've bedded in nicely little or no silvering. Get the other half done later...
[img]  [/img]
[img]  [/img]
@Freester fantastic work!
Corsair of a different kind purchased on my lunch break today -
And my completed Revell 1/72 Spitfire Vb -
Brush painted with Revell Aqua Color acrylics and initially was really happy with the finish of the ocean grey base coat. When painting the green camo the paint bled under the masking and also formed ridges up against the tape which dampened my enthusiasm somewhat. Looks ok from a distance though.
@nostrils nice work. What I've learnt about masking tape... Tamiya tape. Press it down hard. Brush away from the tape.
I started building the Airfix 1/24 scale Mk1 Hurricane. Its going together nicely but its huge! I'm now thinking about putting it to one side because once the wings are on I'll have nowhere to put it!
[url= https://live.staticflickr.com/65535/51752546198_0b0a9511ec_k.jp g" target="_blank">https://live.staticflickr.com/65535/51752546198_0b0a9511ec_k.jp g"/> [/img][/url]
[url= https://live.staticflickr.com/65535/51752312771_85d08e92c7_k.jp g" target="_blank">https://live.staticflickr.com/65535/51752312771_85d08e92c7_k.jp g"/> [/img][/url]
Yeah some models end up way bigger than you expect. I remember building a Revell 1/32 Phantom, and as a teenager it felt like I was assembling the forth bridge!
Whoa that’s a whopper! I presume this is one of the original kits not some kind of fancy new tooling? In which case good luck. Looks great so far…
Its the original one from the early 1970's re-boxed as a "vintage classic" Airfix are selling them as part of their "mystery box" deal so it was only about £25 i think. Its going okay so far, the instructions are vague to say the least and there is some flash but nothing that's a game stopper. I think the Spitfire is much worse though, plus its got an issue with the wings being far too flat so it looks odd when its built.
A productive discussion over this evening's meal with my 10 yr old. We are going to concentrate on Carrier Based aircraft but there are obviously some other essential aircraft we will need in our collection...
[img]  [/img]
Other suggestions welcome!
Hmmm your 10 year old is pretty knowledgeable 😀
Skyhawk would have to be on my carrier list..
Wow! That's some list. Hope you've got some space as there is some serious wing span in there.
You need to add a Gannett to your carrier list btw.
carrier list needs either: A-5 Vigilante or F-8 Crusader IMO
While we’re on the subject of carriers, I’ll just leave this here, from the days when the Royal Navy had proper carriers 😀
[url= https://i.postimg.cc/T3P5hr40/37-BB3413-61-D6-49-D9-8-F68-2375-EA2-EB17-C.jp g" target="_blank">https://i.postimg.cc/T3P5hr40/37-BB3413-61-D6-49-D9-8-F68-2375-EA2-EB17-C.jp g"/> [/img][/url]
And a Hornet.
Good call on the Vigilante.
Superb keep 'em coming.
Hmmm your 10 year old is pretty knowledgeable 😀
I created a monster 🤣
I can remember my mum taking me to the bookshop when I was a similar age to him. I chose this book...

I still have it. Well my son owns it now...
Other suggestions welcome
A6 Intruder?
And I’ve always had a soft spot for the Hoover (S3 Viking). I have an 80s Airfix kit that I might actually build one day.
Brilliant!
I had also forgotten how Fugly the Gannett is...
Corsair nearly finished. A couple more coats of yellow on the prop tips then I'll be fitting prop, folded wings and be calling it done.
Been chipping away at a little Revell 1/72 P-47 with my son. It's a Light Blue / Dark Blue camo pattern with a metallic underside.
This is 2 coats of the light blue, Revell enamel thinned with Humbrol enamel thinners. Hand brushed by the lad looking good already...
[img]  [/img]
Really enjoyed this thread hope you get some great additions to the stash tomorrow!!!
Got the wings on and an overall coat of primer. Underside is painted as well. Now need to mask up and spray overall brown. But I've run into a problem. The engine cowlings are not a great fit. I've cut them up into their original six pieces which helps but the section that fits over the petrol tank isn't even close to fitting and I have no immediate ideas on how to fix it!
[url= https://live.staticflickr.com/65535/51771340472_c30265fcac_k.jp g" target="_blank">https://live.staticflickr.com/65535/51771340472_c30265fcac_k.jp g"/> [/img][/url]
[url= https://live.staticflickr.com/65535/51772403853_945887b7c0_k.jp g" target="_blank">https://live.staticflickr.com/65535/51772403853_945887b7c0_k.jp g"/> [/img][/url]
[img]  [/img]
Well the stash got bigger yesterday 3 my lads the Tomcat is mine!
I know he's got another one coming today 🙈
Nice haul.
I received these...
Both 1/32 and absolutely massive, will save these for when my skills levels hopefully improve.
Airfix Zero ready for priming, not looking forward to masking the canopy...
My haul:
Airfix new mould Spitfire Mk. VC
Airfix Buccaneer S.2C
Sword Harrier T.Mk2
All in 1:72 scale
Also Carrier-based
Zero
Wildcat
Kate
Avenger
Well Jr's Sea Vixen needs some weight in the nose. What are you people using? ISTR someone earlier in this thread had a disaster...? Was it HTS?
Pennies in the nose cone? Liquid gravity? Online people recommending fishing shot, gun shot, old wheel balance weights. Mmmm I think I've got some ball bearings in the garage from when I used to run cone and bearing hubs...
I hate nose weights - you always need more than you think. Ball bearings or fishing weights with pva drizzled round them usually works. I recently purchased a couple of small lead ‘ingots’ online to use, but it’s actually quite hard to chop to shape.
My only kit purchase was an impulse buy at Halifax Modellers World. A 1/35 SAS jeep - it’s a kit I’ve always fancied so when I saw it for a tenner it was a no brainer. I still have a roll of desert diorama mat left over from the Storch so I think it’s going to be joined by an LRDG Chevy too!
You need to add a Gannett to your carrier list btw.
I had also forgotten how Fugly the Gannett is…
True, but a quite remarkable aircraft as well. AEW, anti-submarine, and torpedo bomber as well, IIRC.
When I worked in publishing, the small company I worked for, Picton Publishing in Chippenham, specialised in Philately and militaria, and I put together several little books on naval aircraft, including the Gannet and the Supermarine Sea Hawk. Sadly I can’t seem to find any of the samples I kept, because they had lots of interesting photos that you just don’t normally get to see. As I was designing the books from scratch, I’d just get a box or folder full of photos and a manuscript, so a treasure-trove of stuff for someone who grew up under RAF Lyneham’s flight-path, plus my dad was in the RAF in the far-east during WW2.
I remember some photos of one Gannet, an early model without the big radome underneath, which had lost both complete wingtips; on a Gannet, with folding wings, that meant approximately 1/3 of each wing had broken off completely. The pilot kept it in the air and returned it to base safely! Shutting down one engine meant they could loiter for hours on a mission. Tony Benn ordered their scrapping, not long before the Falklands war.
Some here might find the photos in this article interesting, in an academic sort of way; there are a bunch of low-level photos of American airforce planes at the main maintenance base, USAFB Tinker, flying with no paint, just a naked airframe, so you can see all the panels, and just how complicated an aircraft skin is.
https://www.thedrive.com/the-war-zone/43677/behold-the-naked-warplanes-of-tinker-air-force-base
Thank you - it's good to see NMF finishes with metal fatigue and gobs of filler over the panel lines of that B-52. P-51 Mustangs had puttied wings, with smooth panel lines and minimal riveting so as not to disturb the airflow too much.
Actually finished a kit today!
Will post pictures, eventually.
Re nose weights - you can get a mix of 2.5g and 10g weights for ballast on r/c model aircraft. Not always enough room for these especially in 1/72 scale but they’re a bit easier to manage than say Liquid Gravity. Or fishing weights & a bit of epoxy or even plasticine
I use shotgun pellets and PVA glue. Tyre/wheel weights are no longer made of lead so you 'll need more of them than you might think.
Was it HTS?
Wasn't me. I use self adhesive balance weights if there is space and liquid gravity where there isn't.
I'll tape the major components together early on before anything has been glued then balance the aircraft over a pencil above the rear undercarriage by adding blutac behind the cockpit. This will give me amount of weight required. I do it behind the cockpit as I can usually get the self adhesive weights in there. For the Sea Vixen I'm guessing that there will be space under the cockpit floor and above the airbrake.
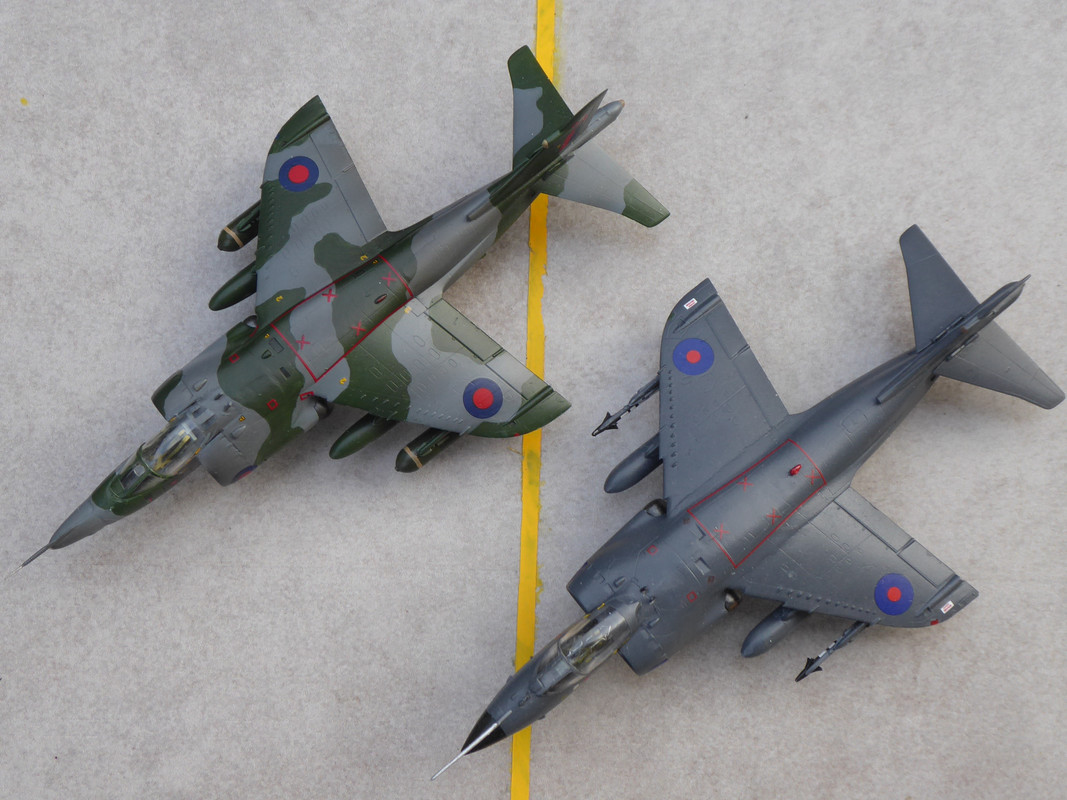
Italeri Harrier Gr.3.
1:72. Brush painted. Out of the box.
Not a bad little kit with very few fit issues. Decals were excellent, nicely printed, did not "explode" and plenty of them.

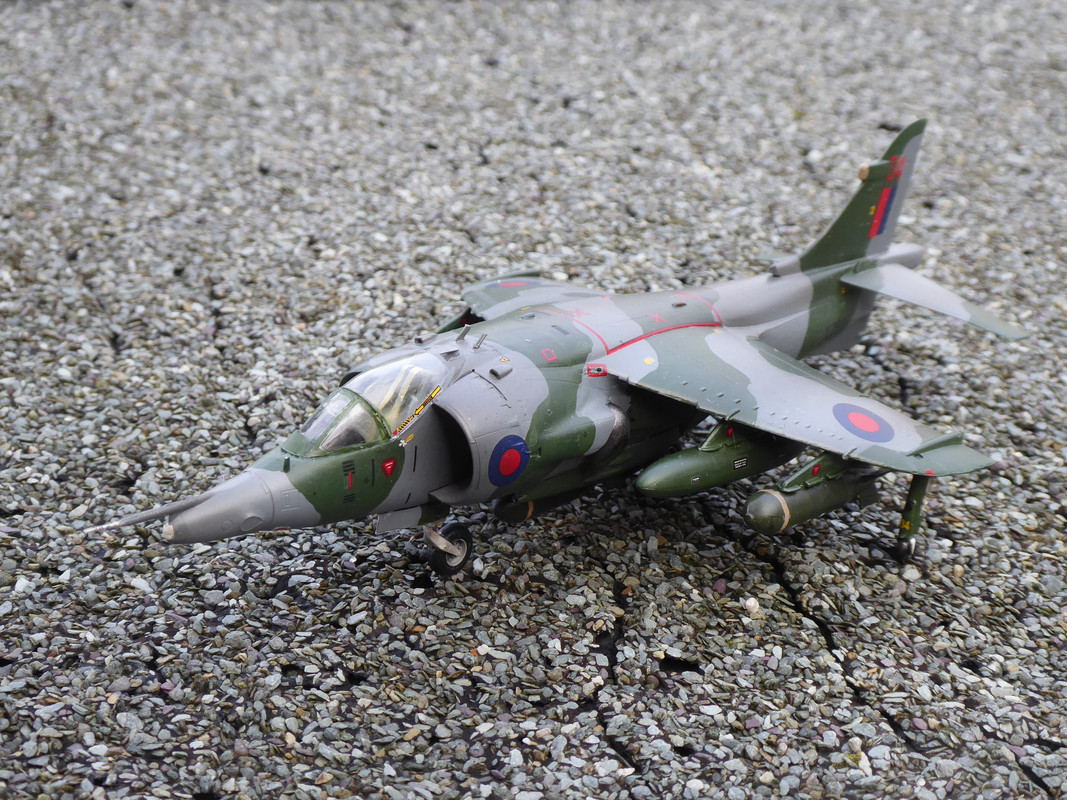
Aircraft is XZ 899, shot down over Goose Green. The pilot, Bob Iveson, survived.
...and with a Sea Harrier.
Nice work just saw your RFI on Britmodeller.
I want to do a Falklands era Sea Harrier 1/72. What are my options? Wait for the new Airfix FRS1?
Mine is an ancient Hasegawa one. It is Ok, but the wings are attached individually rather than in one piece over the top, so the roots are difficult to hide.
Not a bad kit and dirt cheap, in fact I've bought another to do in the light grey scheme.
I'm calling this one done. It's not perfect but I'm happy with it. I can see what I did wrong and where to improve. Still continuing with the hairy stick though!!!
I found this kit quite hard - a 1/48 Hobby Boss Corsair F4U-5. Made mistakes along the way. My son lost interest in this one which was a shame so ended up finishing myself.
[img]  [/img]
[img]  [/img]
[img]  [/img]
Some staggeringly good efforts here - nicely done! What do you do with them all when they're built? Is the fun in the building process, or do you have displays or hang them from the bedroom ceiling?!
That's a bloody good question and I've got no idea where ours will go. Jr was on about getting his grandfather to make an aircraft carrier deck out of some wood. I was like 'and where will that go then?' !!!
@Freester is your Avatar on BM your lad in the cockpit of the Hunter at St Mawgan?
