Fantastic!
Heads up!
New tool 1:72 / 14" MPC Eagle Transporter going cheap(ish) due to a ding on the corner of the box. No good if you are collector, very good if you are a builder!
I've just bought one, but there is another.
Nice little diorama with that StuG
Thanks chaps, I was quite happy with the way the Stug turned out.
@timbog160 'track bashing' 😂
He's supposed to be puking up after a tough day!
I bought an Eduard 1/48 Me109 G-4 profi pack last Saturday and got straight into it, I'm halfway through painting it at the moment. This has got to be some sort of a record for me as a quick build is usually 6 months! It's a great kit as it just falls together, this would be really good for someone who is getting back to modelling as it has no vices whatsoever.
Earlier today I put a coat of rlm78 blue over some preshading, I feel like I'm actually getting somewhere with this technique now. I tried using some Mr Hobby acrylic thinned with their Levelling Thinner, I thinned it much more than I usually thin paint and it went on really well, I'm going to use this a lot more from now on.
[url= https://i.postimg.cc/rw6QbKtP/IMG-20200921-143804.jp g" target="_blank">https://i.postimg.cc/rw6QbKtP/IMG-20200921-143804.jp g"/> [/img][/url]
[url= https://i.postimg.cc/8PfZthsv/IMG-20200925-154135.jp g" target="_blank">https://i.postimg.cc/8PfZthsv/IMG-20200925-154135.jp g"/> [/img][/url]
[url= https://i.postimg.cc/9QGJjCdF/IMG-20200925-154144.jp g" target="_blank">https://i.postimg.cc/9QGJjCdF/IMG-20200925-154144.jp g"/> [/img][/url]
[url= https://i.postimg.cc/PfR6W6fh/IMG-20200925-154256.jp g" target="_blank">https://i.postimg.cc/PfR6W6fh/IMG-20200925-154256.jp g"/> [/img][/url]
I still haven’t figured out how to do that pre-shading thing. Think I’m giving it too much of the top coat
I did the same with the upper sand colour, totally obliterated the shading. The lower blue colour turned out really well but its not that clear in the pic.
Next time I'm going to try it with a darkened version of the topcoat instead of the rlm66 (black grey) I used this time.
[url= https://i.postimg.cc/SsMqp2tX/IMG-20200925-230913.jp g" target="_blank">https://i.postimg.cc/SsMqp2tX/IMG-20200925-230913.jp g"/> [/img][/url]
[url= https://i.postimg.cc/d3RYhMFw/IMG-20200926-180230.jp g" target="_blank">https://i.postimg.cc/d3RYhMFw/IMG-20200926-180230.jp g"/> [/img][/url]
For spraying over preshade I’m generally diluting the paint 50/50 for the first few coats, then even thinner for the final ones. Very easy to go too far. I’ve mostly learnt to stop and leave it overnight when I’m thinking “one more coat…?”, then look at in daylight with fresh eyes.
I also usually do a “highlights” preshade in white, as well as the usual “shadow” one in black/grey/brown. Seems to give a bigger margin for error!
I’ve been doing a lot of armour lately, Andy’s Hobby Store YouTube channel has a number of ‘how to’ videos. He tends to paint the tank overall in NATO Black, then the panels in white before a top coat. I’ve tried that too but I don’t think it really works as soon as you spray Tamiya XF61 Dark Green all over it. Time for some desert colour tanks I think...
Or some aircraft that are not RAF WWII bombers.
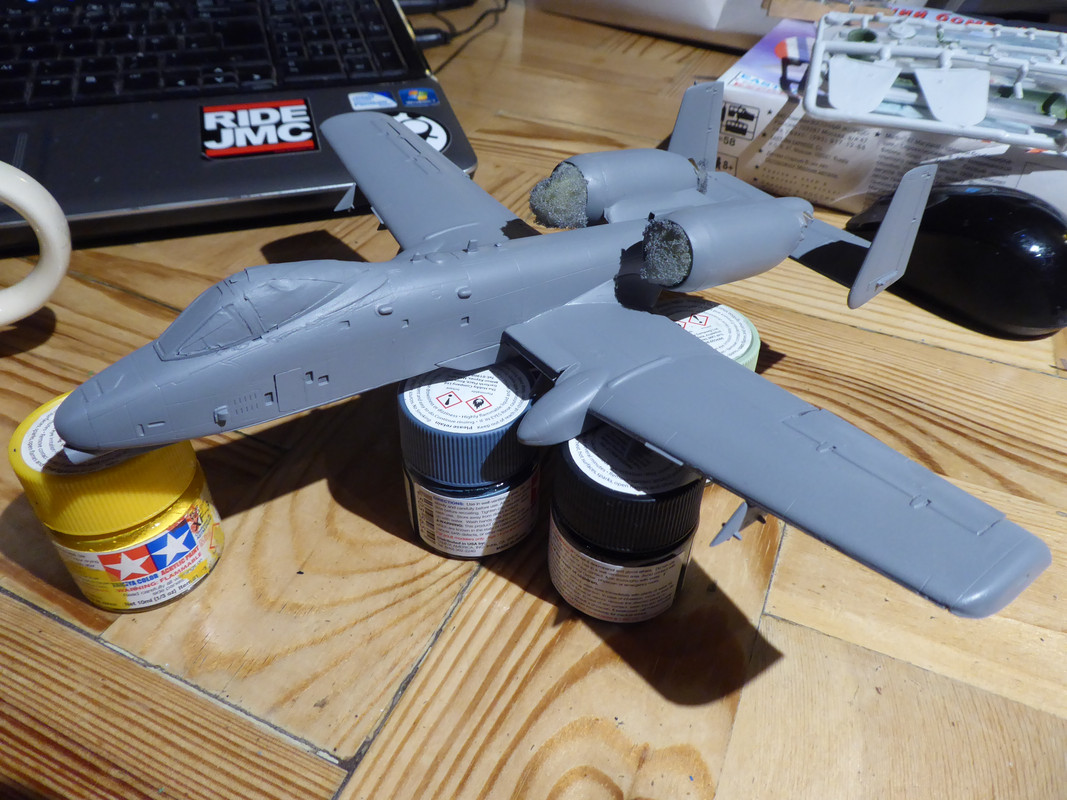
Hasegawa A-7D Corsair II in 1/48 in progress
I quite fancy having a go at this beast...
https://www.emodels.co.uk/meng-model-1-35-russian-9k37-m1-buk-missile-system-014.html
Preshading can be very difficult to get the right balance with. What I have found is that by the time you’ve added paint, clear coat, washes and filters it is surprising how much it will tone down the underlying shading. For this reason I always thin my first couple of coats more than I think is necessary, and leave more of the shading visible than I think I should. This seems to be the easiest way to get a good result.
The advice above about walk away for a while then come back to it is really good! I find this works well with Luftwaffe mottling too..
When everything works well, pre-shading can be quite effective, but as soon as you need to build multiple layers of contrasting colour (like Luftwaffe mottling for example) then you lose the bleed through. One answer is to post-shade using very thin paint at a very low pressure, which is probably what you're going to be doing anyway if you're painting a mottled luftwaffe scheme.
My Eduard FW190d has been WIP for a couple of months and I'm almost finished. The colour scheme was enough to induce dread - the underside of the wings were painted in contrasting colours of RLM 76 and RLM 66 with some panels in NMF. The fuselage mottling obliterated the preshading, so I post shaded the panel lines over the mottled areas with a darker tone thinned to something like a 30/70 paint/thinner ratio and sprayed at a very low pressure. After that I post shaded with a lighter tone, again at low pressure and with a 30/70 mix, to add some tonal variation. The results are okay, not amazing but far better than any luftwaffe subject that I've painted in the past.
Has anyone got any experience with lighting for kits?
I think I’m going to do my Eagle Transporter on a landing pad with a crew access gantry. Lighting that will be easy as I’ll use battery powered LED fairly lights through holes drilled in the base. Lighting the kit however will be different as I don’t want it wired to the ground. I want some lights in the cockpit and a couple of navigation lamps on the external frame.
Is there a kit available with a small battery pack and switch that I can use to power up to a dozen LEDs? For different colours I’ll use gels (sweet wrappers).
There are a small number of lighting kits available from a company called Tyridium Models, iirc. Let me do a search...
Here we go: https://www.tirydiummodels.co.uk/
Thanks. Found an eBay site that does them for boats. I may get a set or two of those.
Something like this?
https://www.smallscalelights.co.uk/
Led's aren't difficult to use from scratch and are cheap components. You'll need a battery holder (2032 battery?) wire, led's, and resistors.
The only issue with making it yourself is the resistor value, but there's plenty of info on the net.
Years ago before led lights on vehicles were a thing I made a LED rear light for a lambretta, a Maplins (I miss Maplins) boffin worked out the resistor value for me and I bodged the rest. If you can solder a wire it should be fairly simple.
I am enjoying this thread, even if it does make me slightly melancholy that I've never produced anything to the standards of some of the models shown.
I need to get rid of accumulated stash though, and the thought of individually listing them all on Ebay isn't appealing. Is there a plastic model-trackworld equivalent with a classifieds section anyone knows of?
What have you got? Someone shifted a load on here that they inherited from a relative a while ago. Put a list up.
Here's my latest effort - a Fujimi VW Golf GTI Mk2 kit that I modified slightly to become my mum's old 1988 Golf CL. It's a pretty basic kit - I built it as a rainy day amusement while I was on holiday, having put the hard work in painting it at home.
[img]  [/img]
I prefer painting stuff on the sprue, I find I can do a much neater job.
[img]  [/img]
I don't have an airbrush and am unlikely to make the investment any time soon (despite really being a railway modeller) so a spray can from Halfords sufficed. My last project I hand painted to a reasonably high standard but it's still not as good as spray.
[img]  [/img]
The build was pretty straightforward, if a little flashy-
[img]  [/img]
I like the wheels, but the anti-roll bar is one of my favourite bits-
[img]  [/img]
[img]  [/img]
[img]  [/img]
The interior was very satisfying to build-
[img]  [/img]
[img]  [/img]
[img]  [/img]
[img]  [/img]
Prying the body onto the chassis was pretty nerve-racking, it was a very tight fit-
[img]  [/img]
[img]  [/img]
It looked alright when it was together though-
[img]  [/img]
Adding the finishing touches-
[img]  [/img]
And it's done!
[img]  [/img]
[img]  [/img]
[img]  [/img]
Well, almost - once I got home I made my mum's old number plates and added them-
[img]  [/img]
I like that a lot ^
I am enjoying this thread, even if it does make me slightly melancholy that I’ve never produced anything to the standards of some of the models shown.
I need to get rid of accumulated stash though, and the thought of individually listing them all on Ebay isn’t appealing. Is there a plastic model-trackworld equivalent with a classifieds section anyone knows of?
You need to have made 100 posts before you can get on the Britmodeller one.
Stick it up here in this thread (if you are allowed). You may get a few takers.
I might do that then, unless anyone would frown upon it. It'll take me a while to go through the kits and sort the wheat from the chaff, but I've got 32 aftermarket decal sets and some conversion kits nearly ready.
@munrobiker really nice job on the Golf, cars are one thing that I've never been able to do.
Golf is looking great although it could do with the red detailing around the grill to get away from the Driver look. That would be a bitch to paint though...
That Golf is really nice, great work
Golf is looking great although it could do with the red detailing around the grill to get away from the Driver look. That would be a bitch to paint though…
@munrobiker - hadn't read your post about modding it to look like you mum's CL. Spot on in that case!
Yep, it's meant to look dull! Just couldn't resist the tartan seat decals.
Really nice Golf there. I had a MK1 Scirocco GTi in Arctic Gold. Must see if they do one of those.
Not looked at this thread for ages, I have to say there are some superb builds, and it seems churlish to pick out one, but JohnEdwards Wellington is just astonishing! Not only is the detail of the interior superb, but the subtlety of the exterior is unlike anything I’ve seen before, the geodesic wing structure actually showing through the ‘canvas’ surface! Really lovely build, I’m very, very impressed.
Just double, I wish! I’ve had a 1/48 B26 Marauder on the go for a few years and I dread to think how much I’ve spent on the extras, decals/resin wheels/photoetch/resin .50 cals/more decals it goes on and on.
Sometimes you get lucky, my goldsmith mate spotted a tank kit in a local charity shop, (can’t remember for the life of me what it was), and it had a whole load of etched brass parts in the box, which he was pretty chuffed about, and it was quite a bit cheaper than the basic kit, too. I’ll try to remember to ask him what it was over the pub tonight.
Carried on to the end of the thread, some more amazing builds, but that T-54 is
mind-buggering! 😳 I’ll be asking my mate about that kit, because he’s an obsessive tank kit builder - he might balk at that one!
The Golf is neat, but one detail bothers me, it’s LHD...
but that T-54 is
mind-buggering!
It was hard work, but I’m really pleased with the result.
There’s an M3 Lee from the same company, again with full interior, in the stash too.
And a monster coming in the post very soon, a Soviet 4x missile mobile SAM vehicle
I think I have too many hobbies now. Two bands, taking up Monday & Friday evenings. Guitar lessons Saturday lunchtime so I need to practice as much as I can during the rest of the week. Doesn’t leave much time for the model making. Let alone riding my bike!
But then I’ve got to a stage where I have several models built, or at least as much as I can before I need to paint them. For example:
Tamiya 1/35 M48 -painted, needs gloss coat so I can do the decals
Tamiya 1/48 Crusader III -ditto
Tamiya 1/48 T-55 - ready for paint
Hasegawa 1/48 A-7D Corsair II -ditto
Tamiya 1/35 6x6 truck - finished, ready for diorama. Might get some photos of that tomorrow
Italeri 1/24 Renault 5 - similar idea to the Golf above, painted it up to match my first car. Needs door mirrors, but now the driver’s seat has come loose 🙁
Bandai 1/72 X-wing fighter - primed but two of the laser cannons have broken off 🙁 I blame the cats
MiniArt 1/35 diorama - stalled as it’s not particularly interesting to build
Here’s another one I’m calling finished. I may have overdone the mucky windscreen...
Tamiya 1/35 WWII US 6x6 2.5t truck


built pretty much OOB but with additional oil drums & Jerry cans and plenty of ‘mud’
And another one...
Airfix 1/35 T-34/85 pictured as captured from the Hungarian army by the rebels during the uprising of Oct-Nov 1956. I think the turret needs a bit more weathering


Should have cleaned up the seams on the external fuel tanks too
@johndrummer that truck is great, I really like the weathering on it! The T34 looks like you lost interest in it and rushed the weathering stage? When I do that I leave it and go back to it after a couple of months doing other kits, I go back to it with fresh eyes.
I finished my Me109 G-4 in two weeks, I don't think I've completed one that quick since I was a kid. I'm quite happy with it apart from one thing that went wrong, if nobody notices it then I'll have gotten away with it! 🤔
[url= https://i.postimg.cc/MHhjJ7vP/IMG-20201004-223440.jp g" target="_blank">https://i.postimg.cc/MHhjJ7vP/IMG-20201004-223440.jp g"/> [/img][/url]
[url= https://i.postimg.cc/Qtd7QN2b/IMG-20201004-223507.jp g" target="_blank">https://i.postimg.cc/Qtd7QN2b/IMG-20201004-223507.jp g"/> [/img][/url]
[url= https://i.postimg.cc/TwNDCMGX/IMG-20201004-223549.jp g" target="_blank">https://i.postimg.cc/TwNDCMGX/IMG-20201004-223549.jp g"/> [/img][/url]
[url= https://i.postimg.cc/yxJSGQY3/IMG-20201004-223612.jp g" target="_blank">https://i.postimg.cc/yxJSGQY3/IMG-20201004-223612.jp g"/> [/img][/url]
[url= https://i.postimg.cc/25wvLLKy/IMG-20201004-223646-1.jp g" target="_blank">https://i.postimg.cc/25wvLLKy/IMG-20201004-223646-1.jp g"/> [/img][/url]
[url= https://i.postimg.cc/9fVZfY1s/IMG-20201004-223748.jp g" target="_blank">https://i.postimg.cc/9fVZfY1s/IMG-20201004-223748.jp g"/> [/img][/url]
The T34 looks like you lost interest in it and rushed the weathering stage?
yeah, pretty much. Turret needs work, fuel tanks need work too
Lovely 109, can’t see any problems with that
yeah, pretty much. Turret needs work, fuel tanks need work too
Friday afternoon job? 😂
Lovely 109, can’t see any problems with that
Keep looking
Is it supposed to have the machine gun barrels poking through the cowls?
I've never seen one without them poking through, but that doesn't mean there wasn't a variant like it.
Is it supposed to have the machine gun barrels poking through the cowls?
No, the guns are there but very small. The left one sticks out slightly but the right one is just inside the hole, the gun mountings are staggered to enable them to fit under the cowling.
Undercarriage fairings on the wrong legs? Could be just the photo angle. But I’m clutching at straws as it looks great.
Undercarriage fairings on the wrong legs?
No, looks like I got away with it!
It's s the decal on the L/H side, the '16'. It looked great after a matt clear coat of Alclad II and I was really happy with it. I like to finish off with a dusting of ground pastels to blend everything together, but for some reason it made the decal carrier film show up, just on that one though. It was invisible after the clear coat, I should've stopped there! 😭
For those of a certain age...
I can’t see anything dodgy on that 109, it’s very nice.
I’m waiting on some paints - a) modern Russian armour and b) USAF Vietnam era aircraft.
Given up on the T-34/85.
Russian SAM vehicle next up, plus a Hasegawa A-7D Corsair II to paint in 1/48 When the ‘nam paints arrive
Harry the Spider I remember the cartoon but had to google what it was called though.
Science Ninja Team Gatchaman
IIRC the little one spoke a bit funny.
Hasegawa A-7D Corsair II to paint in 1/48 When the ‘nam paints arrive
Nice, I've got a 1/48 F105 to do in SEA scheme. I keep putting it off though as its bloody enormous, especially next to the WWI Albatross I've just restarted!
I'm after an F4E to do in Israeli colours if anyone sees one?
I think Model Hobbies have an Italeri F4E in 1/48
Yeah, here you go : https://www.modelhobbies.co.uk/italeri-148-f-4e-phantom-ii--2770-88919-p.asp
Decals should be available aftermarket: https://www.scalemates.com/kits/skys-decals-48-007-israeli-f-4-phantoms--1109341#
Next one up: Meng 1/35 Russian 9K37M1 BUK mobile SAM system. No interior so it [i]should [/i] be quicker than the T-54 I did earlier...
1) working Torsion Bar suspension:


2) it’s big. About 30% longer than a T-34/85:


More to follow...
BTW this is just the [i]lower[/i] hull. Missile carrier/launcher sits on top of this in the same way that a turret would on a regular tank


The rear end:

Top view:

Front end:

I haven’t put the crew visor asssmbles in yet, will do those after the paint job
Next up - the tracks !
4x sprues of 56 links, plus pins to make working tracks

@johndrummer that mobile Sam system looks a beast, do you keep all of your completed kits or just the best ones, I'm running out of space.
I'm not going to pull the trigger on that Italeri F-4E, I'm going to hang on for the Zoukei Mura one that's due out soon. The price is a killer though!
While I'm waiting for the Phantom I've resurrected a kit I started in 1995, the Eduard 1/48 Albatross DV. Its an absolute dog of a kit, the difference between this and their 109 I've just done is light years apart! I'm determined to finish it despite hating it, I'll fight it to the end. It didn't help that I decided to anneal the etched set in it with a blowtorch as I thought it would be quick, it certainly destroyed most of it quick and I had to buy another set (a different one though). The story so far...
[url= https://i.postimg.cc/zfzDwTdQ/IMG-20201011-194032.jp g" target="_blank">https://i.postimg.cc/zfzDwTdQ/IMG-20201011-194032.jp g"/> [/img][/url]
[url= https://i.postimg.cc/g2qk6gKR/IMG-20201011-211601.jp g" target="_blank">https://i.postimg.cc/g2qk6gKR/IMG-20201011-211601.jp g"/> [/img][/url]
[url= https://i.postimg.cc/8zVz52LN/IMG-20201011-211710.jp g" target="_blank">https://i.postimg.cc/8zVz52LN/IMG-20201011-211710.jp g"/> [/img][/url]
[url= https://i.postimg.cc/RVt0vS6g/IMG-20201011-221223.jp g" target="_blank">https://i.postimg.cc/RVt0vS6g/IMG-20201011-221223.jp g"/> [/img][/url]
I do keep them all, unless really poor (eg my 1/72 Airfix 190A). They do end up boxed up & in the shed after a while. That might not be happening to the later beasts though. Thing about tanks, even in 1/35, they do fit nicely in a shoebox, for the most part. I suspect the SAM thing will need a bigger box. E.g. a DrMartens box
That Albatross does look like it’ll make a fine model, even if you do have to wrestle it a bit. I’m not keen on anything with rigging so biplanes, WWI monoplanes & sailing ships are off my radar for now
The SAM system is actually coming together quite quickly, I think I’ve got the lower hull done in 3 nights. Thankfully no interior...
Until I start on the tracks
I’m not keen on anything with rigging so biplanes, WWI monoplanes & sailing ships are off my radar for now
I'm not a fan of those kits you listed but I'm going through a bit of a masochistic phase at the moment, I bought the 1/48 Airfix Walrus last week!
Some more WIP photos of my 1/35 SAM system:
Working suspension:

Part finished track:


https://i.imgur.com/pJ2F7Zy.jpg
Individual links, held together with pins on one side & glue free. Mostly. Some didn’t hold on their own so had to be glued. A pain to build but very nice
Little jig to help build the tracks:

https://i.imgur.com/VUBc6tL.jpg
4 sprues of track links & joiner pins:


Yes, I know I haven’t plumbed the hoses in, and I haven’t finished the tracks or the crew compartment visors...
Found a good mossy log for my 1/76 Panzer.
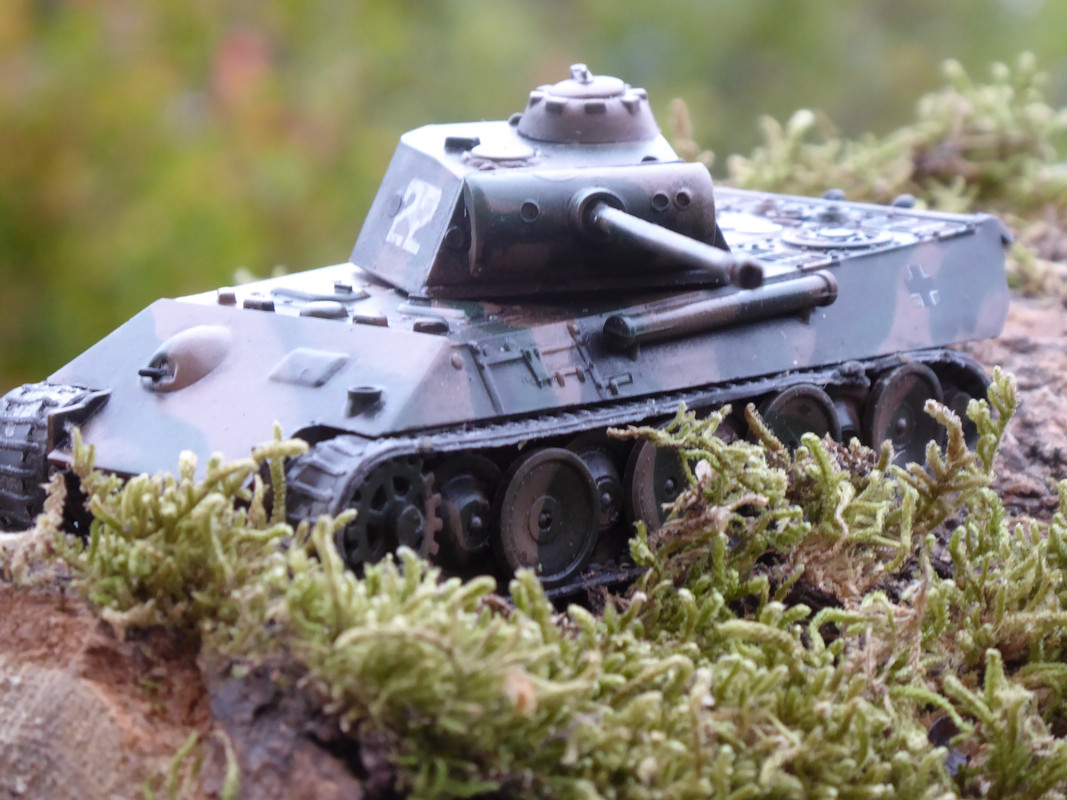
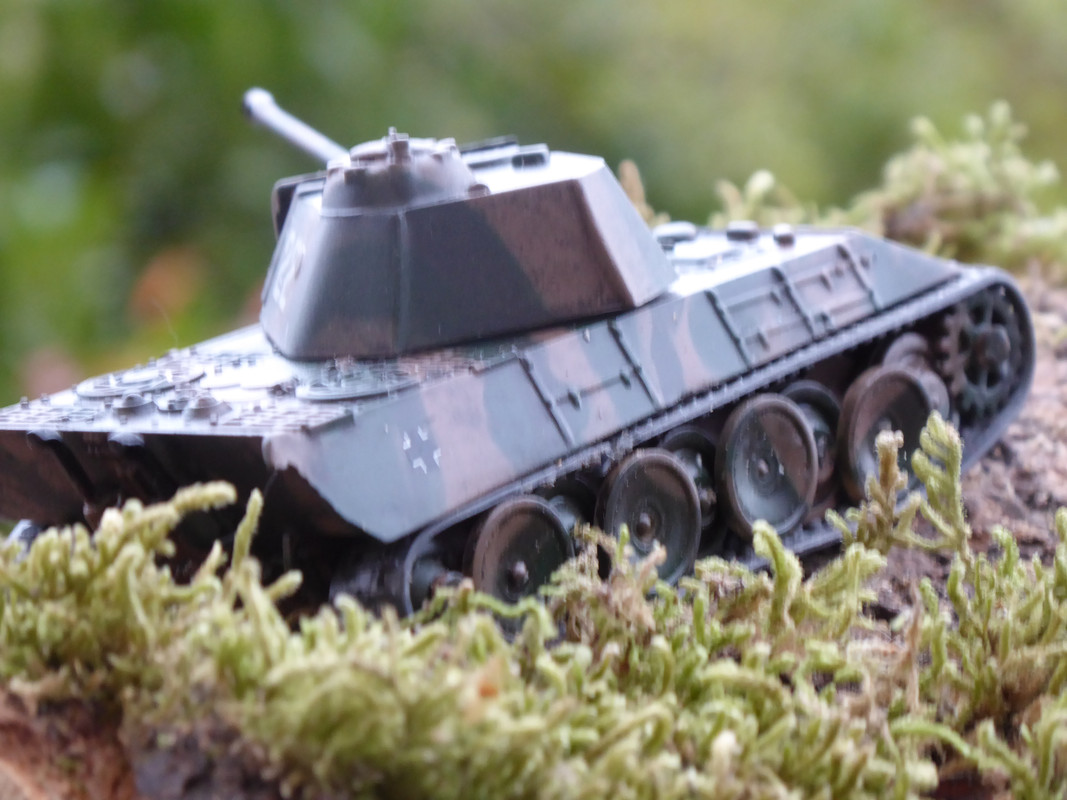
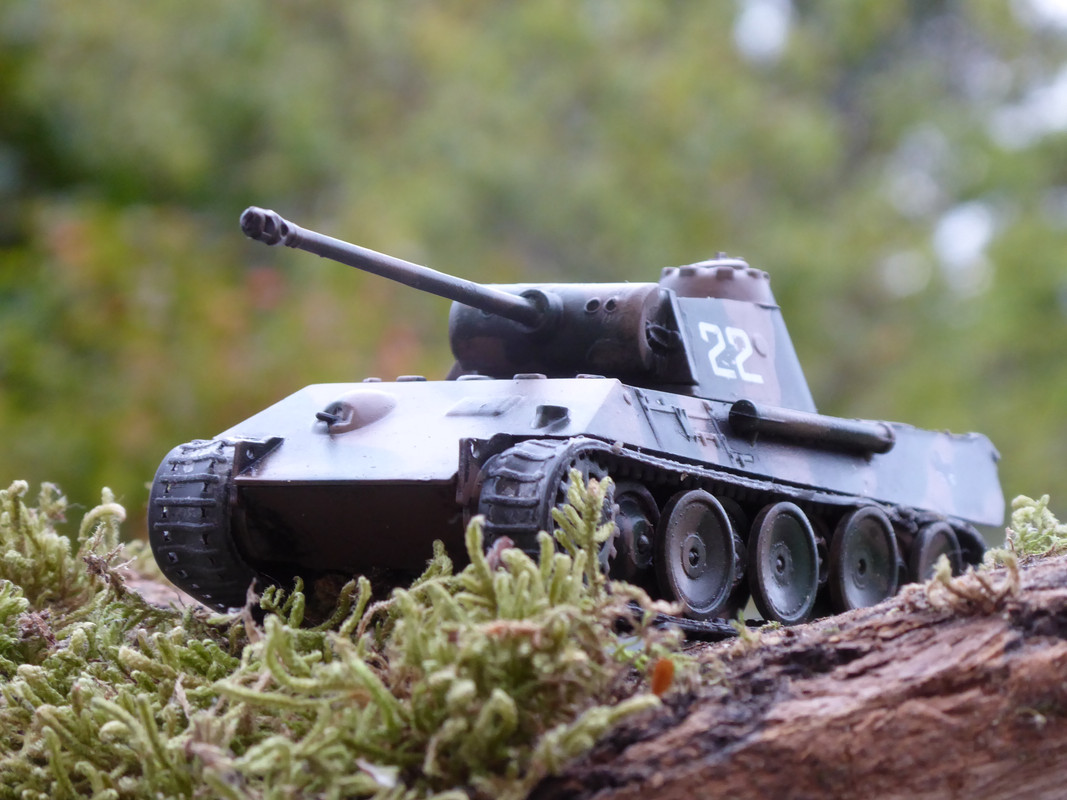
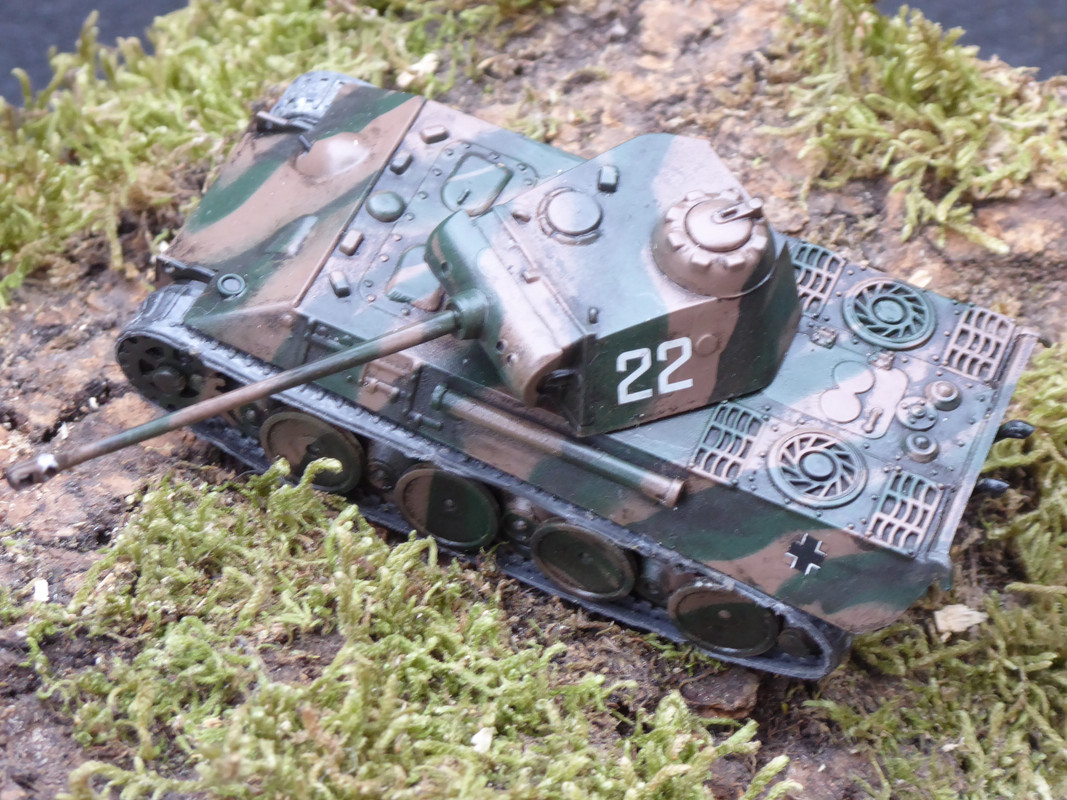
Nice. I can’t work at that scale, almost
Cheap one from my LMS so that I could try Blutac Worm Technique.
Done and dusted in about 2 hours.
It normally hides in the kitchen until my wife finds it. Then I have to re-hide it.
Going to keep the log and put a Typhoon flying over it.
Well here's another one. Airfix Whitley GR MkVII 1/72. Mostly went together very nicely - the exception being the bomb bay doors which are a rotten fit if you leave them closed and have no method of location at all if you want them open - hence a slightly bodgy 1/2 and 1/2 approach. Still haven't got dipping transparencies sorted, not helped by getting overspray inside the turrets. <<sigh>>. Still - it looks OK from a normal distance.
[img] https://live.staticflickr.com/65535/50498503177_1292314abe_k.jp g" target="_blank"> https://live.staticflickr.com/65535/50498503177_1292314abe_k.jp g"/> [/img][/url]
[img]  [/img][/url]
[img]  [/img][/url]
[img]  [/img][/url]
[img]  [/img][/url]
[img]  [/img][/url]
@countzero - thanks for the praise (we are not worthy etc). That's mostly Airfix to blame for the Wellington interior and the moulding of the geodesic framework in the wings, with some help from Flory washes and some luck! (and a decent camera and a copy of Lightroom)
That is very nice JonEdwards
I’m on tracks at the moment. Wish me luck
That is very good!
Such an odd looking plane.
Tracks finished 🙂
Primer next
Once again my contribution to this thread is not a proper scale model, but a converted tank for a game of plastic toy soldiers. Specifically this is Gerti, an Imperial Guard armoured recovery vehicle that I converted from Warhammer 40,000 Chimera APC and Galvanic Servouhauler kits:

I have a Flickr album containing more photos, including WIP shots.
I think that I am less bothered about getting everything "right" when I paint gaming stuff than when it was taking me months to finish even the smallest scale model. It's nice to actually be finishing things!
Progress.
I'm doing the Revel version but brush painting. Having trouble with the decals though. Soaked in DecalFix and brushed the paintwork first but on the engines they have bits round the edge that don't stick and form ridges. Tips please!
Did you give it a coat of gloss before doing the decals?
That’s the only other thing I can think of
Yep. Gloss and and perhaps an application of diluted PVA.
Hmm. Sometimes you have to be very careful with a very sharp blade
No gloss, it's a matt finish. Is there some clear varnish I should be using?
No gloss, it’s a matt finish. Is there some clear varnish I should be using?
Yes. The gloss coat gives the decals something to purchase onto that'll prevent air bubbles from causing the silvering that you often get by applying decals onto a matt surface. I swear by ordinary Pledge floor polish, followed by a second coat of pledge to seal the decals in. After that you apply a matt varnish to get the finish that you're after.
I use either Tamiya or Revell gloss clear acrylics as a base for decals & pin washes, then another coat on top, followed by a Matt or satin coat if it’s a military vehicle/aircraft/boat.
I’ve started using Ammo by MIG and Vallejo acrylics too. No gloss or Matt varnish from them yet.
Tamiya thinners tend to work with everything except Humbrol, for which you need their own brand. So I try to avoid
I use Alclad. It works for me.
Whilst on this subject... Does anyone use Pledge with an airbrush? If so, how do you clean the airbrush afterwards?
No, but if I did I’d first soak it in warm water , then clean it as normal with airbrush cleaner
Whilst on this subject… Does anyone use Pledge with an airbrush? If so, how do you clean the airbrush afterwards?
Yes. I usually thin with either Tamiya thinner or water, as Pledge will puddle and dry quickly. Afterwards, I disassemble my airbrush and soak in soapy water before reassembling and blasting it through with a tiny amount of Humbrol cellulose thinner.
If Pledge is approximately the same stuff as the Johnson's Klear or Future everyone swore by a few years ago then ammonia is your full-on option for cleaning it up. Preferably in a form other than neat ammonia, unless you have a lot of filtering and ventilation on the go.
In an attempt to do something different during dark evenings, I've a kit on the way.
I've helped my kids do a few, I've done a few as a kid. We've got knife, paintbrushes, glue, some random spare colours from Warhammer and airfix kits...
However, top tips and sources of any extra items I need, without investing lots of money on case I'm a dufus at this.
Filler, sanding sticks, a tin of primer and reading glasses!
What kit did you get?
I've got in to the habit of reading books and making associated kits.
Tempest V and The Big Show
Lancaster BIII Special and Dambusters/Enemy Coast Ahead
Martin Maryland/Macchi 205/Spitfire Vb Trop' and Fortress Malt/Warbutron's War
Sea Harrier / GR3 and Hostile Skies
However I read faster than I build so my book about the Falklands is accompanied by a WWII Martin Maryland.
And an A10. And a Victor K2. And an SU35.
Playing catchup, sorry.
Harry the Spider I remember the cartoon but had to google what it was called though.
Science Ninja Team Gatchaman
It was Battle of the Planets in the UK (and US). And that model is awesome.
The original Gatchaman had some pretty dark themes. The reason BotP was bookended with those awful 7-Zark-7 segments in a clearly different (and terrible) animation style obvious even to 8-year old me was to backfill all the bits they had to crop out to make it child-friendly. Notably in the original story Jason had a brain tumour, in our sanitised version it closed with an 'and then he had a nice cup of tea and a sit down and it was all OK' sort of handwave.
However, top tips and sources of any extra items I need, without investing lots of money on case I’m a dufus at this.
And some Microsol decal setting solution.
What kit did you get?

