![]() You don't need to be an 'investor' to invest in Singletrack: 6 days left: 95% of target - Find out more
You don't need to be an 'investor' to invest in Singletrack: 6 days left: 95% of target - Find out more
Just a wee PSA - the hose reel used for my wort chiller from [url= http://www.tesco.com/direct/tesco-10m-micro-reel-garden-hose-with-spray-gun/577-4001.prd ]Tesco[/url] is reduced in my local tescos from £10 to £7. Might help you grum.
So been doing some more research on beersmith giving me dodgy volumes and as PF correctly guessed i am 99% sure its too little strike water to start with. Off to do some good old fashioned troubleshooting!
so i think ive found the issue.
part 1: for full BIAB in BS they recommend changing the grain absorbtion rate for no sparge.[url= http://beersmith.com/blog/2014/01/11/no-sparge-beer-brewing-for-all-grain-brewers/ ]Last Paragraph[/url]
This added c. 1l to the initial mash volume - see below
part 2. When printing a recipe from BS2 or viewing the ipad version, you might see a figure quoted saying total water needed, but only in the desktop version (that i can see anyway) is the correct figure of mash volume needed (shown in green) visible. This is where i've been mashing with 1.5- 2l too little of water and because my volumes are off my mash efficiency has been off too, leading to low pre boil OG.
[img]  [/img]
I've emailed the creator or beersmith for ipad to see if this is shown somewhere, because when i look at either a printed recipe from desktop (i've linked to at least one up there^) or the ipad version, i've incorrectly been taking the first stage of the mash -the saccharification process- as the strike water volume. oops 🙂
If i'm being thick please let me know, otherwise i'll update you with what Brad says!
Cheers
David...that looks right.
Sorry for not getting back to your email, my yahoo account has been a pain and can only be accessed from my iphone at the moment, so attaching anything is a pain.
I'm waiting on delivery of a thermapen since the £2 thermometer that came with the massive brewery kit has finally given up. I now think that it may have been out by 2 degrees though, which means my mash temperatures were about 2 degrees too warm (which could explain being a bit high on a few of my FGs).
Hey PF, no worries on the email, you hit the nail on the head originally so i think the kit profile was / is ok. The thermapens seem to get a good review. My Amazon freebie (ordered a thermometer not realising it would come from US, cancelled it same day and it arrived anyway)started saying it was 62 degrees in my kitchen at the weekend. i need to check it out and re calibrate / poss new battery, but i do fancy a thermapen with the probe. so many gadgets so little time!
Monitoring the temperature of the mash is tricky IME with BIAB - don't know what others think? Always feel like it's quite a rough approximation, esp with a large volume. It's a v heterogeneous mixture that must have a lot of temperature gradients throughout the mash body.
I always think changing the mash temp accurately would be v hard, so I tend to hit temp and hope!
think i've got my first dodgy batch 🙁 took a gravity reading of my SNPA clone last night and whilst i definitely recognise flavours of SNPA there, there is also a distinct vinegary smell from it. I did wonder if the brew was a bit off as the smell from it during the early days was a bit more pungent than usual.
in good news it hit the FG bang on the money though 🙂
I have nobody but myself to blame as i topped up again with tap water and didn't sanitise my dropper when taking my OG post boil, so an expensive lesson to learn but it reinforces the need for good practice. I'll bottle it anyway as i think it was quite drinkable from the sample i had and going to brew another using the correct mash volumes this weekend to avoid having to top up.
YLAL!
On the one occasion when a load of tap water made it into my cooling wort (due to my leaky chiller), the batch tasted awful when I bottled and didn't get any better.
That said, definitely bottle it. I bottled a black IPA a couple of weeks ago which tasted a bit dodgy as I was bottling it, however 2 weeks later and it's incredible.
Give it time...you'll know in a couple of weeks if it really is a bad one!
yeah i see the consensus is bottle it and give it time, so i'll do that and see. I'm a bit gutted that its not awesome and no issues, but it was only my 2nd BIAB and i knew i was playing with fire by adding water. the OG was 1.078 beforehand though so i'm not sure what would have happened if i'd not topped it up - higher abv i guess?
In any case i have found the reason why i was off with my volumes so i'll rectify that and see what this batch turns out like. I'm not sure if its the placebo effect but i did think beyond the slight tang that there was identifiable flavours of SNPA.
If you hadn't topped up water it would have had a higher ABV, more body and it would have given you fewer bottles obviously.
The more I brew, the more I realise that good beer is simply the result of getting all your processes right, and dialling them in is a bit of trial and error, so you're just another step closer to consistently good beer!
I think I just brewed my 25th batch. The difference between batch 1 and batch 20 is huge...but the difference in the last 5 batches has been even greater.
At first, it seems like there's so much going on, never mind looking at water chemistry, playing around with the mash and fermentation temps etc. But gradually you get familiar with each individual part and are able to tweak it and understand what each of those tweaks are doing to the finished beer.
In all honesty, it's one of the most interesting and satisfying hobbies i've ever had. The more time I spend researching and brewing, the more I seem to enjoy it. The fact that I get a crate of free beer at the end of it is a major plus too!
50% science, 50% art IMO. Perfect!
Think you hit the nail on the head with that post above Peter!
Just bottled up batch 3 of the original massive brewery recipe. Whilst it is good, it is not dissimilar to micro brewery stuff I can buy here. I want to make something that reminds me of Sheffield!
Can anyone help with a simple recipe?
I have:
2.5kg Maris Otter
2kg Crystal Malt
300g E Kent Goldings
150g Phoenix
1 pack Mangrove Jack's M44 US west coast yeast
2 packs Mangrove Jack's M07 British Ale yeast.
Must get round to getting to grips with beersmith...but I want to get a brew on before heading to Turkey for 4 weeks with work.
Thanks in advance!
If you want consistent results without the faff of water chemistry then get some Gypsom and use the Tesco Ashbeck water only about £1 for 5 litres
and add some gypsom to the mash and some to the boil
1 teaspoonful in each for a 23 litre batch so you should be able to down scale
no worries about the chlorine either
And looking forward to work tomorrow as doing some flooring at the Saltaire Brewery 😀
I'm helping out at a micro brewery tomorrow, 1000L batch of Pale Ale 🙂
Allthepies- I'm jealous!!!
Get some pics!
Trout - how does that work if you're brewing an IPA v a stout? As I understand it, a profile that is good for one isn't necessarily good for the other?
from a well respected brewing guru called Aleman
[url= http://http://www.forum.craftbrewing.org.uk/viewtopic.php?f=44&t=907 ]water treatment [/url]
mugsys...I don't have access to brewsmith right now, so can't give quantities until later, but how about this for a general brewing plan:
Brew 1 - just Maris Otter and some Goldings
Brew 2 - Maris Otter, a bit of crystal and some goldings
Brew 3 - Maris otter, some crystal, some goldings and some phoenix
That way you get to taste the difference that each ingredient makes to the finished beer. You could even keep some bottles from each batch aside and do some side by side comparisons?
There are programs out there that are easier to get on with than beersmith (you could even try the iphone version?). Beer Alchemy is pretty good, but try it for free first.
I've been brewing every 2 weeks for quite a while now. Currently got an Oatmeal Stout, Citra/Centennial IPA, Black IPA, Cascade Pale ready and drinking...another pale due to be bottled at the weekend and an amber in the fermenter. There's also an RIS and DIPA in the loft that have been conditioning for abotu 9 months or more.
Hmm that sounds a very good idea. For the maris and goldings, how about same quants and strike temps etc as per the massive brewery recipe just swapping out the phoenix with the goldings?
Yep, that will work no problem at all.
If at all possible, use the same yeast across the batches.
Sit down in a couple of months with a glass of each batch and compare.
My first few batches were too complicated because I got so excited (my second brew was an Old Peculier clone!), but you learn very little. As soon as I went back to basics with ingredients it made a world of difference in terms of understanding what each component of the brew does.
Another useful experiment (if you have a spare fermentation vessel) is to split one of your batches in half when you're about to pitch the yeast. Stick one strain in one fermenter and a different strain in the other. Do a similar comparison and you'll see how each yeast strain affects an otherwise identical wort.
trout, I can't seem to get that link to work?
Just checked, my tap water is actually remarkably close to Ashbeck anyway (first figures are mine, second are Ashbeck):
PH 5.86 v 6
Nitrate 3.8 v 23
Chloride 7.35 v 14
Calcium 7 v 10
Magnesium 1 v 2.5
Sulphate 11.66 v 9.9
[url= http://www.buckscc.gov.uk/media/137448/food_water_survey.pdf ]Linky[/url]
Another great idea re. splitting the batch.
Can do that no worries.
Thankyou so much!
Off to put my climbinh kit away after a damp bivvy on the s side of the Barre des Ecrins and an aborted attempt on the S_N traverse.
Are there any alternatives to the Massive Brewery kit?
They are out of stock and I've emailed asking when they will next been in stock but not received a reply as yet.
I did a list of links for a mate a wee while ago that's very similar to Massive Brewery kit but will allow you to do a full boil (ie no faffing about with a dunk sparge) and get 10l into the fermenter rather than 8.
Let me dig out the email and I'll post it up.
You could put together your own kit with bits off eBay for around the same price. The Massive kit is great for getting you started & convenient but tbh I upgraded everything in it bar the chiller (which is really well made and seems great value compared to what people are selling on eBay) before too long. Obviously you could make your own chiller though (see a few pages back in this thread!)
As peter says you'd probably want a bigger stock pot anyway, and the grain bags & thermometer that come with the Massive kit are crap.
Cheers peterfile, email is in profile.
Did my approx 10th brew last night - a Belgian one for the first time! Getting pretty confident with the basic process (including water treatment) and consistently hitting my target numbers now so starting to experiment with other factors now. Did the mash a little bit higher as this apparently produces a drier beer (for the Belgian style). Will be adding some candi sugar as fermentation dies down a bit as well.
Also have stuck the FV in a water bath for the first time to keep the temp down. (Live in a flat and space is limited unfortunately otherwise I'd definitely have a dedicated brewing fridge or two!) My last two bitters with S-04 yeast were definitely fermented too warm as they had "unwanted" (although not unpleasant) flavours. Porters were better as the stronger flavour masked these (if they were there at all). Pale ales with US-05 yeast fermented side-by-side tasted great though so I guess that yeast is less temperature critical?
stu, here's the list
19 Litre stock pot: £26 http://www.ebay.co.uk/itm/160901418854?_trksid=p2059210.m2749.l2649&ssPageName=STRK%3AMEBIDX%3AIT
10 litre fermentation bucket x 2: £11 http://www.amazon.co.uk/Litre-Fermentation-Vessel-Bucket-airlock/dp/B0047UTPS2/ref=pd_cp_kh_0
Little bottler and tap : £7 http://www.amazon.co.uk/Little-Bottler-automatic-bottle-filler/dp/B0041XM36Q/ref=sr_1_2s=kitchen&ie=UTF8&qid=1408015412&sr=1-2&keywords=little+bottler
Hydrometer: £4.50 http://www.amazon.co.uk/Home-Brew-Wine-Making-Hydrometer/dp/B005LVQA1G/ref=zg_bs_3579743031_22
Thermometer: £2 http://www.amazon.co.uk/DIGITAL-KITCHEN-THERMOMETER-COOKING-TURKEY/dp/B007CJR67C/ref=zg_bs_3579743031_1
Straining Bag: £5 http://www.amazon.co.uk/Large-Nylon-Straining-Bag-Fine/dp/B0026X6LLG/ref=zg_bs_3579761031_19
Hop bags: £3 http://www.amazon.co.uk/Muslin-Bags-Pack-of-10/dp/B0026WXMR8/ref=zg_bs_3579743031_19
Wort chiller: £35 http://www.ebay.co.uk/itm/Immersion-Wort-Chiller-Copper-Homebrew-Micro-Brewing-Real-Ale-25-33Lts-/331274716366?pt=UK_Home_Garden_Food_SM&hash=item4d218304ce
Bottle capper: £12 http://www.ebay.co.uk/itm/Youngs-Home-Brew-2-lever-Beer-Bottle-Crown-Capper-Sealer-26mm-Diameter-Bottles-/251561207897?pt=UK_Home_Garden_Food_SM&hash=item3a92376859
Total cost: [b]£106[/b]
Slightly better than the MB kit (IMO in that you get a full boil, more wort into the fermenter, less chance of boil over, ability to brew higher gravity beers, a proper way to bottle (little bottler), and a proper capper).
IMO, you'd also be wise picking up some Star San (it's about £10) and if your budget can stretch to it, get a better thermometer (I recently bought a thermapen and discovered that my original thermometer was 2 degrees out!!!).
+1 on the Thermapen, you can get a refurbished one direct from the manufacturer (ETI) on eBay for a decent discount. The cheap thermometers take an age to take a reading and are guaranteed to break at the most inconvenient time!
+1000 on Star San, makes life so much easier.
(Live in a flat and space is limited unfortunately otherwise I'd definitely have a dedicated brewing fridge or two!)
I had a similar issue at mrs pf's house.
I bought a small wine chiller (it doesn't have a compressor so is almost silent, uses very little electricity, has a glass front door and doesn't need as much ventilation).
Kitted it out with an STC 1000 thermostat and a 60w greenhouse heater. I can hold any fermentation temp I want down to about 10 degrees (so no lagering, but that doesn't bother me).
It fits a 10 litre FV perfectly.
Best thing was...mrs pf had one of these in the corner of the room...
[img]  [/img]
While she was out, I removed the panel facing the wall, and adjusted the rest of the box slightly so that it would fit perfectly around the chiller (I had specifically sourced the chiller for this purpose).
I put it back together, plugged it in and pushed it back into the corner of the room.
I left it for a week before telling mrs pf so that she had no excuse to say it was noisy/unsightly etc! She hadn't even noticed it.
Chiller was £20 from gumtree
STC 1000 was £15
Greenhouse heater was £10
So I've got a fully functioning, stealthy fermentation chamber for under £50 🙂
something like this?
[url= http://www.currys.co.uk/gbuk/household-appliances/refrigeration/wine-cooling-mini-refrigeration/essentials-cwc15b14-wine-cooler-black-21904558-pdt.html ]http://www.currys.co.uk/gbuk/household-appliances/refrigeration/wine-cooling-mini-refrigeration/essentials-cwc15b14-wine-cooler-black-21904558-pdt.html[/url]
Yes, pretty much. Just make sure it's thermoelectric cooling rather than traditional fridge cooling (easy way to tell - if you can't see anywhere a compressor might be hiding, it's probably thermoelectric)
Also, have a look on gumtree/ebay since you can pick some slightly grubby ones that have been in people's garages for very very cheap (no one seems to want a grubby wine chiller!).
Just check that it doesn't have a built in shelf or similar. You'll want the full space available. That's why the small beer fridges don't work very well - they've got a shelf at the bottom that the compressor sits behind, wiping out much needed space.
US-05 yeast fermented side-by-side tasted great though so I guess that yeast is less temperature critical?
possibly. I believe this is the "Chico" strain from Chico, California, as used in Sierra Nevada Pale Ale. granted SNPA will be brewed in properly temperature controlled conditions, but I wouldn't be surprised if the original wild yeast is a bit more temperature tolerant than say a German or Czech lager yeast
Thanks, will scour ebay/gumtree!Also, have a look on gumtree/ebay since you can pick some slightly grubby ones that have been in people's garages for very very cheap (no one seems to want a grubby wine chiller!).
Yeah I've considered mini beer fridges in the past but they've never seemed big enough/the right shape for an FV. Never even thought about a wine chiller for some reason!Just check that it doesn't have a built in shelf or similar. You'll want the full space available. That's why the small beer fridges don't work very well - they've got a shelf at the bottom that the compressor sits behind, wiping out much needed space.
Interesting, thanks. It's definitely my favourite yeast so far out of the ones I've tried. Cracked open the first bottle of a new batch made with it yesterday while I was brewing - it's the first beer so far I've managed to make which was properly clear (and tasted great) so pretty happy!possibly. I believe this is the "Chico" strain from Chico, California, as used in Sierra Nevada Pale Ale. granted SNPA will be brewed in properly temperature controlled conditions, but I wouldn't be surprised if the original wild yeast is a bit more temperature tolerant than say a German or Czech lager yeast
If I am doing 1/2 the batch with 1 yeast and 1/2 with the other, shall I still use all the yeast packet in each? i.e. is 1 packet per 4 litres really pushing it and asking for trouble?
Overpitching to the extent that it has a negative effect on the beer is normally quite difficult, but from memory there's about 200 billion yeast cells in an 11g dry yeast pack (i'm assuming yours are 11g?).
mrmalty calculator says you'd only need 2g of dry yeast for 4 litres at 1.048, so 1/2 a pack is around 5.5g...almost triple the recommended pitching rate.
If you're able to eyeball 1/4 of a pack it would be better, but I wouldn't be too worried if you put a bit too much in...just try to avoid dumping a whole pack in 🙂
How accurate are your scales? Weight the pack, tip a bit of yeast into the wort, weigh again...repeat until it's 2-3g lighter than when you started.
sounds a bit of a faff to me. but then I do 19-23 litre batches & a whole pack of yeast is just fine & dandy
I must admit I do like US05, but that's mostly because I like the American style ales. I do like other styles too...
I use a narrow range of yeasts, not [i]that[/i] fussed about getting the [i]exact[/i] yeast that the original brewery uses:
American style ales / British IPA - US05
English bitters - S04
Stouts & Porters - Danstar Nottingham. Needs rehydrating in 100ml of tepid water before pitching
come October I'll be trying a Peroni clone, so I'll use Saflager for that & fermenting in the shed
I saw an ad at the back of good food magazine offering 20% off a thermopen from the manufacturers site. Might need to dig it out and share if its a decent price compared to the refurbs etc. My freebie electronic thermometer went haywire during my last brew (as expected 🙂 ) so come the end of the month i'll be buying a few more toys 🙂
currently on a detox so no beer for me (which is proving tough!) but i've brewed two SNPA clones so far. One was suspect (i thought it was contaminated) but is drinkable and has notes reminiscent of the SNPA original. The one thing that didn't seem to work was batch priming, so i've reverted to bottle priming for the v2. Not sure why but the first few bottles i opened were a bit flat, so i assume there isn't enough sugar in those bottles. Will see what the rest of the batch is like soon.
V2 was only bottled a week ago, so i've yet to see what that is like. I'm hoping its an improvement but this was the first batch where i'd changed the water volume and actually put in a bit too much this time, so OG was a bit low. FG came out at 1010 though after 3 weeks in the fermenter so i'm hoping it will be ok.
Need to get the brew on this Sunday i think, give me something to take my mind off food!
Glad you're having fun David 🙂
How much sugar did you use for your batch priming? I find it works wonderfully. For 9 litres (bottling volume), 2 volumes of co2 takes about 45g of sugar. I boil it up in some water, let it cool, dump it into the bottling bucket and then rack the beer on top of it. I always have even carbonation throughout the batch.
How long are you leaving them to carb and at what temp? I tend to leave them for 2 weeks at room temp before bothering to check and I've yet to have a batch that haven't properly carbed.
Amazon have the thermapen for [url= http://www.amazon.co.uk/SuperFast-Thermapen-professional-thermometer-Green/dp/B005Z02NI2/ref=pd_sim_kh_4?ie=UTF8&refRID=17Q4KDFHJJG72XYBASD4 ]£37[/url] at the moment. Brilliant wee device, it's only a couple of seconds to take a reading, so no more hanging around waiting for readings.
I bottled a Casacade/Galaxy IPA at the weekend. It tasted incredible, like tropical fruit! But...something went wrong with my auto siphon and I ended up blasting the beer in the bottling bucket full of air 🙁 Fingers crossed it holds up long enough to carb before it starts going stale and I'll just make sure I drink it quickly!
hey PF,
I batch primed by dropping the brewing sugar straight into the secndary and only added 1/2 tsp per bottle for that batch as i would when i was bottle priming, not sure how that relates to grams. That could be the reason for the lack of carbonation if the sugar didn't dissolve properly or there simply wasn't enough.
I carbonate them at room temp for 2-3 weeks first, so that wasn't a problem. I find bottle priming easy enough so i might carry on with it.
just been browsing the ebay site for thermapen, 36 notes for a refurb. tempted!
David, check that amazon one I linked to...it's £37 for a brand new one.
As peterfile says above, the best method is to boil the sugar in a little bit of water. This helps it mix with the beer properly and also would sterilise the sugar. It's also much less hassle than priming each bottle individually!I batch primed by dropping the brewing sugar straight into the secndary and only added 1/2 tsp per bottle for that batch as i would when i was bottle priming, not sure how that relates to grams. That could be the reason for the lack of carbonation if the sugar didn't dissolve properly or there simply wasn't enough.
There is a handy calculator in Beersmith (other tools are available!) for working out how much priming sugar to use. I've found it really enhances the overall feel of the beer to get the carbonation appropriate to the style so this is worth doing properly IMO.
Yeah i dont really know what i was thinking when bottling that first batch by just dumping the sugar in, i can't blame beer though as i wasn't drinking during it! I will look into it in a bit more detail in Bs, now that i've got my head around the issues i had with volumes.
Cheers
Was chatting with my mate over a pint in the local microbrewery about the problem of keeping the beer cool during fermentation. We came up with the idea of some kind of insulated jacket which pumped coolant around (similar to how a liquid-cooled PC would work). A bit of Googling shows there are a few commercially available implementations of this idea although they all obviously contain pipes and a pump so mechanically there are things to go wrong.
Then I found this! Anyone seen it already? [url= http://www.brewjacket.com ]http://www.brewjacket.com[/url].
It was a Kickstarter, but has already been successful and is shipping at the end of the year apparently. Uses the Peltier effect for cooling so has no moving parts. Very energy efficient, is compatible with all FVs and doesn't increase their footprint. Can get the beer very cold as well so useful for layering or cold crashing.
Only drawback really seems to be the cost!
so i went on a bit of a shopping spree at the weekend:
-thermapen (made a booboo PF and didn't realise the Amazon one was new, compared to the refurb on ebay. idiot that i am - shouldn't matter too much)
-a 10l FV (was brewing in my 25l FV and it was a bit overkill)
-refractometer from ebay
-some amarillo, centennial, cascade and EKG hops from brewuk.
going to try a midweek evening brew, possibly a Citra Smash to use them up or maybe something a little more exotic. I still have some magnum and perle hops, but i'm not sure the perle would make a great smash, any experiences?
Also contemplating doubling the brewfridge capacity with a wine chiller 🙂
expensive wee hobby once you start!
To save me reading through the entire thread, what does the cost per pint roughly work out at with home brew? Tempted to give it a go when I'm less busy at home
Hi Bamboo,
I'm sure others will have different figures, based ingredients, size of the batch and cost of kit used, but a basic kit to brew 40 pints is about £20-25 for a reasonable kit. The equipment needed will probably set you back another £60-70, but the cost per pint comes down the more you brew. If you start going into more complex brews than kit brews then the cost of kit goes up and (usually) your batch size comes down a bit so cost per pint increases. Its difficult to put an exact figure on it. I have well over £200 worth of brew kit, but I've only bottled about about 150 bottles in total, so my cost per pint is relatively high. I think PF has brewed >25 batches so his bottle count must be over 250, so per bottle his might be cheaper, although i think he has as much if not more kit than me 🙂
I think most of the brewers on here will say they don't do it to save money though (much like MTB :)) its more about creating your own brews the satisfaction of steadily getting better at it to produce something thats as good as, or better, than commercially available brews.
Give it a go if you can afford the kits, its great fun!
In other news, the thermapen arrived and itsa lot bigger than i imagined! Calibrated 12th July though and looks new, so happy enough with it.
The biggest cost, by far, is your time. Finding it hard to brew at the weekend atm, can't fit the 5 hr block in around everything else.bamboo - MemberTo save me reading through the entire thread, what does the cost per pint roughly work out at with home brew? Tempted to give it a go when I'm less busy at home
On the plus side it's the opposite of labour intensive - you can do other things whilst a brew is on, you just need to be there to tend to it at certain critical junctures.
It was a Kickstarter, but has already been successful and is shipping at the end of the year apparently. Uses the Peltier effect for cooling so has no moving parts. Very energy efficient, is compatible with all FVs and doesn't increase their footprint. Can get the beer very cold as well so useful for layering or cold crashing.Only drawback really seems to be the cost!
I read all the info and thought "brilliant!" and was about to order three to allow me to store fermenters in some awkward places.
So, pre ordering three would cost me $900. Are they having a laugh?
I built a peltier effect brew fridge for £50.
Nice idea, but £200 per fermenter????!!!
Also contemplating doubling the brewfridge capacity with a wine chiller
David, check [url= http://www.homebrewtalk.com/f51/fermentation-chamber-485840/ ]this[/url] out.
Great idea if you've got the space!
[img] 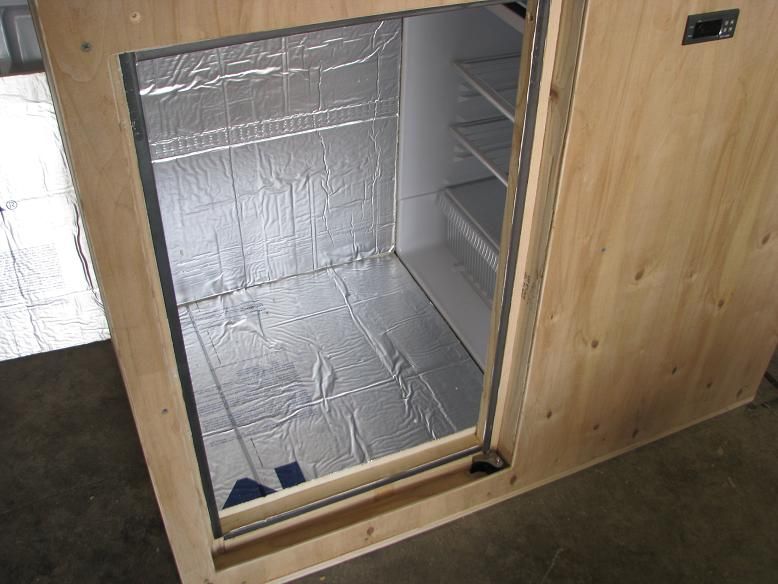 [/img]
so i've got a weekend brewing slot lined up to test some new toys, namely a refractometer, thermapen and a 10l FV. I've also got a handle on my volumes so hoping to make a good brew. Want to make something better than all my previous attempts as i have a memorial weekend in mid Oct for a good mate we lost 2 years ago and i'd like something to be proud to hand out for drinking.
I have loads of MO, most of a kilo of Crystal, some perle, magnum and Citra hops in the freezer and new 100g packs of amarillo, EKG, Centennial and cascade hops.
Whats does the STW beerhive think i can do that will be simple and good?
On another note a fellow brewer suggested a teaspoon of sugar per 500ml bottle, rather than 1/2 tsp i normally use. How brews did have a much better fizz and head on them. I know carbonation styles vary by volume but what do you guys normally use?
Cheers
Back from my holidays and have unpacked the brewing gear.
I have some new toys too!
Beersmith software
Refractometer
Thermapen
My brewing hasn't been great. I regularly get the starting gravity too low.
Hopefully with these new toys I can monitor what I'm doing and work with it instead of just guessing.
My birthday is in mid November so I reckon I can get two brews ready for a birthday party.
Also, as an aside
If you were re-doing your kitchen is there anything specific you'd add or way of setting things up to aid brewing?
We're re-doing ours in the flat so might as well think about it.
Can't really think of anything...
Is an induction hob better for temperature control than a gas burner?
have loads of MO, most of a kilo of Crystal, some perle, magnum and Citra hops in the freezer and new 100g packs of amarillo, EKG, Centennial and cascade hops.Whats does the STW beerhive think i can do that will be simple and good?
you'll need a few bits more, but try this one, it's a cracker...
(you may be able to substitute Crystal for the Munich, Caramalt etc, and Pale malt for the Wheat Malt & Carahell; Torrefied wheat is optional)
Dirty Celebration Ale - an American IPA in the style of Sierra Nevada Pale Ale.
OG 1057, FG 1011, ABV 6%. Colour 17.2 EBC, bitterness 66.3 IBU
To make 10L you'll need 13L of water in total and you should aim to have 11.5L in the pot before the start of the boil.
You can always add bottled water if it's too high an OG, but if it's too low, there's nothing you can do except boil for longer, which could affect the bitterness
1.88kg Pale Malt
242g Munich I
157g Caramalt
100g Carahell
100g Wheat Malt
47g Crystal
47g Torrefied Wheat (for head retention)
mash for 60 minutes at 67degC, boil for 60 mins
10g Chinook at 60mins
8g each of Amarillo, Cascade & Centennial at 15mins
8g each of Amarillo, Cascade & Centennial at 5mins
8g each of Amarillo, Cascade & Centennial at flame out. (Ideally chill to 80degC then add the last of the hops & then) leave to steep for 30 mins before chilling to pitching temperature
you could also try dry-hopping with another 8g each of Amarillo, Cascade & Centennial in primary, but that [i]could[/i] be overdoing the hops a bit...
depending on how long you leave it in secondary before bottling, I usually add 1/2 a teaspoon of brewing sugar per 500ml bottle. I have left one or two brews too long and had to reprime later to avoid FBS (flat beer syndrome)
Boring question here, but any good ideas for labelling bottles? Am currently using marker pen on the caps, with the date basically. Am wondering if there's any sort of white marker that could work on the bottles and then rub off when no longer needed.
Is an induction hob better for temperature control than a gas burner?
I have no experience of Induction hobs but TBH a steel pot on a gas burner should be fine. If your strike water is 71deg, when you finish adding the grain it should drop to about 67-68. Put the lid on it, turn the heat off and wrap it in towels, it shouldn't lose too much heat in 60 minutes but you can always check it every 10 and put the heat back on if it has dropped below 65. I used to use a 32L steel pan and it would only drop 1 or 2 degrees over a 90 minute mash
I now use a 32L electric boiler with digital control so there's no need to wrap it, the element kicks back in only if it goes 1deg below the set value. One of these:
http://www.morleyhomebrewcentre.com/ucommerce/grains-hops/electrim-digital-mash-bin/c-23/c-121/p-1375
Boring question here, but any good ideas for labelling bottles?
I use self adhesive labels from Staples / Tesco / A N Other stationers. A bit of fun in Paint (other drawing software packages are available) and off you go. They soak off in about 10 minutes. Except on PET bottles, that takes a bit more effort
[img]  [/img]
you'll need a few bits more, but try this one, it's a cracker...
Thanks very much for the suggestion John - need inspiration for a Christmas brew so this might well fit the bill!
In the end i brewed up an amarillo/cascade brew using the new hops and my malts - recipe was from beersmith but i can't find it at the moment. Its due to be dry-hopped tonight so hopefully things are good. I hit the pre-boil OG (1.045) bang on, but the post boil OG was 1.070 when it should have been 1.052 ish. I can't figure out how it inflated so much as i though boil off rates were pretty standard at 1.2l /hr
anyway, using my new toys:
1. the thermapen is superb - my other therms were about 1.5 degrees out. although worryingly it said my mash temp was down at 59 degrees at one point, but i dont think i was getting an accurate reading. now investigating ways to insulate my mash in the pot better 🙂
2. the refractometer was dead easy to use and so much less hassle that the hydrometer. i calibrated it with deionised water and it seemed to be ok. wondering if there is a way of using it to measure OG after fermentation? the hydrometer is a chore to use compared to this!
3. now seriously exploring PF's link above about extending my brewfridge to accomodate two 10l FV's - my current fridge can only manage one and its a waste of space really as i could have a brew on the go all the time. i'm brewing less and enjoying the product more so i'm drinking more than i'm brewing which is unsustainable! 🙂
I wrap my sleeping bag around it. Loses 1 degree max over the hour!now investigating ways to insulate my mash in the pot better
Didn't see this reply 2 weeks ago!So, pre ordering three would cost me $900. Are they having a laugh?I built a peltier effect brew fridge for £50.
Nice idea, but £200 per fermenter????!!!
Yeah it's expensive. I reckon it's a great solution though for those with limited space - plus I doubt your brew fridge can lager or cold crash? I did actually find someone selling a wine chiller locally but it was F rated for energy so would cost around £60 per year if it were on all the time! The BrewJackets would use a fraction of that so would probably pay for themselves after 5 years. (As you can see I'm trying to justify buying 1 or 2!)
[url= http://www.ebay.co.uk/itm/181494007828?_trksid=p2059210.m2749.l2649&var=480452453834&ssPageName=STRK%3AMEBIDX%3AIT ]this badboy[/url] will hopefully help me. I'm going to do a double / triple layer and stick a zip on it for easy application. not sure what the r-value will be but should be better than nothing. will also fold flattish for storage which was a key consideration.
When measuring mash temperature, should you be sticking the probe inside the grain bags or in the water?
When I used a stove top pan, the bag was big enough to fit completely around the rim and sit inside the pan. Grain then goes in that, loosely, and there's only one place I could get the thermometer - in the grain.
my new electric boiler with digital control holds the thermocouple in the water beneath the bag.
so to answer the question , I guess it doesn't really matter!
One question for you though - how tight do you have the grain bags if there's more than one of them?
Reason I ask is, I'd be concerned about getting all of the possible sugars out of the grain if too tight.
I'd much prefer to see a single bag, open, draped around the rim of the pan to give the grain room to move and get completely wet
Hmm, that's an interesting thought.
Using my thermapen I was able to keep the temps really stable. But my gravity by the end of the mash was still a bit lower than I expected.
Maybe a simple change of bag could do the trick....
if it helps, here's the bag in the pan before I added any grain; I do not put all of the water in the pan as I'll be using some for sparging later:
[img]  [/img]
and here it is with the grain added:
[img]  [/img]
as you can see, the grain is a very loose 'porridge' kind of affair. If you can do it this way, each grain has a lot more room, and therefore more chance of getting thoroughly wet, and so getting more of the sugars out
While mashing, I clean, sanitise and rinse my fermenting vessel and a colander, which I put inside the fermenter, upside down.
When the mash is over* I simply lift the (very heavy!) bag out of the pan and sit it on top of the colander in the FV. I sparge with a kettle or two of off-the-boil water while the bag is sat on top of the colander, and collect all the extra wort produced this way, then discard the spent grains and add the wort back to the pan, which is now coming back up to the boil.
now for the boil:
[img]  [/img]
If you find you lose too much wort to the boil, you can either add some bottled spring water back to the chilled wort, or you can put a lid [b]partially[/b] on the pan. Don't completely cover or it WILL boil over, and that makes one hell of a mess
Spent grain can be used for feeding your chickens, if you have any. But not if you add spent hops
* turn out the lights 😉
When measuring mash temperature, should you be sticking the probe inside the grain bags or in the water?
If you're asking this because you're using the Massive kit, my advice would be: ditch those bags, they're shit! Search ebay for "youngs nylon bag". I got a fine meshed one. Should be about £7. 100 times better.
sparge temps should still be below 76'C really.
You risk the chance of washing out some bittering compounds from the husks , plus any starchy residue might be released.
normal practise is a 2 to 1 liquor to malt ratio, plus another 5 to 1 sparge ratio
This might not be much use to many in here but if you're just starting it'll help a bit, plus you get cheap beer.
Aldi are doing bottles of German beer for £1.79 a bottle, it comes in the brown glass flip top type bottles. I'd looked at these type of bottles before from Wilko's and they are 6 for £8 (£1.33 each) but they are clear glass. I'm going to go buy a couple of boxes of the Aldi beer tomorrow as it only works out 46p more per bottle plus you get to drink the contents! I'd also read somewhere that it's better to put beer in brown glass bottles as opposed to clear.
Indeed it is
Interesting. I have a few Grolsch bottles.
Ordered up one of those bigger grain bags to give it a try.
My current Black IPA is coming along nicely.
Going to do a Citra Double IPA once I bottle the Black one and free up my fermenter.
40 bottles filled with rather tasty German helles beer for £71.60. Once I've finished them I'll get my next brew on the go, got some 2 can kit thing, can't even find it at the minute it's been that long since I brewed anything.
so, knocked in brew #5 today - citra double ipa [url= http://beersmithrecipes.com/viewrecipe/6673/citra-double-ipa ]recipe[/url]
had to substitute the warrior for magnum, not sure how that will go but we'll see!
still learning and tweaking though
-had enough of my mashing bag. it fits the pot badly (too narrow and tall) so its hard to secure it to the pot. raining in grain is a three handed affair! Anyone used one of these custom BIAB makers to run up a bag? i'm using the 19l ebay pot.
-my insulation experiments needs work - i think the foam wrap lost about 2.5/3 degrees/hour which is a bit much. needs revisited i think to get this closer to 1 degree/hour
-hit the pre-boil og almost bang on (0.1 down) and the refractometer is just so handy for this. found myself just measuring the OG regularly through the brew to see where it was.
-also reduced my boil off a wee bit as for some reason i was losing an awful lot of volume during the boil. this time i covered the pan slightly and using the refractometer kept an eye on the OG. in the end i think it was 0.3 over and the volume was pretty much spot on too, so hopefully this will be good.
- need to invest in some ss bearings or something to sink hops in a hop bag, my last dry hop effort hardly touched the wort as it sat on the top of the brew:(
anyway still learning and loving the hobby!
need to invest in some ss bearings or something to sink hops in a hop bag, my last dry hop effort hardly touched the wort as it sat on the top of the brew:(
no need. do you have any shot glasses lying around? one of these, sanitised as with all other post-boil equipment, in the hop bag should be fine
for future reference, Citra works really well with Cascade 🙂
Great shout john on the shot glass. I had some cascade hops in the freezer too, typical!
hopefully the magnum is a decent match for the citra.
try this one some time, it's a cracker
to make 23L, scale down according to your brew lengths...
4236g Pale Malt
484g Caramalt
mash at 68degC for 1 hour, boil for 1 hour
16g Citra 60 mins
10g Citra 30 mins
25g Cascade 10 mins
40g Cascade 0 mins
plus whatever clearing agent you use at 10 mins (e.g. protofloc, irish moss, etc)
bitterness 35.5 IBU, colour 13.3 EBC. OG 1043, FG 1011 assuming 67% efficiency, 4.2% ABV fermented with Safale US05 or equivalent
davidrussell - I’ve just done my 21st brew, so still a novice and learning/tweaking/screwing up/rescuing brews as I go, but here’s my 2p’s worth…
had enough of my mashing bag. it fits the pot badly (too narrow and tall) so its hard to secure it to the pot. raining in grain is a three handed affair!
The place I buy grain from sends it in big zip-lock bags – typically there’s about 2.5 to 3 kgs in each one. Stirring with one hand and trying to pour steadily from a flimsy but bulky bag is tricky. I found that it’s easiest to put the grain in a big Tupperware box first. Being rigid it’s much easier to pour it single-handed while stirring.
If it's just a case of needing one hand to hold the grain bag and stop it falling in, use pegs as per john_drummer's pics.
Anyone used one of these custom BIAB makers to run up a bag? i'm using the 19l ebay pot.
I bought some voile material with this intention, but ended up buying a ready-made bag. The only problem is that it’s essentially the same shape as a pillow-case, i.e. rectangular. When it’s full of wet grain it tends to hang with the two corners lowest, so there are two streams of wort running off it. This can be a bit tricky to manage, as it’s chuffing heavy, and I often end up spilling a bit on the floor before I manhandle it over a pot and lift one of the corners to rearrange the grain inside.
If I ever get round to making my own, it’ll still be a flat bag (like a pillow case) but the sewn end will be pointy rather than square – so hopefully when lifted it’ll have a roughly conical shape at the bottom.
my insulation experiments needs work - i think the foam wrap lost about 2.5/3 degrees/hour which is a bit much. needs revisited i think to get this closer to 1 degree/hour
I brew in a 48L electric urn. I use a big, heavy, cotton beach towel folded lengthways then wrapped around the pot, secured by a bungee strap. I then take another big heavy towel and wrap that over the first, moving the bungee so it’s now securing both towels. Then I wrap a foam camping mat round the lot, moving the bungee again so it holds the lot in place. The width of the folded towels is about the same as the camping mat, and conveniently about the same as the height of the urn. I insulate the pot from the start, so the insulation is fully warm at the start of the mash (so I don’t lose heat to warming up the insulation). Once the gain is in I put the lid on, fold another towel into a square about the size of the lid, put that on top, then finally drape yet another towel over the top to close up any gaps. It’s possibly overkill, but it’s cheap and I generally don’t lose more than 1°C over an hour, and I’m not convinced that such a small change makes any significant difference. I guess if you're doing small-size batches then heat loss is a bigger issue due to the volume:area ratio.
need to invest in some ss bearings or something to sink hops in a hop bag, my last dry hop effort hardly touched the wort as it sat on the top of the brew:(
As mentioned above, pretty much anything will do – glass marble? Ss nut or bolt? (admittedly the latter two will have nooks and crannies for grot to hide in, but can be boiled for 15mins to sterilise)
I ferment in a glass demi-john, which has a tiny neck (about an inch internal diameter). I put my hop pellets in a nylon stocking (I got the wife to buy me a multi-pack of knee-high ones), knot it and thread it into the FV. It’s suspended on a bit of mono-filament fishing line for retrieval, secured by the bung in the top. Initially it just sits on top of the wort, but it very quickly sinks as the pellets soak up the liquid. It does ‘float’, but immediately beneath the surface, fully submerged. Maybe before adding weights, try using a sanitised spoon to poke it under the surface until it’s wet enough to stay there?
Hmm, that Citra Double IPA is the one I was going to do.
My Black IPA smells very good. Have to crack the lid of the fermenter every couple of days to let the gas out, it's bulging.
Good call on the shot glass for dry hopping.
also reduced my boil off a wee bit as for some reason i was losing an awful lot of volume during the boil. this time i covered the pan slightly and using the refractometer kept an eye on the OG. in the end i think it was 0.3 over and the volume was pretty much spot on too, so hopefully this will be good.
Not sure whether that's a good idea david.
Have a read about DMS:
"Since DMS needs to evaporate off during the boil, it is important not to cover your pot. Covering a brew kettle during the boil will prevent the DMS from evaporating and create a beer with much higher levels of DMS."
[url= http://beersmith.com/blog/2012/04/10/dimethyl-sulfides-dms-in-home-brewed-beer/ ]Linky[/url]
Presumably you're getting less boil off because some of the water was evaporating but then returning to the kettle? If that's the case then you're probably adding back stuff that you want to boil off.
A better idea might be to up your starting volume to account for your high boil off rate. When I add my grain for the mash, the water is right at the very top of the 19l pot. I've then got plenty of room left once I remove the grain for the boil, but using those volumes I end up with 10l pretty much on the dot.
I've got a minor dilemma... I've currently got an APA fermenting away nicely in the garage. Everything went to plan on brew day except I forgot to add Irish moss late in the boil.
Normally this would be just a mild annoyance - it's not going to affect the taste, so I wouldn't care. It might be a wee bit hazy, but normally it's by and large only for my consumption so no big deal.
Except this beer is being brewed for a homebrew competition at the wife's work... so now I'm wondering what (if anything) to do -
a) just leave it and hope for the best.
b) after primary fermentation is done, rack to secondary, hoping that the disturbance will help proteins to drop out. But the extra exposure to the air increases the chance of infection.
c) a day or two prior to kegging, crash chill by dropping the temp as low as the fridge will go (an old fridge with an STC-1000, no idea how cold it will get - although it did hold 2 degrees very well for a lager I did last winter)
d) a and c
e) b and c
f) something else?
I'm leaning towards leaving it in primary and crash chilling prior to kegging, unless there are any other bight ideas out there...
b) and f) - You can add finings to the secondary - I know some brewers do this with gelatine. Not done it myself, though, so can't speak to the results first hand. Sounds like it won't hurt.
I'd add some gelatin to secondary and then cold crash .
I'd be surprised if it was still hazy after that.
Some decent info [url= http://www.bertusbrewery.com/2012/06/how-to-clear-your-beer-with-gelatin.html ]here[/url]
I always add finings to the secondary. usually isinglass but if I'm out of that, Auxiliary Finings. But NEVER mix them.
Thanks for the link pf, i'll have a read when the work proxy doesn't block the site 🙁 I had no idea that partially covering the pan could cause a prob, so thanks for the heads up.
you have me wondering about my volumes now too, as i added a litre extra to the strike water volume this time over my last brew as it came up a bit short. re-boil vol this time was 13l where beersmith wanted 12.29, so maybe i didn't need to cover the pot after all. I'll need to calibrate and mark my FV i think (i have one of the wee 10l ones) so i can tell what kind of volume i'm actually putting into it - i may actually have got >10l into the FV this time, it was filled to about 1.5" from the top.
i definitely need to extend my brewfridge like the pics on the previous page, doing max 2 brews/month is getting a bit limiting, not to mention stocks run down quickly 🙂