![]() You don't need to be an 'investor' to invest in Singletrack: 6 days left: 95% of target - Find out more
You don't need to be an 'investor' to invest in Singletrack: 6 days left: 95% of target - Find out more
Liquor additions are not my strong point.
I know you need alot of calcium pretty much throughout the process to make everything work.
Water Hardness CACO3 , and PH and important . Also the quality of the water you are supplied with matters. yes , it may meet all EU requirements but that does not make it great for brewing.
The big brweries around Burton on Trent are there because the water is perfect for brewing with , needing little or no additions.
We add acid to lower our start PH from 7.9 to nearer 6.0, then add Murphys DWB to the Grist which contains calcium chloride and gypsum and some magnesium iirc. 4lb to 20BBLs. for our water.
We also use different treatments for Milds and Stouts
Since starting to brew again, I've wanted to make 'farm beer' of the type my grandfather used to serve up to his farmhands at harvest time. Light, thirst quenching stuff.
Just opened a bottle of a recent batch and I've cracked it!
Maris Otter and crushed crystal with Goldings. It's lovely! Might make it a little bit hoppier next time, but otherwise it's bang on! Happy, happy, happy.
Poundshop for this cleaner
[URL= http://i199.photobucket.com/albums/aa46/amticoman/2014-04-16174604.jp g" target="_blank"> http://i199.photobucket.com/albums/aa46/amticoman/2014-04-16174604.jp g"/> [/IMG][/URL]
£1 for 625 grams works just the same as the dearer stuff ace for soaking the fermenting vessels and removing the muck stuck to the sides .
The oxi is nice and cheap but make sure you rinse well when done, the poundshop stuff (as above) I've bought recently has a perfume additive. You don't want any of that hanging around in a brew 🙂
hi all, long time off the thread and great to see its still going strong!
I'm still assembling kit to brew using the MB style - I have a stock pot and a very well fitted bag and have some copper to make a wort chiller, but after my last effort i'm scared to try it!
I did notice your comment though PF - where did you get the pot?
Bought a 20 litre pot so I can dispense with the dunk sparge and to allow me to brew 10-12 litre batches. First brew in the new pot, with no sparge, gave me 70% efficiency and much less faff/mess. No boil over with this pot either! It was only £20.
EDIT - i was also going to ask how your stove handles heatin a bigger volume of water, did it cope ok?
Cheers
David
I got this one david [url= http://www.ebay.co.uk/itm/160901418854?var=460229007350&ssPageName=STRK:MEWNX:IT&_trksid=p3984.m1439.l2649 ]19 litre for £21.99[/url]
My stove is utterly useless, however by using the same techniques as before (spreading across two elements and using a camp kettle to reduce the surface area of the liquid) it was absolutely fine.
I would definitely recommend a larger pot over the 11 litre MB one. You can get a full 10 litres into the FV without a dunk sparge, or if you use the same technique as the MB kit you could get about 16/17 litres!
for me, the benefits are less mess, no sparge and greater volume. There are no downsides as far as I can tell. The pot size only feels a little bit bigger than the 11 litre (I actually though i'd bought the wrong size until I measure the capacity!)
My stove is utterly useless
Try brewing on an Aga! Even worse!
Hey, thanks for the quick reply. That looks like the people i got the 11 litre pot from, I wonder if they'd accept returns after 3 months 🙂
By doing away with the dunk sparge are you doing away with sparging altogether then and just relying on the grain giving up its goodness in a slightly larger volume of water?
Cheers
Try brewing on an Aga! Even worse!
i can imagine - my folks have one and it varies from screaming hot to almost out overnight (old school coke fuelled one)
I have actually been looking at 5 burner hobs with the wok burner element before i've even brewed a batch 🙂
Try brewing on an Aga! Even worse!
#firstworldproblemsflashy 🙂
By doing away with the dunk sparge are you doing away with sparging altogether then and just relying on the grain giving up its goodness in a slightly larger volume of water?
Yup. I got 70% (only a 2% drop) first attempt. Given that the cost of grain at our level is pretty cheap, I'm not even going to bother employing any techniques which might increase efficiency any higher, it's just not worth the extra effort to save 20p on grain for me right now, got too many other areas I want to improve! 70% suits me fine for the moment.
Peterfile I'm another after some of your sage advice 😀
I'm planning on graduating from kits to AG and already have an FV, so don't fancy the Massive kit. Do you find your 19 litre pot large enough? And what bag do you use? I was thinking of this one:
[url= http://www.the-home-brew-shop.co.uk/acatalog/Nylon_Bag_with_Drawstring24x24.html#a496978 ]Bag[/url]
Mostly though, I'm desperate to try that SNPA recipe, and wondered what quantities you used for your 19L pot, did you just scale them all linearly?
I'm also struggling to find Cara-Pils/Dextrine, what did you use? (same for the english carastan tbh)
Any advice would be massively appreciated
[quote=The Chair said]
I'm also struggling to find Cara-Pils/Dextrine,
http://www.the-home-brew-shop.co.uk/acatalog/Carapils_Malt_500g_Crushed.html#.U1Ji8vldW9U
ahh, thankyou kidly atp, that'll do!
Bottlng tip for you, folks - if using the Lakeland bottle capper, Morland's bottles work best.
Conveniently, they have also been a three for a fiver deal, including the rather lovely Old Crafty Hen.
Don't recommend clear bottles for beer unless you can store in a dark place. Beer bottles should be brown
No light in my beer/wine store!
That's alright then 🙂
I have a similar bottle capper to the Lakeland one and it handles everything fine except the type used by Wychwood (which is a shame as I like their beer.)
+1 for brown bottles though. I guess they're only used for marketing purpose (making light coloured beers more distinctive/appealing). I wouldn't buy a beer in a clear bottle personally - clearly the shops don't store them in a light-free environment.
Managed 2 brews and 1 bottling over Easter. The one I bottled (a porter) was the first brew I'd given "the works" in terms of liquor treatment and I have to say it lasted amazing out of the fermenter so I have really high hopes for that one!
Interesting article using an induction hob for the boil
[url= http://byo.com/component/k2/item/2967-induction-heat ]induction hob brewing [/url]
Brewing a Schwarzbier today. Mash is underway.
john_drummer - Member
Don't recommend clear bottles for beer unless you can store in a dark place. Beer bottles should be brown
Almost agree but not quite. I always use one clear bottle and one PET bottle per batch. The clear one so I can see how it's looking and the PET so I can give it a squeeze and check for carbonation.
Clear glass + sunlight can lead to sunstruck flavours which are not good. There is a hop called Tetnang which helps to delay the effect in beers and Lagers. It can make beers go 'skunky' and i will leave this to your imagination.
Clear is usefull though for clarity checks and PET bottles ace for a simple carbonation check . Buy a bottle of fizzy water , then compare your secondary fermentation to the volumes of dissolved CO2 by squeezing the bottles to see how much deflectin you have .
Personally for an ale I wouldnt want alot of CO2 in there , maybe 1 vol , but for a Lager of Blonde maybe 2 vols.
Its very easy to rig a pressure guage up in the screw top of a PET to see exactly whats going on , useful if forcing secondary fermentation.
I'm planning on graduating from kits to AG and already have an FV, so don't fancy the Massive kit. Do you find your 19 litre pot large enough? And what bag do you use? I was thinking of this one:
Bag
Mostly though, I'm desperate to try that SNPA recipe, and wondered what quantities you used for your 19L pot, did you just scale them all linearly?
I'm also struggling to find Cara-Pils/Dextrine, what did you use? (same for the english carastan tbh)
Any advice would be massively appreciated
Sorry, missed this, just back from holiday.
The 19 litre pot i plenty large enough for me to fill my 10l fermenter to the top. In fact, if you did a dunk sparge, you could get about 17 litres into a fermenter!
I use 2 bags, for no reason other than I bought a Young's mash bag and then realised it has a coarse mesh at the bottom, so also bought a large nylon straining bag with a really tight mesh. I stick the nylon bag inside the young's one, since the Young's seems to be really strong and I feel better squeezing it 🙂
As for the SNPA recipe, you can just adjust the grain weight simply, but I use beersmith for hop adjustments, since it seems to apply a bit of jiggery pokery to keep the bitterness and aroma the same as the original recipe. That said, the difference is small so it probably isn't noticeable.
So... actually drank a Sierra Nevada for the first time in a couple of years. Think my clone is gonna be spot on!
Today: bottling day... next week - quaffing day!
Have kept a second bottle aside for back to back tasting.
Had a bottle of Brewdog's Jackhammer the other day along with Flying Dog Raging Bitch IPA. Think I might try something like that next.
Apologies for the random interruption, STW seems like as good a place as any to pose my question!
My knowledge of brewing is (regrettably) rather limited. However, I have an interest in fermentation and I have been wondering why it is that beer is predominantly made with hops as oppose to any other herb/plant. I think I'm right in saying that the role of the hops is to impart a bitterness that balances the sweetness of the malt. If this is the case, why are other bitter plants not more widely used?
so, having never brewed with my 11 l Massive Brewery style stock pot I got on ebay, i've taken the plunge and got a 19l pot to remove the need to sparge 🙂
i have had a seamstress run me up a bag for the 11l pot which was a pretty neat fit, so i think i'll just buy a bag as in the scheme of things its a lot less hassle. Anyone had any experience with [url= http://www.brewuk.co.uk/store/otherequipment/jugsfunnelsstrainersfilters/nylon-straining-bag-fine-large.html ]this?[/url]
Anyone got one of these: [url= http://www.brewbot.io ]http://www.brewbot.io[/url]
Don't think they are in production yet. A mate of mine, who owns a coffee roasting co, has one of those WilliamsWarn brewing machines. I wanted to hate it but with a bit of cunning you can make an epic beer in it but effectively making your Wort and then transferring it in for the rest of the process. Even the two can option with a bit of nifty dry hopping made something that people wouldn't recognise as a Craft beer you would buy and drink through your designer moustache. Like all true fiddlers they have now got a bit of upgradeitis and are getting a 250litre brew centre built for them !
Interesting question Jamz - I don't know the answer. Let's face it though, if there's one thing on planet earth that ain't broke, it's beer 🙂Jamz - MemberApologies for the random interruption, STW seems like as good a place as any to pose my question!
My knowledge of brewing is (regrettably) rather limited. However, I have an interest in fermentation and I have been wondering why it is that beer is predominantly made with hops as oppose to any other herb/plant. I think I'm right in saying that the role of the hops is to impart a bitterness that balances the sweetness of the malt. If this is the case, why are other bitter plants not more widely used?
One possible reason is that hops impart a flavour and bitterness without tasting 'herbal', by and large. A herbal sort of beer, thinking about typical herbs that are used to flavour food, would not be very palatable IMO. It seems that hops are brilliantly compatible with the malt body of ale.
However, beer is older than God, so I am sure it has all been tried at some point in time, maybe with good results.
I've just started a Festival Razorback IPA having had great success with the Suffolk Strong Ale and the Father Hooks bitter. With our house being very cold, even in summer, I've set up a water bath with an aquarium heater in the bottom to keep the FV warm. It's working very well, a constant 22 degress.
Anyone had any experience with this?
David, I have that exact bag. The weave is perfect for BIAB and it's plenty big enough (it fits my 19l pot well), but it doesn't have a draw string or anything to attach it to the pot. I've been using it inside a mashing bag, but I'm sure you'd be fine with a few bulldog clips.
With our house being very cold, even in summer, I've set up a water bath with an aquarium heater in the bottom to keep the FV warm. It's working very well, a constant 22 degress.
What yeast are you using and what is 22 degrees; the wort or the water bath?
22 is on the warm end of most ale yeasts and the first few days of fermentation throw off some surprising heat, so if you're reading 22 degrees, the fermenting wort could easily be sitting at 25+.
I tend to keep fermentation in the lower range of the yeast initially, to keep those initial few days under control (where most off flavours seem to pop up), which is generally about 17-18 degrees for me. Then I let it creep up towards the upper range of the yeast as fermentation is completing, which seems to help clear up the beer.
I've had my best results fermenting in the lower range of the yeast, especially during the first few days...but as with everything brewing related, i'm sure there are some who swear by aiming for the upper end!
Thanks for the reply as alway PF.
i could be your copycat on this, with the exception that you have brewed loads of beers whilst i've brewed none! I have just spent months faffing around with kit. I'm going to have another go at the BYO wort chiller soon, but i'm not sure on the dims of the 19l pot (I copied you again and bought the same 19l pot off ebay :)) I assume it's only a few mm's taller+wider than the 11l pot as you said they looked really similar so if i work to that it shouldn't be an issue. do you happen to know height of the 19l pot? If possible i'd like to have the tails of the wort chiller well clear of the side of the pan to avoid any leakage scenarios contaminating the wort. Thats assuming i ever actually brew a batch instead of constantly buying/making equipment and wasting money 🙂
Hey PF how did you get on with your waterprofiling?
From memory, it was 31cm diameter and 28cm height (excluding the lid).
I actually had to measure it and do a volume calculation because it didn't seem big enough to hold almost double the amount of water!
I used some [url= http://www.homebase.co.uk/en/homebaseuk/diy/sealants-and-plumbers-tape/rescue-tape-109743 ]Rescue Tape[/url] on my wort chiller, which seems to have worked perfectly. The ends of the chiller are inside my pot now, but with the tape forming such a good seal, it's not a problem.
I can't believe you still haven't brewed a batch! 🙂 Think I must be close to 20 now, even after a hiatus. Whenever there's a spare 4 hours (usually about once every couple of weeks, I get up super early or do it later at night) I just get some strike water heated and go for it.
Just picked up a refractometer for about £20. I've always found the continual monitoring of gravity throughout the process to be a pain (especially during the boil, when you have to cool down each sample). This should let me get pretty accurate readings almost instantly. Another bit of fine tuning!
Hey PF how did you get on with your waterprofiling?
ah yes! I forgot to mention those results had come back!
I got a very helpful sheet detailing my water profile, plus the recommended additions for each particular beer style.
I ended up buying the relevant additions from Murphy...which came to a grand total of about £4 🙂 Good for around 20+ batches.
Will be giving it a whirl as soon as they arrive.
[img] 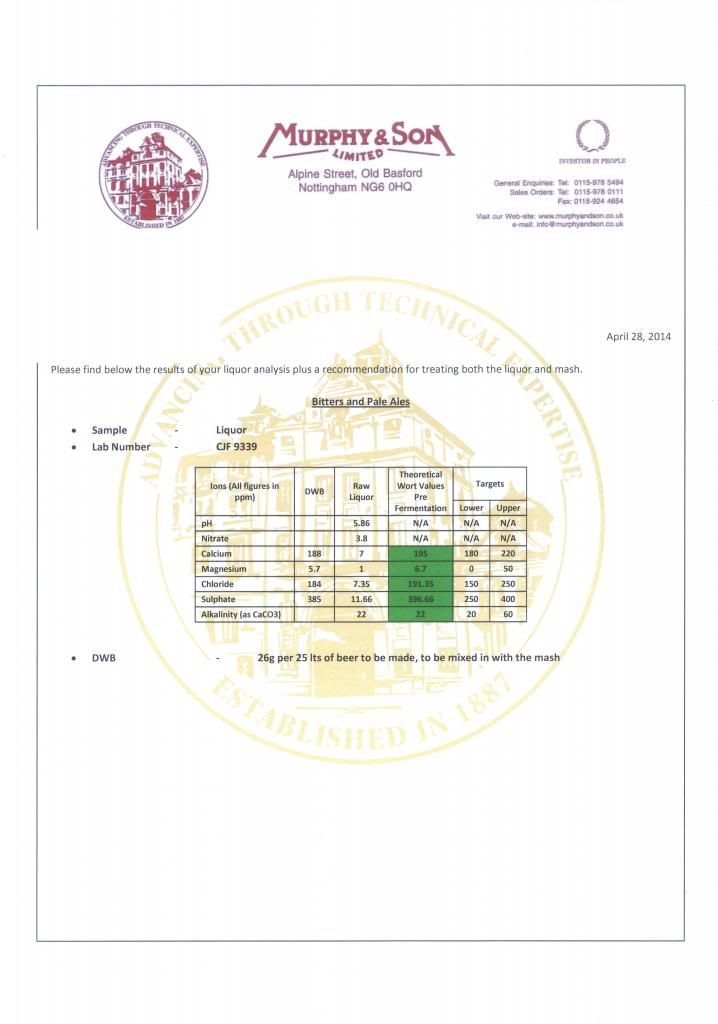 [/img]
[img]  [/img]
Thanks for that PF, looking forward to a report to let us know if the additions improve your brew!
I can't believe you still haven't brewed a batch!
yeah thats classic me - research it to death, buy stuff and want everything perfect before starting it, then make an @rse of it anyway. research more, buy more stuff, still make an @rse of it 2nd time 🙂
Once the pot arrives i'll get the chiller made and just buy the rest of the bits / ingredients and give it a go. found a nice smash recipe on beersmith so i'll get the bits and get it done.
Half the battle is finding / making time, i just need to go for it!
Honestly, you're better off just getting started with whatever you have already, since you'll undoubtedly want to change things once you get a feel for it anyway! I've gradually changed/tweaked most things as I've gone along, so very very glad that I didn't spend loads on kit at the outset.
The first few brews are quite time consuming, however once you've got the hang of it you'll find that even though it takes 4.5 hours from start to finish, you're free to go do something else for a couple of those hours. It's quite good to do it along side cleaning the house etc. Hugely satisfying when you're finished up at 11.30am on a Saturday/Sunday morning having just stuck a load of wort into the fermenter and have a clean and tidy house!
I usually do the supermarket run while my mash is on.
and you don't [i]need[/i] a chiller. in countries where water is at a premium, many home brewers use the no-chill method. OK you can't put the yeast on it straight away but that doesn't seem to be a huge problem
Hey guys, more good advice as always, especially thanks to PF and J_D
To be fair i have a lot of kit from my kit brewing time, so I don’t actually need a lot more stuff to move to the BIAB method, although I completely take your point about working with what you have. I have come to loathe starting a task if i don’t feel I have the right kit, as I’ve made too many screw ups in the past by trying to improvise - my previous attempt at a wort chiller and a very expensive attempt to drift bearings out of a Chris King hub spring to mind 🙁 I'm not quite an ATGNI type, but not far off. I guess i just don’t want to be lacking something vital on the day that causes a screw up because that really winds me up if time and effort and money goes to waste. I'm sure there are many on here who sympathise 🙂
I've got my 19l pot now and i managed to put together a wort chiller today (I had already bought the copper and fittings for it) so the only things i need now are a mashing bag and some ingredients! The brewuk guys sell both so I’m going to put an order in this week and break my duck!
In terms of the wort chiller I’d say a DIY effort is fine if a: you are an accomplished metalworker, as copper is a bit temperamental to work, or b: you aren’t looking for a perfect example (it’s really hard to get copper looking like a factory finish)
My chiller is functional and looks ok, but I almost crimped the pipe twice because of the way it bent. I was using a pipe bender but a small lapse in concentration and its easy to crimp the pipe, then there is a few sweaty moment as you try to recover it. I’m reasonably happy with it though and it fits the pot quite well. A few pics below for you to laugh at 🙂
[img] 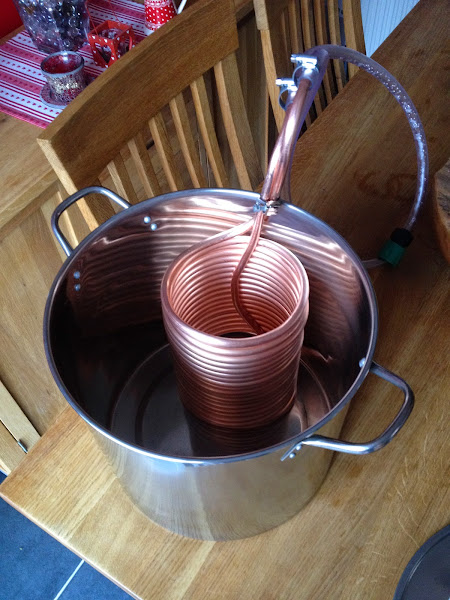 [/img]
[img]  [/img]
[img]  [/img]
[img] 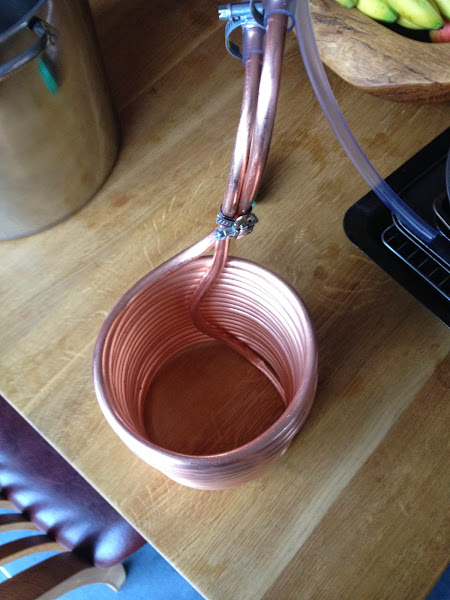 [/img]
That looks great 🙂 just remember to test it for leaks [I]before[/I] you actually need it
Looks very good!
Had a bottle of a brew I'd made in early April today and wow! Leaving it longer in the bottle really pays off.
Nice effort on the chiller! Did the same fiddly job myself and works fine. 🙂 If you can, I'd recommend you bend the ends over a little bit more - if the jubilee clip comes loose you could end up with tapwater getting into your wort, which could spoil it.
That's a great effort!
If it was me, I'd definitely stick a bit of Rescue Tape where the copper and tubing meets, but that's because I've already lost a batch to a little leak at that joint.
Happy brewing 🙂
Thanks for the comments folks, much appreciated. It was an interesting half hour bending the pipe I tell you.
Interestingly if you are looking for something cylindrical and straight to wrap copper round to make your own, an off cut from a 140mm gas pipe is just the ticket. The guys were replacing the gas main near my folks house and were happy to give me an offcut that was basically straight. Worked like a charm.
I will tweak the connections a bit because I think there is potential for leakage with the jubilee clips alone, but the pipe passed a pressure test with a finger over the end at mains pressure, so hopefully all good. Now to actually brew a batch!
Cheers
I will tweak the connections a bit because I think there is potential for leakage with the jubilee clips alone, but the pipe passed a pressure test with a finger over the end at mains pressure, so hopefully all good.
Be careful...I noticed that the leak wasn't showing up with my tests, but as soon as I had a temperature differential (cold water + hot wort) it seemed to crop up. I think John's chiller developed a similar problem after a while too. Just keep an eye on it 🙂
^ yep be careful and test it with boiling water and cold water, they do leak and the last time you want it happen is mid boil !
What yeast are you using and what is 22 degrees; the wort or the water bath?22 is on the warm end of most ale yeasts and the first few days of fermentation throw off some surprising heat, so if you're reading 22 degrees, the fermenting wort could easily be sitting at 25+.
Don't know what particular yeast the kit uses, it doesn't state on the box or in the instructions. However, it recommendeds a fermentation temperature between 20 - 25 degrees. I've gone on the side of caution and set the aquarium heater at 22, I took the temperature of the wort and it's bang on 22.
Thats a good shout guys on testing during a boil, i'll give it a go and see how it fares. I think at least a second jubilee clip would be needed at least but i'll check out the sealing tapes too.
it had better be an epic first brew 🙂
Brewed a simple IPA late last night to try out some new kit/technique.
Maris Otter with a bit of crystal and carapils. Then 110g(!) of Citra and Cascade for "hop bursting". All of the hops went in at 15/10/0 mins, ie no bittering additions early on.
60 IBUs, hit gravity dead on, so should give around 6%.
Stuff of note from this brew:
Having now used a refractometer, I can't understand how I expected to brew consistently without one. Surprisingly accurate. Now I can check preboil gravity and monitor gravity throughout the boil with each reading taking seconds. No excuses for not hitting gravity dead on every time now! Brewsmith also has a calculator for working out fermenting gravity based on the OG. This will prove much easier for quickly checking how things are progressing in the FV. Best £19 spent so far.
I had to do away with hop bags for this brew due to the sheer amount I was chucking in, so I just dumped them all in the kettle. Much easier and I'm hoping that their will be more utilisation due to the increased contact between the wort/hops (compared to a swollen bag). I sanitised a nylon bag and drained the pot through this into the FV, however it clogged up quite quickly. Will just pour through my colander next time and let the smaller hop bits settle in the FV.
Treated my water on this brew in line with the lab report from Murphy's. I picked up some pH test trips to check mash pH. My mash pH ended up at around 5.2, so pretty pleased. I wonder what it was before I started treating the water! I think in future, I'll dump in 1/2 of the additions with the strike water, then check the mash pH after 5 mins, then add the remaining additions depending on the reading I get.
I rehydrated my yeast for this batch, simply because I've never done it before and it's very little effort. I don't imagine it will make much difference, especially since I know I'm pitching more yeast than I need, but will be keen to see if there's any noticeable change in activity in the FV (ie less lag).
Brew fridge - again, can't imagine not having this now, especially with the warmer days and cool nights, the temp in my house fluctuates from 14 at night to 25 during the day. It's great, chuck the FV in and forget about it. With US 05, I tend to let it sit at 17 degrees for the first few days of fermentation (you can really hear the cooler working during those days!), then raise it to around 18/19 for a week, then up to about 20 for another few days before bottling (or transferring to secondary).
Think I'm going to pick up a thermometer with a probe on a wire. Getting bored of continually sticking the pen style one into the pot to check strike water temps and cooling temps (it takes a while to take the reading and it's only a matter of time before I drop it in there).
Next up...a nice porter once the brew fridge is free.
🙂
great update - thanks PF. I really like my brew fridge too, its a fit and forget once you get it set up properly and very cheap to put together. In my case it has been forgotten as its not climate controlled a brew all year :)Shameful i know but i'll get one going soon. I still have c. 60 bottles of kit brew in my sisters garage to plough through....
the refractometer sounds good but i think i'll learn to walk first - this thread is a bad influence for new toys 🙂
A couple of inane questions for the brewers. Following on from the wort chiller DIY effort i'll look at sealing the hoses, but i'm sure i read somewhere that the cold water inlet pipe does make a difference. I expect you'd have the cold water inlet pipe feeding the top of the coil and the warmed water would exit the bottom of the pan. Can anyone confirm this?
also PF i was wondering if you have changed your beersmith equipment profile? I assume the volumes etc have remained the same. To be honest i need to get beersmith back open and have a better look at it. I was toying with getting the ipad version only as i dont want to buy a licence for both desktop and ipad, but does anyone have a burning love / hate for either bit of software?
so many questions, so little brewing 🙂
I'll check my chiller when I get home david.
I have changed my beersmith equipment profile to take into account that I'm now getting 10 litres into the FV (rather than 8.5), i've lost a couple of points efficiency (presumably as a result of not sparging anymore) and have a greater pot volume.
As much as I like (and need) beersmith for recipe design and calculating various aspects of the recipe and brewing process...I still use paper sheets for recording everything about the brew day. I've found that looking back through brewsmith recipes doesn't tell me the stuff I want to know, the important bits are lost in the detail. Much easier to fill out a paper record and make notes against each section.
I use [url= http://cdn2.brewersfriend.com/brewersfriend_allgrainsheet.pdf ]THIS ONE[/url].
Tried my Sierra Nevada last night.
OK, but not great, Seemed a bit 'watery'...? Don't know how to describe it. The smell is spot on, but something missing taste-wise - think it might be a lack of alcohol possibly? Still drinkable, but not amazing.
Looking back the specific gravities had been off. Brewday was 1.040, 6 days after brewing was 1.015, 11 days after brewing was 1.020 which is when I closed the lid on the bucket. 8 days after that (19 days after brewing) I bottled it and it had been in the bottles 10 days before I tried it last night.
Tried my Sierra Nevada last night.
OK, but not great, Seemed a bit 'watery'...? Don't know how to describe it. The smell is spot on, but something missing taste-wise - think it might be a lack of alcohol possibly? Still drinkable, but not amazing.Looking back the specific gravities had been off. Brewday was 1.040, 6 days after brewing was 1.015, 11 days after brewing was 1.020 which is when I closed the lid on the bucket. 8 days after that (19 days after brewing) I bottled it and it had been in the bottles 10 days before I tried it last night.
The lack of body is almost certainly related to your OG, which is pretty low. What temp did you mash at? Did you lose much temp during the mash?
Also, 10 days in the bottle is very young, a pale beer can change so much in the bottle between 2 and 6 weeks. Many of the pales I've tried early have made me worried that I'd brewed a duff beer, but given time almost all sorted themselves out. The last bottle you have is generally the best! 🙂
Think I figured out why my Sierra Nevada was a bit watery and not very flavourful....
Too much water! Went to re-brew it tonight, checked my spreadsheet and I'd entered 2.75kg of grain instead of 2.33kg and consequently added an extra litre or so of water at the beginning.
Damn numbers!
Anyway, brewing another batch tonight.
Right, once again time for you, the Brewers of STW, to "Pimp my brew!"
I have at my disposal;
Marris Otter
Crystal (Crushed and whole)
Chocolate
Goldings
East Kent Goldings
Target
Columbus (haven't tried this before, but it's a 17.5% Alpha number, so could be swaying towards a big American style hopmonster!)
So, do your worst! (Or, preferably, your best!) MassiveBrewery volumes, if you have them!
You could do a nice Porter with those ingredients. I'd use Fuggles but Goldings might work.
Going out now but I can post a recipe later. What final volume are you aiming at?
Agree with John!
Try this flashy:
2kg maris otter
200g crystal
175g chocolate malt
15g of Columbus in at 90 mins (i'd go for a 90min boil, simply because the recipe i brewed called for it).
That's pretty close to an Anchor Porter clone (save for some black malt).
Shoot for 1.060 OG. That's based on a 73% efficiency, with 8.5l into the fermenter.
I've brewed something similar a couple of times. An english ale yeast (like S 04) gives it a nice round, fruitier flavour, where as an american ale yeast (like S 05) makes it a lot drier and "punchy". The 05 brings it closer to stuff like Anchor Porter.
I wouldnt pitch a brew below 20'C with SO4, US05 or Nottingham. Too long a lag phase in which any bugs that are in the wort will be going crazy with zero competition from the yeast . The ph will take time to plummet as well , not helping in killing bacteria either.
HELP!
5I think it is too late.....); Just doing my first brew with the massive brewery kit. I did the mash. Then transferred the grain bags to the _l of sparge water. transferred the sparge water and only the sparge water into the pot, added the hops etc and now boiling away.
However, I squeezed the grain bags out into the water I used for the mash and then poured it down the sink...... In wondering how 8l of sparge water makes 10l of beer I think I should have squeezed the water out of the drain bags into an empty pot and then added the sparge water to it....
I got confused with the massive brewery instructions as it talks about combining the contents... and I thought well the 6.5 mash water plus the 8L sparge water will be too much.
So, have I royally screwed up? At the bottom of the mash water which I poured away there was a thick greyish sludge....
I have emptied the grain bags and the grain is sitting in a carrier bag...
I should add as per the instructions to fill up the pot I added a litre and a bit of water which I poured over the grain bags and gave them a really good squeeze with a small saucepan lid in the collander.
Not completely following you mugsys - what did you throw down the sink? (surely not the mash water)?
Also, the volume of sparge water sounds way excessive. Not sure of your exact set-up but have not heard of a brew-in-a-bag method where the sparge volume is greater than the mash volume.
I squeezed the grain bags out into the water I used for the mash and then poured it down the sink.
Ooops! 😯
1. Pull the bag out of the mash pot, squeeze it over the mash pot. Don't pour anything away, that's your glorious wort!
2. Dunk the bag in sparge water. Squeeze bag over sparge water.
3. Top up mash pot with sparge water until it's almost full to the brim.
Remember, you lose some of the water in both your mash and sparge due to the grains absorbing it.
It would seem the mash water maketh the beer and not the sparge water...
Time to order some new ingredients then........
I watched the video several times and re-read and then thought I had it but was not exactly sure, then I had comitted.... I even kept the mash water in a pot to one side just in case, but it seemed to work so threw it...
Feel like a right idiot. That is 5 hours worth of precious time wasted then....
As far as I can see for the massive brewery pale ale with phoenix, the mash water is 6.5 l and the sparge water 8l?
Feel like a right idiot. That is 5 hours worth of precious time wasted then....
Don't beat yourself up about it. There's a lot going on at first. I made some daft mistakes too.
5 hours isn't wasted, you'll have learned more than you think!
As far as I can see for the massive brewery pale ale with phoenix, the mash water is 6.5 l and the sparge water 8l?
I'll check when I get home, but for the massive brewery pot, I seem to remember mashing in around 7-8 litres and sparging with 5-6. I tweaked the process so that my mash pot was completely full to the brim when mashing, then I used less sparge water.
Yep, learnt a lot!
New ingredients ordered.
Will use the time to write a step by step methodology. That should help it get cleare in my head.
Unlucky Mugsy... It's all about the wort, the precious mash juice, some people don't even bother with the sparge at all...
You could always boil what you have down to a couple of litres maybe add 50g of golden syrup and chuck a little yeast in, see if it ferments...
So who can adivse me on sparge water voulume as going to try again tomorrow. Can you also check the following.....don't want another disaster.....
6.25 litres mash water heated to 72 degrees celcius
Add 2.5kg maris otter in grain bags.
Leave for 1 hour maintaining 65 degrees celcius.
Prepare 6.9? litres of sparge water at 80 degrees celcius in FV
Take grain bags out of mash water squeeze into mash water and put grain bags in plastic bucket. Squeeze out into FV.
Add contents of FV to mash water
Add 16g hops boil for 55 minutes
Add 34g hops add immersion chiller. Boil for 5 minutes.
Chill to 20 degrees celcius
Pour over hop bags into sterilised FV
Add ½ packet safale SF-05
Anybody can give Mugsys_m8 some advice so he can make his beer and I can drink it
cheers
I'm not sure about the amount of sparge water, how much are you aiming to get into your FV ? and at what OG?
1) apart from the Maris Otter, any other grains? or are you aiming at a Blonde/Really Pale Ale?
2) don't add the hops until the wort is boiling
3) that's the bittering hops, any for aroma? add those 10 mins from the end of the boil
4) I'd add the chiller 15 mins from the end of boil, make sure it's properly sterilised.
5) if you have any Irish Moss (3g) or Protofloc (5g), add it when you add the chiller
6) hop bags? are these the aroma hops? see point #3 if so; if "dry-hopping" then fine. I'd be tempted to do a bit of both
7) don't mess about with the yeast, chuck the whole lot in, it's cheap enough
Aiming for 10 litres and a opening gravity of 1.04.
Using the massive recipe pale ale nothing but maris otter and phoenix hops.
It is mashing as we speak....
6.25 litres mash water heated to 72 degrees celcius
Add 2.5kg maris otter in grain bags.
Leave for 1 hour maintaining 65 degrees celcius.
Prepare 6.9? litres of sparge water at 80 degrees celcius in FV
Take grain bags out of mash water squeeze into mash water and put grain bags in plastic bucket. Squeeze out into FV.
Add contents of FV to mash water
Add 16g hops boil for 55 minutes
Add 34g hops add immersion chiller. Boil for 5 minutes.
Chill to 20 degrees celcius
Pour over hop bags into sterilised FV
Add ½ packet safale SF-05
mugsys, those strike water and sparge volumes will be great.
I've just finished putting an Oatmeal Stout into the FV. Great wee evening brewing!
I've also just dry hopped a "hop bursted" Citra/Cascade IPA. Basically, I didn't add any bittering hops. In fact I didn't add any hops at all until the last 20 mins and then dumped an incredible amount in. Still managed to hit 40 IBUS with those additions, but obviously picked up far more flavour. Hop bursting/late hopping is how all the good craft breweries (including Kernel) get their huge flavour. The sample I just took was incredible! Different ball game.
I use BrewMate for my recipes so I've fed your info in...
10L in the FV with 2.5kg of Maris Otter, assuming 68% efficiency gives OG of 1054 and a predicted FG of 1014 - 5.3% ABV; 16g Phoenix boiled for 60 mins gives a bitterness of 32.1 IBUs, which sounds about right for the style
to get 10 litres into the FV you'll need a total of 13L of water (liquor) assuming BIAB method. Strike temperature should be 71degC, allowing the grain to bring the temperature down to 67degC
After you remove the grain, some of the water will have been absorbed; you can squeeze this out and sparge with some of the 13L total - how much depends on how much you got into the mash pot in the first place. remember, some of the sparge water will also be absorbed by the grain.
You want to be aiming at 11.6L in the pot [i] before [/i] the boil to achieve an OG of 1054, and you'll lose just over 1L to evaporation during a 60 minute boil. Less wort before the boil = higher OG.
If the pot won't hold that much, start with a lower amount and add the rest during/after the boil - but don't add too much. You can always dilute the boiled wort with bottled water, but you can only make it stronger by boiling it for longer - and that will then affect the bitterness
If your efficiency is lower than 68% you'll get a lower OG for the same amount of wort, but I'd be very surprised if it goes much lower than 60% (which would give an OG of 1048)
With the massive brewery kit, even if you put 10 litre expected volume into the Massive Brewery calculator, you'll generally only get around 8.5 litres in reality.
The kettle is only 11 litres, so in order to avoid a total mess when you're boiling, you need to keep an inch or two clear at the top, meaning you're probably only starting the boil with 10 litres.
interesting... I love Kernel's beers (esp the single hop pale ales) so will definitely give that a go. Just bottled up batches 6 & 7 from the Massive kit this weekend - all have turned out great so far 🙂Hop bursting/late hopping is how all the good craft breweries (including Kernel) get their huge flavour. The sample I just took was incredible! Different ball game.
Have a read here zilog - [url= http://www.mrmalty.com/late_hopping.php ]Mr malty[/url]
Beersmith (or similar) is pretty essential for helping to get the balance right for bitterness from late hopping.
mugsys_m8, I've modified your brew day instructions, hopefully this will make sense. What John Drummer says above is spot on, but based on your questions, is perhaps a bit over you head in these early days of brewing (sorry, not meaning to sound condescending, I can only just follow it myself - but while his calcs appear correct, worrying too much about efficiency and the like is (IMHO) perhaps a bit too technical for your second brew!) and sorry JD, no offence intended 😉
I don’t have a Massive kit, I just do regular 5-gallon BIABs with an assortment of kit cobbled together, but the principles are the same.
1) 6.25 litres mash water heated to 72 degrees Celsius
2) Add 2.5kg maris otter in grain bags.
3) Leave for 1 hour maintaining 65 degrees Celsius. Easiest way is to make sure the hat is off (!) and wrap the pot in a big old beach towel or two for insulation. Don't be tempted to keep opening it to check the temp, as you'll just let the heat out.
4) Prepare 6.9 litres of sparge water at 80 degrees Celsius in FV
5) Take grain bags out of mash water and squeeze into mash water to get a fair amount of the water out. Put grain bags in plastic bucket. Put the mash water on the hob and start heating it.
6) Meanwhile… I assume the plastic bucket is your fermentation vessel (FV) doubling up as a sparge vessel? If possible, you might want to have the bag open with the top hooked over the rim of the FV all round, so the bottom of the bag is suspended off the bottom of the FV and you can pour water into the bag. This way the water can flow through the grains and fall into the FV. If the bag is just sitting in the bottom of the FV it will be fine though.
7) Slowly pour the sparge water over the grains in the FV. What you are doing here is getting all the sugars out of the grain that you can. Don’t let this sit for ages, once you have poured the sparge water through the grains, lift the bag and let as much drain out as possible.
8 ) Squeeze the bag into the FV. Put the grain bag in the sink, to be chucked away later on when you get a minute.
9) Add the liquid from the FV to the mash water in the pot, and bring the lot to the boil.
10) If you have a way of measuring the gravity, take a sample and do it now. If not, don’t worry.
11) Add 16g hops and start a stopwatch. This is the start of the boil, zero minutes.
12) At 45 mins add the immersion chiller.
13) At 55 mins Add 34g hops.
14) At 60 mins switch off the heat. Start the chiller. Chill to 20 degrees Celsius.
15) While it's chilling, clean and sanitise your FV.
16) “Pour over hop bags into sterilised FV.” Not sure what you mean here – I think if the kit has a hop bag then you would put the hops in the hop bag and let the bag sit in the pot during the boil. Add more hops to the bag as required during the boil. This allows the water to flow around the hops, to get the flavour out, but means you can easily whip the bag out at the end of the boil and you have ‘clean’ wort, i.e. it’s not full of sludgey hops. Alternatively, if it’s a big straining bag then add the hops directly to the boil. Your wort will be full of sludgey hops, and you will pour it through the bag into the FV, basically using the bag as a sieve to strain the hops out of the liquid. I suspect it’s the first option, especially if the hop bag is smallish.
16) Add packet safale SF-05. Add the whole pack, the yeast is just going to multiply in the FV anyway, may as well give it a head start.
Also, note that during the mash the grain will soak up lots of water, so your 6.25L will end up as about 3.5L. Then you sparge and get most of your sparge water back (as the grain is already saturated so can’t soak up any more water), so you’ll end up with a little over 10L of wort in the pot for boiling. Allowing for say 1-2L of evaporation during the boil, and some further liquid being soaked up by the hops, you’ll end up with about 8L in the FV.
Have a read here zilog - Mr malty
Cool, ta! Bought beersmith after doing my first brew. Can't recommend it enough! Takes all the guesswork out of coming up with your own or modifying other people's recipes.
Thanks all.... Currently boiling away. Biggest concern is I had the mash temp way above 65 degrees during the mash though. Strike temp was right, but it crept up as I kept the gas on. Anything to be done about it now?
I can't recommend BrewMate enough. Free from www.brewmate.net and there are loads of recipes there too. Type in the recipes at the specified volume, then change grain mode and reduce the final volume; grain & hop weights will be calculated for you
regarding efficiency - I've never worried about it - worked it out once at 68 and that'll do for me.
Nothing you can do about it now but for future reference you don't need the heat on during the mash. Heat off, wrap the pot in towels and leave it