![]() You don't need to be an 'investor' to invest in Singletrack: 6 days left: 95% of target - Find out more
You don't need to be an 'investor' to invest in Singletrack: 6 days left: 95% of target - Find out more
I'm looking for an easy(ish) way to add a removeable but lockable perspex cover to an enclosed TV unit to protect the screen from damage (autistic toddler).
It needs to be secure during the day, and then removeable at night when I'm using the TV (assuming the perspex will be too reflective and degrade the image quality).
My initial thoughts we're to use button fixings and then add cabinet/mailbox locks but thought I'd ask here to see if there would be a better way to attach it?
Button Fixings: https://www.ebay.co.uk/itm/173320186452
Cabinet Locks: https://www.ebay.co.uk/itm/404070722273
Clevis pins may be another option but I'd need to add blocks to the unit to mount them through.
Excuse the ChatGPT render but this the general idea of what I'm trying to achieve:
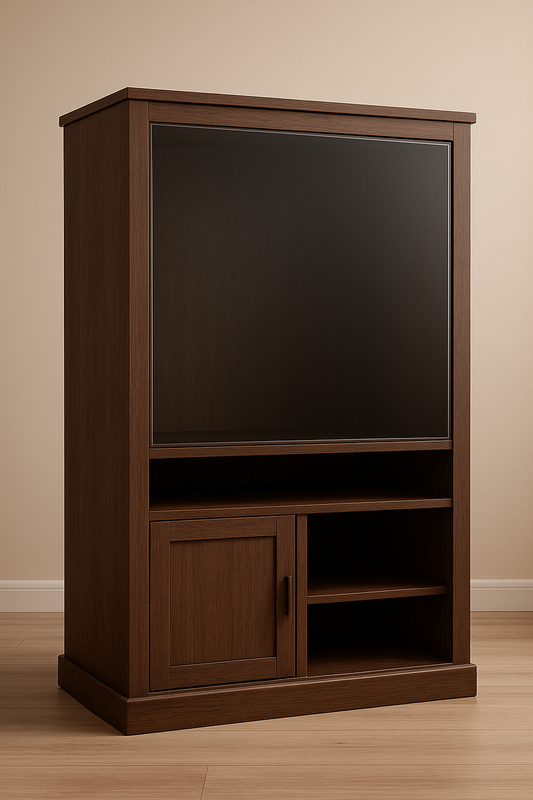
The perspex would be cut to size slightly larger than the recess for the TV so it covers the front facing edges of the unit, just to keep fingers out and items being posted through.
Wall mounting the TV isn't an option, and the perspex screen protectors that fit to TV screens won't offer enough protection hence the whole thing needing to be enclosed.
Thanks!
Magnetic strip - the stuff they use for secondary glazing ?
Magnetic strip - the stuff they use for secondary glazing ?
Good shout, I hadn't thought of that.
Reckon it would be strong enough to hold up a 1400x800x5mm sheet of perspex?
If you are making a cabinet/enclosure for the TV, could you not just create a channel down either side that the perspex could slot into from the top (say 10mm edge overlap).
Make a channel along the bottom that the bottom edge of the perspex drops into & a similar removable piece at the top that can be easily fastened into place - some kind of clamp/thumb screw. Just remove that and lift out the perspex when required.
A channel all the way round will keep the perspex nice & rigid, and if it can only be removed from the top that should prevent it being messed with. Could always secure the top piece with an eyelet & padlock at each end if needed.
If you are making a cabinet/enclosure for the TV, could you not just create a channel down either side that the perspex could slot into from the top (say 10mm edge overlap).
Make a channel along the bottom that the bottom edge of the perspex drops into & a similar removable piece at the top that can be easily fastened into place - some kind of clamp/thumb screw. Just remove that and lift out the perspex when required.A channel all the way round will keep the perspex nice & rigid, and if it can only be removed from the top that should prevent it being messed with. Could always secure the top piece with an eyelet & padlock at each end if needed.
The plan is to build a frame on top of our existing unit. I did look into pre-built units but nothing I found was suitable, matched the livingroom decor or wasn't twice the price of the TV (LG C4 55 OLED)... and still in the wrong colour!
Channels would be definitely be a good solution however I don't have the tools to accurately cut them.
I was thinking I'd order 15mm thick plywood and perspex cut to size then vinyl wrap the ply the same "smoked oak" finish as the base unit. I'll have supporting members along the top and bottom at the rear of the frame to keep it sturdy and may also use some L shaped brackets too if it feels like it needs some extra support.
It probably sounds a bit ghetto but I'm confident in being able to make it look half decent 😊
Good shout, I hadn't thought of that.
Reckon it would be strong enough to hold up a 1400x800x5mm sheet of perspex?
I have a wooden star ceiling 1800 x 1600 x 12 held up by magnets
Reckon it would be strong enough to hold up a 1400x800x5mm sheet of perspex?
If you used lexan (polycarbonate) instead, you could probably go down to 2 or 3 mm, it is approx 20-30x stronger than acrylic (perspex) for the same thickness. The only thing to watch for is that you don't go so thin that the sheet is too flexible.
Thanks! Riot shield material, probably not a bad idea to be honest!
It appears to be a bit cheaper for the same size too.
Looks like it offers less clarity than acrylic, but that won't matter when the kids are using the TV during the day.
We used 2mm acrylic sheet and magnets for our temporary secondary glazing. It's really strong, you can flex it but it would essentially be impossible to smash. The sheets are roughly 90cm by 150cm. We used 20mm magnets which are the limit for that thickness - heavier sheets need bigger magnets as ours creeps down over time. Easy enough to fix and not an issue for us. Clarity seems fine, at least no noticable difference
We sourced sheets and magnets from separate suppliers as it was cheaper that way and we needed lots of each
The colour of the magnet and sticky strips need a bit of thought as you will see them through the sheets. Maybe your design will hide them in a cover strip?
What's the value of the TV?
Just thinking from a different angle, if you buy a big-ass top of the range 144hz OLED or whatever.. that's a lot of money you'd need to protect by putting a screen in front of a screen, to make it look worse, which would kind of negate the extra money you spent on the fancy pants screen in the first place.
It might be worth a considerartion to buy a more budget tv of the same size, and don't protect it, and if it gets busted, it gets busted?
What’s your plan for dealing with heat build up?
What’s your plan for dealing with heat build up?
Yeah, That's also another consideration, high end TV's can pump a bit of heat out the rear... the vents on the back aren't just for show.
We used 2mm acrylic sheet and magnets for our temporary secondary glazing. It's really strong, you can flex it but it would essentially be impossible to smash. The sheets are roughly 90cm by 150cm. We used 20mm magnets which are the limit for that thickness - heavier sheets need bigger magnets as ours creeps down over time. Easy enough to fix and not an issue for us. Clarity seems fine, at least no noticable difference
We sourced sheets and magnets from separate suppliers as it was cheaper that way and we needed lots of each
The colour of the magnet and sticky strips need a bit of thought as you will see them through the sheets. Maybe your design will hide them in a cover strip?
That sounds good, I'll have to have a Google.
What's the value of the TV?
Just thinking from a different angle, if you buy a big-ass top of the range 144hz OLED or whatever.. that's a lot of money you'd need to protect by putting a screen in front of a screen, to make it look worse, which would kind of negate the extra money you spent on the fancy pants screen in the first place.
It might be worth a considerartion to buy a more budget tv of the same size, and don't protect it, and if it gets busted, it gets busted?
It's a 55 inch LG C4 Evo OLED, which is replacing a 55 inch LG Nano86 that got smashed at the weekend. The C4 has recently been superceded by the C5 so it's not as expensive as it once was, but still not cheap.
I hated the Nano86 to be honest, but it was a budget entry to 4K and ticked all the boxes the Xbox Series X HDMI 2.1 features.
That's why I'd like the protective screen to be secure but removable, to preserve the image quality when I'm using it for gaming/movies etc.
What’s your plan for dealing with heat build up?
Heat is definitely a considerartion. The unit will be open backed but I may fit some AV cabinet fans, one or two on the bottom to pull in cool air and one or two up to to push the hot air out.
I'm also going to need to drill holes in the bottom and rear of the base unit cupboard section where the Xbox will live, to provide better airflow for that.
The TV will see very little use during the day when the protective screen is in place though.
I appreciate all the replies so far 😊
Have been in similar situation (albeit over 20 years ago).
Might not be the prettiest solution but this might work - Screw a thin strip of the perspex along the length of three of the sides of the cabinet around the viewing border. Then screw on a slightly wider strip on top of those strips (so it it overlaps on the inside) This would create a border on three sides with a channel that you can slide the large perspex screen into (from the side with no strips). You may then have to use something to prevent the perspex screen being slid out too easily. Hope that makes sense (it did in my head before I tried writing it out 🤣)
There are different grades of clear plastic. Cast acrylic, rather than the cheaper extruded, will virtually unnoticeable. You will get reflections but only from very specific angles. A bit more expensive but you can also get museum grade acrylic, designed to go in front of paintings in art galleries. Pretty much invisible. Might be less hassle than taking it on and off.
Have been in similar situation (albeit over 20 years ago).
Might not be the prettiest solution but this might work - Screw a thin strip of the perspex along the length of three of the sides of the cabinet around the viewing border. Then screw on a slightly wider strip on top of those strips (so it it overlaps on the inside) This would create a border on three sides with a channel that you can slide the large perspex screen into (from the side with no strips). You may then have to use something to prevent the perspex screen being slid out too easily. Hope that makes sense (it did in my head before I tried writing it out 🤣)
Haha, yeah that makes perfect sense! Would definitely be easier than cutting channels but as you say, perhaps not the prettiest.
I think I may just settle for the Button Fixings as I've watched a few YouTube videos and they do seem very fit for purpose.
There are different grades of clear plastic. Cast acrylic, rather than the cheaper extruded, will virtually unnoticeable. You will get reflections but only from very specific angles. A bit more expensive but you can also get museum grade acrylic, designed to go in front of paintings in art galleries. Pretty much invisible. Might be less hassle than taking it on and off.
That's good to know, thank you. I reckon I'd go with cast as the museum stuff is 4 or 5 times the price (justifiably so for it's intended use).
TV is with DPD now so I'll need to make a decision today and get everything ordered.