![]() You don't need to be an 'investor' to invest in Singletrack: 6 days left: 95% of target - Find out more
You don't need to be an 'investor' to invest in Singletrack: 6 days left: 95% of target - Find out more
Everyone loves a good build thread, so I thought I’d share some pics of the project I’m currently working on with my son. Apologies in advance – it’s a bit wordy (and this is only the first installment!) – I’ve been taking pics along the way and have just sat down to do a bit of a write-up. Feel free to skip the text, look at the photos and start criticising 😆
Three years ago I built a wee treehouse for my eldest, who was two at the time. Just a simple platform, with a climbing wall, scramble net and slide. It was small, but ideal for a kid his age. The main thing was it was close to the house, so we could keep an eye on him.
[url= https://c2.staticflickr.com/1/625/31303287313_7ffe1be3b1.jp g" target="_blank">https://c2.staticflickr.com/1/625/31303287313_7ffe1be3b1.jp g"/> [/img][/url]
[url= https://flic.kr/p/PGawJe ]2017-01-05 17.17.37[/url] by [url= https://www.flickr.com/photos/willhyde/ ]W Hyde[/url], on Flickr
It's been a castle, a space ship, a pirate ship, lookout tower and many other things, but The Boy said it was too small, and could I make it bigger? Well, no, I said, the tree's not big enough and I’d like to keep it for his little brother to play in when he's old enough.
But, I said, we could just build a bigger one. 🙂
I admit, at this point my mind was already wandering towards Endor:
[img] 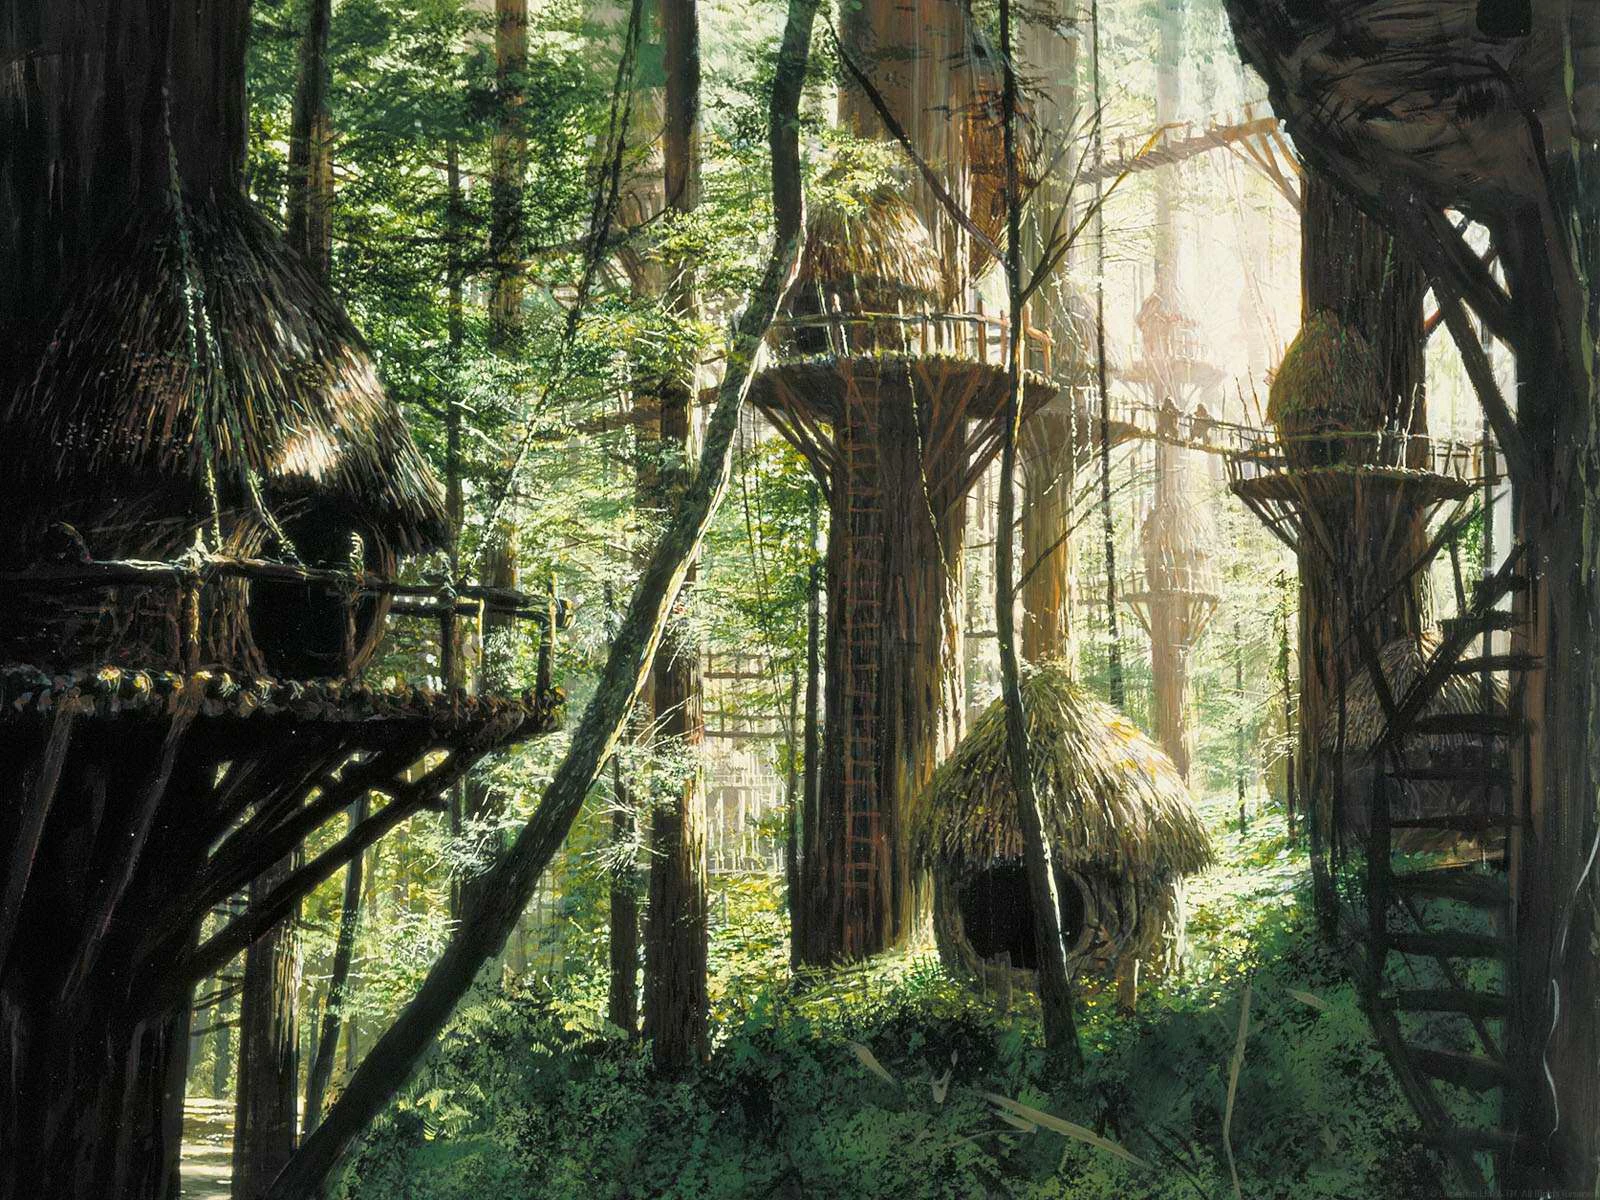 /revision/latest?cb=20070811234556[/img]
[img]  /revision/latest?cb=20151106180948[/img]
So we had a scout round the garden for suitable trees. We have a few stands of sequoias in various places and settled on three trees, with the idea being to build a platform between them.
I then applied my google-fu to the subject of treehouse building. The treehouse bit is quite simple, you’re basically building a deck without the posts/piles. The tricky bit is attaching it to the tree(s). The consensus is that a small number of big holes is less damaging to the tree than lots of smaller ones.
There seem to be two schools of thought. The cheap(er) way is to use lag bolts/coach screws, generally ½” or bigger.
[img]  [/img]
There are a few stories floating about of ½” bolts failing though. Generally you attach your beams 50mm or more from the tree to allow for growth (as opposed to having the beam up against the bark) so you can generate a significant bending moment around the spot where the bolt exits the tree. For anything bigger than a small platform you really need to be looking at 1” or 1 ¼“, and they are neither readily available nor cheap here.
There’s also the matter of allowing for tree trunk movements, if you are attaching to more than one trunk. In strong winds the lower parts of the tree trunk might only move a small distance but will put a huge force on anything trying to resist it.
The generally accepted “proper” way is to use treehouse attachment bolts.
[img]  [/img]
[img]  [/img]
But these aren’t cheap, and I’d need six attachments for what I had in mind, so the cost was going to be significant. I figured that I could make a knock-off version using some threaded rod and a stack of fat washers. Ideally the washers would be welded together and to the rod, but a) I have no welding gear and b) I don’t know how to weld; so loose they would have to be.
I bought two one-metre M24 high-tensile threaded rods, chopped them into thirds using an angle grinder and then used the bench grinder to grind parallel flats on one end. This meant I could grip the end with a wrench to drive them into the tree. I also got a stack of 50 mm washers, and some nuts.
Drilling the holes required some new toys: 50 mm forstner bit and 20 mm auger bit.
[url= https://c4.staticflickr.com/6/5747/32058457315_658eee6020.jp g" target="_blank">https://c4.staticflickr.com/6/5747/32058457315_658eee6020.jp g"/> [/img]
[/url][url= https://flic.kr/p/QQTYsF ]2016-12-27 10.46.52[/url] by [url= https://www.flickr.com/photos/willhyde/ ]W Hyde[/url], on Flickr
We had a couple of redwoods felled a few years ago (they’d fallen in high winds and were hung up on other trees) so had some convenient stumps for a test run:
[url= https://c1.staticflickr.com/1/423/31910507712_239cfb57e1.jp g" target="_blank">https://c1.staticflickr.com/1/423/31910507712_239cfb57e1.jp g"/> [/img][/url]
[url= https://flic.kr/p/QBPGcs ]2016-12-11 11.42.18[/url] by [url= https://www.flickr.com/photos/willhyde/ ]W Hyde[/url], on Flickr
That seemed pretty solid so with much trepidation I started drilling massive eff-off holes into a healthy tree 🙁
So we had a scout round the garden for suitable trees.
Just how big is your garden???
Poor tree 🙁
First up was marking the spots to drill four holes: two on opposite sides of a big trunk (1 m diameter) and one each on two other trees. All had to be at exactly the same height, so I showed The Boy the old-skool way of doing things:
[url= https://c8.staticflickr.com/1/382/32058445095_d99ae0c0d6.jp g" target="_blank">https://c8.staticflickr.com/1/382/32058445095_d99ae0c0d6.jp g"/> [/img][/url]
[url= https://flic.kr/p/QQTUPZ ]2016-12-26 17.43.14[/url] by [url= https://www.flickr.com/photos/willhyde/ ]W Hyde[/url], on Flickr
And for good measure the modern equivalent (borrowed the Leica laser level/measure from work over the holidays). Not that I thought gravity might be wrong, mind, but one should never pass on an opportunity to muck around with lasers 8)
[url= https://c7.staticflickr.com/1/452/32019526046_0afb725726.jp g" target="_blank">https://c7.staticflickr.com/1/452/32019526046_0afb725726.jp g"/> [/img][/url]
[url= https://flic.kr/p/QMsrxU ]2016-12-27 10.24.26[/url] by [url= https://www.flickr.com/photos/willhyde/ ]W Hyde[/url], on Flickr
Turns out gravity is at least as accurate as German precision optics.
Forstner first, then auger:
[url= https://c8.staticflickr.com/6/5486/31940651271_088ed57ae5.jp g" target="_blank">https://c8.staticflickr.com/6/5486/31940651271_088ed57ae5.jp g"/> [/img][/url]
[url= https://flic.kr/p/QEubPZ ]2016-12-27 11.19.10[/url] by [url= https://www.flickr.com/photos/willhyde/ ]W Hyde[/url], on Flickr
(It was a struggle to not make a smutty comment about that pic...)
[url= https://c2.staticflickr.com/1/406/31248315233_076b360c48.jp g" target="_blank">https://c2.staticflickr.com/1/406/31248315233_076b360c48.jp g"/> [/img][/url]
[url= https://flic.kr/p/PBiMrK ]2016-12-27 11.22.23[/url] by [url= https://www.flickr.com/photos/willhyde/ ]W Hyde[/url], on Flickr
[url= https://c1.staticflickr.com/1/745/31683596080_e64775c342.jp g" target="_blank">https://c1.staticflickr.com/1/745/31683596080_e64775c342.jp g"/> [/img][/url]
[url= https://flic.kr/p/QgLHgW ]2016-12-27 11.33.31[/url] by [url= https://www.flickr.com/photos/willhyde/ ]W Hyde[/url], on Flickr
First one in. Five 3 mm washers held in place with a nut, to spread the load (hopefully). The Boy gave it a load test.
[url= https://c8.staticflickr.com/1/378/31248326983_2e74c6564f.jp g" target="_blank">https://c8.staticflickr.com/1/378/31248326983_2e74c6564f.jp g"/> [/img][/url]
[url= https://flic.kr/p/PBiQWk ]2016-12-27 11.34.07[/url] by [url= https://www.flickr.com/photos/willhyde/ ]W Hyde[/url], on Flickr
Next up, the bearers (190 x 45 mm, 4.8 m long) went onto the supports and I assembled my cheapo brackets. 50 x 3 mm flat steel cut to 150 mm lengths, with 25 mm square section cut to 50 mm at each end, attached with M10 lag screws.
[url= https://c8.staticflickr.com/1/673/31940698111_883be10ecd.jp g" target="_blank">https://c8.staticflickr.com/1/673/31940698111_883be10ecd.jp g"/> [/img][/url]
[url= https://flic.kr/p/QEuqKz ]2016-12-29 15.23.38[/url] by [url= https://www.flickr.com/photos/willhyde/ ]W Hyde[/url], on Flickr
I’m pretty happy with these, I paid the equivalent of about 75 quid for enough bits to make six supports, including the sliding brackets. That’s less than the cost of one proper attachment bracket. Admittedly it’s not as strong, but they still feel like massive overkill.
qwerty - Member
Just how big is your garden???
Just under a hectare (about 2.5 acres) but most of it is a ridiculously steep wooded hillside.
Looks good. Are you in the UK? The trees look foreign.
redthunder - Member
Poor tree 🙁
It did feel very wrong, but they're massive trees and will barely notice these wounds, judging by the random bits of wood attached to some others - looks like remnants of past treehouses.
Qwerty - we emigrated to NZ a while back. They're still foreign trees though, coastal redwoods. Native to the US I think, but classed as 'exotics' here.
Just under a hectare (about 2.5 acres) but most of it is a ridiculously steep wooded hillside.
With a trail down it, surely?
Just under a hectare (about 2.5 acres) but most of it is a ridiculously steep wooded hillside.
Anyone else thinking 'northshore'??!!
DrP
rossburton - Member
Just under a hectare (about 2.5 acres) but most of it is a ridiculously steep wooded hillside.
With a trail down it, surely?DrP - Member
Just under a hectare (about 2.5 acres) but most of it is a ridiculously steep wooded hillside.
Anyone else thinking 'northshore'??!!
It's on the 'to-do' list 🙂 Along with a pump track and short section of trail on a less bonkers slope to make some nice small table tops to learn to jump on, something I've never been able to do.
Northshore possibly less likely, I'm not keen on heights when on the bike. The hillside is about 1 in 2 on average, so a trail zig-zagging down it should be doable.
Only problem is finding time, between a job, wife, two young kids and a jungle to try to keep on top of (first world problems etc etc 😛 )
A few more pics.
I was originally thinking of building a wee house at one end and a deck at the other, each squeezed in the gaps between the trees. They would be joined via a small walkway. In the end I adopted the ‘go big or go home’ approach and went for a 4.2 x 2.5 m rectangle which encompasses the two smaller trees. It will (probably) have a pitched roof over the whole thing, and then I’ll put up some light stud walls to make a ‘house’ at one end.
I’d put some boards down on the main beams as The Boy was keen to get up there. This is him with a pad and pencil, measuring his foot…
[url= https://c1.staticflickr.com/1/271/31217436754_5fd424604b.jp g" target="_blank">https://c1.staticflickr.com/1/271/31217436754_5fd424604b.jp g"/> [/img][/url]
[url= https://flic.kr/p/Pyzwmb ]2017-01-02 10.27.46[/url] by [url= https://www.flickr.com/photos/willhyde/ ]W Hyde[/url], on Flickr
Turned out he didn’t want a ladder to get into the treehouse. What he wanted was to build a platform in a nearby tree, with a ladder, and then have a bridge from there to the main treehouse! Good to know he’s on board with the Ewok Village concept 🙂 His idea was that the bridge will go from the tree in the foreground of the pic above (far right of the photo) to the treehouse, which means a ~5 m long bridge. He was measuring his foot as that’s how big I have to make the gaps between the planks, so they are big enough to fall through and therefore scary! 🙂
[url= https://c1.staticflickr.com/1/286/31683649430_2f6f9608ec.jp g" target="_blank">https://c1.staticflickr.com/1/286/31683649430_2f6f9608ec.jp g"/> [/img][/url]
[url= https://flic.kr/p/QgLZ8L ]2017-01-02 10.27.11[/url] by [url= https://www.flickr.com/photos/willhyde/ ]W Hyde[/url], on Flickr
See that ladder there…? This is the other end of it:
[url= https://c1.staticflickr.com/1/524/32058507355_2a5a2ed723.jp g" target="_blank">https://c1.staticflickr.com/1/524/32058507355_2a5a2ed723.jp g"/> [/img][/url]
[url= https://flic.kr/p/QQUekr ]2017-01-01 16.50.54[/url] by [url= https://www.flickr.com/photos/willhyde/ ]W Hyde[/url], on Flickr
Solid! She’ll be right, as they say round these parts.
A few joists put in place to get a feel for the dimensions:
[url= https://c1.staticflickr.com/6/5518/31910593192_09b24a9f32.jp g" target="_blank">https://c1.staticflickr.com/6/5518/31910593192_09b24a9f32.jp g"/> [/img][/url]
[url= https://flic.kr/p/QBQ8Bf ]2017-01-02 19.17.51[/url] by [url= https://www.flickr.com/photos/willhyde/ ]W Hyde[/url], on Flickr
Another new addition to the tool-kit, a chain hoist 🙂
[url= https://c1.staticflickr.com/1/768/31272012864_847c6be965.jp g" target="_blank">https://c1.staticflickr.com/1/768/31272012864_847c6be965.jp g"/> [/img][/url]
[url= https://flic.kr/p/PDpeVA ]2017-01-05 14.47.07[/url] by [url= https://www.flickr.com/photos/willhyde/ ]W Hyde[/url], on Flickr
A small additional section of joist work so the bridge can be attached all perpendicular like:
[url= https://farm1.staticflickr.com/460/32638888435_1041ec7b38_z.jp g" target="_blank">https://farm1.staticflickr.com/460/32638888435_1041ec7b38_z.jp g"/> [/img][/url]
[url= https://flic.kr/p/RJbQpM ]IMG_20170201_132511[/url] by [url= https://www.flickr.com/photos/willhyde/ ]W Hyde[/url], on Flickr
Bit of decking…
[url= https://farm1.staticflickr.com/336/32259537480_a657d1777f_z.jp g" target="_blank">https://farm1.staticflickr.com/336/32259537480_a657d1777f_z.jp g"/> [/img][/url]
[url= https://flic.kr/p/R9EyA5 ]IMG_20170201_132413[/url] by [url= https://www.flickr.com/photos/willhyde/ ]W Hyde[/url], on Flickr
At this point I was beginning to wonder if maybe I should have stuck with the plan to build two smaller decks!
like! 😀
I hate this sort of thread. BE GONE with your "few stands of sequoia" and "ridiculously steep wooded hillside"....
*grumbles whilst sitting in his windowless office*
batfink - Member
I hate this sort of thread. BE GONE with your "few stands of sequoia" and "ridiculously steep wooded hillside"....*grumbles whilst sitting in his windowless office*
Yeah, it's a hard life but someone's got to do it 8)
If it makes you feel any better, I'm posting from my office which is about 100m from a glorious vista over the estuary. Unfortunately between me and the estuary are a bunch of beige and grey buildings, which is all I can see 🙁
I do have a beer in hand, though, as it's knocking off time 🙂
Next bunch of photos... I decided to build the second treehouse and connect the bridge before finishing the decking on the first one. Once the deck is down the access to where the bridge ropes connect will all be from below, which will be a PITA.
This one’s a lot simpler, just an octagonal platform around a single tree (although it has an awkward secondary trunk).
[url= https://farm5.staticflickr.com/4420/35571138813_3ccd2d574e_z.jp g" target="_blank">https://farm5.staticflickr.com/4420/35571138813_3ccd2d574e_z.jp g"/> [/img]
[/url][url= https://flic.kr/p/WciohM ]IMG_20170805_154554[/url] by [url= https://www.flickr.com/photos/willhyde/ ]W Hyde[/url], on Flickr
Rope attached to check the alignment of the bridge:
[url= https://farm5.staticflickr.com/4416/35982603150_8e13e29cf0_z.jp g" target="_blank">https://farm5.staticflickr.com/4416/35982603150_8e13e29cf0_z.jp g"/> [/img][/url]
[url= https://flic.kr/p/WPEfiu ]IMG_20170805_154924[/url] by [url= https://www.flickr.com/photos/willhyde/ ]W Hyde[/url], on Flickr
Perimeter joists for the deck:
[url= https://farm5.staticflickr.com/4369/36615337826_11b1d7c6c0_z.jp g" target="_blank">https://farm5.staticflickr.com/4369/36615337826_11b1d7c6c0_z.jp g"/> [/img][/url]
[url= https://flic.kr/p/XMzbh3 ]IMG_20170819_162145[/url] by [url= https://www.flickr.com/photos/willhyde/ ]W Hyde[/url], on Flickr
Using a handy weight to test the load-bearing abilities of the new platform:
[url= https://farm5.staticflickr.com/4344/35975125114_c4cb2388ef_z.jp g" target="_blank">https://farm5.staticflickr.com/4344/35975125114_c4cb2388ef_z.jp g"/> [/img][/url]
[url= https://flic.kr/p/WNZVkQ ]IMG_20170826_170326[/url] by [url= https://www.flickr.com/photos/willhyde/ ]W Hyde[/url], on Flickr
Setting out the bridge ‘rungs’ and tying them together – my hands were like claws by the time I’d done both sides!
[url= https://farm5.staticflickr.com/4332/35995823044_9bc3859e7a_z.jp g" target="_blank">https://farm5.staticflickr.com/4332/35995823044_9bc3859e7a_z.jp g"/> [/img][/url]
[url= https://flic.kr/p/WQQ17G ]IMG_20170827_134507[/url] by [url= https://www.flickr.com/photos/willhyde/ ]W Hyde[/url], on Flickr
And yes, the Baby Jeezus and many, many kittens committed hara-kiri on seeing the state of that gravel.
Temporarily putting the bridge in place to see if it fits…
[url= https://farm5.staticflickr.com/4339/36833208795_a817fe1a6e_z.jp g" target="_blank">https://farm5.staticflickr.com/4339/36833208795_a817fe1a6e_z.jp g"/> [/img][/url]
[url= https://flic.kr/p/Y7PPJ4 ]IMG_20170827_170718[/url] by [url= https://www.flickr.com/photos/willhyde/ ]W Hyde[/url], on Flickr
So we had a scout round the garden for suitable trees. We have a few stands of sequoias in various places......We had a couple of redwoods felled a few years ago (they’d fallen in high winds and were hung up on other trees) so had some convenient stumps for a test run:
You are a distant relative to Mcmoonter and I claim my £5
😉
Brilliant thread. Really interesting and love your write up and photos. Keep it coming!
Interested to see how the platforms attachments still allow room for movement in the tree as it still seems like they are all essentially locked together. If one tree sways more than its neighbour how is that accounted for?
I've watched that American tv show Treehouse Masters a few times and they always use bolts into the tree. I've also seen attachment points that hug the tree rather than bolt into it.
I guess if he advocates bolts then they must do little damage.
Great work. Look forward to more updates 🙂
Think I'd have wanted steel cable and stronger mounting for that bridge. You don't want one rope stretching and the bridge going off camber. Also the bridge will try and pull your mounting board off the structure. Little un isn't that big at the moment but a few yrs time and a few mates jumping on the bridge might need considering!
Crikey. Makes my modified climbing frame game look somewhat weak.
Strong work OP
Nice one, your lad (and you) will have hours of fun in that
Cheers all.
Kayak23 - three Treehouse Masters guys use the fancy bespoke bolts I posted at the start. They use proper floating brackets too, mine are just cheap copies.
[url= https://farm6.staticflickr.com/5578/31683620930_47cb07176c_z.jp g" target="_blank">https://farm6.staticflickr.com/5578/31683620930_47cb07176c_z.jp g"/> [/img][/url]
[url= https://flic.kr/p/QgLQEo ]2016-12-29 15.23.30[/url] by [url= https://www.flickr.com/photos/willhyde/ ]W Hyde[/url], on Flickr
There's about 50mm of movement each way along the line of the beam. In this photo there's no movement along the line of the rod due to the nuts, but I've loosened them since. They're either side of the same trunk so should never need to move on that axis anyway. Where there's a single attachment on a tree I only used a lock nut on the end of the rod to stop the bracket slipping off the end. The trees are all 30-odd metres tall and 700mm to over a metre diameter near the bases where I'm attaching to, so they don't move about to much!
Burko - don't worry, the bridge isn't attached to the edge joists. On the small platform the ropes are going to be anchored to the big bolts set into the tree. At the big platform they'll be mounted to the big joists that support the platform. They'll all be attached using turnbuckles so I can adjust the length of each end individually if/when the rope stretches. Also, I'll use a second rope entwined around each main one, similarly anchored. And there'll be handrail ropes at 0.5m and 1m high on each side, with 6mm line running up and down attaching them to the bridge 'deck'. The main ropes are 12mm three-strand poly anchor rope. Working load limit is about half a tonne, breaking load is two tonnes, there'll be eight altogether... Should be ok. At worst it'll collapse slowly if one breaks.
wow, just wow. My tree house we built when I were a lad, balanced on top of the branches, so the whole thing was able to move around, nothing screwed in. It only lasted about 6 yrs, but we had moved away by then anyway, and were about 15, so tree houses were getting used for other things...
Excellent. Makes sense.
🙂
This is simultaneously inspiring and depressing. Keep up the good work!
I made my own treehouse attachment bolts using M24 cromoly bolts with a lead shim on which a steel handrail tube and tube clamp. The tube clamp has a bracket onto which the tree house support sits. The lead shim enables the steel tube to slide in and out as the tree moves or just out as it grows.
[img]  ?efg=eyJpIjoidCJ9&oh=e5bd7421029c0551d6820858010c79b0&oe=5A4C9AD8[/img]
It has been up for 2 odd years now and a dozen kids jumping up and down in it.
Excellent stuff!
Tomato, that is a thing of beauty! Such a simple solution. I did start off looking at massive coach bolts/lag screws but they're not readily available or cheap here, hence my bodged effort.
Thanks! My inventiveness is fuelled by a lack of cash for fancy American Treehouse Attachment Bolts that are just way out of the price range of an ordinary treehouse. Perhaps if you are spending tens of thousands on a posh shed in a tree they are affordable.
The bad news with treehouses is that they need planning permission! Mine doesn't and I winged it. My neighbours are cool and the treehouse is clad in camouflage tarpaulin, effectively a Klingon cloaking device.
I'm stealing that bolt idea, Tomaso. Muchos mebranos!
Apologies I just realised that auto correct changed you to tomato!
We also require consent (planning permission) here in NZ but I'm not bothering. I'm building it to meet the relevant standards, and if I was ever called on it I can get a code compliance certificate for $400 rather than a consent now for $2700...
Hi Guys! this is tony I'm a newbie here. I've been reading threads and comments for the last hour. This one looks so cool. Cant wait for the finished tree house Tomazo!