![]() You don't need to be an 'investor' to invest in Singletrack: 6 days left: 95% of target - Find out more
You don't need to be an 'investor' to invest in Singletrack: 6 days left: 95% of target - Find out more
I'm reasonably comfortable with tubeless tyres on my Swift, some tyres go straight up and stay up and others loose pressure overnight and take a few days and plenty of sealant to finally seal and stay up.
I've just set up my first gravel wheels, DT Swiss G1800 with Maxxis Receptor tyres (the bike's not built yet and I'm just doing the odd bit now and then).
The tyres went up and seated easily enough but 40 minutes later and they're flat. I'm never lost pressure quite so quickly so is it just a case of TLC and sloshing plenty of sealant around over the next few days or does it indicate a bigger problem?
The rims were taped at the factory so the only other thing I had to do was fit the supplied valves. Most valves just drop into the rim hole and you tighten up the valve nut to pull them into the hole and seal.
The supplied DT valves on the other hand have a 10mm rubber collar which apparently has to be forced into the rim with quite some force (it felt like I was going to snap my thumbs off). I believe that it makes for a really tight seal if you get them in properly, but maybe I've left a gap.
Any thoughts?
is it just a case of TLC and sloshing plenty of sealant around over the next few days
Pretty much. Spraying the wheel with some dilute washing-up liquid will often indicate the leak - either sidewall, valve or a spoke hole (which usually indicates a taping issue).
They need a few miles ride time, just sloshing the sealant around for a few minutes by hand just won't do it. I'd either fit them to another bike and ride them or wait until the proper bike is built. Nothing disperses sealant better than a ride
What 🚀 🐕 said....
I set up a set of tubeless tyres the other day. The front ping,pinged very satisfactorily.
The rear never made that satisfying sound, this despite putting around 350 psi into it. It's still holding air though so that's the main thing...
I’d say 350 psi is brave
I reckon they all benefit from a ride soon after setup.
https://www.renehersecycles.com/how-to-set-up-tubeless-tires/
The Maxxis site says that the Receptors are tubeless ready, so I assume that they should hold air. Perhaps the rims/tape is leaking (although they both seem to be acting identically).
350 psi
😳
😳
I've embellished things because internet but yeah there was some wincing when it came to letting all them psi's go from the highest pressure tank inflator 3000...
Are the rims welded or just pinned? My m1900s leaked like a bloody sieve from the pinned rim joint until I went for a ride...
They're pinned (entry level wheels). Hopefully they'll seal up in time🤞
Is it worth over-inflating them a tad so the pressure pushes the sealant where it needs to go?
Are they skinwall?
Maxxis skinwall tyres do have a reputation for not holding air well based on quite a few reviews and user feedback
This has also been my own experience too. As per other posts, a couple of rides will distribute the sealant and add a layer of latex where it is required.
The problem if not will most likely be the tyres themselves, or more specifically the porous sidewalls. The addition of more rubber and different compound in the blackwall option makes quite a difference. Only seems to be an issue with Maxxis. I have used other branded tanwalls and skinwalls without a problem.
The soap solution will highlight if you have a specific gap which sealant should fix, but it won’t highlight the porosity of the tyre itself.
I would echo the advice to spray some soapy water around.
Cheers all. They're not skinwalls (the Vittoria ones I had trouble with on the Swift were) and they're meant to be tubeless ready.
It could be the tyres, the tape, the rims or the valves so I'll have a play and slosh in some sealant and, of course, give them a good ride when the bike's built (I don't have another bike to ride them with as the Swift's QR).
Thanks again.
At the risk of making a useless suggestion, do you have a wheel jig or another bike that you could fit the wheels to off the ground and spin them for a while? Even if you couldn't ride it, fitting them to another bike and spinning them up in a work stand or upside down on the floor might help to distribute the sealant better.
+1 on "even a short ride does more sloshing than any amount of workshop shaking."
Sorry, just another thought based on experience.
You mention that the bike isn’t yet ready to build. Depending on the definition of ‘not ready’ you might want to reconsider inflating the tyres and adding sealant now.
If you are talking days, don’t worry. If you are talking weeks and months, bear in mind that the sealant will be ageing and solidifying and evaporating, particularly if the tyres are losing air.
I know how tempting it is with a ground up build to assemble parts as they arrive but sealant should be one of the last jobs to complete really. That way you maximise its life and you can then spin the wheels on a real ride through a range of angles which really helps to distribute the sealant. Sealant has a finite life so maximise it!
You also run the risk of the sealant solidifying in particular spot in the tyre which can really impact the balance of the wheel
If you are talking about weeks and months, I might suggest at least removing the sealant back to its air tight container. You can pop the tyre off and suck it up with a 10p syringe from a chemist if you don’t have one. Much cleaner than trying to pour it back and you should get most of it up.
As I said, if it’s days, don’t stress, get the bike built soon and it will probably resolve itself on the first ride!
Thanks
Hopefully the build won't take too long, I've got all the parts I just need to knuckle down and do it. If it looks like it might take a while I might look at draining the sealant.
When I re-inflated the tyres I could hear a very slight hiss from around the valves (both wheels), sloshing sealant around the valve area stopped this.
I've also tightened up the valves, although I don't want to overcook it and damage the rims. I was hugely surprised by the amount of force needed to get the DT Swiss valves in through the valve holes (as above they have a very tight rubber collar). I've tweaked them beyond finger tight using a small mole wrench don't want to mash the nuts.
Also, where does the O ring go? I've fitted it inside the rim between the valve base and the rim, but it could also go under the nut. Googling seems to yield a 50% split here (and not all DT Swiss valves include them). As it stands, I seem to be now holding air!
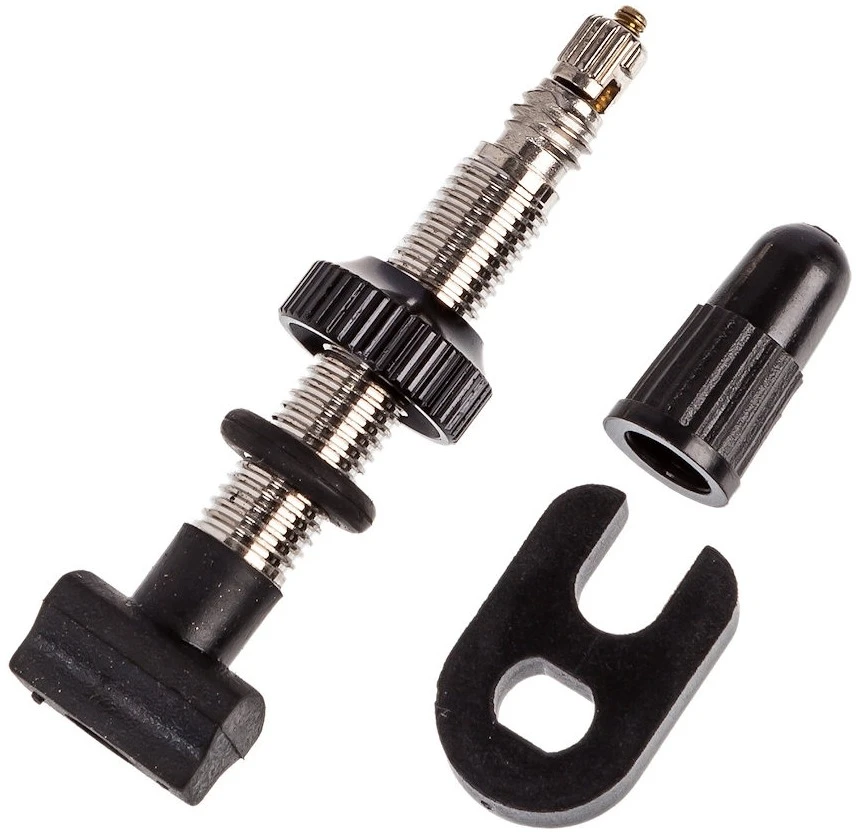
Also, where does the O ring go?
Under the nut
That might be it.
The o-ring goes on the outside between the nut that you use to tighten the valve and rim. They aren't designed to be used any other way. The little o-ring is of questionable value since any air escaping under the valve has the chance to escape around the rim cavity and out through any spoke hole. It might be just there to prevent the nut from gouging your rim as your tighten it.
The rubber moulding attached to the valve itself is meant to squish and conform to your rim bed. If yours are exactly like the ones above, they are also designed to fit longitudinally (ie the long bit sits along the rim bed rather than across it).
They are designed to be tightened up quite tightly. The tighter they are, the better they squish and conform.
If the valve is the issue, once you take it apart and fit it back together in the right order, let your wheels sit with the valves at the bottom, thus the sealant will be resting over the valve internally and plug any air gap.
Back to the advice of 'take it for a ride', this would be happening every rotation, but sat in your shed/garage/front room/wherever, the sealant will only be plugging wherever it is resting at the bottom of your wheel when it is static.
What a muppet!
Right, the O rings have been retrieved and are now in the correct place and the wheels seem to be holding air. Hopefully I'll have it all built up in a week or two so I've left the sealant in for now, if things conspire against me it can come out.
I don't recall having O rings with my previous valves and probably shouldn't have trusted Mr. Google.
I've only put together hardtails in the past, this will be my first gravel (road) bike so I suspect that there will be plenty of further opportunities for me to embarrass myself.
Thanks again for all the help!
Yay, progress!
What bits do you still need for the build?
Good stuff.
If the wheel is holding air, no need to worry about removing the sealant if you will be all done in a few weeks. Think how long the stuff stays in there normally. The suggestion was only if it was going to be months and the tyres were leaking air.
What bits do you still need for the build?
I've got everything (mostly from the Wiggle sale) including a nice half-price Ragley Trig frame and some £35 Easton carbon bars. I just need to knuckle down and put it together, although I ought to do some reading up online too.
Brifters and drop bars are new to me and as it's the first time I've bought a full groupset I suspect that the brakes will be JKit too. It's also got these new fangled thru-axles (the Swift's still QR) that look surprisingly like they might loosen off in used; my Shimano QRs have been remarkably secure.
I'm not too bad as an amateur home mechanic as long as it goes well. It's when things go askew that I tend to flap!
Setting up brifters isn't too bad; Calvin's Park Tool videos for how to tape and route them are good. And once you're away from the handlebars, everything will be familiar.
However; if this is your first time taping drop bar grip tape... set aside longer than you think for that. Definitely one of those "every ten minutes of YouTube will take you an hour the first time" situations. You will get fast at it though!
(If you're familiar with bar tape, I apologise for the presumption ))
with the upmost respect, if you managed to put the O rings inside the rim and if you are new to setting up road levers and brakes would it be best to get someone who does know how to set them up to check everything before you go hurling yourself down a trail on it?
not saying don't do it yourself, that's half the fun of it but get it checked before at the very least you brake something expensive to replace and at the very worst, break yourself
Perhaps yes, although I've been similarly unsure about mountain bike kit in the past. I think that if I take things slowly and check details online I should be okay but I do need to get over my nervousness around carbon bars and forks (I am suitably equipped with torque collars to tighten things correctly).
I'm hoping that it'll be an enjoyable learning experience.