![]() You don't need to be an 'investor' to invest in Singletrack: 6 days left: 95% of target - Find out more
You don't need to be an 'investor' to invest in Singletrack: 6 days left: 95% of target - Find out more
Has anyone converted their non Di2 road bike to run full Di2?
I'm thinking about making the change but my current model Roubaix will not allow for internal routing of wiring etc...
Interested to hear what others may have done.
I see a purchased of zip ties coming soon.
i saw a scott scale last year with full di2 installed largely with zip ties.
A large quantity of zipp ties is exactly what i'm trying to avoid!
Duct tape might be lighter
I'm thinking to do the same. I reckon I'll only know once I buy the upgrade kit and see what all the cables etc are like.
Shimano sell adhesive cable sheaths for this. http://www.chainreactioncycles.com/shimano-ewc2-di2-cable-cover-sheath/rp-prod69041
You can get the sheaths but even they look pap.
Giant had a top end TCR in the range last year with them on and it ruined it for me. A lovely carbon matt black frame with baggy wires and stick on routings for them.
It's got to be right imho!
It can be done reasonably neatly. We've done a couple in the shop.
Could you drill the frame at all? I only ask as I know some manufacturers will give you details of how to do this safely, [url= http://www.cervelo.com/media/docs/S3-S2-Di2-installation-guide-71ad2e79-8ab7-4f28-944a-f141d92de2a5-0.pdf ]Cervelo for example[/url]
Couldn't resist! Ordered the upgrade kit from Merlin so will see how the external cabling install goes...
Was going to suggest the same as the Colnago. Black frame? Run the cable under some insulating tape on the underside of the downtube?
How easy is it to set Di2 up as I am looking at the Merlin deal, although the wallet took a pounding with buying the wifes Caad 10 last night. 🙄
Could you drill the frame at all? I only ask as I know some manufacturers will give you details of how to do this safely, Cervelo for example
I was going to say something like that, seeing as headtube badges are often rivited on, and BB cable guides likewise, drilling a similalry small hole in the same area should be OK I'd have thought?
Well the kit came and I installed it this weekend. The Shimano cable sheaths are really good and make it look quite neat.
However, the Merlin kit comes with very long cables (and you cant choose which lengths you receive). The cables are £17 each to buy on their own so I ended up getting the soldering iron out and shortening 3 out of the 4 cables as there was just too much slack to hide anywhere on the frame.
[img]  [/img]
Seems to still work. First ride tonight! 🙂
I have ordered my Di2 kit and hope to have it tomorrow. Do you set up the rear alignment in any gear on the cassette ? Hoping its easy to set up.
Yeh, that bit was fairly easy. Shift to the 5th gear, then press the button to go into the adjustment mode and use the shifter buttons to micro adjust the mech.
I spent a LOT more time just looking at the frame thinking about how to connect it all together and make it neat. Hit me up if you have any questions.
Any chance of a few pics, interested in seeing how neat it is.
Presumably if you don't have internal routing, you probably have cable stops and a 50/50 chance they're riveted on.
Gently drill a rivet and you have a hole that might well be expandable to run the Di cable through.
Just a thought.
Edit: but you might need to remove and re-make the cable terminations
I spent a LOT more time just looking at the frame thinking about how to connect it all together and make it neat. Hit me up if you have any questions.
Cheers, will do. 😀 Just got the text for Tuesday delivery, so stripped my bike tonight. Got lots of nearly new 105 now to sell to get an Ultegra chainset.
Well, got everything today. Got home, spread it over the dining room table. Had already stripped my bike down last night. No instructions for it included. Found I had many bits I never used ( hope I don't need it) Had a few issues with the front mech, but sussed it in the end. Had 2 front loom kits in the box, which confused me again. Different part numbers too. One was in the bag for the rear mech and the other was in a bag on its own. Decided to try the one with the mech. Had issues fitting the connector under the bottom bracket and had a file a little out the frame to be able to slot it home. Other than that and fiddling cables into the frame, it fired into life ( charged the battery at work so was fully charged). Found afterwards the front mech grub screw to locate and support the front mech on Park Tools site. So checked and adjusted.
Shifting now changed in my eyes is a revelation. So much smoother and precision than the 105 I took off. Up the road in the darkness test, was great. Really looking forward to testing it at the weekend.
Oh and one other thing, do I need to turn it off at all or leave it?
I'm looking at the Merlin upgrade kit too but can't decide whether to go for 11 speed mechanical or 10 speed Di2 setup. Any thoughts?
That'll be a no then.
I've taken the plunge anyway & decided to go electric.
Right choice!I've taken the plunge anyway & decided to go electric.
Finally got round to finishing mine and taking it for a ride. Very impressed; it certainly put a smile on my face!
Here's some (bad) photos of the external install on my winter/audax bike:
[img] https://lh5.googleusercontent.com/-2C7i3kvcqfI/UlkmmjSJKjI/AAAAAAAAMuI/TGqglLga1Ms/w500-h846-no/IMG_0939.JP G" target="_blank"> https://lh5.googleusercontent.com/-2C7i3kvcqfI/UlkmmjSJKjI/AAAAAAAAMuI/TGqglLga1Ms/w500-h846-no/IMG_0939.JP G"/> [/img]
[img] 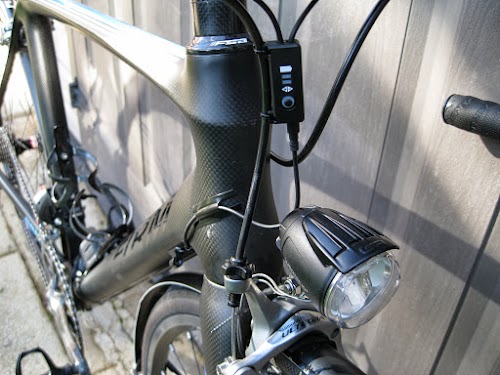 [/img]
[img]  [/img]
[img]  [/img]
Took it out again on Sunday for a very wet club run.
1. It works in the rain.
2. I'm loving it even more! The front shifting is immense. I love the hood shape; really nice to hold.
Sadly my Ultegra chainset and brakes didn't turn up until 4pm on Saturday !! and Sunday was just a washout, so haven't used it yet in anger, but just the housing estate test and ride to work shows it to be fantastic. Roll on next weekend.......Hold on...I'm working....... 🙁