![]() You don't need to be an 'investor' to invest in Singletrack: 6 days left: 95% of target - Find out more
You don't need to be an 'investor' to invest in Singletrack: 6 days left: 95% of target - Find out more
So my 18 month old Reverb has developed 10mm of vertical play and is off back to SRAM for warranty repair (yes I checked the pressure!). This seems a fairly common problem and I figure it'll happen again only this time it'll be outside warranty.
So I've been thinking about easy ways to repair it. The RS youtube vid (no. 3) shows how to fully bleed but I think there might be an easier way (assuming the seals don't need replacing):
1. Clamp the seatpost vertically in a vice so the saddle clamp is uppermost. Remove all pressure.
2. Double check you've removed all pressure
3. Remove the top circlip (the one under the saddle clamp), washer, plug and poppet valve.
4. Squirt/pour some oil in there, which should lift out any air
5. Put back together
6. Repressurise and check the post is rock solid
7. Bleed the remote
This should work and avoids faffing with IFP height tool and the brass bleed tool that only seems to be for sale in Germany.
Also, idea number 2 (been a quiet day!): Even for a full rebuild you can probably avoid having to use that daft brass bleed tool
1. Clamp seatpost in vice vertically with saddle clamp downwards. Leave the remote lever in place for now and don't touch the saddle clamp circlip
2. Depressurise, disassemble and replace seals.
3. Fill tube with oil
4. Insert inner tube
5. Insert IFP into tube a few mm
6. Set IFP height whilst depressing handlebar lever. This will allow the IFP to move downwards and the excess oil it displaces will come out of the top of the inner tube. This will make a mess so best wrap a rag around the outer tube
7. Insert inner rod a few mm into the inner tube
8. Replace seal head and tighten
9. No need to bleed remote
i used the first method and it works fine .
just be careful though , once you remove the circlip the rest might pop out with a lot of force so be prepared to catch the bits .
it is not easy to add fluid in the chamber , you might need to force it down .
but the harder bit is to select the correct amount of fluid . too little and it will still sag a little bit and too much and it wont work . there needs to be air underneath the piston .
I presume the air space under the piston is only there to allow the piston to move down a bit (i.e. to open up the oil flow port). Can probably work that out roughly based on how much the valve moves when actuated
How do you think the air gets in there in the first place? My best guess is that it gets sucked past the IFP seal as the IFP moves up and down.
And thinking about it - how does the official SRAM procedure leave an air gap under the piston? Surely it gives a complete air-free bleed?
Edit - ah, that'll be what the bleed tool does. This image shows it quite nicely - that small black space under the piston (green bit) needs to be air to allow the valve to move
[img] 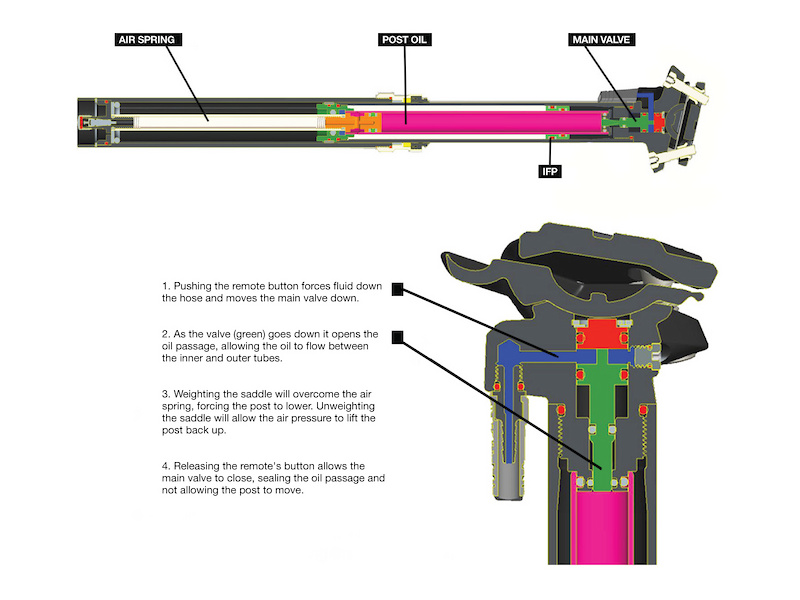 [/img]
Yes bleed tool empty the black space.
No idea how the air gets there, probably used seals.
Turns out Tweeks sell the bleed tool. I've ordered one as they're only £5
RicB - Member
Turns out Tweeks sell the bleed tool. I've ordered one as they're only £5
POSTED 15 MINUTES AGO # REPORT-POST
Which bleed tool do you need? I've got the same problem with one of my reverbs, so could be a home job now!
Or do I buy all three tools just in case...,..
all the tools plus the full service kit is £70 , so you might as well send it to LOCO for £80 and it will be done professionally .
but to do it at home , you only really need the remote bleed kit and some fluid .
cchris2lou - Member
all the tools plus the full service kit is £70 , so you might as well send it to LOCO for £80 and it will be done professionally .
but to do it at home , you only really need the remote bleed kit and some fluid .
POSTED 11 SECONDS AGO # REPORT-POST
I could send it off - or buy the tools and then I've got them for next time!
It doesn't look like rocket service to do it - and I like doing stuff myself.
I've got the remote bleed kit, so just need to work out if I need the IFP tool as well, and which of the tools tweeks sell.
My 2nd hand Reverb has had the 10mm drop syndrome 3 times now. On all occasions it was caused by the big silver collar coming loose causing damage to one of the O-rings inside. On each occasion i fixed it myself using only basic tools and with minimal disassembly (no special tools needed). The last time I fixed it I used a load of thread lock on the collar and that was over half a year ago. Not had an issue since. The O-rings used came from a £5 kit of 1000 assorted O-rings from any motor factors/Aldi.
Good point - I did the check the seal head on mine and it was fine, but I've heard this problem too.
This is the tool you need:
[url= http://www.tweekscycles.com/Product.do?method=view&n=4646&p=631518&c=215&utm_source=Google&utm_medium=Base&utm_campaign=Seatpost%20Spares&gclid=CjwKEAiAkpCkBRCtstKQo5ia5nESJACsCikRtv6ddxGlOnVUd3kTlUtYffo0t2dIU8Wz4i8qAntg3BoCJhHw_wcB ]Tweeks post bleed tool[/url]
The syringe, tubing and fluid are from the remote bleed kit
I suspect the problem will get more likely over time as the seals wear, but I'm without a post for 10 days and it would be handy to be able to fix the problem myself at home. As previously mentioned, O-rings ain't expensive...
So what does that tool do then?
My post has started doing this now! Think I'll give the first technique a go. Mines 3.5yr old now so had a good innings so far.
the bleed tool kit for the post (not remote ) empties the piston chamber . you can do it without it but it is a bit trial and error , too much or not enough fluid left .
to be fair the whole procedure takes 15 minutes , but you can waste quite a lot of fluid .
cchris2lou - Member
it is not easy to add fluid in the chamber , you might need to force it down .
Could you expand on that? Is it a case of replacing the valve etc pushing it down, removing them and repeating? Or is there another way?
Old thread I know but still relevant to some.
My reverb sagged 2-5mm so I tried the first method RicB suggested and it seems to have worked well giving a solid post and full actuation.
When I released the plug and poppet valve on top it did pop out into the rag I had covering the top of the post releasing a lot foamed up oil. I'm not sure if the foam was caused by air in the main post oil or the release of pressure foamed up the remote circuit oil.
After the bubbles had settled out I could see clearly where the tube steps in between the valve and and main oil chamber. I dripped in fluid with remote bleed syringe up to the step then tilted the post side to side which released a few more bubbles from the main oil chamber. I repeated that until I was satisfied no more air would come out.
At this stage I was worried that the valve may displace oil into the gap around the valve as mentioned earlier in the thread. As it happens oil did come up around the valve as I positioned it but once I had the circlip back in, air spring pressurised and remote bled it worked fine with no more sag and a smoother quicker action.
Thanks RicB and the other contributors for this as it was an easy and cheap fix.
If it all goes wrong I'll report back but for now my reverb works great again.