![]() You don't need to be an 'investor' to invest in Singletrack: 6 days left: 95% of target - Find out more
You don't need to be an 'investor' to invest in Singletrack: 6 days left: 95% of target - Find out more
Tried out a coffee / epoxy filler mix today but completely forgot to take photos. Also tried an electrical tape wrap. I'll unwrap it in thd morning and try to remember to take photos....
Here's a couple of pics of the coffee/epoxy mix after I unwrapped it this morning.
[img] 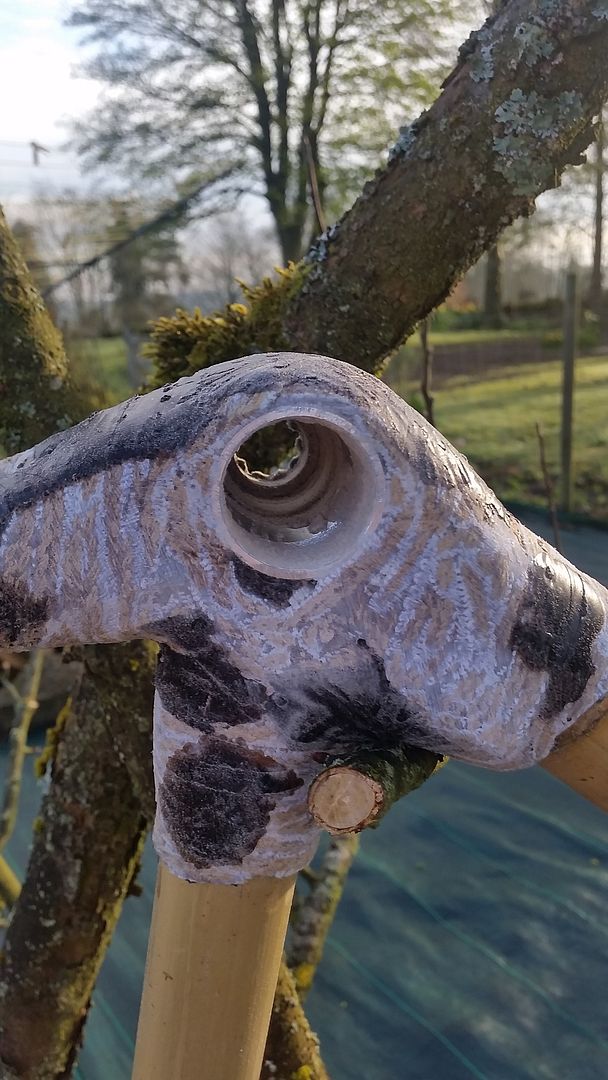 [/img]
[img] 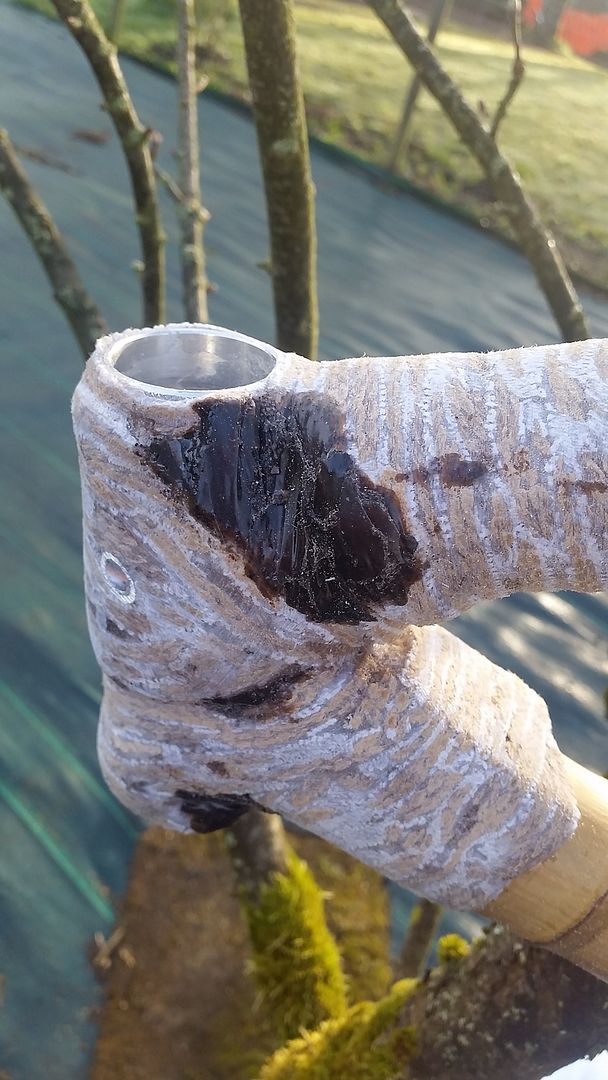 [/img]
It sands back nicely so I think I'll carry on with this method for filling the gaps before any 2nd wrap of hemp.
Nice!
[url=
Conway is currently riding a bamboo bike[/url] on the bike leg of his UK coast triathlon and [url=
friend built himself one earlier this year[/url].
Hub arrived today..... and it's 135 OLD ! TYPICAL. So I'm sending it back - may have to go with so nova techs.
Also I've worked out why the stays didn't fit the non drive side dropouts - some how I did manage to put the wrong stays on the wrong side. If you look at the photo below you can see how the longer seatstay should have extended below the disc mounts. I may strengthen the area by sliding some bar up the seat stay and bonding it in. But i'll probably just see how it rides first - assuming it's straight (off to the lbs tomorrow to see if they have any old 700c rear wheels).
On the plus side my coffee filler mix is coming up nicely after a bit of sanding back, it'll endup looking a bit like a brown camouflage joints at a guess. I'm hoping to get another hemp wrap of the head tube done tonight, and possibly the seat tube junction. Then it'll just need the fine sanding at the weekend.
[img] 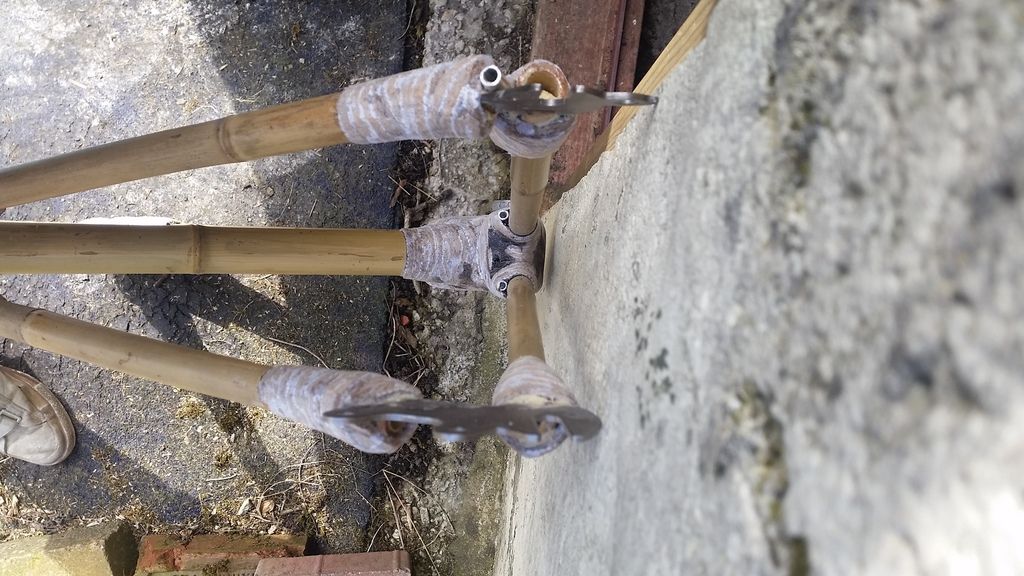 [/img]
Bb joint is almost done and is looking pretty good but i cant take any phot is at the momen as i didn't get around to doing the 2nd wrap earlier in the week so the frame is screwed to the worktop and covered in electrical tape. The 2nd wrap (hopefully) is this afternoons and tomorrow's job.
Here a pic of the headtube wrapped up. I did the wrap at about 3pm yesterday, usually epoxy should have a good cure after 12 hrs, checked this am an my test pot is still a little soft and tacky, so i'll leave it at least another 12hrs until i unwrap it and can do the seat tube junction. The
Epoxy im using should be at around 20°+ when used, and I'm doing it in my garage which isn't heated + I'm using it quite thick so it needs the extra time.
[img] 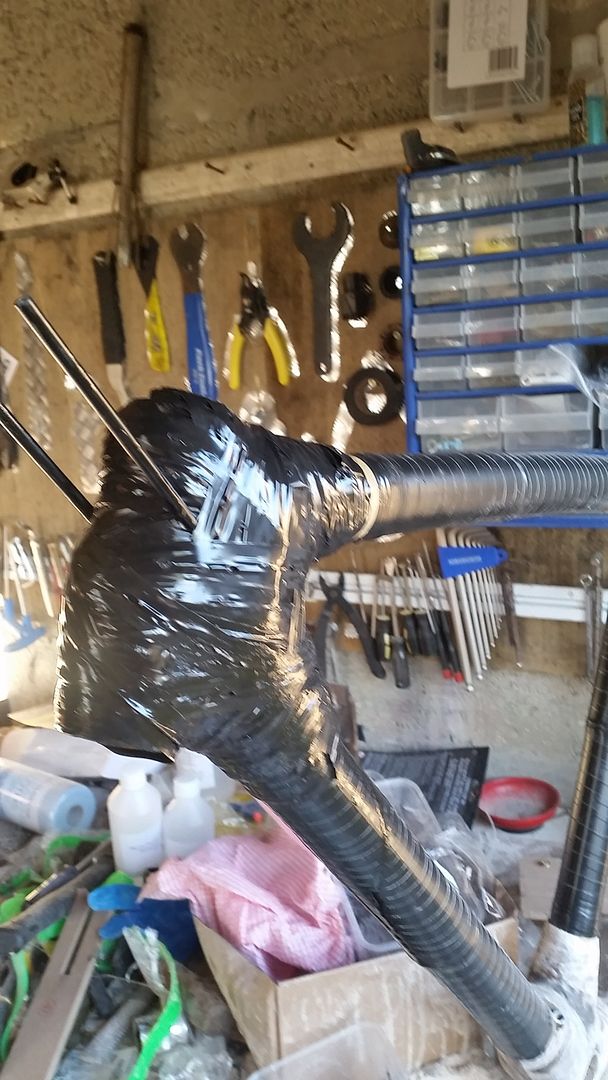 [/img]
Its coming together well, and looking good too.
I have (yet) another question, do you know what sort of bamboo they supplied and has it been treated at all? Lots of sites I look at are on about drying and going over the poles with a blowtorch to do something to the natural resins in the bamboo, others talk about using boron salts or similar to drive out bugs, reduce water absorption and prevent mould later on...
Anything like that come up when you bought your kit OP?
[b]Cookeaa[/b] - afraid not. There's no info on the bamboo species or how its been dried out. Personally I'd stay away from buying green bamboo and drying the bamboo your self - from what I've read if you use the blowtorch method it fast dries it - stem coming out the end of the poles! And may make the poles brittle and more likely to split or cracks to form at a later date (once the frame is finished).
If your going to go down the specific species etc. Your best off speaking too or visiting these guys https://thebamboocompany.co.uk/ they are the UK bamboo importer and should be able to talk through the properties of each plant and drying process.
I'm only using this frame as a first build - already learnt a load of stuff. I'd like to go down the complete custom (rather than a kit built) frame for the next one.
Just got back bespoked - only one bamboo frame I could find this year.
[img]  [/img]
I'll leave the frame for a couple of days I think, as it's way too takey to work on and I want to do one joint at a time.
But I just sprayed so ipa over the bb junction to clean it up. It shown what the finished area should look like after an epoxy glaze.....
[img] 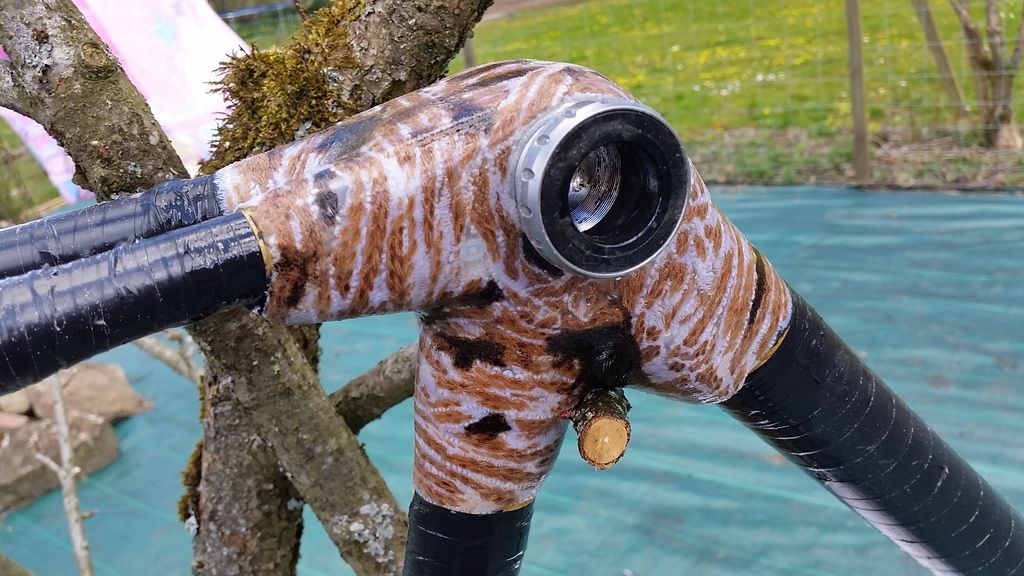 [/img]
[img] 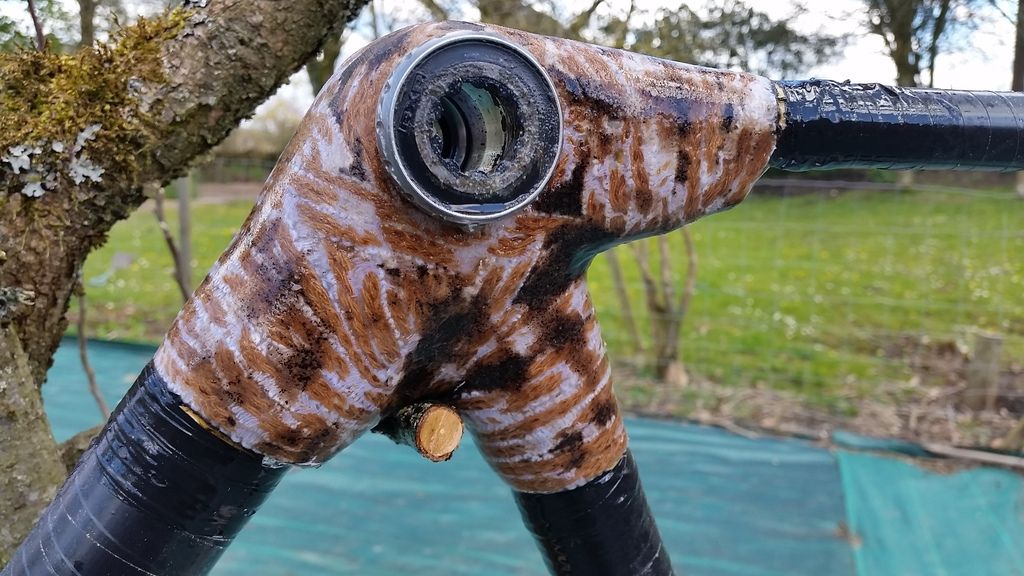 [/img]
[img] 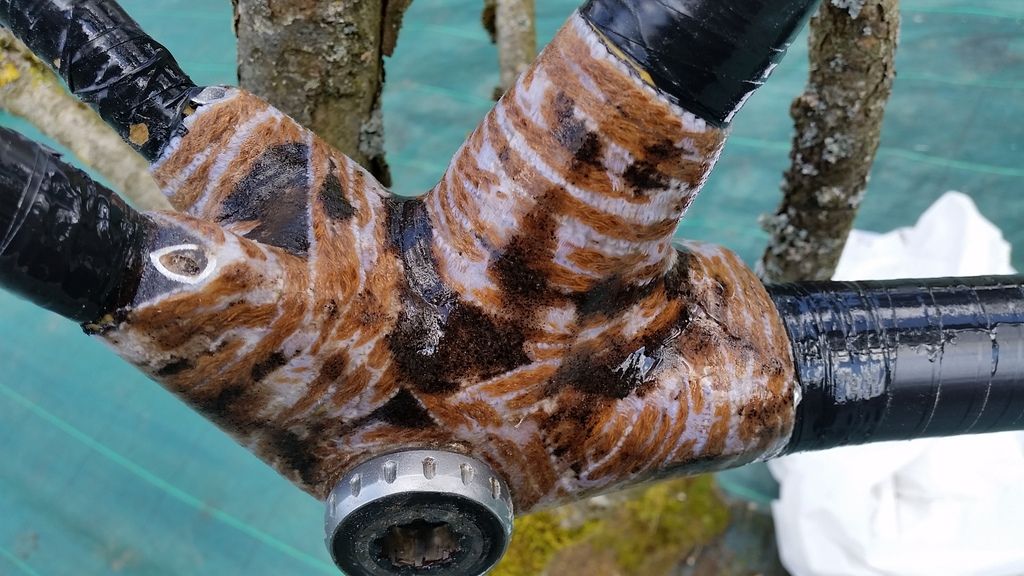 [/img]
Enjoying this thread, I'm waiting until I got the spare funds! I was reading somewhere that the bamboo should be at least 3 year old? Something to do with its strength.
Cheers, Steve
Skankin_giant - the bamboo should be at least 3 year old? Something to do with its strength.
When the bamboo is green it's filled with water, bamboo structure Is like loads of tiny straws compressed together - you can see the dots of the cross section in the photo earlier in the thread of the end of the tube. The wetter the bamboo the more flexible it is - remember that bit in crouching tiger hidden dragon where they fight in the bendy bamboo forest? But once it's dried out its pretty solid, but from what I've read the quicker you dry it out the more unstable it is.
Yeah there's a lot seems to have been written about bamboo for bikes and Fishing poles (some of it quite contradictory), from what I can tell, flame isn't actually intended to dry it out, you can apply heat to help seal it/kill the naturally occurring bugs and mould, and reduce the risk of it splitting or warping later, but application of heat has a fair chance of splitting it straight away...
and drying is really a case of letting it hang somewhere possibly using some type of desiccant to draw moisture out.
Apparently it losses a bit of diameter when drying (around ~5%) which would be a bit catastrophic if it dried and shrank, once assembled into a frame... I have a bit of a plan now, some notional geometry I want to produce and an ever growing BOM that I might start pulling together soon...
Cheers OP this has been an inspirational thread...
Great work. Lookin forwards to seeing the finished bike.
Those joints are starting to look really good.
Ended up wrapping the seat tube junction this afternoon - can't touch it untill Wednesday night now... then more sanding and fitting the bottle cage bosses and I should be done.....
Bought some 130mm O.L.D carbon clinchers in the end - not my first choice of wheel for this build but worked out a bit cheaper than getting a set built (and less hassle).
I'm thinking about calling it 'Cafe racer' after the coffee in the epoxy 🙂 just need to work out a way of writing it on the frame.... (carefully with the dremmel and more coffee/epoxy?).
I'd also like to epoxy in a head badge of some sort.
epoxy a coffee bean into the final wrap for a head badge?
Cheers, Steve
I could do that but I don't think it'll stand out on the lug which will already have dark brown blotches- I was thinking of bending up some solder into shat I want, paint it over with some thick epoxy and sand it back to flat (if that makes sense)....
Ah didn't think of that, could always gold/silver leaf the coffee bean first......
Cheers, Steve
[img] 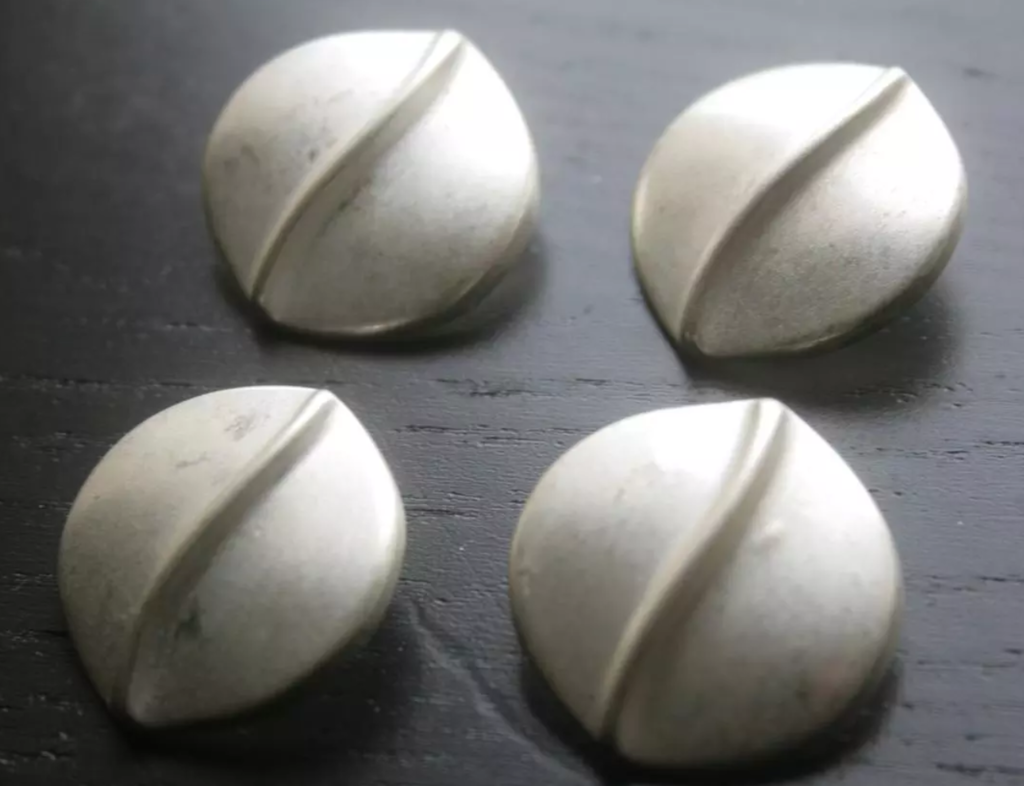 [/img]
Oooo just found these (pewter?) Coffee buttons which would work - 27mm across so not to large (for a head badge) either.
I was also having a think earlier about how to finish the dropout ends of the bamboo - decided to try some brown Sugru - never really liked the 'finger print' finish you get with sugru, but it'll be nicer than car filler or similar.
SAND PEOPLE!!!!!
[img]  [/img]
[img] 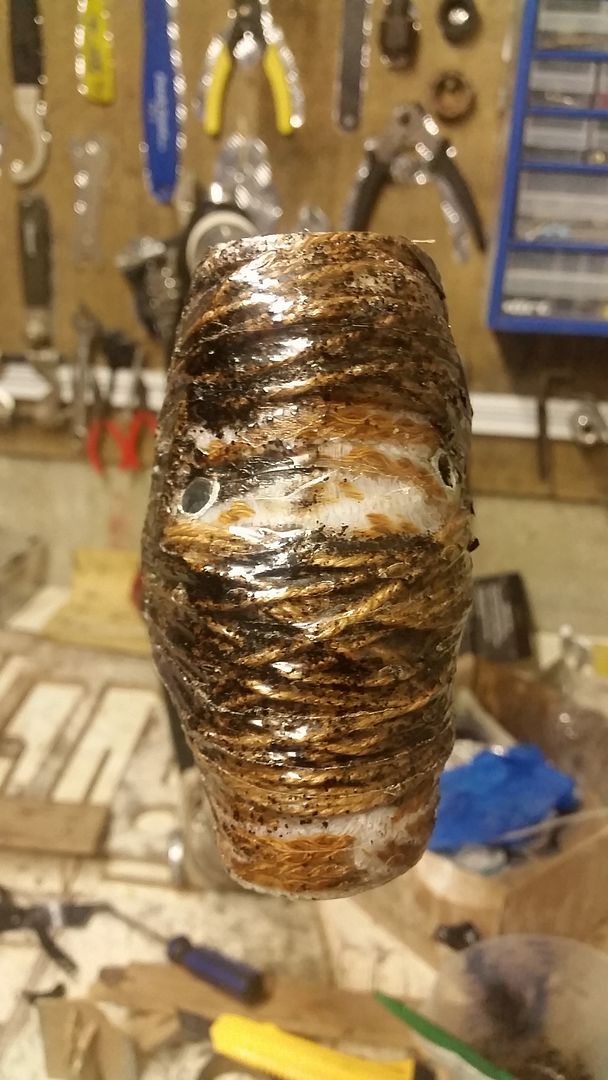 [/img]
The headtube (wrapped on saturday) was dry enough to unwrap tonight looks a little messy again, to be expected. And there's still some low spots where I don't want them, but it's sanded back nicely.
I also put some leftover epoxy/coffee mix in under the electrical tape wrap which seems to have worked.
If I have to do another electrical tape wrap I'd used coloured (green, red, blue) as trying to pick out tiny bits of black tape was a pain.
I used slightly thicker hemp string I ordered a while ago (stupid China post) rather than the thinner 1mm stuff I've used on the second wrap around the stays/seat tube. So each jojng will be slightly different from the others.
I'm hoping that I've left enough space for one of those buttons between the cable guides / eyes.
[img] 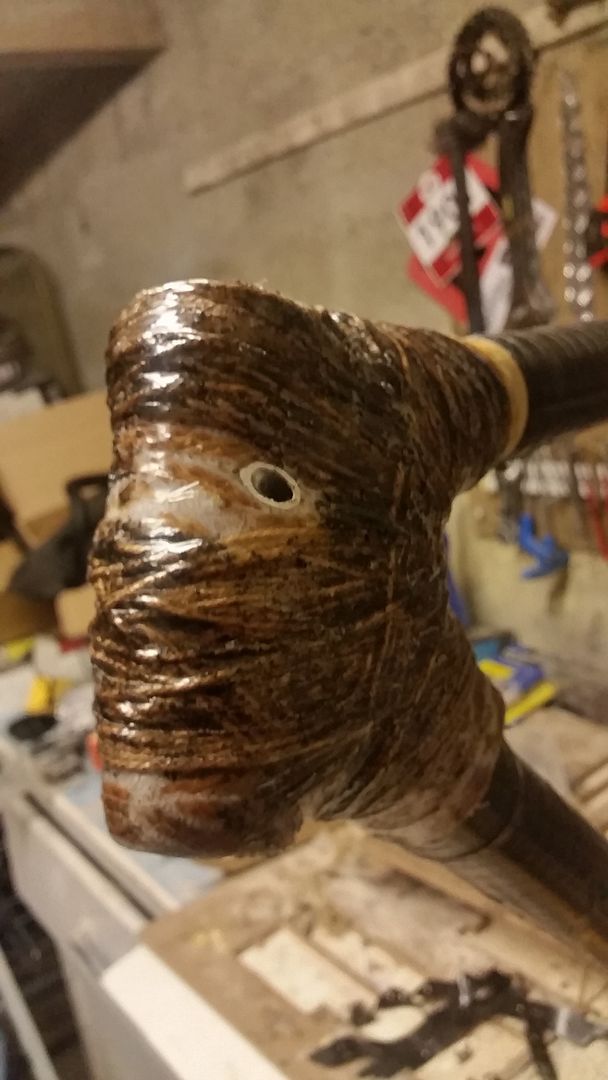 [/img]
[img] 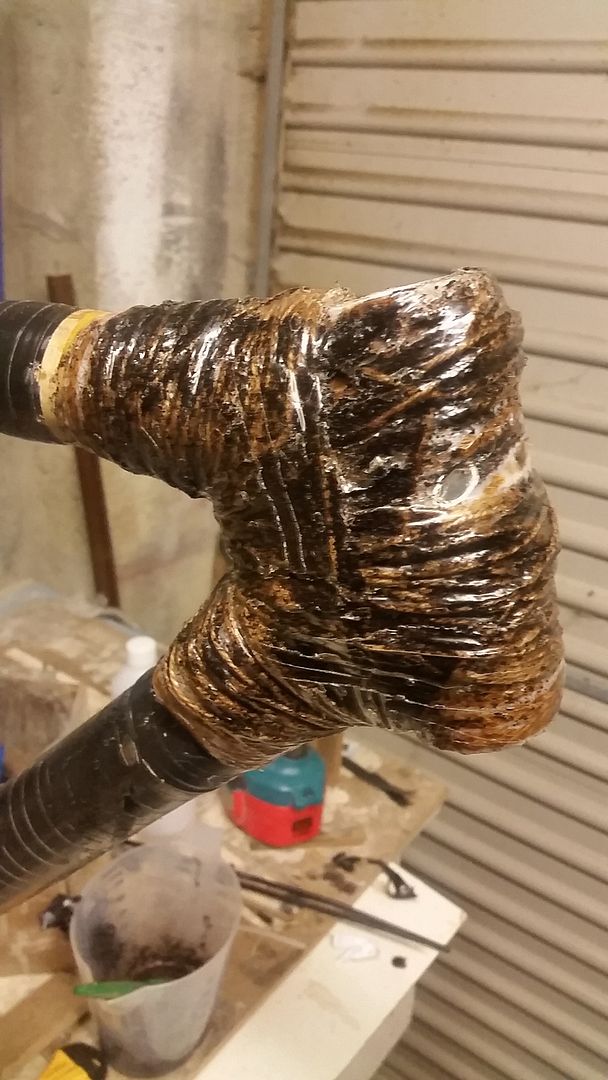 [/img]
Excellent stuff, looks great & thanks for sharing.
A 25.4 seatpost arrived in the post today, surprise surprise it doesn't fit. Quick check with the Calipers ands it's closer to 26..... luckily it was a cheap trial seatpost.
So i'll either get a 26 or a 26.2, but i'll wait until I finish the sanding so that I can get so good measurements.
Also I have a choice of bars now, some traditional drop bars or some planet x mungo (mustache bar).
Another 20mins work on it... and it's slowly getting there.
[img] 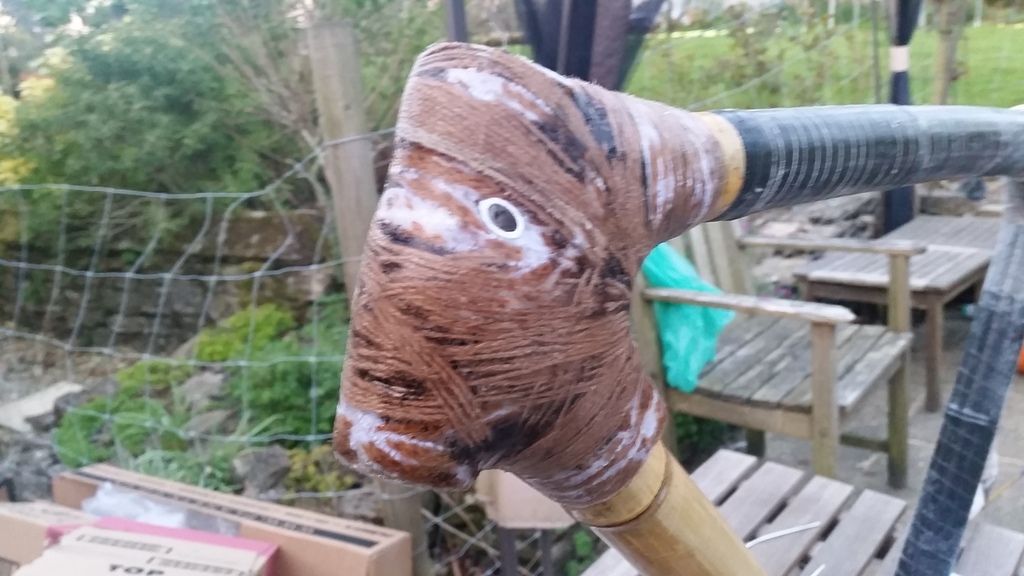 [/img]
[img] 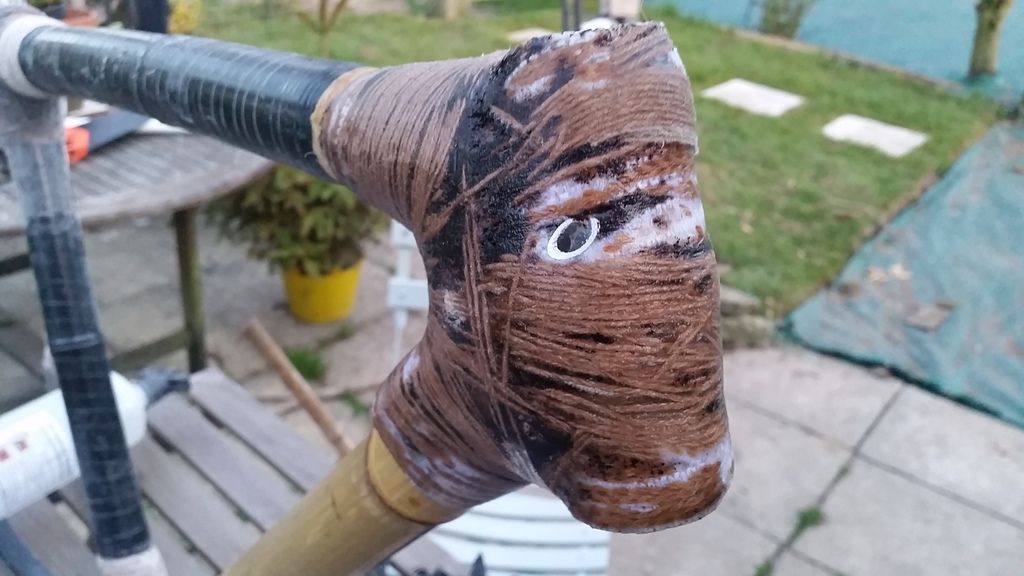 [/img]
[img] 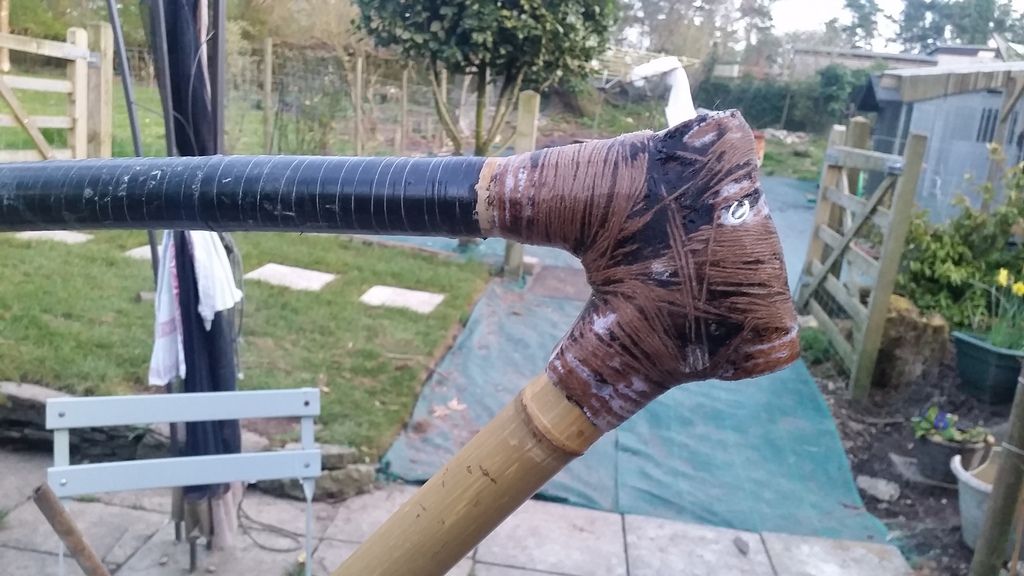 [/img]
I used a different 1mm hemp string on the seat stays which gave a tighter wrap but... It doesn't sand as well. I think that as it was tighter it didn't soak up the epoxy as well so when it's sanding it's furring up.
I'll try to so more work on it and post photos of the seat stays etc over the weekend, but I've family down so can't promise anything.
This is ace. Very tempted to build myself a road frame.
Just be prepared to spend a lot of time sanding!!
I'd be tempted to use woven carbon fibre on the joints. That hemp looks hard work.
Just be prepared to spend a lot of time sanding!!
I built a canoe a few years ago. That is something I'm quite familiar with. 😀
I may use some carbon in the next one......
The button 'headbadge' turned up in the post this morning, same size as a 2 pence piece so about spot on.
[img] 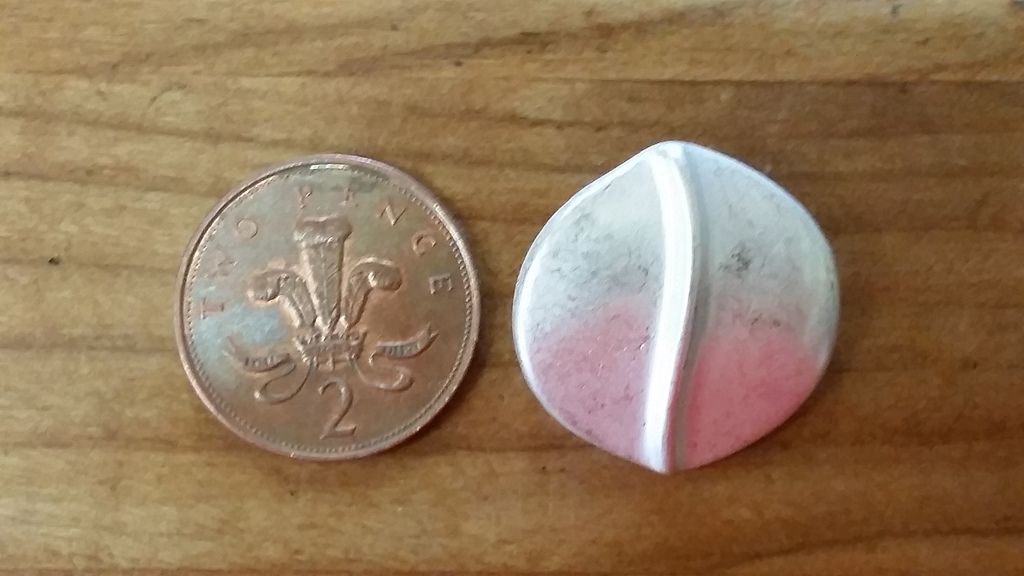 [/img]
Also paid the customs charge on the wheels which should turn up on Tuesday.
I'm hoping to get some more of the finer finishING done later today and will update if I can.
Right, a bit more sanding and this is where I am....
[img] 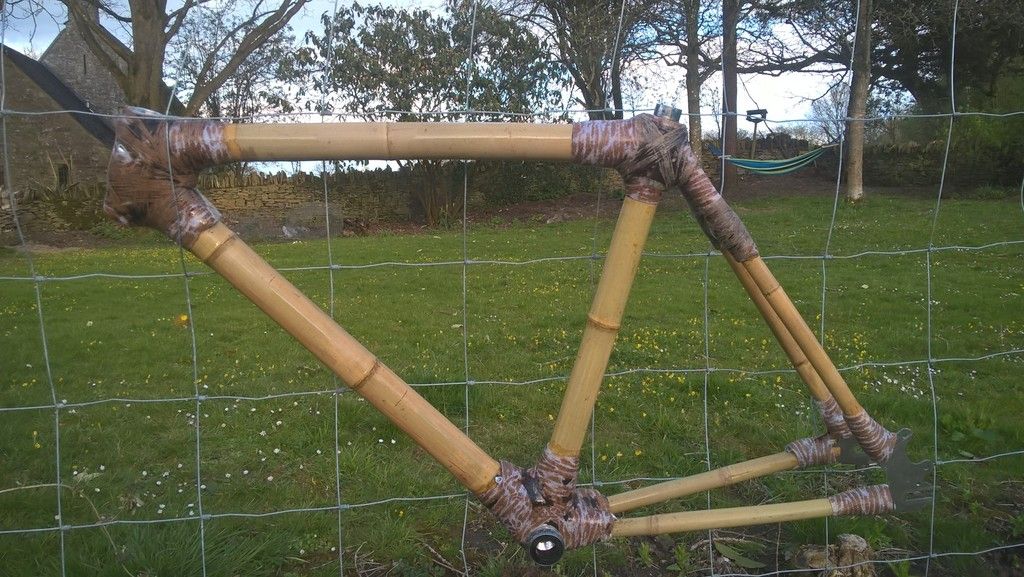 [/img]
[img] 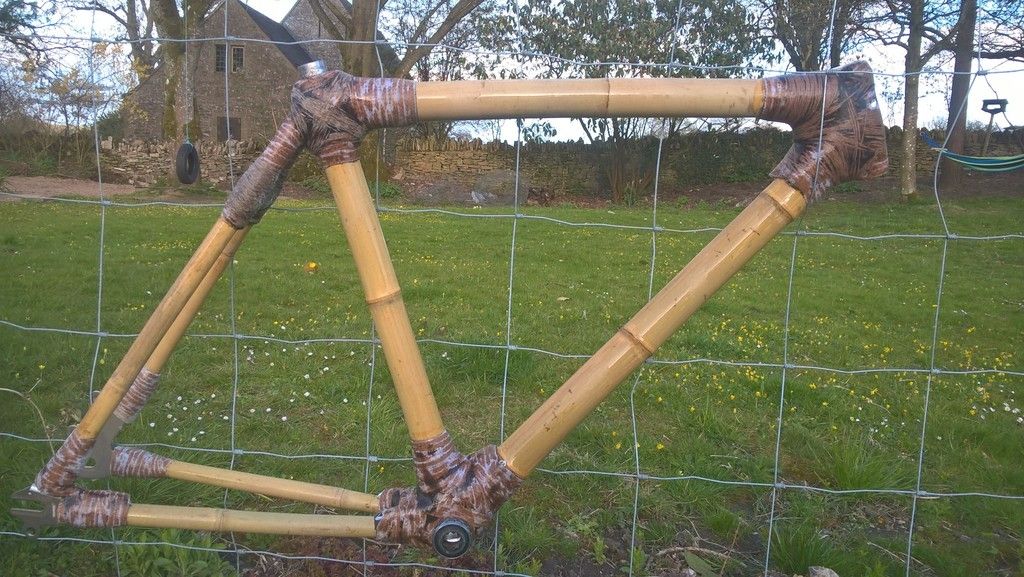 [/img]
I had to cut a few slots in the back of the button and bend it a bit to get it to sit nicely on the headtube and it still needs a little more work
[img] 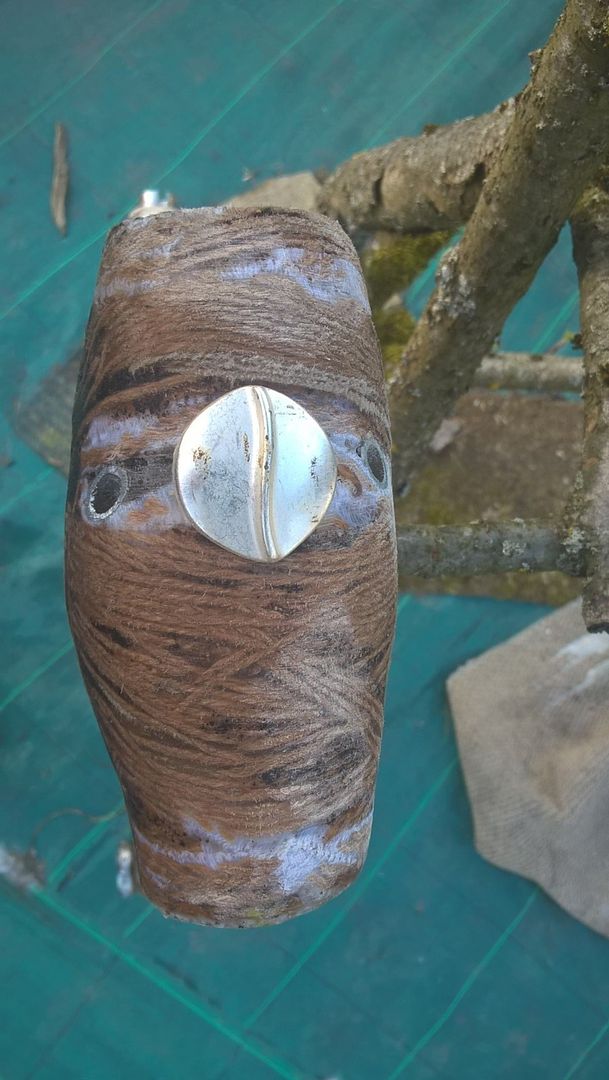 [/img]
If your wondering whats left to do, there's the fine sanding and filling. I could just give it a final thin coat of epoxy and build it up at this stage.
[img] 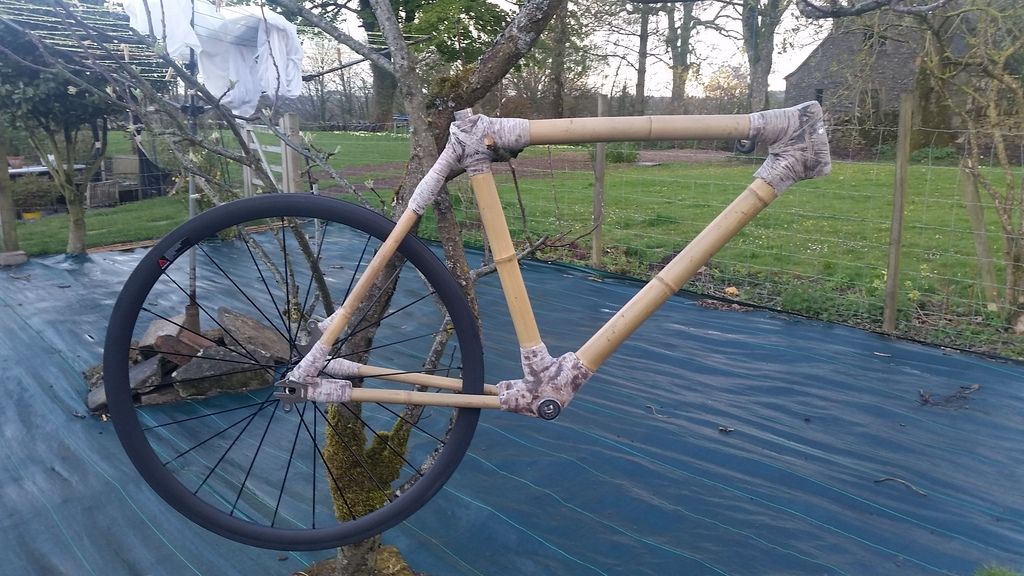 [/img]
Wheels turned up today. Gave me a chance to check the alignment and is out by 2<3mm so no biggy. Somthing the horizontal dropouts can deal with. There us also masses of clearance as the back - may be able to run 38c tyres!
Wheel are also much better than I thought for £250 China carbon jobbies. 1580g....
Looks great! DIdn't fancy the matching Bamboo rims :O
https://www.etsy.com/uk/listing/123023756/bamboobee-bamboo-veneer-rims?ref=related-0
Cheers, Steve
Looking good there Sir, this is a great thread and I'm really enjoying watching you go through your labours of love.
What are the forks you are putting on it? They Bamboo too????
Skankin_giant - at £92 each no thanks... They also give no info on how they are made....
bikebouy - What are the forks you are putting on it? They Bamboo too????
Well I have got some carbon disc road forks on order. But now I know I can fit much wider tyres ill swap them out for some cyclocross ones. Is love a set of the new Lauf gravel bike forks but the be way out of my budget for this bike.
Decided to do some of the finer filling with Miliput (epoxy putty). I've done half of it and I'll do the other half later on and will post photos.
Sean Conway is riding round the whole of the UK coastline on a bamboo bike.. He's currently somewhere on the NW scottlandish coast
Right, while I wait for the milliput to cure, I've ordered the majority of parts for the rest of the bike (bank holiday discounts and all that).
So the full build will be......
Frame: Bamboobee 'XC' kit
Fork: TBC - ive a carbon road disc fork which should arrive in the next week, but this will change to a cyclo cross one pretty quickly.
Headset: Chris King
Stem: cheap one I got from Plant X in the sale to try for size (110mm)
Bar: either On One Mungo bars which i have already or Salsa Cowchippers (depending on drop required for fit).
Tape: DEDA leather look (brown)
Seat post: cheap one 26mm dia...
Saddle: Brooks Cambium
Brakes: TRP Spires - 140mm rear (i hope it'll fit, if not i'll swap for a 160mm) and 160mm front. Cane Creek levers
Gear lever: Dia compe ENE 10sp thumbie
Chainset: Sram Apex set up single ring with a 39t ring.
rear mech: Sram GX 10sp (should work with the thumb shifter as its not indexed).
pedals: Shimano SL road
Tyres: Conti Cyclocross Speed 35c - need to get hold of some 23 or 25c tyres though for the current fork.
oh and 2x fabric cage-less bottles.
Quick update...
[img] 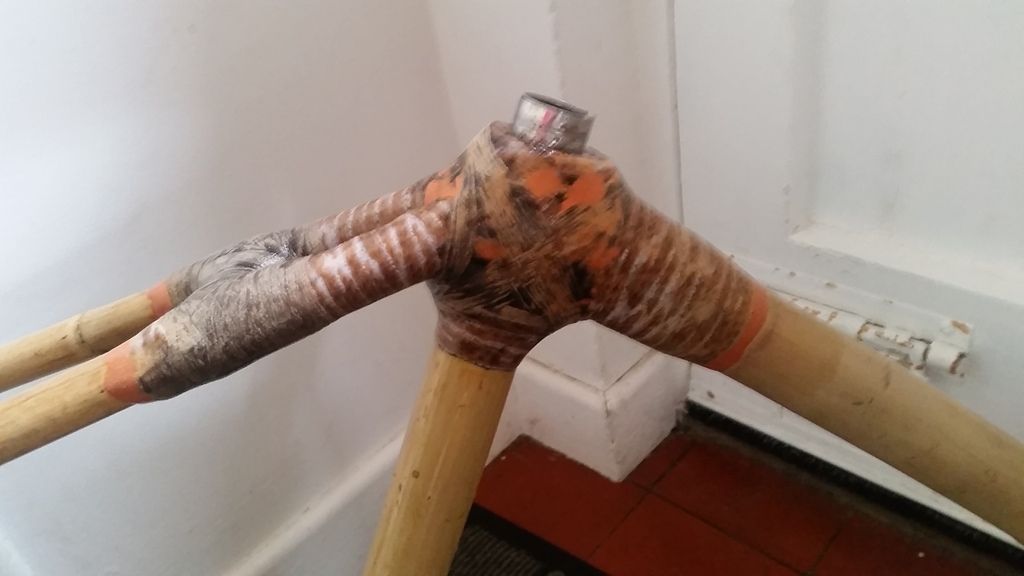 [/img]
[img] 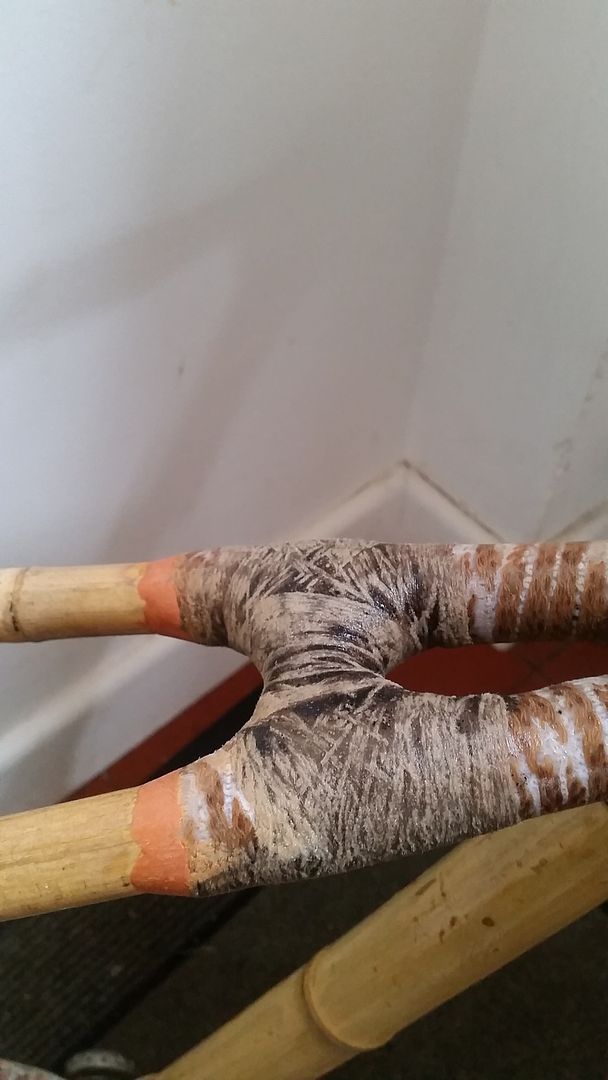 [/img]
[img]  [/img]
Miliput done (the otange bits) and so is the fine sanding on the seat tube junction it should look like this when the final layer of gel coat is applied (just sprayed with ipa fir the photo).
Run out of 240 grit paper so I can't do any more today.
Update: the wife tells me the forks have been delivered at home - mockup build tonight!!
Also the fabric cage less bottle has arrived so can get the bottle cage bolts in which will be a bit scary as it involes drilling into the down tube and seat tube and the screwing in the recessed bolts.... 😕
Quick mock up.... now to drop or not to drop....
[img] 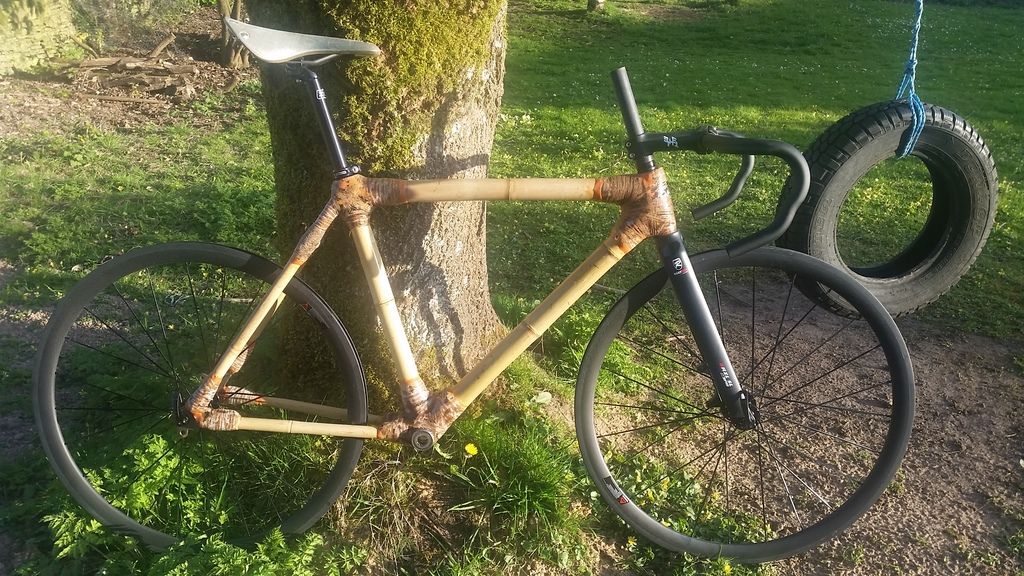 [/img]
[img] 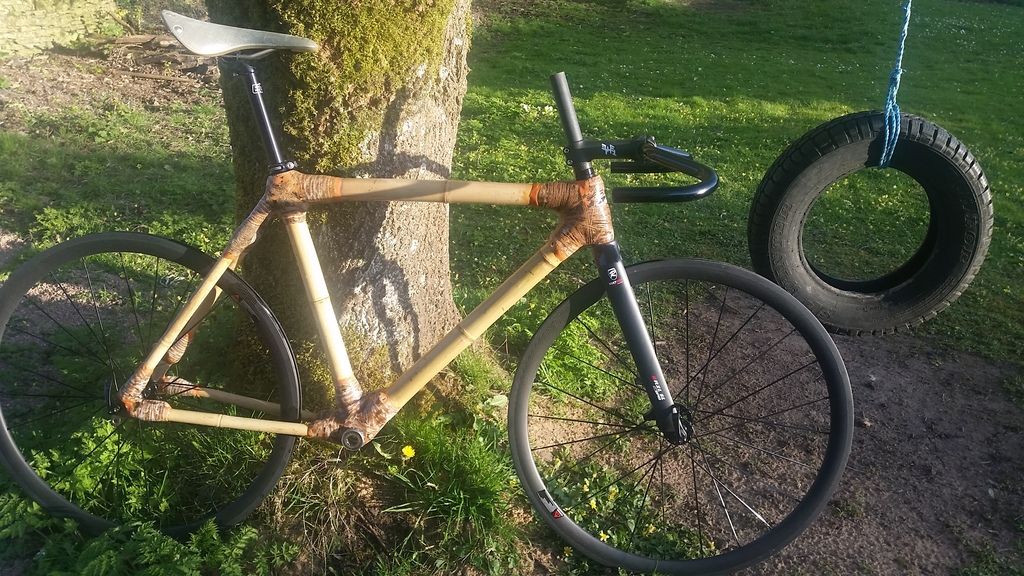 [/img]
Not managed to do an update for awhile as im waiting on the parts to arrive so I can do a full build 'dry run' prior to the final finishing coat. I'll try to get the bottle cage mounts and cable guides in later on today.
Right - update....
When I bought the frame kit I bought some 'bottle cage inserts' which are a little Ikea in fashion if you know what I mean:
[img]  [/img]
Essentially you drill a couple of 6mm holes (spaced correctly)......
[img] 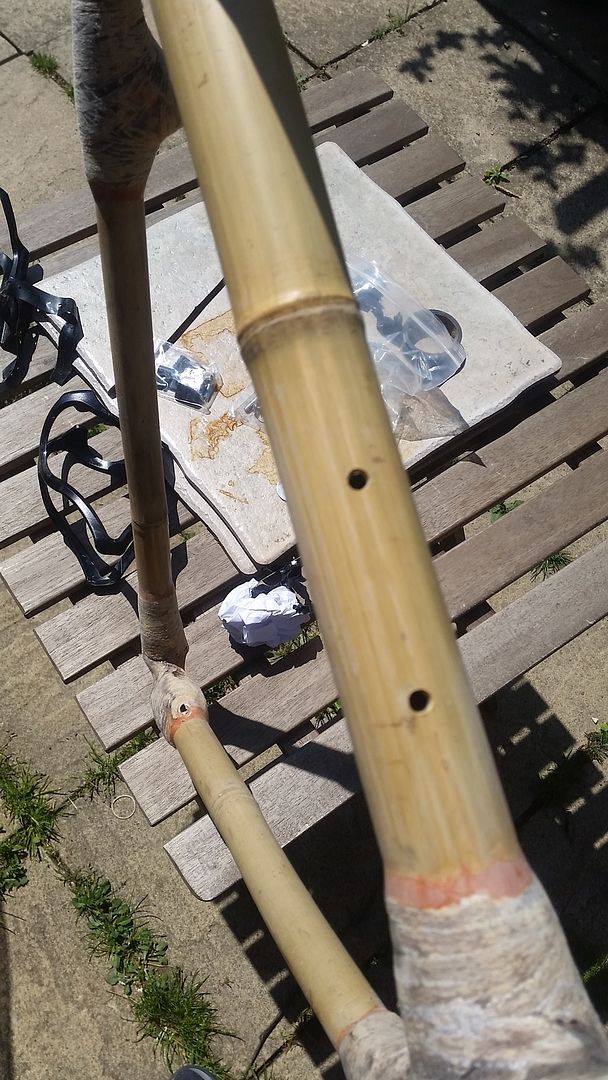 [/img]
and screw them in with a bit of epoxy to fix.
[img] 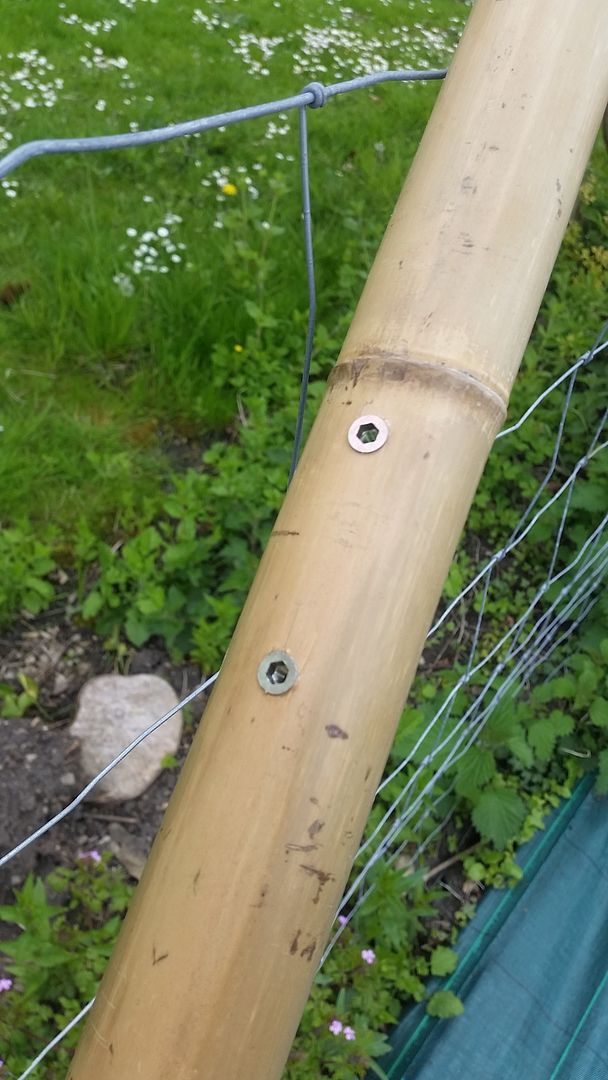 [/img]
The downside is that it lifts and splits the top
Layers of the bamboo around the insert.
[img] 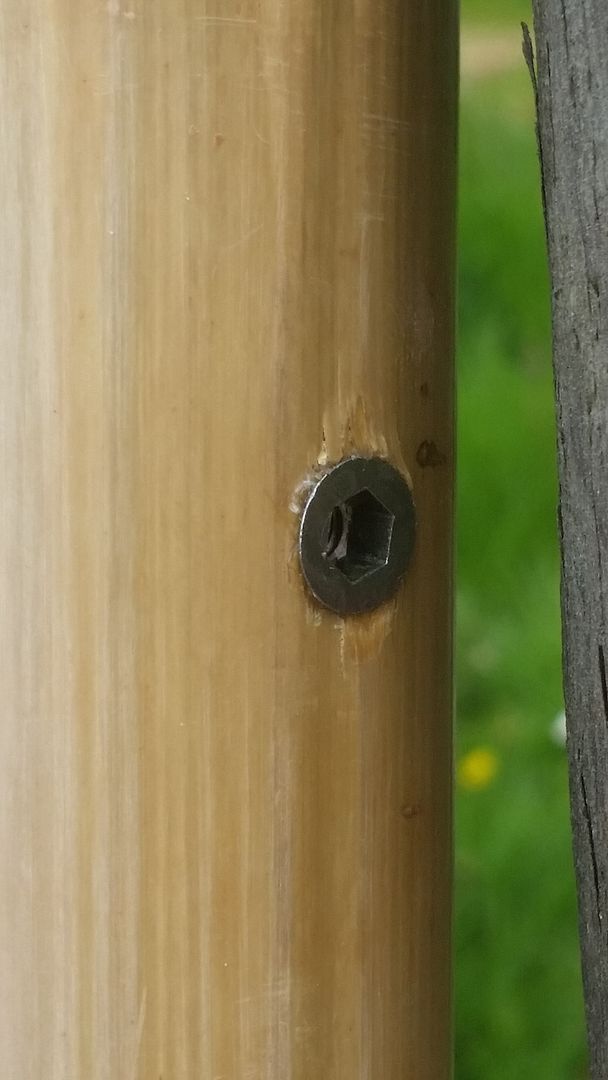 [/img]
If I were to use them again, I think I'd wrap the areas around the 6mm holes in a few lengths of hemp prior to screwing them in.
Getting them in has ment I've sorted the cable routing properly - I'm using some double cable guides from crc in conjunction with Fabric cage less bottle mounts. I like to carry a single bottle but have the option to run 2 on hot days So I had to make sure that the bottle mounts would fit with the cable guides. This ment swapping the bolts for some longer ones and grinding down the heads so they'd fit in the bottle mounts.
[img] 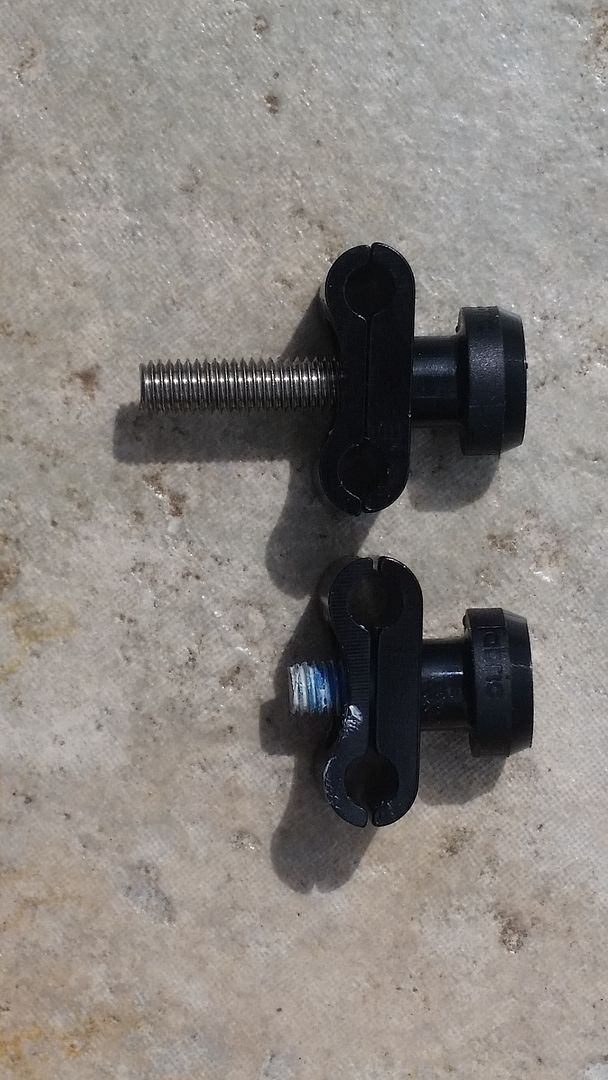 [/img]
[img]  [/img]
[img]:/i1092.photobucket.com/albums/i404/skinheadjc/Mobile%20Uploads/2016-05/20160515_142249_zpsegq2d3nq.jpg[/img]
Any way.... starting to do the dry build as the parts start to arrive.
[img] 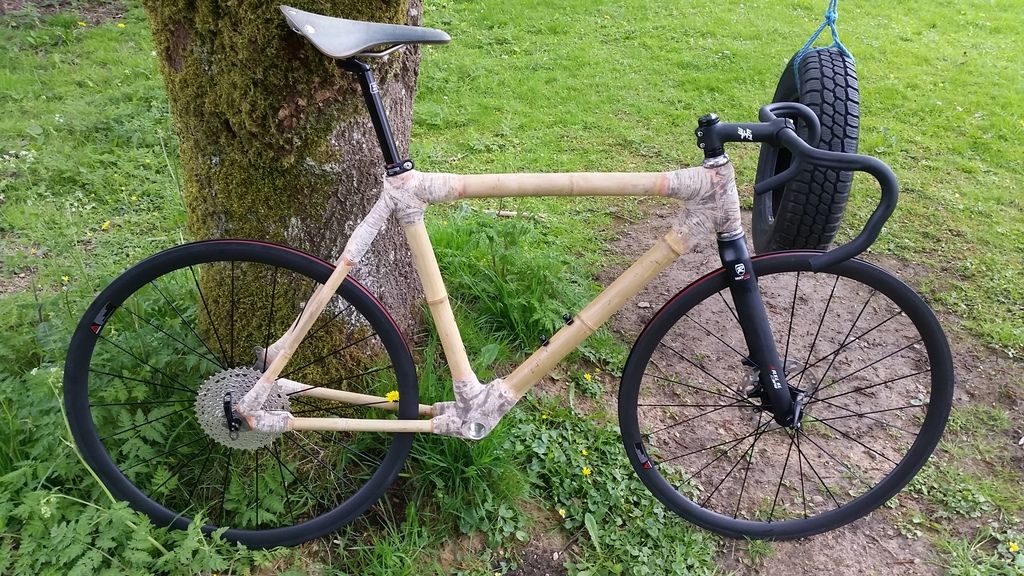 [/img]
I'm not happy with the fork - it doesnt sit right with the chris king headset, obviously made for tapered headtubes so i'll probably swap that at some point. It's also very very close to the 160mm disc (like 1mm close).
Fitted a sunrace 11-42 10speed cassette - I'll be running a single 39 or 40t chainring (depending if I go narrow wide) which will give 0.9 gear inches in the bottom end - same as running a 36t caste with a 34t chainring. ~ it's hilly in the cotswolds!!
I've also ordered new bars and stem - some Love Mud bombers and 31.8 stem.
All the remaining bits 'should' arrive by next weekend so I'll be able to do a full build to check for clearances prior to stripping down again, making any adjustments, final 250 grit sand and a coat of gel coat.
All colours of crazy that.
I like 8)
Oh yeah - forgot to give it some IPA shine before the photos....
To be totally fair, whilst I admired the effort I thought it looked quite horrendous. But, once mocked up in to a full build styley, it has grown on me massively.
Touche good sir.
Yeah - bamboo bikes always look terrible until they are built.
Will you leave it that colour or paint it?
It's going to be left with a clear layer of epoxy gel coat on the joints at least, although i've not sourced this yet. Haven't decided if i'll wax or varnish the bamboo.
The joints look quite light in the photos above as they are dusty - it'll darken up with the gel coat layer.
I could paint the joints but I don't see the point in that - I'd rather keep its 'home made charm'.
I'm still waiting on my box of bits to appear - I did have a sram apex chainset on order (was due into the shop yesterday), but I've just swapped this over to a deore so that I can get the thing built. I've also ordered a 40t ring to go on it.
After the first few bits have gone on I've noticed that the drive side seat stay joint is blocking the chain line so i'll have to sort that out this weekend.
I'm hoping that the rest of the bits I need will get dispatched today and delivered tomorrow.....
That looks so much better than I expected at the start of this thread, even in its part-built guise. Which Chinese seller did you go with for the wheels?
The wheels were these:
[url= http://www.ebay.co.uk/itm/272212494694 ]link to ebay.[/url]
It'll be a complete Frankenbike when it's built with a complete mix of mtb / road / touring & cyclocross parts.
Great, thanks.
Enough of my bit turned up today to start building it up.
First problem is that the diacomp thumb shifter didn't come with the shims for my bar... Started to make one out of some tube but it wasn't thin enough so i'll have to sort out something else.
2nd problem the chainset came without the bb.... guess that's another £10 ill have to spend.
3rd problem the forks are just too tight for
The 35c tyres I want to run. I'm guessin they'd be fine with 28's so I either need to compromise on the tyre size or swap the fork out. But as I didn't like how its sits either the headset anyway - the fork has to go! I may get some cheap 23c tyres just so I can get it rolling in the mean time.
4th issue was that tyre clearances at the rear are also tighter than I'd like. With the wheel slotted all the way in the horizontal dropouts the tyre has about 1 or 2mm either side - enough for the little rubber manufacturing spigots to buzz on the frame - I'll need to possibly run bmx tensioners to get the wheel to sit securely.
5th issue, with the 140mm disc on the rear I need to remove the rear caliper to get the wheel out - not great if/when I puncture. This ill need to some thought into as I don't think I could run a 160mm disc - but we'll see....
[img]  [/img]
[img] 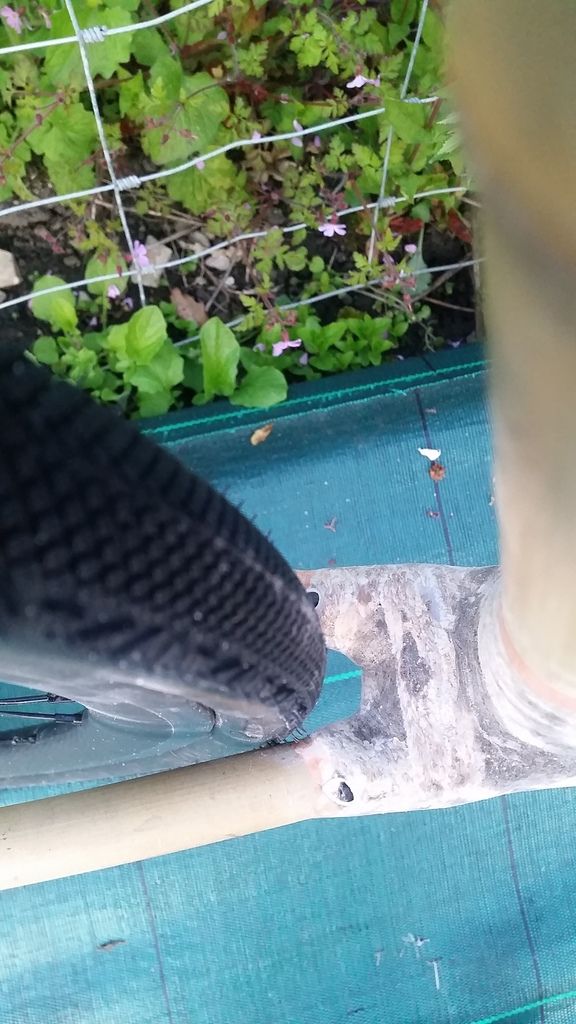 [/img]
[img] 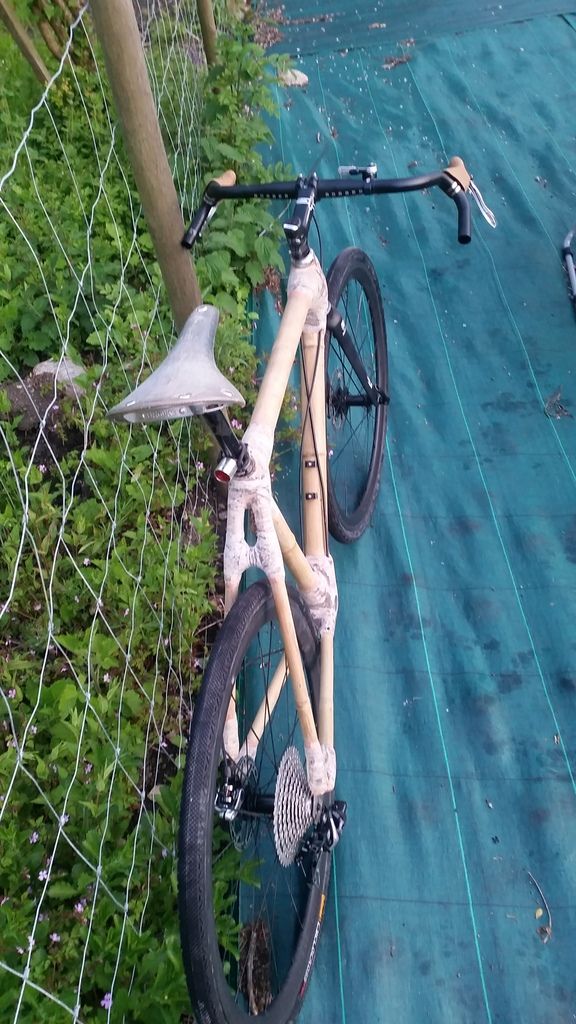 [/img]
[img] 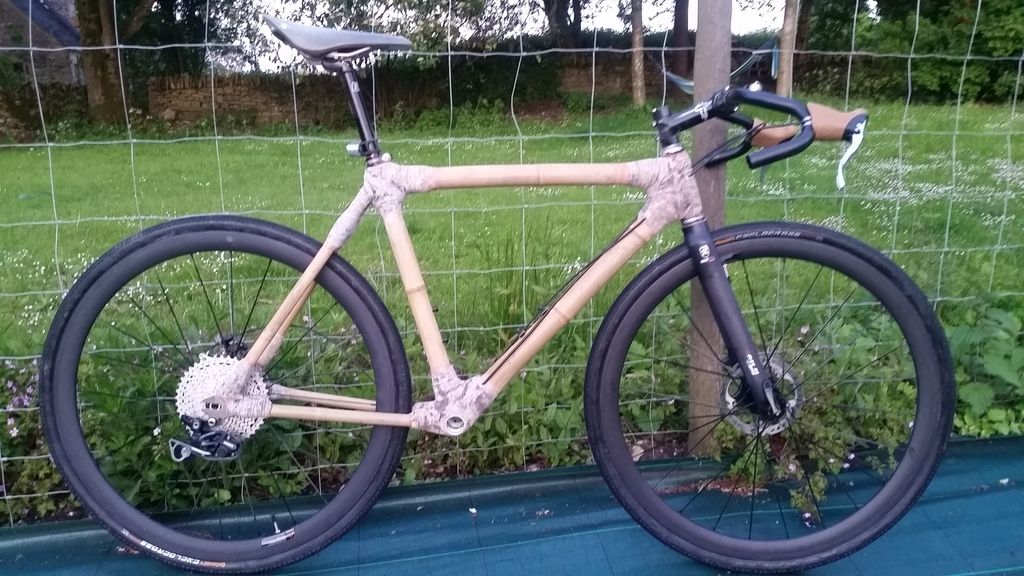 [/img]
Wow looks great
That looks amazing. Great work sir!
I must admit, I winced a bit when I saw those threaded inserts. Hideous course threads on them combined with the hardness of bamboo 😯
Glad you got away with them. You can get versions of them with much finer threads which can just be epoxied in.
Fantastic build. Really interesting stuff.
🙂
Ohhh the rear tyre clearance is a bugger.
Jekkyl - it's not so bad when slotted back in the dropouts a little...
New cyclocross fork on order - it's a bit of a bugger finding an affordable 1&1/8 straight steerer disc cyclocross fork. China to the rescue so if the frame doesn't kill me, the fork will!
Looking pretty fabulous, glad to hear about all your problems and issues faced so far. I've really enjoyed reading and looking at the pics,
Still bonkers, but now looking more like a bike.
It's a bit of a way of yet, but when do you expect the first ride on it ?
I'm hoping to get some sort of shakedown test over the weekend - just waiting on the bottom braket to turn up.
After that it'll all come apart again for final finishing and varnish - already had to do some sand in to get the disc to fit (also around 1mm clearances). I'll need to either go up to 160mm (if i can) or change the disc mount possition completely to get around the wheel removal issue.
Started to build it up last night so expect a full update at some point in the weekend.
The rear break will definatly have to change to a 160mm rotor if I can get it to fit in the frame - the caliper fouls the seatstay IS brake mount AT the moment.
I'd also bought a lindrets tan pan : [url= http://www.lindarets.com/tanpan ]link[/url] to reduce the throw of the dia comp shifter, but this doesn't work with my cable routing so i'm undesided if ill use it. It also gives less acurate shifting with the unindexed thumb shifter...
I need to sort out the chain alignment with the deore chainset as its about 4 or 5mm over to the right at the moment - kinda for got about this when i swapped the road chainset for it - i'll make sone spacers up from old chainrings...
Ta Daa
[img] 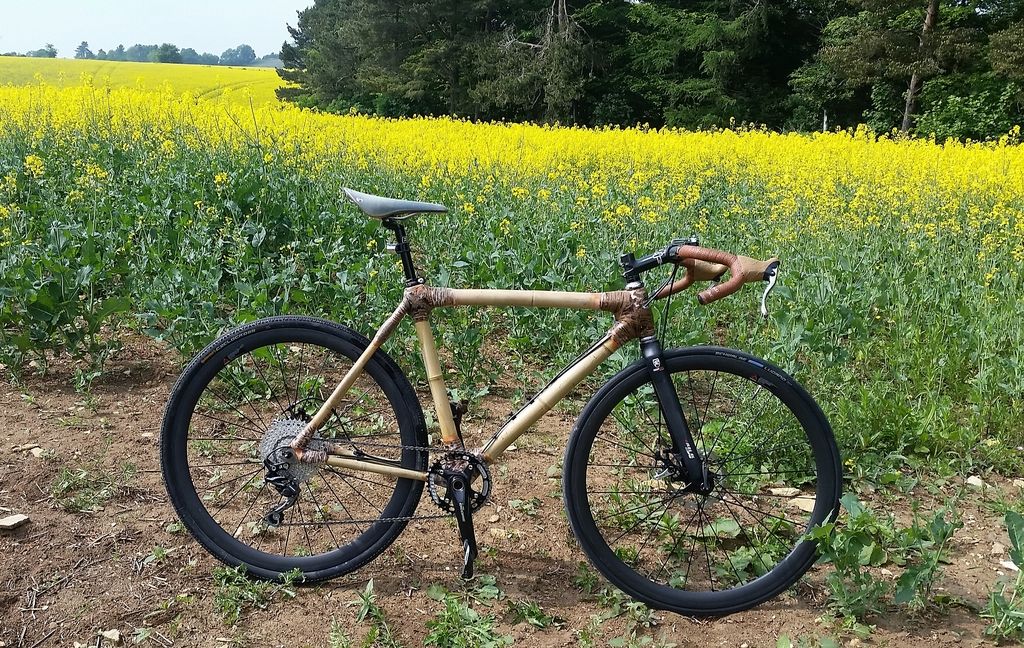 [/img]
[img] 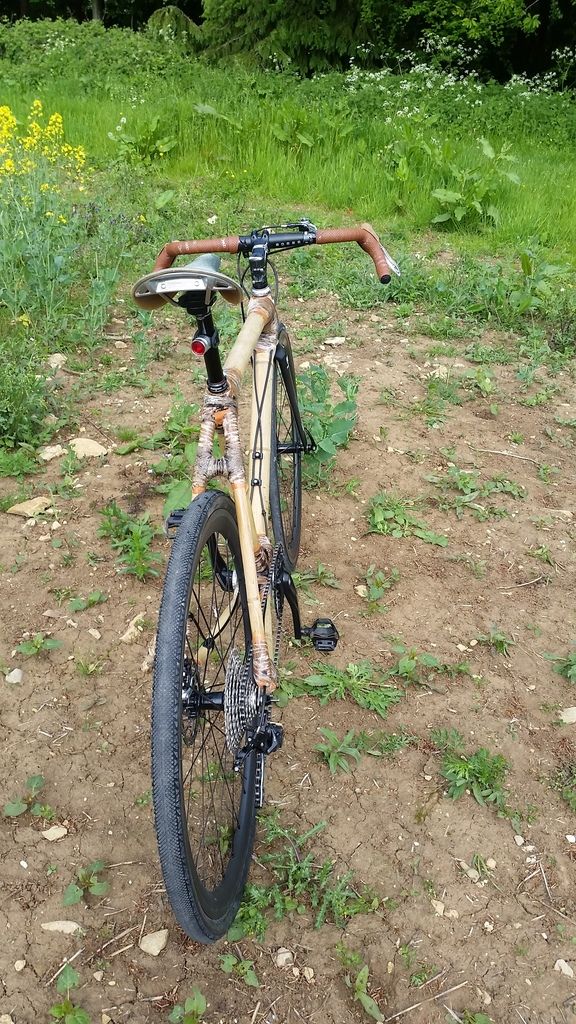 [/img]
[img] 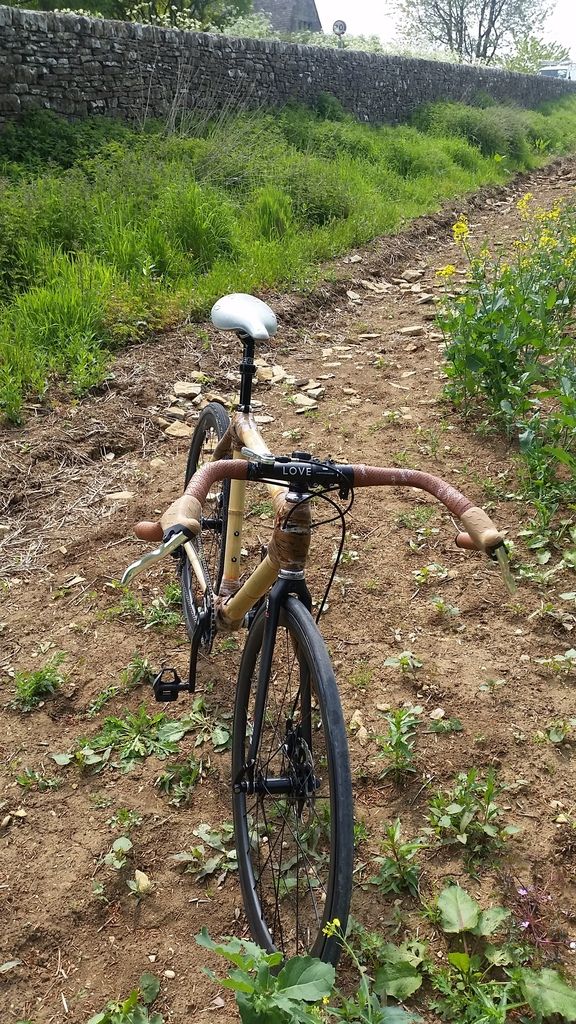 [/img]
So, how does it ride?
So, how does it ride?
Irrelevant. How quickly do runner beans grow up it, that's what I want to know!
It's very comfortable & smooth - however I can't 'put the power down' as the tyre buzzes the chainstays at the mo... This will be sorted by some tensioners (I only did a couple of 100 yrds).
No sign of runner beans yet 😀
Other issues include not quite getting into 10th gear as it's fouling the seat stay joint. Other than that it's spot on.
With all those issues you should take it back and get a warranty replacement.
Nah - there all simple fixes 🙂
[img]  [/img]
Sorry. I have to say this has been one of my favourite STW threads. The bike looks great. Well done you.
😀 glad to hear it....
Although reading back through some of my posts I really should start using the laptop more - predictive text and adding photos etc causes too many mistakes.
Still not finished & already planning mkII.
That is kinda cool.
I want to ask if the ride is a bit wooden? But will get flamed,
Most Eco bike on STW ever.
Excellent!
You've done a great job, clearly there will be tweaks a plenty but now we'd all like to know a) how it rides and b) where/what terrain you'll ride it on.
8)
Looks cool AF.
I'm just doing n-3 as well, so would like to build one of these!
Dunno about Eco....
Frame kit came from China and there's a lot of Epoxy involved.
The brief ride I had this afternoon was good - it rides like any other bike but the stays (and big rear tyre) take up a fair bit of road buzz.
It's still only part way to finished - on the list to do now are:
• mark out and fit a front mech direct mount (fir a chain device, or front mech if I want to fit one in the future)
• sorting out the chain clearances.
• sort out the chain alignment
• cable routing for the rear break along the chainstay, could use the sugru?
• chainstay protection - either sugru or leather?
• then a full 100% strip down.
• finishing the 250 grit sanding and finishing (my dremel gave up the ghost last week so I didn't get to do this)
• complete clean of the frame followed by some sort of clear gel coat to the joints.
• mount the head badge
• final finish to apply to the bamboo - I'm thinking wax at the moment.
• the a rebuild with the new fork.
a) how it rides and b) where/what terrain you'll ride it on.
As for a) see above...
b) a bit of everything, road, some local gravel, Cranham woods maybe? I'm sure I'll also take it to Swinley next time I'm in the area.
[img] 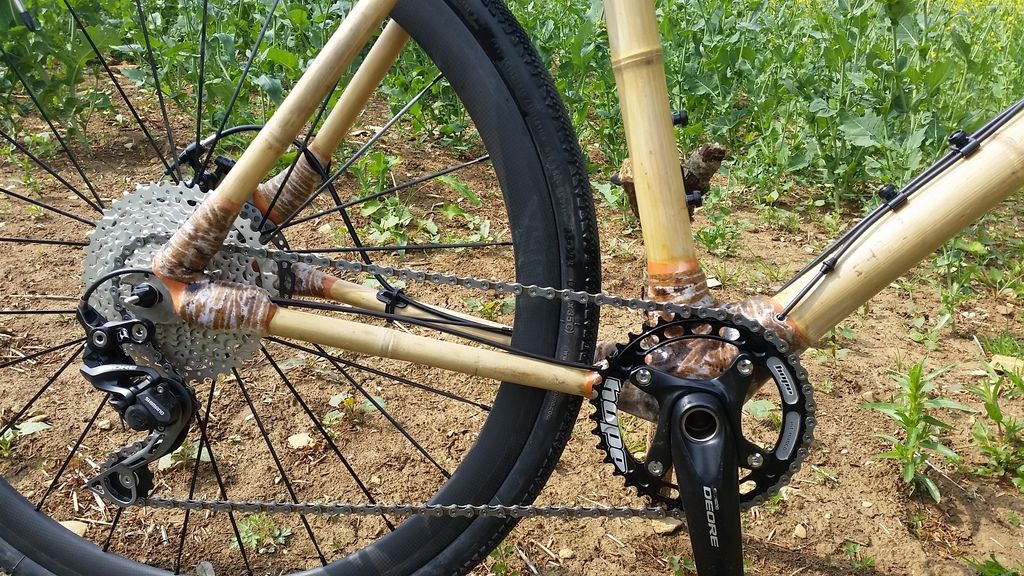 [/img]
[img]  [/img]
Nice job!
Nothing better than that first ride on a raw unfinished home made frame. I always seem to end up using the same route of little roads and tracks (i.e. not too far from home....) I'll hopefully be trying a gash build of my (boring old steel) CX frame this week.
It is always the little things you learn with each frame - cable guides, fork, disc, crank and tyre clearances. All of which means you'll soon end up making another one. And another.... 🙂
Just mounted the chain device.
[img] 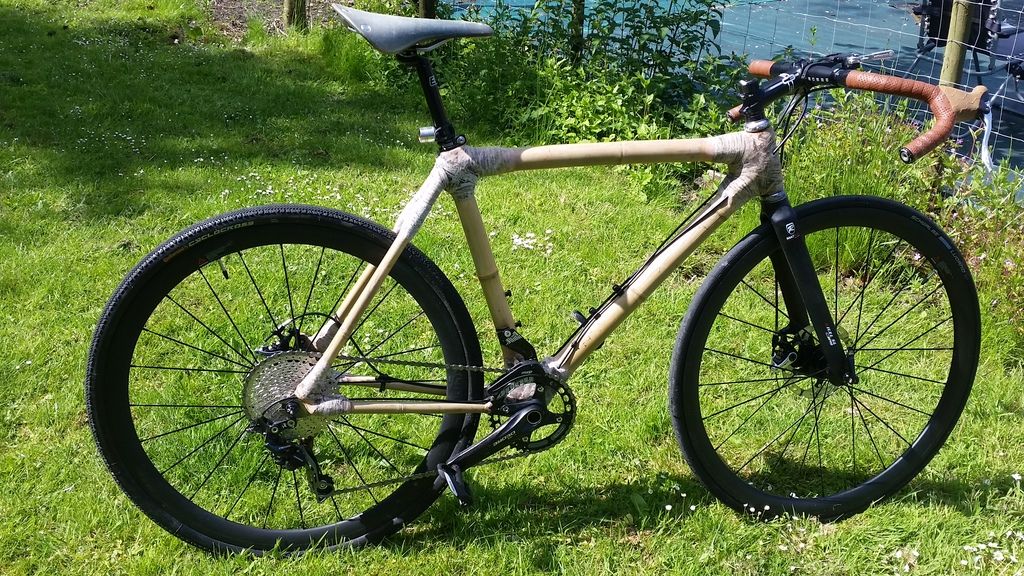 [/img]
[img] 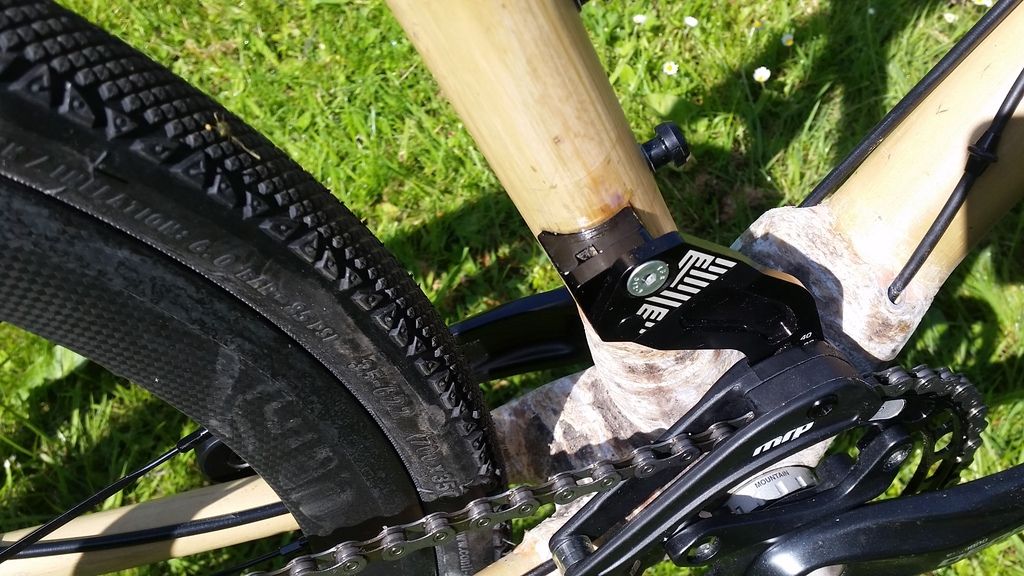 [/img]
I'm hoping it'll stay stuck!
Also took off the chain tensioner on the wife's bike (she won't notice). But had to mod it into a spacer to stop the wheel sliding all the way forward into the dropouts.
[img] 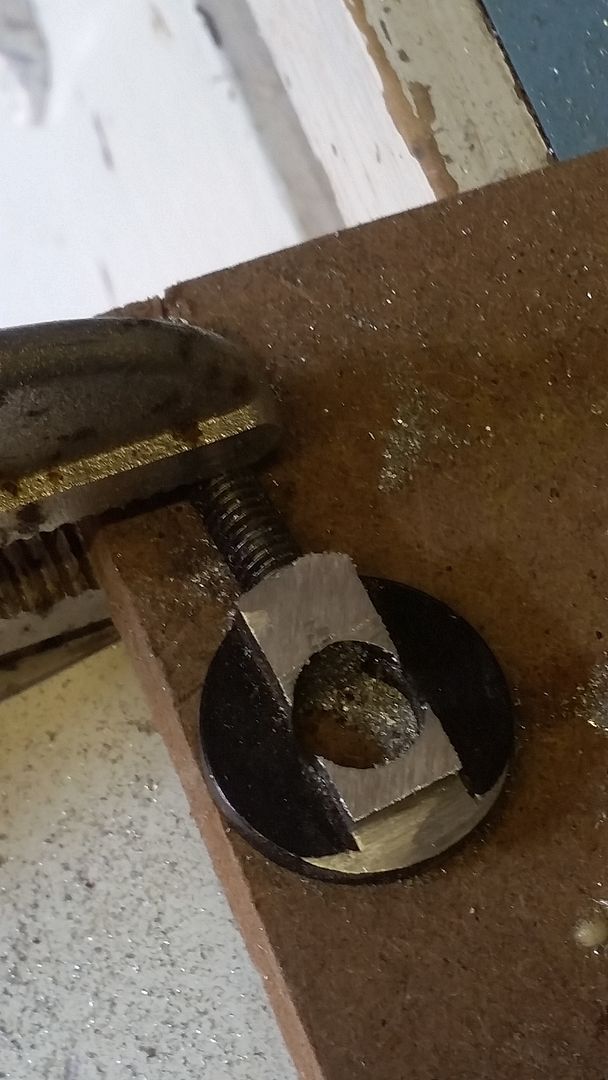 [/img]
[img] 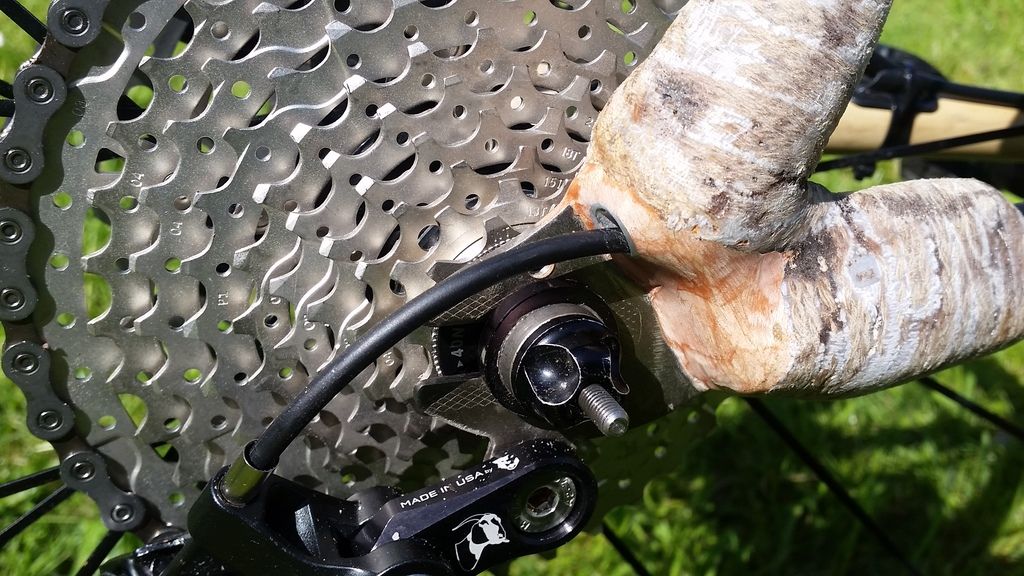 [/img]
I've only one so i'll have to see how it holds.
Right it's all dry, spacer is in and I just did a couple of miles around the block with a bit through a field thrown in....
It rides great. I had to stop a couple of times to get the rear wheel sitting true as ive only spacer in one side so when you put any serious power down It drags the wheel into the stay. Too be honest ill probably just run 28c's for now (I've a couple on order).
As for the ride - great. I've only experience of carbon road bikes which I've always found very harsh. The bamboo really does soak up the bumps - I'll have to see how much a difference running a 28c tyre makes.
I may end up putting a 90mm stem on there as well - it's a little stretched when on the drops. Especially when on the rough stuff (could be the mtb'r in me talking). But for a first ride it was great.
With regards to the slipping dropout I'd thoroughly recommend getting a shimano qr in there and really cranking it down tight. I've run singlespeeds with one chain tug and a shimano qr and it works fine.
Right, just been able to do a little more:
[img] 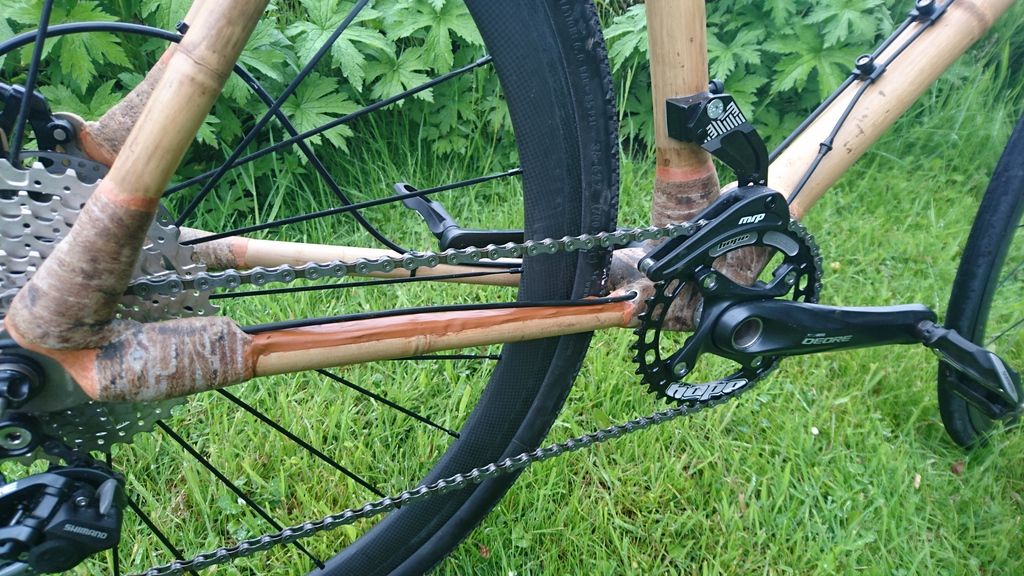 [/img]
Fitted the Sugru to the chainstay.
And ended up going with a wax finnish rather than gel coat or similar. I've ended up using wax as it'll be easier to make any adjustments to the frame at a later date. It'll mean a constant replication to protect the frame, and the UK block won't be very good (epoxy degrades in sunlight) but this is a first / trial build so I'm not that fussed.
[img] 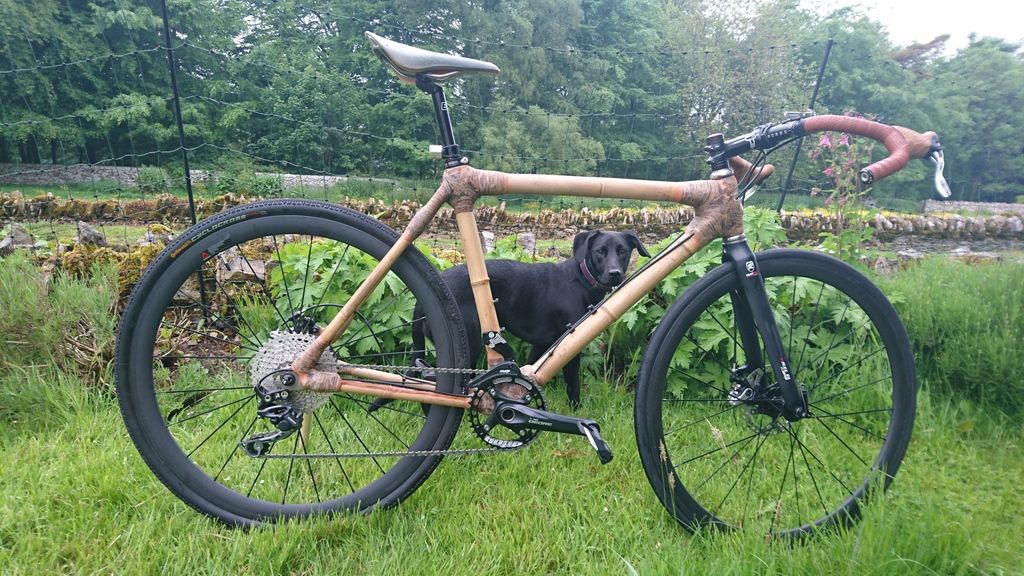 [/img]
Also got the 'head badge' fitted.
[img] 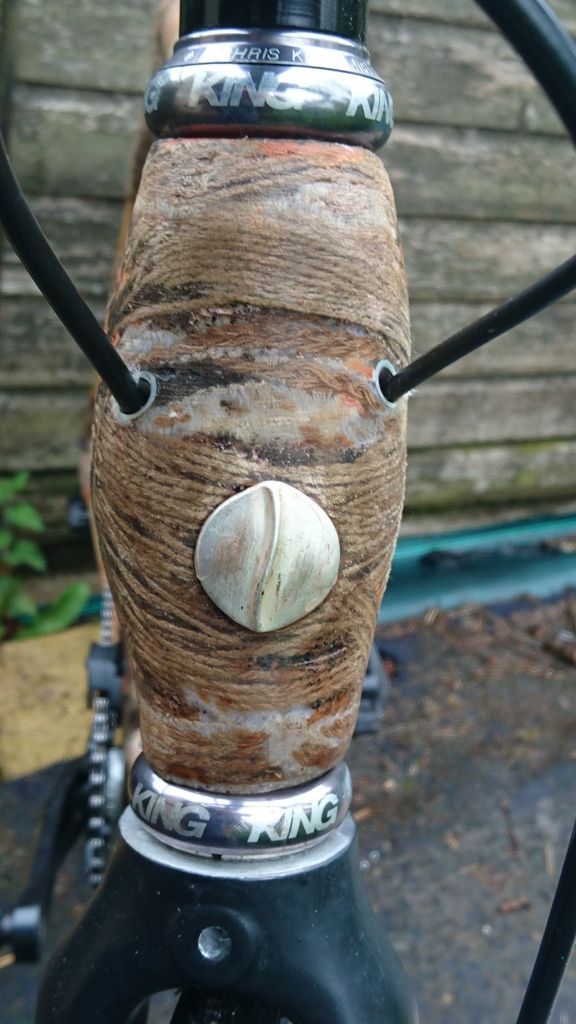 [/img]
Oh and my new phone made a video 😀