![]() You don't need to be an 'investor' to invest in Singletrack: 6 days left: 95% of target - Find out more
You don't need to be an 'investor' to invest in Singletrack: 6 days left: 95% of target - Find out more
The new frame turned up in its box this morning - just need to put it together... 🙂
[img] 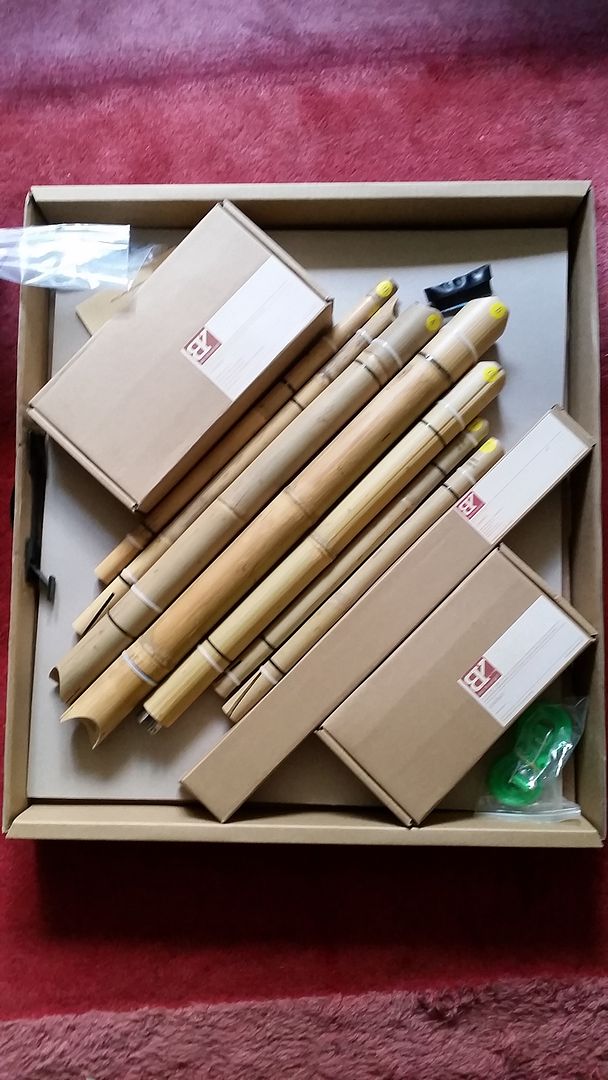 [/img]
Awsum, we need picture updates as it progress's
Now this I like 🙂
Nice, can you play a tune on it as well?
Keep us updated please!
Have you got wood?
Does it smell like bamboo? Do you need to dip it to make it strong?
How long will it take to build? Are you finished yet?
More pics please 🙂
If you ride it in the rain will it grow into a tandem?
🙂
Plant it in the garden and another will probably appear through your lawn.
@ mrsfry
Yes it smells like bamboo
No you don't need to dip it, although some people do a resin coat over the whole thing at the end.
It should take a couple days to get it stucktogether and wrapped - but + another 30 hours or so of sanding for a decent finish.
Got the jig (it comes with one) built and it mocked up this afternoon....
[img] 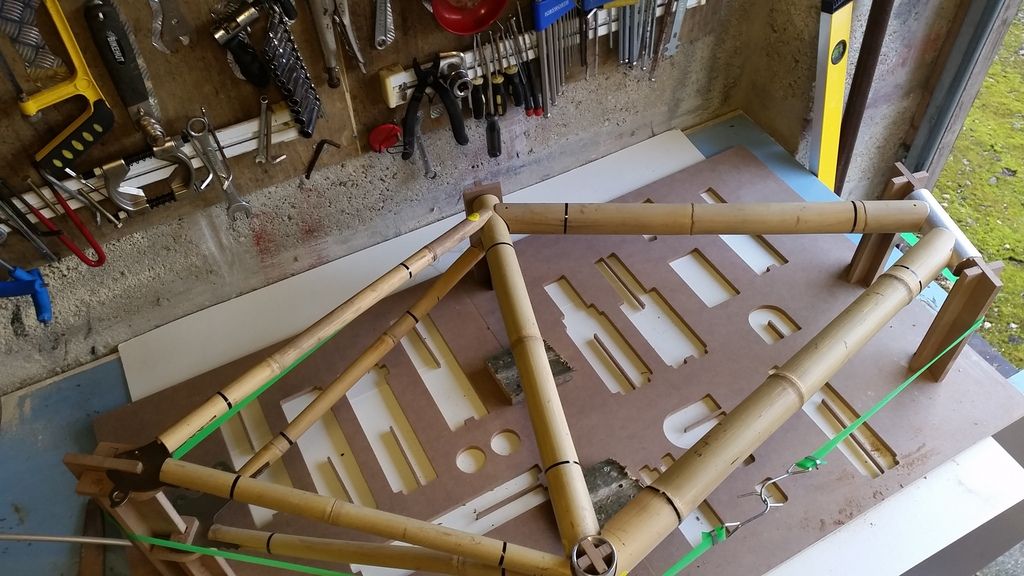 [/img]
The bb and headtube (1&1/8) come pre knurled which you don't get with some kits
[img]  [/img]
Excellent, keep up with the build pictures.
What geo, is it a std kit or can it be customised?
That looks great, keep the updates coming.
It's a standard kit from bamboobee.net - there's no detail on geometry on the Web site and tbh you're never going to get 100% accuracy as every joint has around 1-2mm of play. It's a 'standard' medium road bike kit so it was £180 ish all in wit postage.
Postage was quick - 5days via dhl from Hong Kong.
Cost was £160 but I also bought 2 sets (8 bolts) of bottle cage kits which i'll use as bolt on cable guides.
I'm going to try to tweek the cable routing so that it's integrated through the lugs - kinda semi internal. I'm using 8mm ali tubes for this.
Bamboobee also have a full 'how too' on youtube if anyone's interested.
Spent the last hour rasping 4 of the joints - you need to roughened the bamboo around the joint area so that the resin and hemp gets a better key.
[img]  [/img]
Only 10 more joints to go - think I may get the power tools out...
Also thought I'd post a pic of the double tube construction bamboobee have used for the main triangle - the main tube us reamed out and a smaller one bonded in. Not sure if it's entirely necessary and will make a heavier frame but it's nice anyway.
[img] 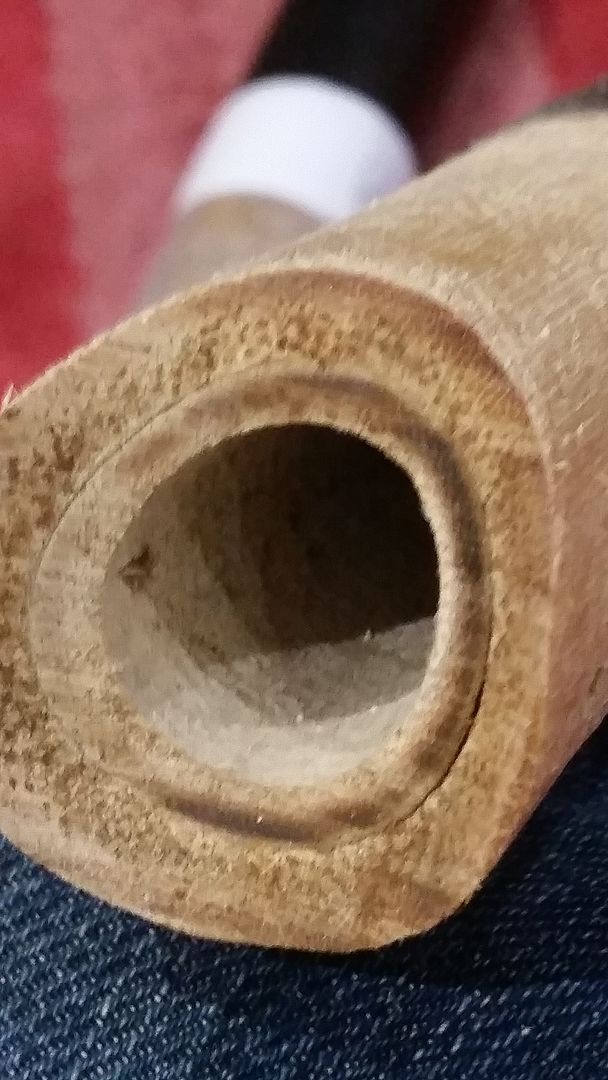 [/img]
Well, this thread is excitement enducing.
I like ( hits the like button )
Be great if you can find time for more pics, this could turn out epic.
😀
I'll try to do pics as I go but I'm afraid it'll be a bit hit and miss. I'm aiming to get it tacked up in the jig by the end of Monday - then glued and wrapped over the next couple weeks.
[img] 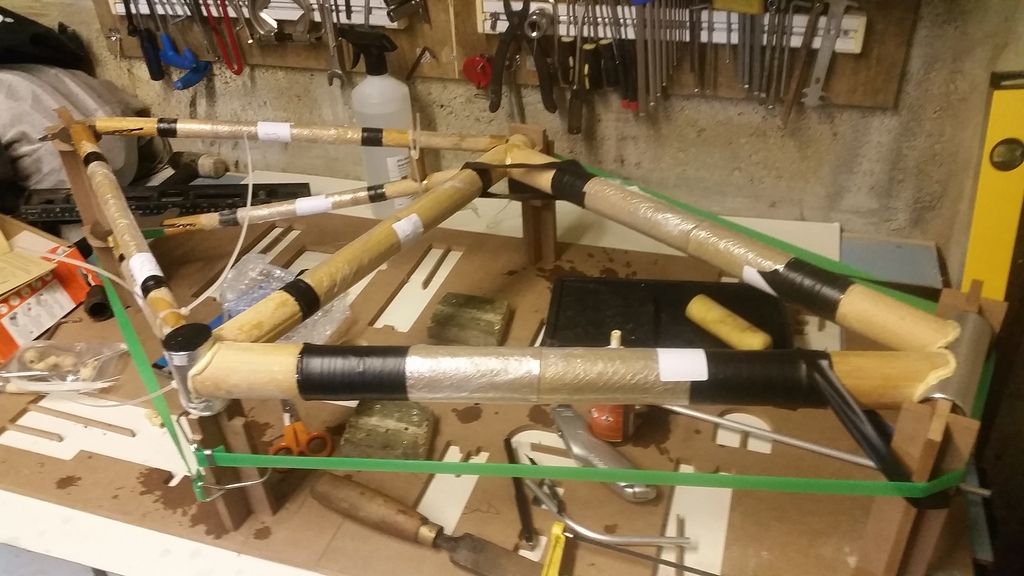 [/img]
Just finished tacking up the frame. I've used gorilla glue as it expands into the joints and will help fill some of the tighter gaps that the hemp / epoxy mix won't reach. Others have used balsa joints or fibreglass to further this but this kit didn't come with that so i'm not going to bother.
[img] 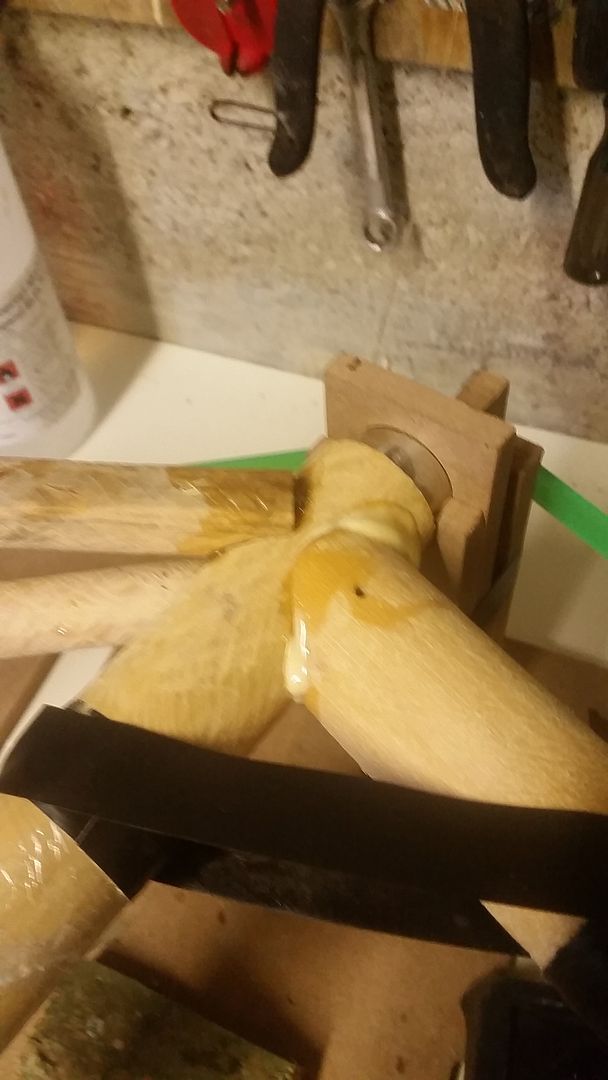 [/img]
Getting it all aligned was a bit of a pain - lost of measuring and re measuring - I'm still not sure if the drive side stays are correctly aligned - if I were to do it again I'd make my own upright jig.
[img] 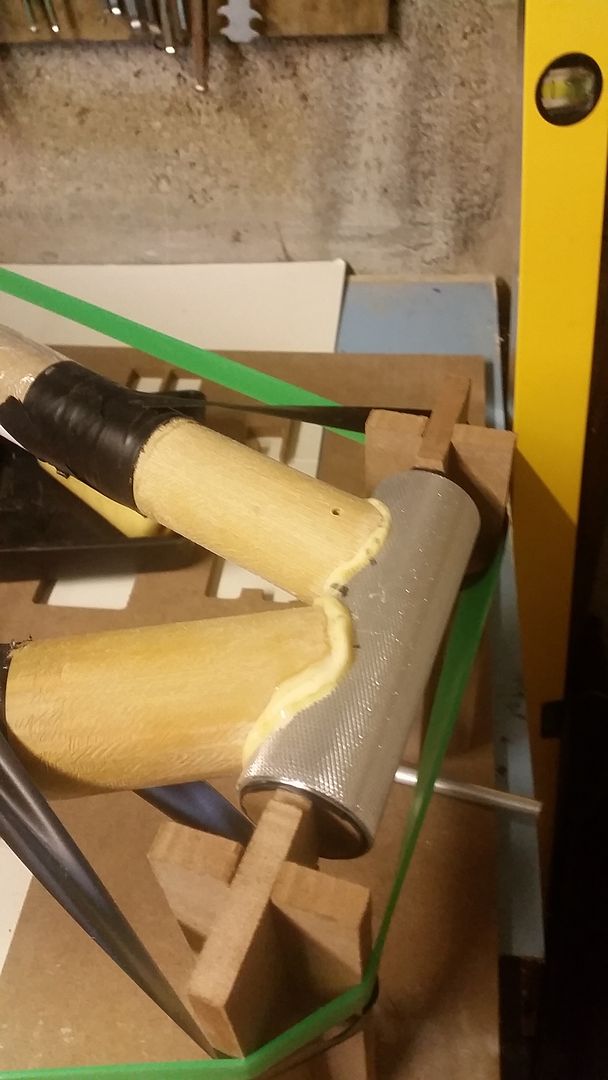 [/img]
[img] 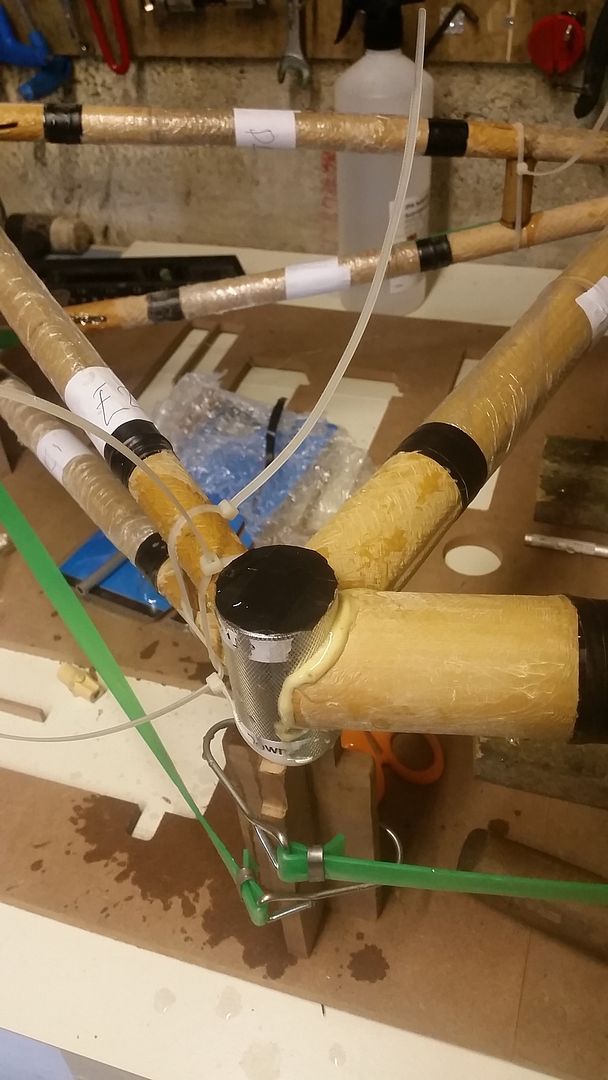 [/img]
Also had to use most of the zip ties in the kit to keep it tight - IT also comes with wire sections for added strength but i'll replace so of these with Ali tubes for my cable routing after its tacked up.
[img] 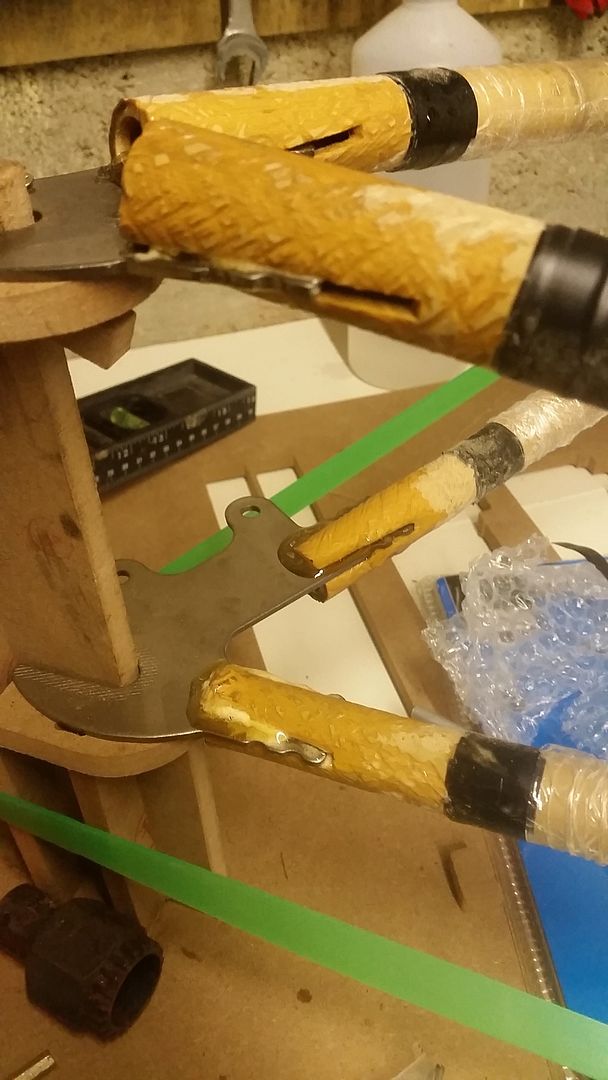 [/img]
^^ this is my biggest concern - you can see the non drive side dropouts are nice and tight in the pre cut slots, but they are no where near on the drive side. I've measured it three times and the drop outs are the same distance from the BB. I may have to remove it from the jig to tripple check the alignment which will be a real pain (and may kill the jig in the process (I hope gorilla glue will be strong enough).
looks good altho slightly terrifying.
A bloke I chat to on my daily cycle commute on CS7 rides one of those. Ridden it for years.
Ah, now I see how you ended up finding thisbamboobee.net
Just spotted this thread and I is all excitement now...
Hadn't come across bamboobee before only [url= http://bamboobicycleclub.org ]bamboo bicycle club[/url] who's kits seems a little pricey, seem to want to coax you on a course in London and rent you a jig...
I really like the flat pack jig idea... [s]Did you have many extra costs / problems importing the kit from the states?
[/s]
Edit just read the post above
No import taxes - came labeled up as 'sample bicycle components'.....
Just about to start the wrap.... not sure if it comes with enough hemp for a good 'all over' finish - the instructions show part of the headtube exposed and several of the customer pics show this on there bikes. Luckily I have a big ball of hemp string which I can over wrap with if needed.
Looking good, I see your point on the joints.. But hey, it's not like you'll be riding it tomorrow is it? Is it?
Maybe take it out at night first 😯
Thanks for the photos, I know we're all "more, more" and it's a problematic grabbing the phone with glue on yer hands, but we are excited for you 😀
Here's what it looked like an hour ago...
[img] 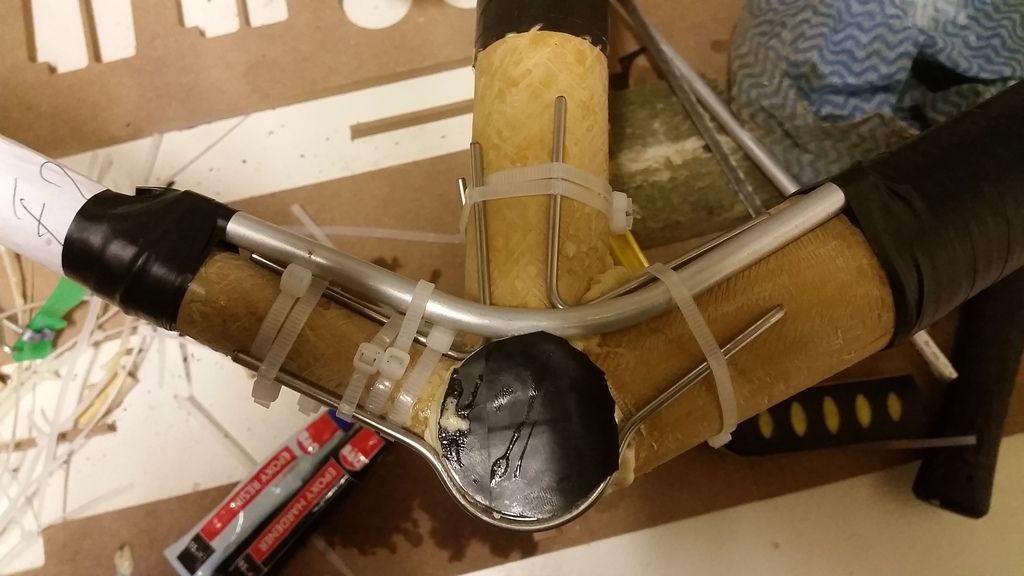 [/img]
[img] 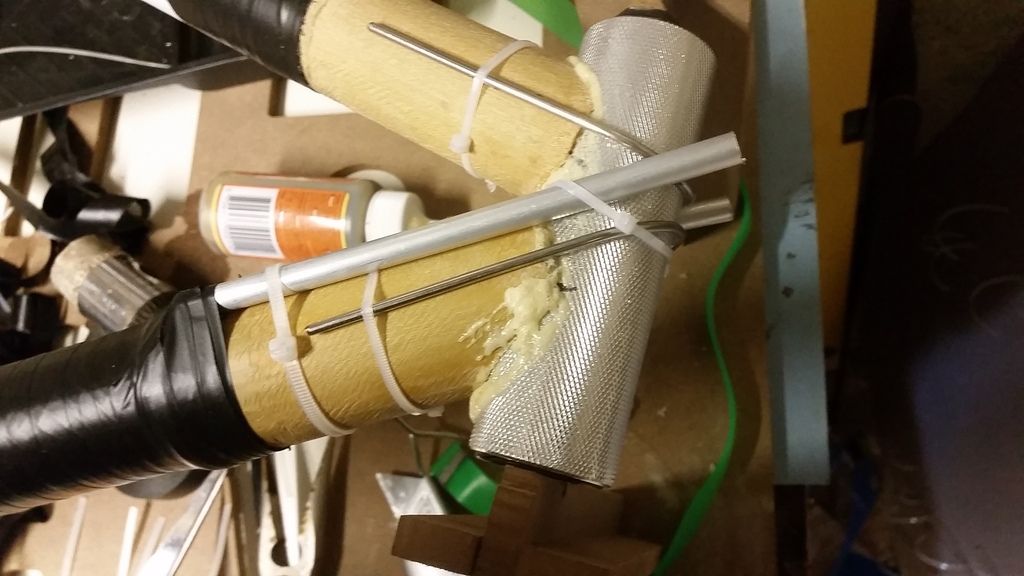 [/img]
[img] 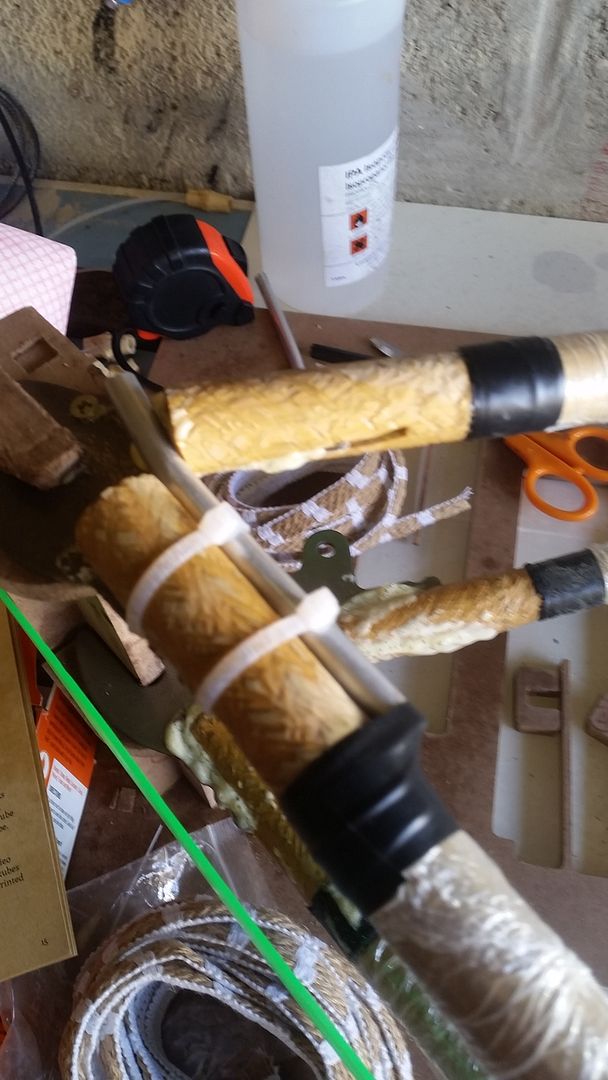 [/img]
You can see how I aim to run the cables internallyto the lugs with 8mm ali tubes which should be easily enough to file down with the joints.
And here it is now:
[img] 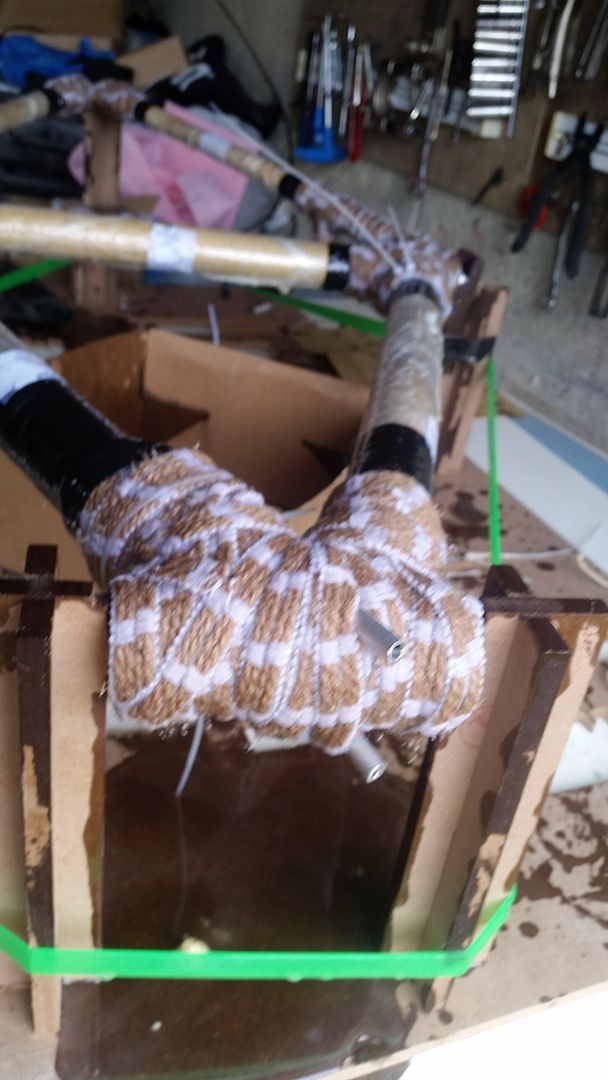 [/img]
[img] 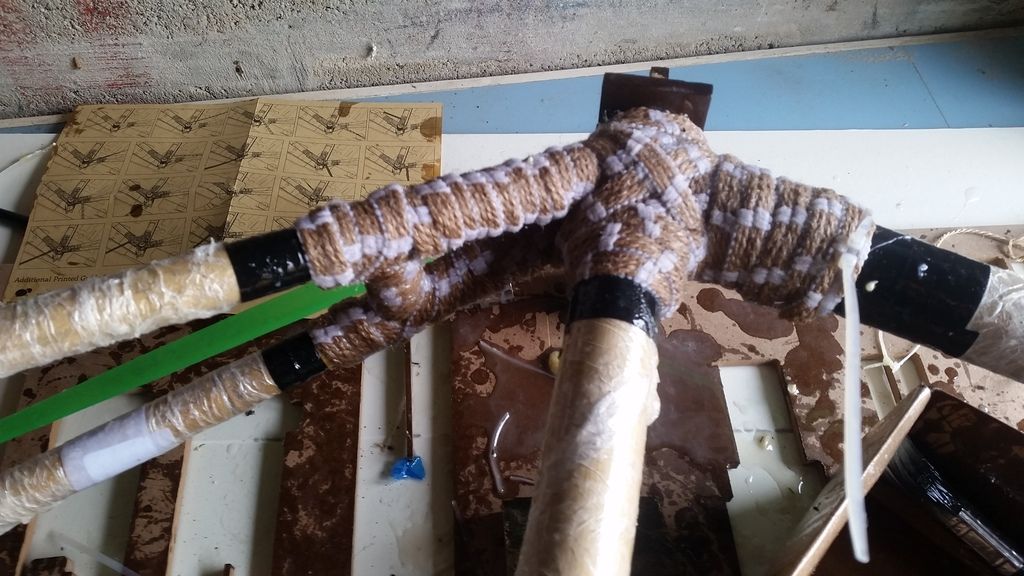 [/img]
I have to say it was a tricky disgusting process - 1kg of epoxy and really long lengths of string = one big sticky mess. I fully expect to find the jig stuck to work bench in the morning.
I've also realised that routing the rear break down the down tube won't give the best route along the chain stay - should have gone under the top tube with them both. I'm aiming to go 1x10 so no front mech routing.
[img] 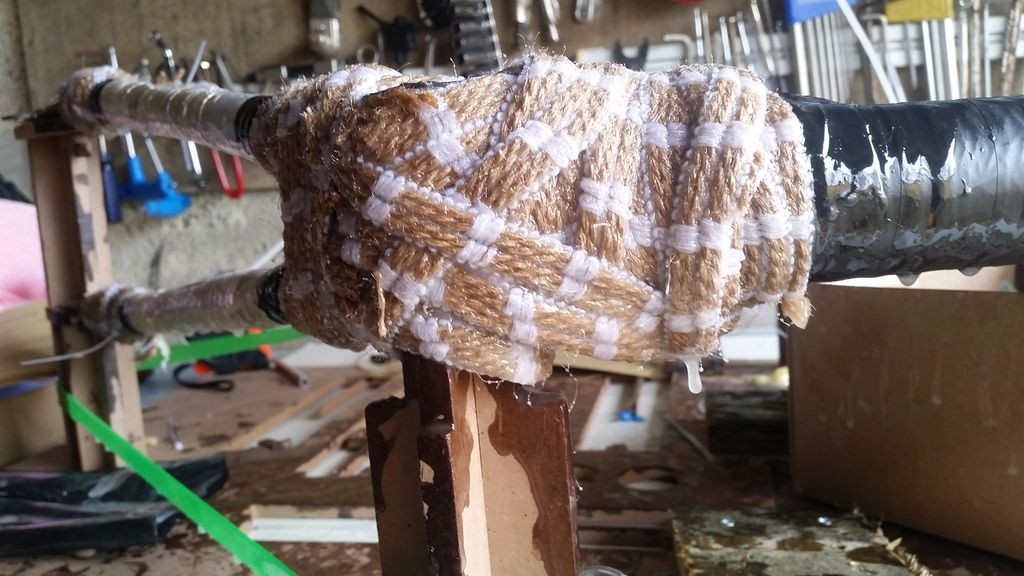 [/img]
Another issue with a flat jig is that I couldn't see the none drive side so there will be LOTS of tidying up to do on that side - you can see how lopsided the BB area is...
Just 12-24hrs for it to cure before jig removal (big mallet and swearing to be involved)...
Re the DS dropout could you maybe pack out the slot and inside of the tube with some epoxy? Maybe with some GF filler?
Would you be at all tempted to reinforce the joints with the blackstuff before wrapping the hemp over? Or is that a No-no...
Ooooh another thought, might not be your bag, but what about directly bonding a guard and/or rack while it's still on the jig?
I filled the extra long slots with extra gorrila glue and it should be ok.
Not sure on the build yet - but I doubt I'd ever use a rack and it won't see the rain (I hope) so shouldn't need guards - the same company makes bamboo do-it-yourself guards as well so it's always an option in the future.
Need to buy loads of mini grinding and sanding bits for the dremel - it can take 60+ hours to finish the lugs nicely and with that second of wayward hemp around the BB I may need to find a bench mounted belt sander.
I've kept most of the bamboo dust from filing the joints to make filler incase there are any bits of exposed bb/headtube etc.
I've seent the company in the UK that sells the kits but that looks pretty good too. Does it come with dye to colour the joints?
Did you remember the Panda repellent?
🙂
That close up of the head tube looks like a sand people off of star wars.
No dye - u wanted to see what the cotton / hemp mix looks like first.u can always mix up a coloured epoxy layer to go over the top. But TBH what's the point In a hemp joint if you then colour it after.
I've seen plenty of sprayed up joints as well.
That close up of the head tube looks like a sand people off of star wars.
Hopefully it won't once it's sanded down.
No disrespect ? I think what you are doing is excellent ?
Wow - good effort.
I've been thinking about getting a kit like this from the London bamboo company and building up a 29er to go with some singular swift forks as a commuter. So really interested to hear how it finishes up and especially how it rides.
Good luck and keep up the updates!
Been pouring over the bamboobee site this afternoon, noticed this:
dropouts (127 mm apart on jig)
Is yours spaced 127mm? I noticed it has disc tabs will it stretch comfortably to take a 135mm hub, or could the jig be re-spaced?
joints
resin
big ball of hemp
Uuh, you sure it is a bike frame you are making?
😀
WOW! You have skills
Loving the pics and thank you for the reply 🙂
Is yours spaced 127mm? I noticed it has disc tabs will it stretch comfortably to take a 135mm hub, or could the jig be re-spaced?
Yes they are spaced at 120mm. A 130mm disc hub will fir and there are still some about, I'm aiming to get some novatech hubs for the bike.
Oops that should read 127mm...
Hmmm, I would be tempted to modify the jig to make 135mm fit...
I am very keen on getting one of these kits, but I want to see how your exploits turn out...
What are you doing to finish the joints? looking about packing over with hemp wool, sanding and polishing them up smooth looks like the most popular choice...
This is excellent.
I would like to know if you woke up with your left hand stuck to your left buttock cheek?
cookeaa - it'd be pretty easy to mod the dropout secton of the jig - you only need to move the dropout positions by 2.5mm either side and it's onlt 6mm mdf - you could do the non drive side with a file and just pack up the drive side.
I would like to know if you woke up with your left hand stuck to your left buttock cheek?
Nope but one hand has brown splodges (gorilla glue) and the other is covered in flaky bits of epoxy.
Right - update time...
Took the frame out of the jig which, predictably, was smashed apart in the process. The drive side isn't to bad....
[img] 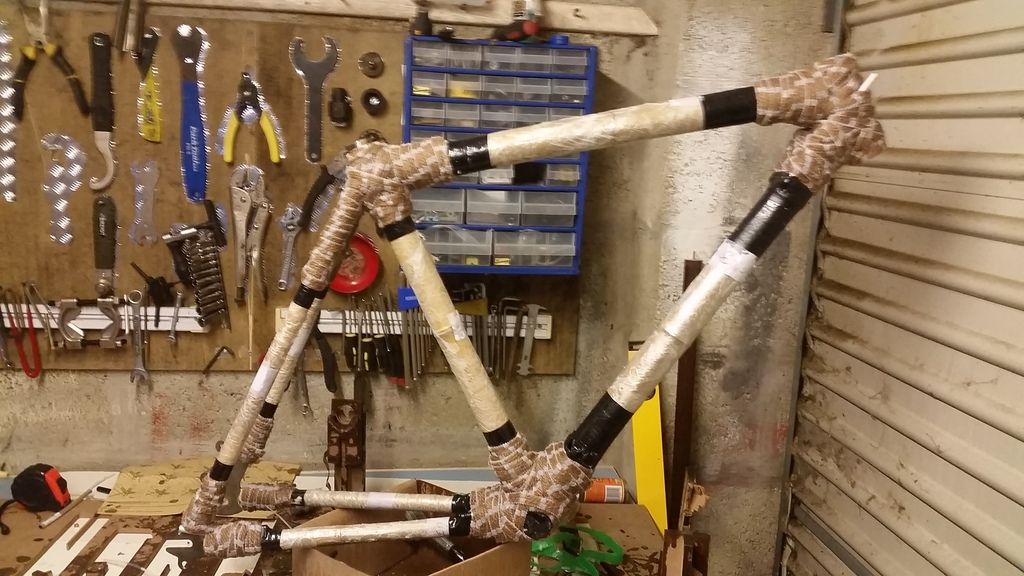 [/img]
Non drive side (which I couldn't see when wrapping up the joints) is a different story...
[img]  [/img]
Looks ok on the face of it, but there are lots of gaps and bits of visible metal/bamboo so will need a fair bit of filling...
[img] 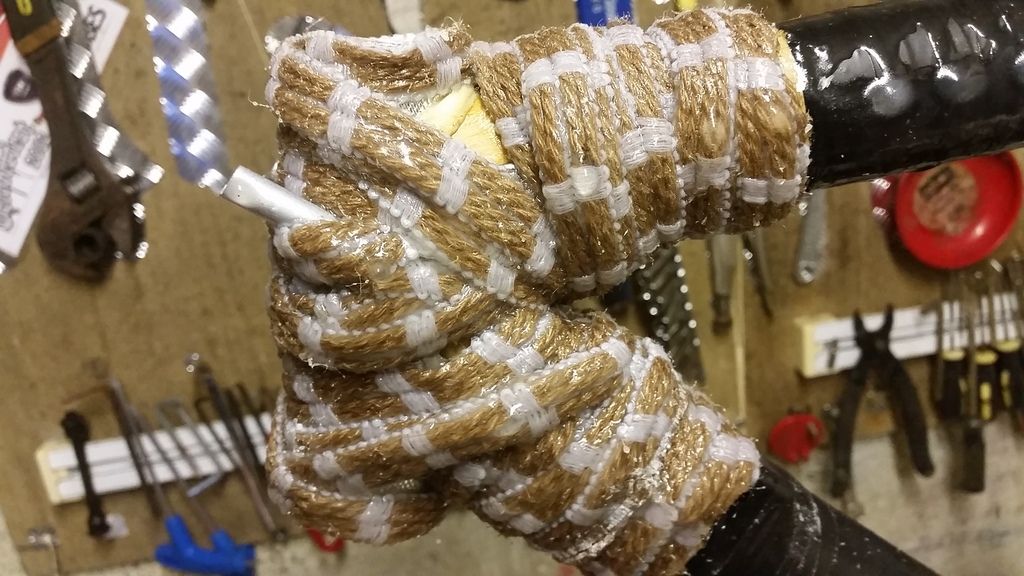 [/img]
[img] 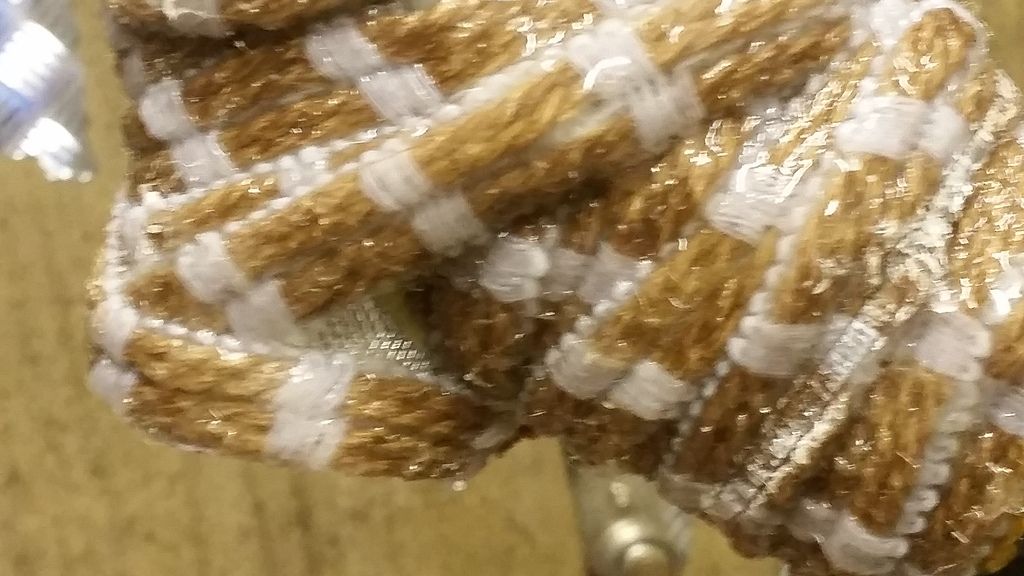 [/img]
[img] 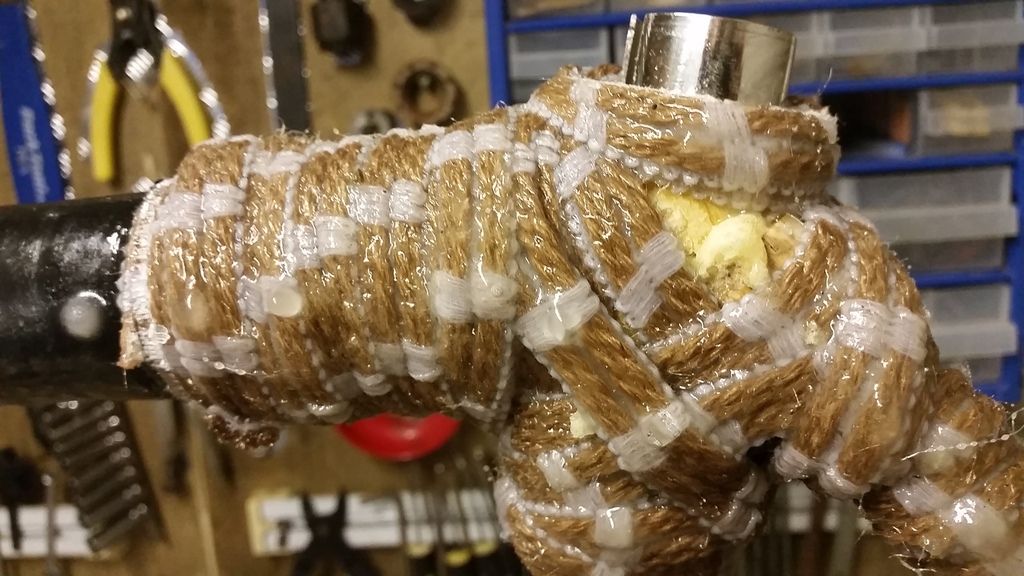 [/img]
[img]  [/img]
It's still a little tacky (too cold and wet for a decent 12 hr cure in my garage), but initial 30 secs with the file supplied in the kit suggest it'll be ok to file down. However i probably won't get a chance to give it ago untill next week when I have some time off. I'm going to rough sand back as much as I can before I fill any of the holes on the non drive side as I may well expose some more in the process.
I aim to fill with an epoxy hemp mix as well as the bamboo sawdust collected from rasping the joints.
Haven't decided if ill do another (thinner) hemp cloth layer after that - I'll see how I feel once the first lot of sanding is done.
I also need to do a couple more hemp wraps for the bottle cage / cable mount bolts and anot her hose guide for the rear brake on the chain stay so I guess I'd better order some more epoxy.
Oh, and my 2nd hand Chris King headset turned up and some 1&1/8th straight steerer carbon disc forks are in the post so I guess I'll have to do the head tube first.
Will be waiting eagerly for the next installment!
Can you use a hairdryer to speed things up or not ?
Looks pretty 🙂
Could you not have epoxied the tubes in place in the jig, then removed from the jig for the wrap? Then you could have had 360 degree access for that part.
that's flipping awesome 😀
cannot wait to see it fully built.
Good work OP. Love this type of threads.
Could you not have epoxied the tubes in place in the jig, then removed from the jig for the wrap? Then you could have had 360 degree access for that part.
Yes.... but the chances of it moving one of the joints would have been high as you need to wrap as tight as possible.
The pros like calfee and bamboo bicycle club or Web works all seem to have vertical jigs which are accessible from both sides. For a one time use jig that came in the kit it's fine, but wrapping the frame when horizontal has its limitations.
When I've spent a couple hundred on a kit I didn't really want to spend a few hundred more on making a decent vertical jig.
It shouldn't impead the strength of the frame, just means I have more work to finish it off.
Nice 🙂
Well I can see where the 60 hrs of finishing comes from.... This is about 30mins work of sanding and filing by hand...
[img] 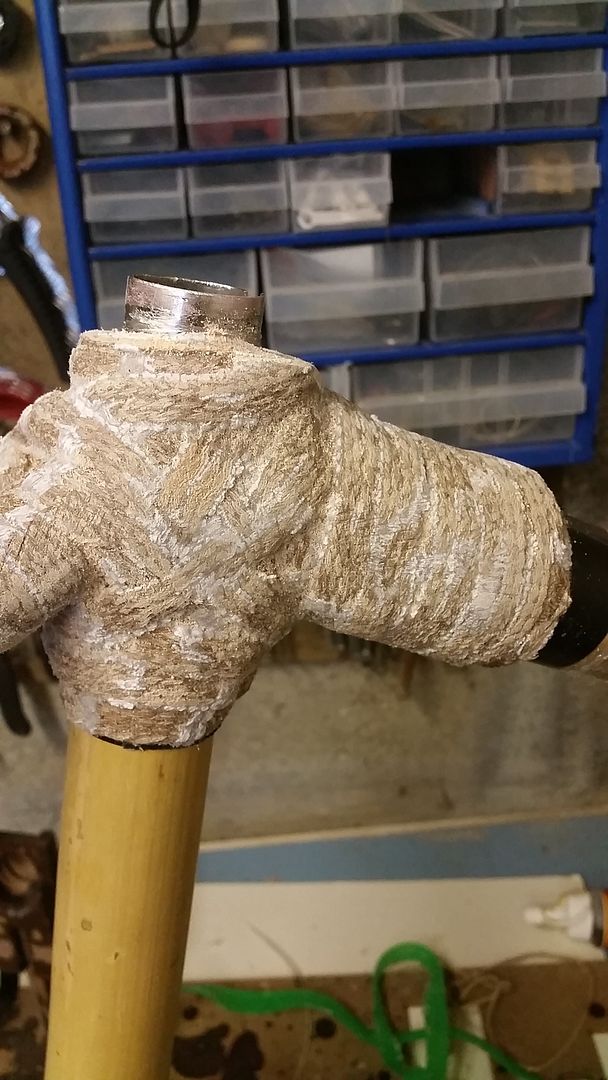 [/img]
Lot of work but it should look good when it's done.
Brilliant .
Certainly won't build into a light weight frame - in its unfinished form it's almost 7lbs!
Well..... its getting there...
Drive side BB joint with the bulk of the sanding done:
[img] 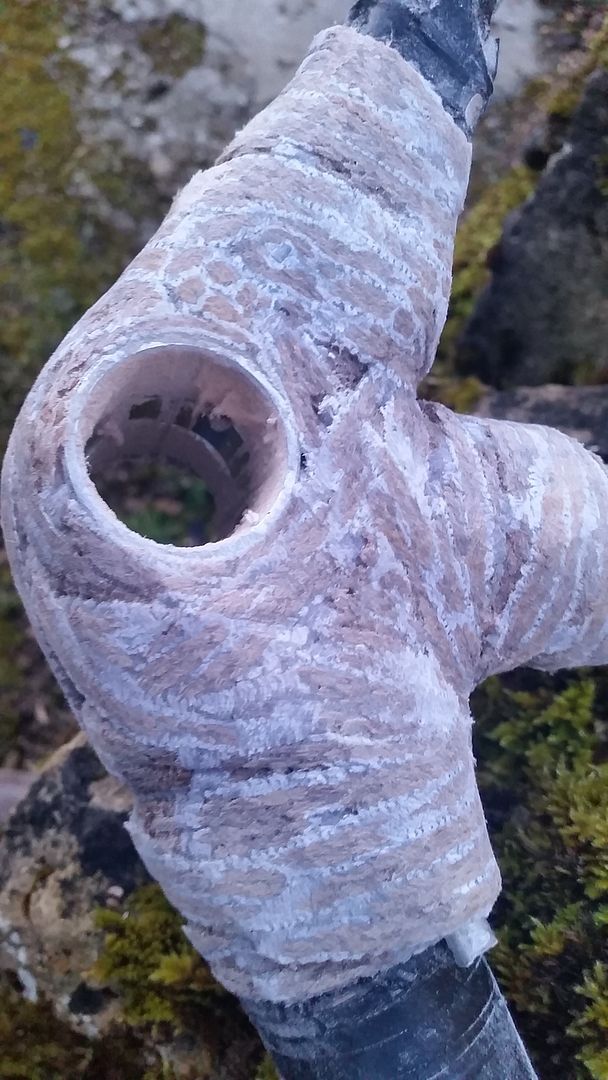 [/img]
Vs non drive side (unsanded)
[img] 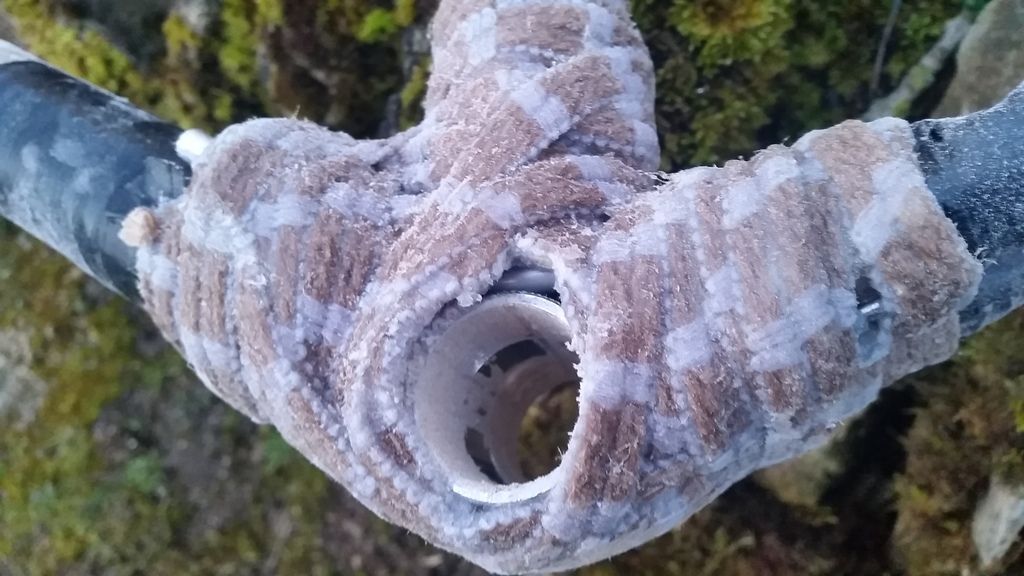 [/img]
Mumified bike 🙂
I [u]so[/u] could not be arsed with this - you have the patience of a saint!
Did you used to paint all of your Airfix models on the spru before assembling?
Oh and White Industries make a 130mm CX Disk hub. I used to have one.
It's not all hand finished, I did the seat tube junction by hand for a bit to see how hard it is - but I've been using the dremel and finger belt sander since. To do the drive side BB as above was about 30mins with these (just not had the time to put into the project over the last week).
As for hubs, it'll be a budget built and Novatech do a 130mm disc hub. It'll be interesting getting disc alignment right. I expect either shimming or shaving of the disc adapter.
Did it come with the disc drop out? Its not clear on the website unless I've missed it?
[b]mtbtomo[/b] - It's the standard 'XC' kit which comes with disc dropouts. And is essentially a cyclocross kit - you could also do conventional rim brakes with a bit of missing. There are other kits avaliable on the wen site as Etsy, Inc a MTB kit, but they don't ship to the uk only the US.
I'll try to get some more photos up later. However if I was doing it again I'd use half the rope that they supply on a 1st cure and also wrap it with perforated electrical tape. And the either get some hemp cloth or tow for a second cure. It's really hard to get a good tight joint with the rope as it's so large. This means i have loads of finishing to do and I'll still need to sort out some pretty bit dips and holes on the none drive side - then a second load of sanding. Smaller rope / string will get a much cleaner join early on. Also the instructions recommend doing all the joints in one hit, mixing up over a ltr of epoxy for this. This means I had to rush through the joints to get them wrapped up and secure be for the epoxy started to set. If I build another I'd experiment more with a bit of fiberglass first maybe.
Also thinking I may add dried coffee granules along with my orriginal bamboo sawdust to my filler mix to bulk it out! Mainly because I don't want to use any of the sawdust I'm making as it has epoxy already in it, but also because it'll give it a darker look.
Here's some pics of where I am now.
[img] 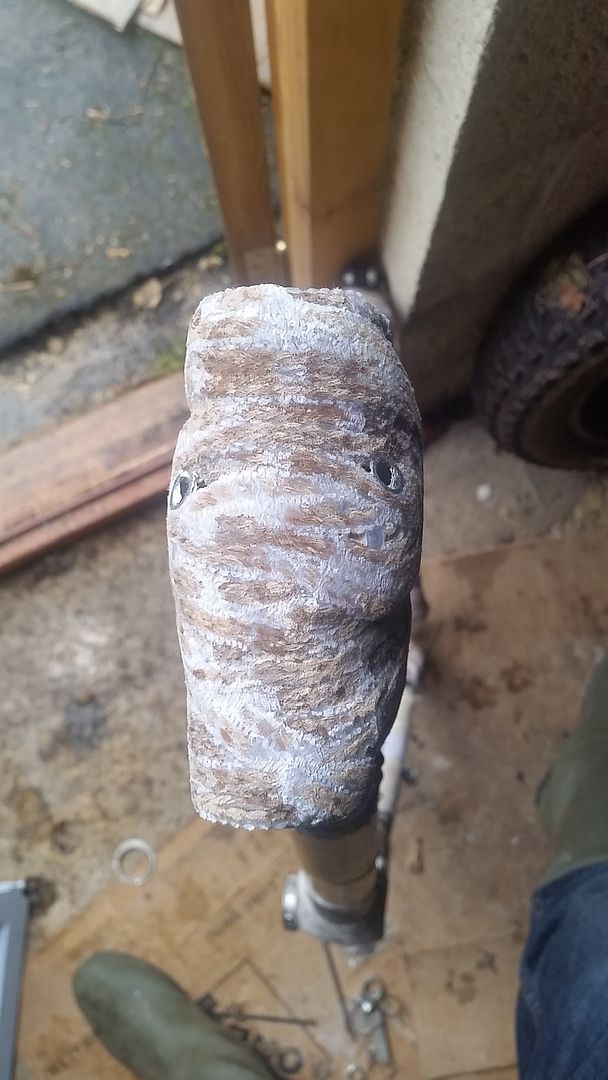 [/img]
You can see how uneven the wrap was on the none drive side of the headtube. This will need another wrap of hemp to keep the strength. Which means I'm having to sand evtra channels into the drive side to maintain the new fibre lengths around the headtube.
[img] 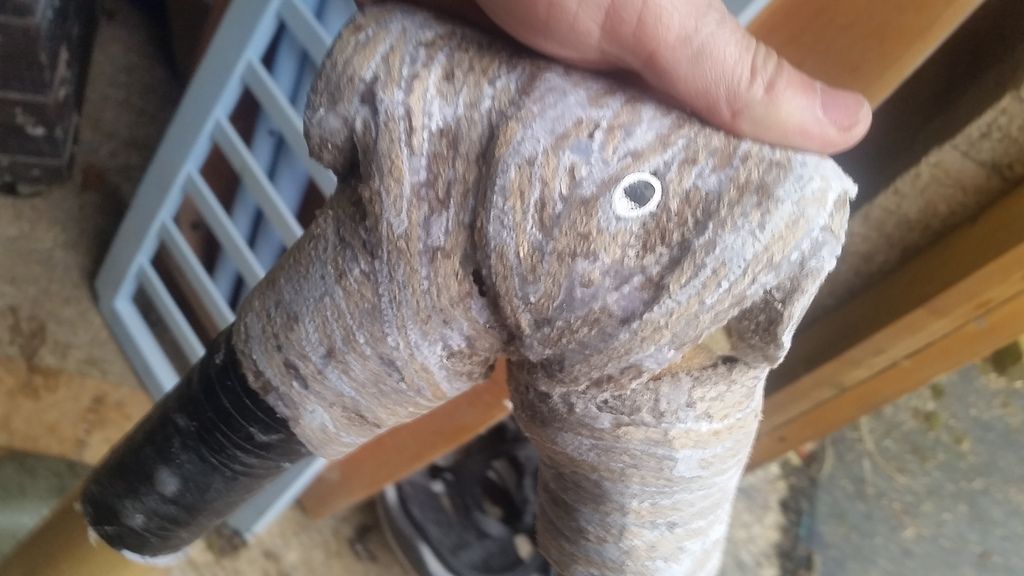 [/img]
[img] 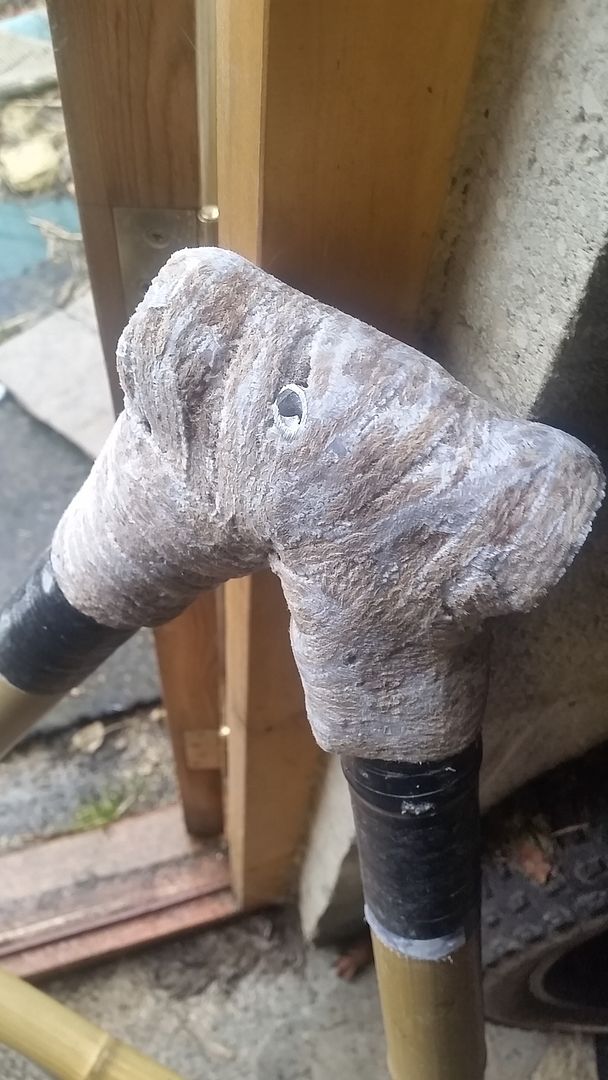 [/img]
That pic needs posting in the "Aargh! My eye!" thread.
Here's what the BB joint looks like at the mo...
[img] 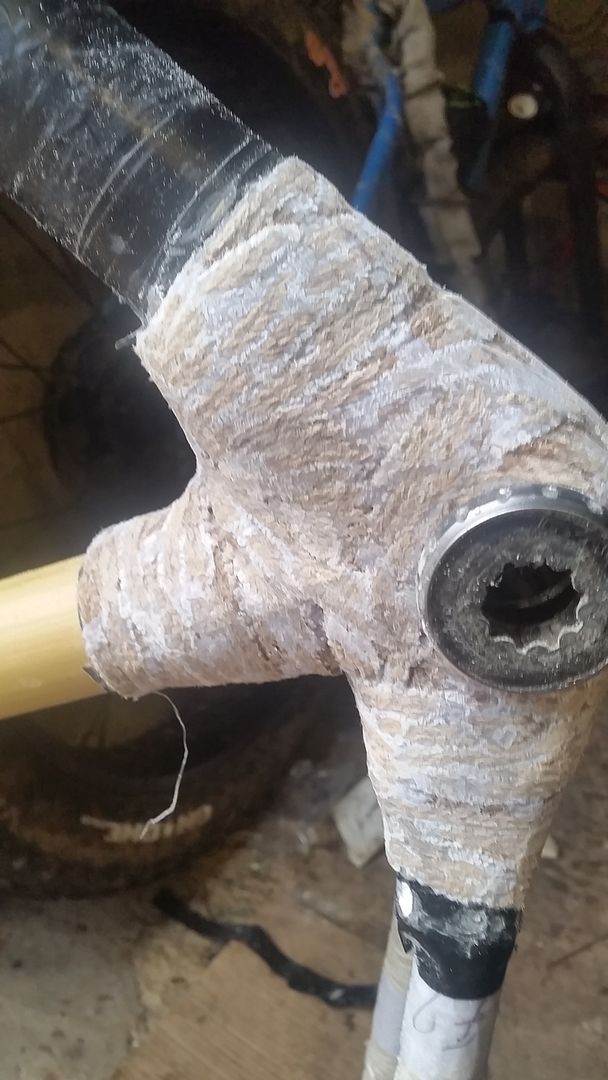 [/img]
The BB is in just to help keep the threads clean
[img] 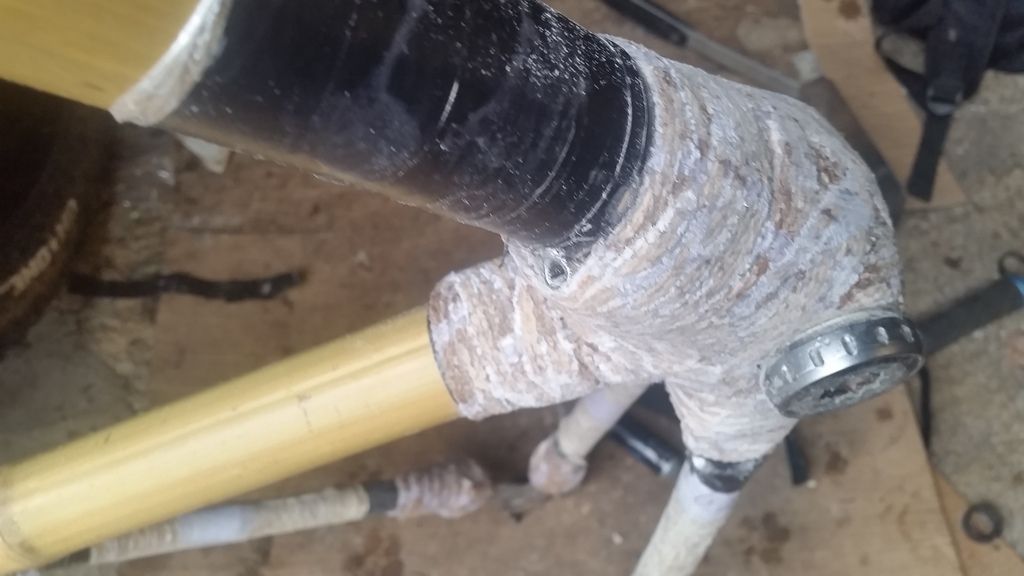 [/img]
And here's the non drive side now...
[img] 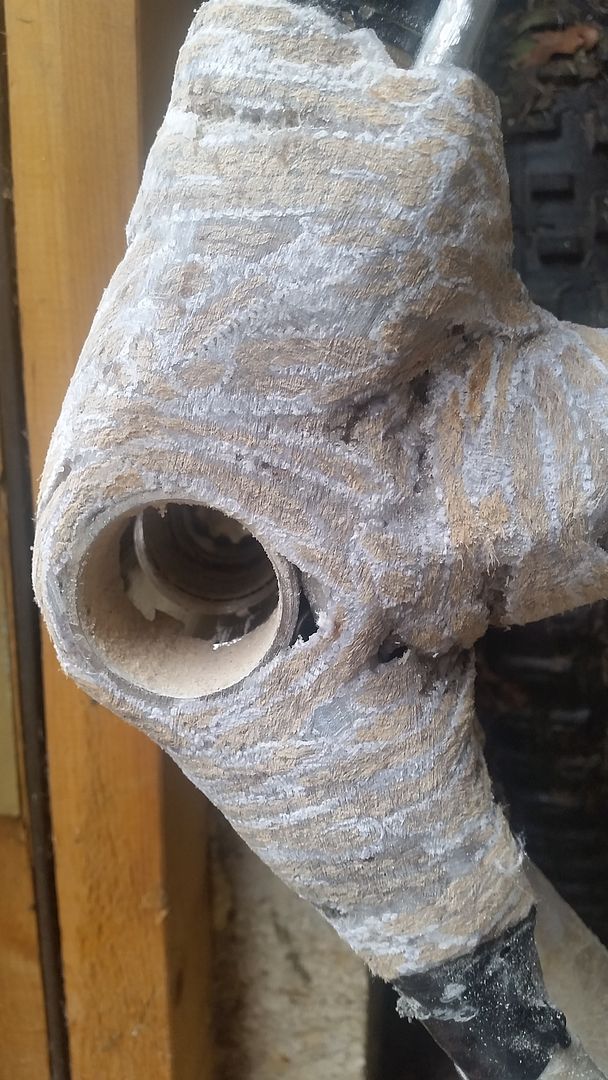 [/img]
You can really see how the large hemp rope causes big areas of epoxy to form which won't give the best strength.
[img] 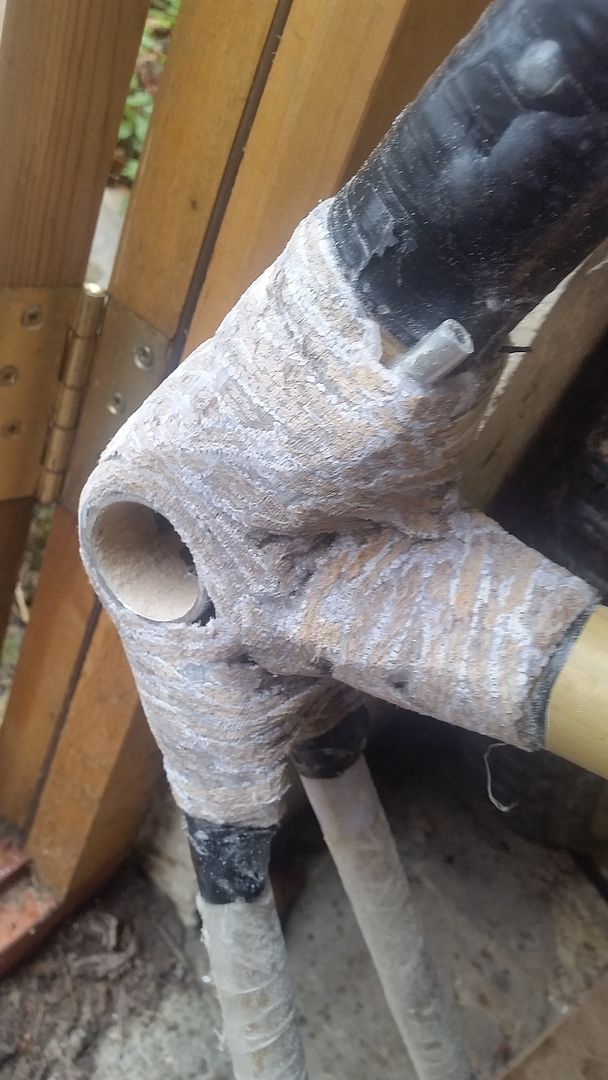 [/img]
I guess if you sand that too far down you'll loose the strength.. So how do you know when to stop sanding?
Clearly you'll end up with a bumpy finish at best rather than smooth.. ?
how do you know when to stop sanding?
Guess work - but if I go too far i'll be doing a second wrap with smaller hemp string in those areas anyway so the joint will be strengthened back up.
Most home built bamboo bikes use either carbon tow or hemp fibre tow. I'd like to experiment with different joints if I were doing another build. The reletivltly thick hemp and cotton mix supplied with the kit is ok, but dosent give the best or easiest finish.
Clearly you'll end up with a bumpy finish at best
Pictures don't do it justice - I'm only 1/2 way through and they should end up like this but with a more structured/stripy look:
[img] https://encrypted-tbn2.gstatic.com/images?q=tbn:ANd9GcRqnEXbtJlEewCW3Kb2gQAYW0s5jv2M4_DdsOljj275fyotr1IX [/img]
Ah ha, then thats pretty cool I have to say.
I'm still intrigued buy the strength around the joints, but it's looking good have to say.
You've got a LOT of sanding to do, judging by that pic. Can#t say I'd want one, but I'm interested to see how it goes.
You've got a LOT of sanding to do, judging by that pic.
That's where one of these comes in handy 😉
[img]
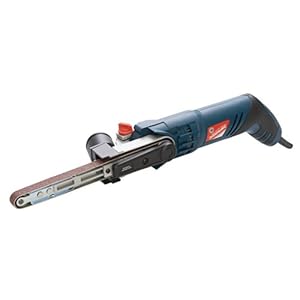 [/img][
TBH to get the BB area to that point has taken less than an hour with 40 grit (and I've gone through about 5 belts) - considering how out of place the rope was its not that bad. I must had had to sand it back by around 10mm or so in the BB area.
Also just had this turn up in the post:
[img]
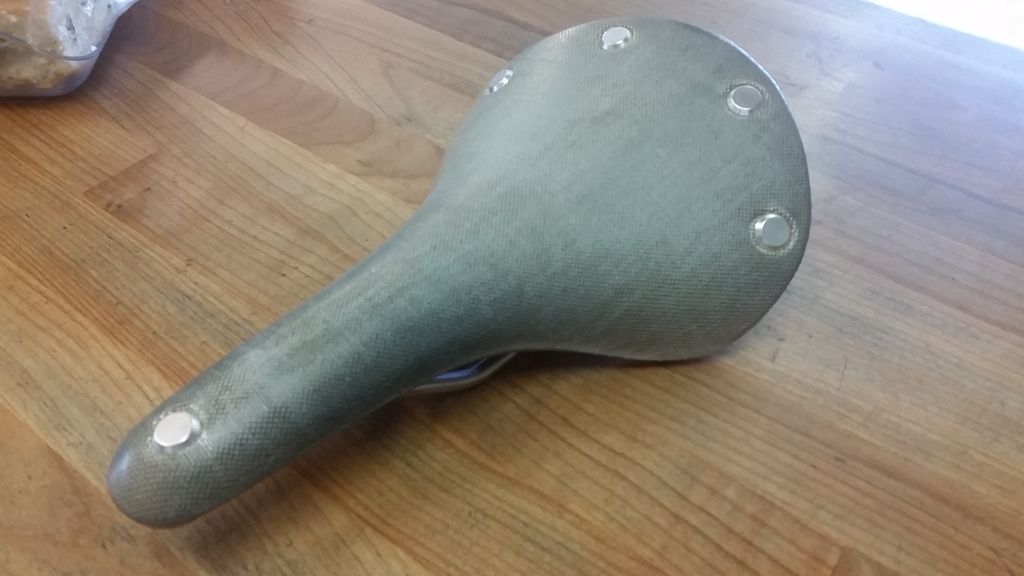 [/img]
Since your first post I have been getting all bamboo geeky, not sure I want to buy the same kit you have now, I am fancying sourcing stuff for myself, either 'Tonkin' or 'Moso' bamboo, joints smoothed off with fibreglass, with some strategically placed UD carbon tape wrapped over with carbon tow, and compress it all using heat shrink tape (no vac bagging kit).
I might look at cheating a bit and using prefabed carbon for the seat and head tubes...
There are some more eco-friendly epoxies available now too...
Biggest issue though will be making a jig first...
I was going to go down the full on carbon route - but this is a relatively cheap and easy way of 'giving it a go' first.
If you go straight into buying carbon tubes etc it could be one expensive F up.
Here's quite a good pic of the dropouts - the chain stay drop out has had about 10mins work with the sander and 40 grit belt - seat stay is untouched.
[img] 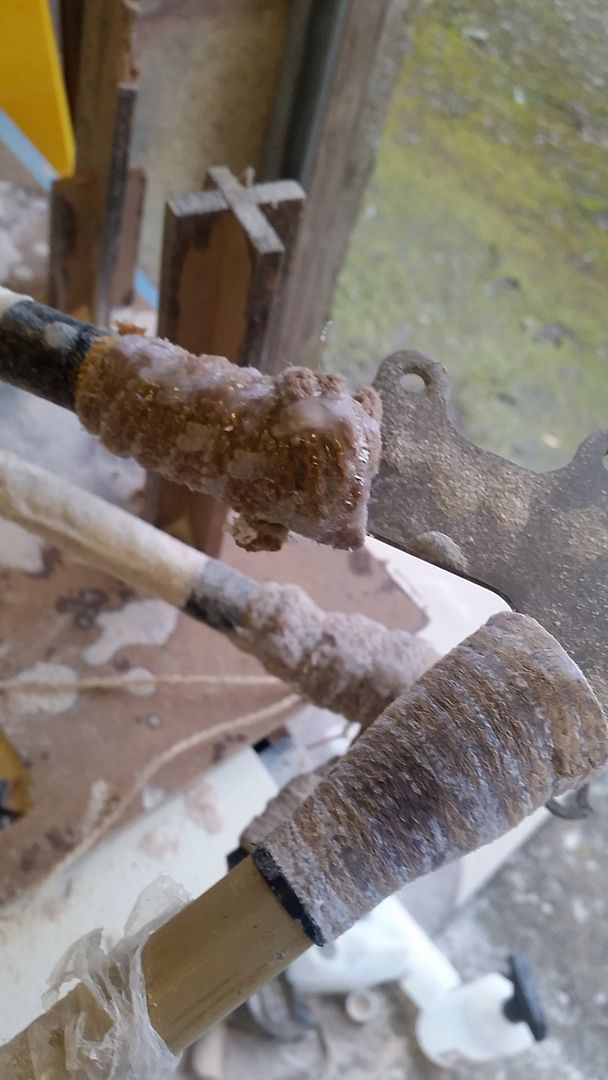 [/img]
Love this. Keep up the good work!
Looking good mate that chain stay has cleaned up beautifully.
Starting to look a little more 'frame like' - just cleaning it up today before s second wrap of hemp and a fill of the holes and low spots (more epoxy).
[img] 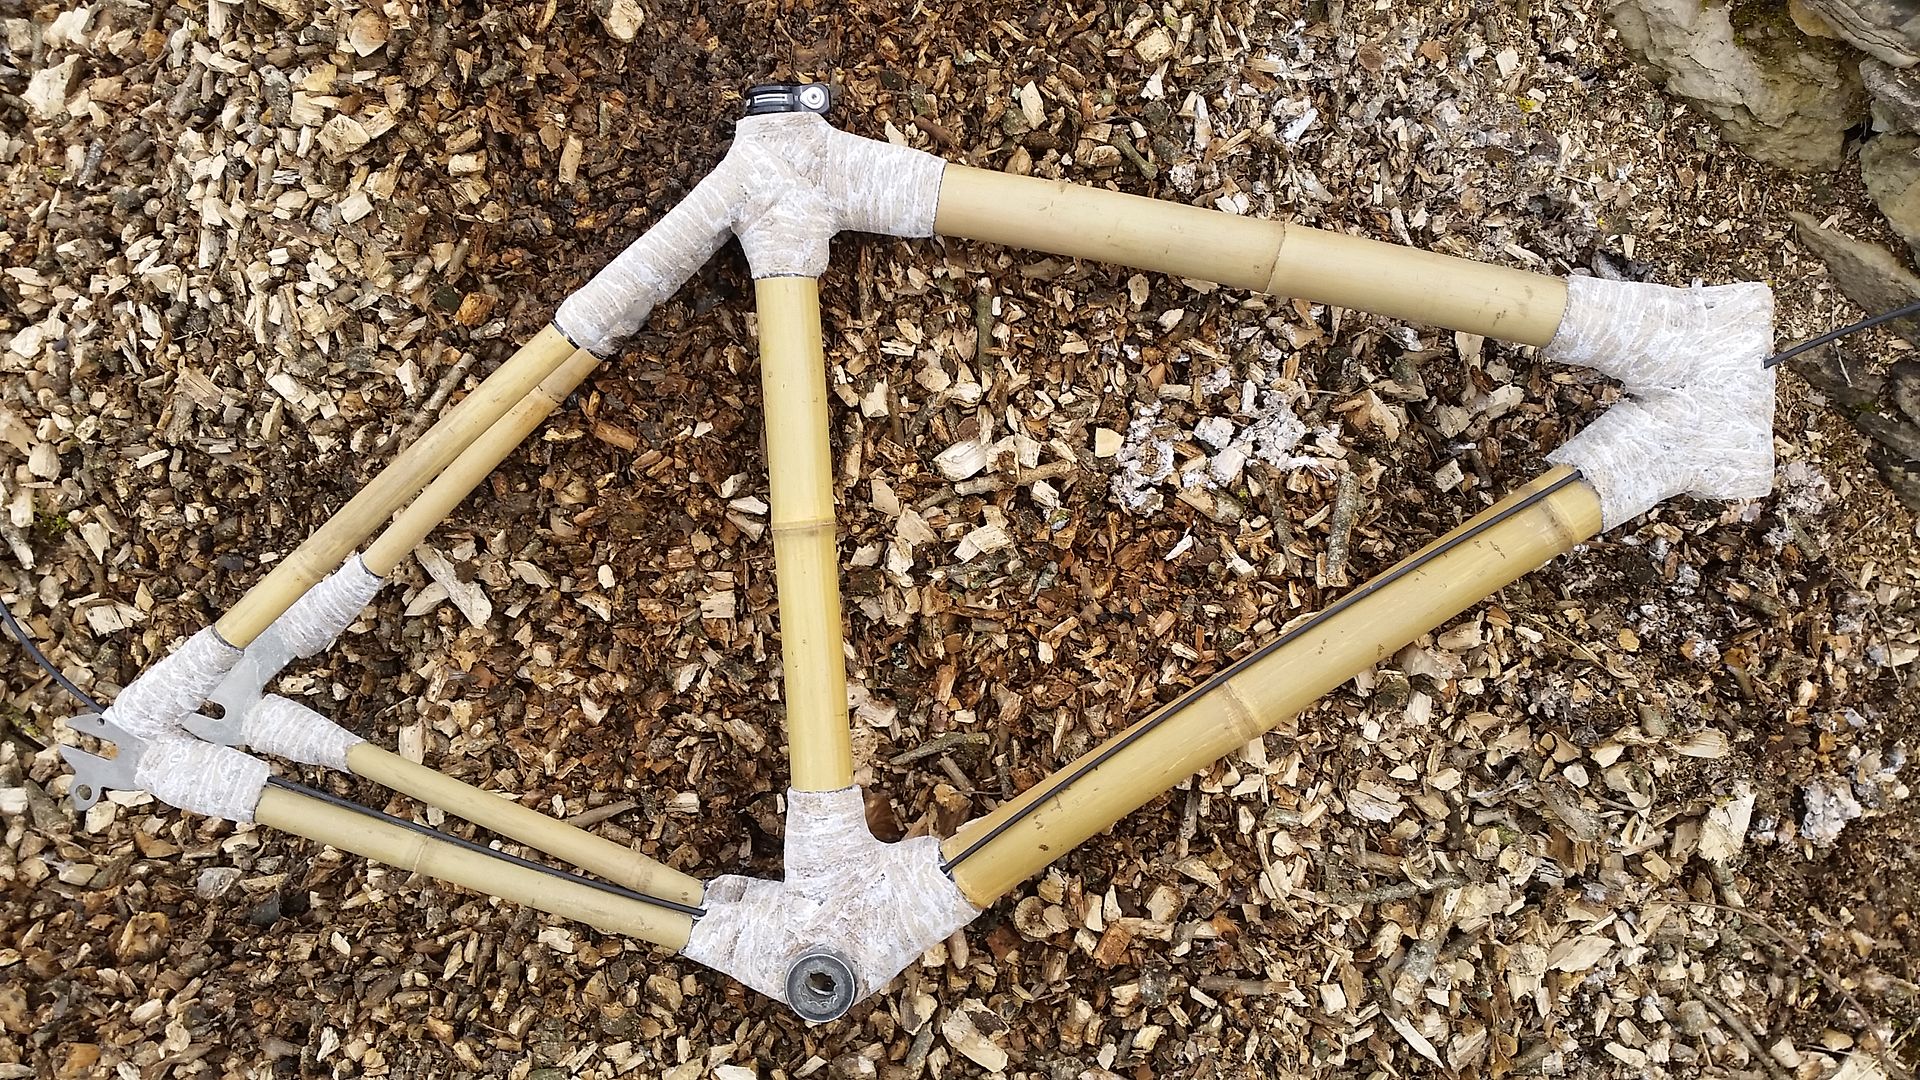 [/img]
[img] 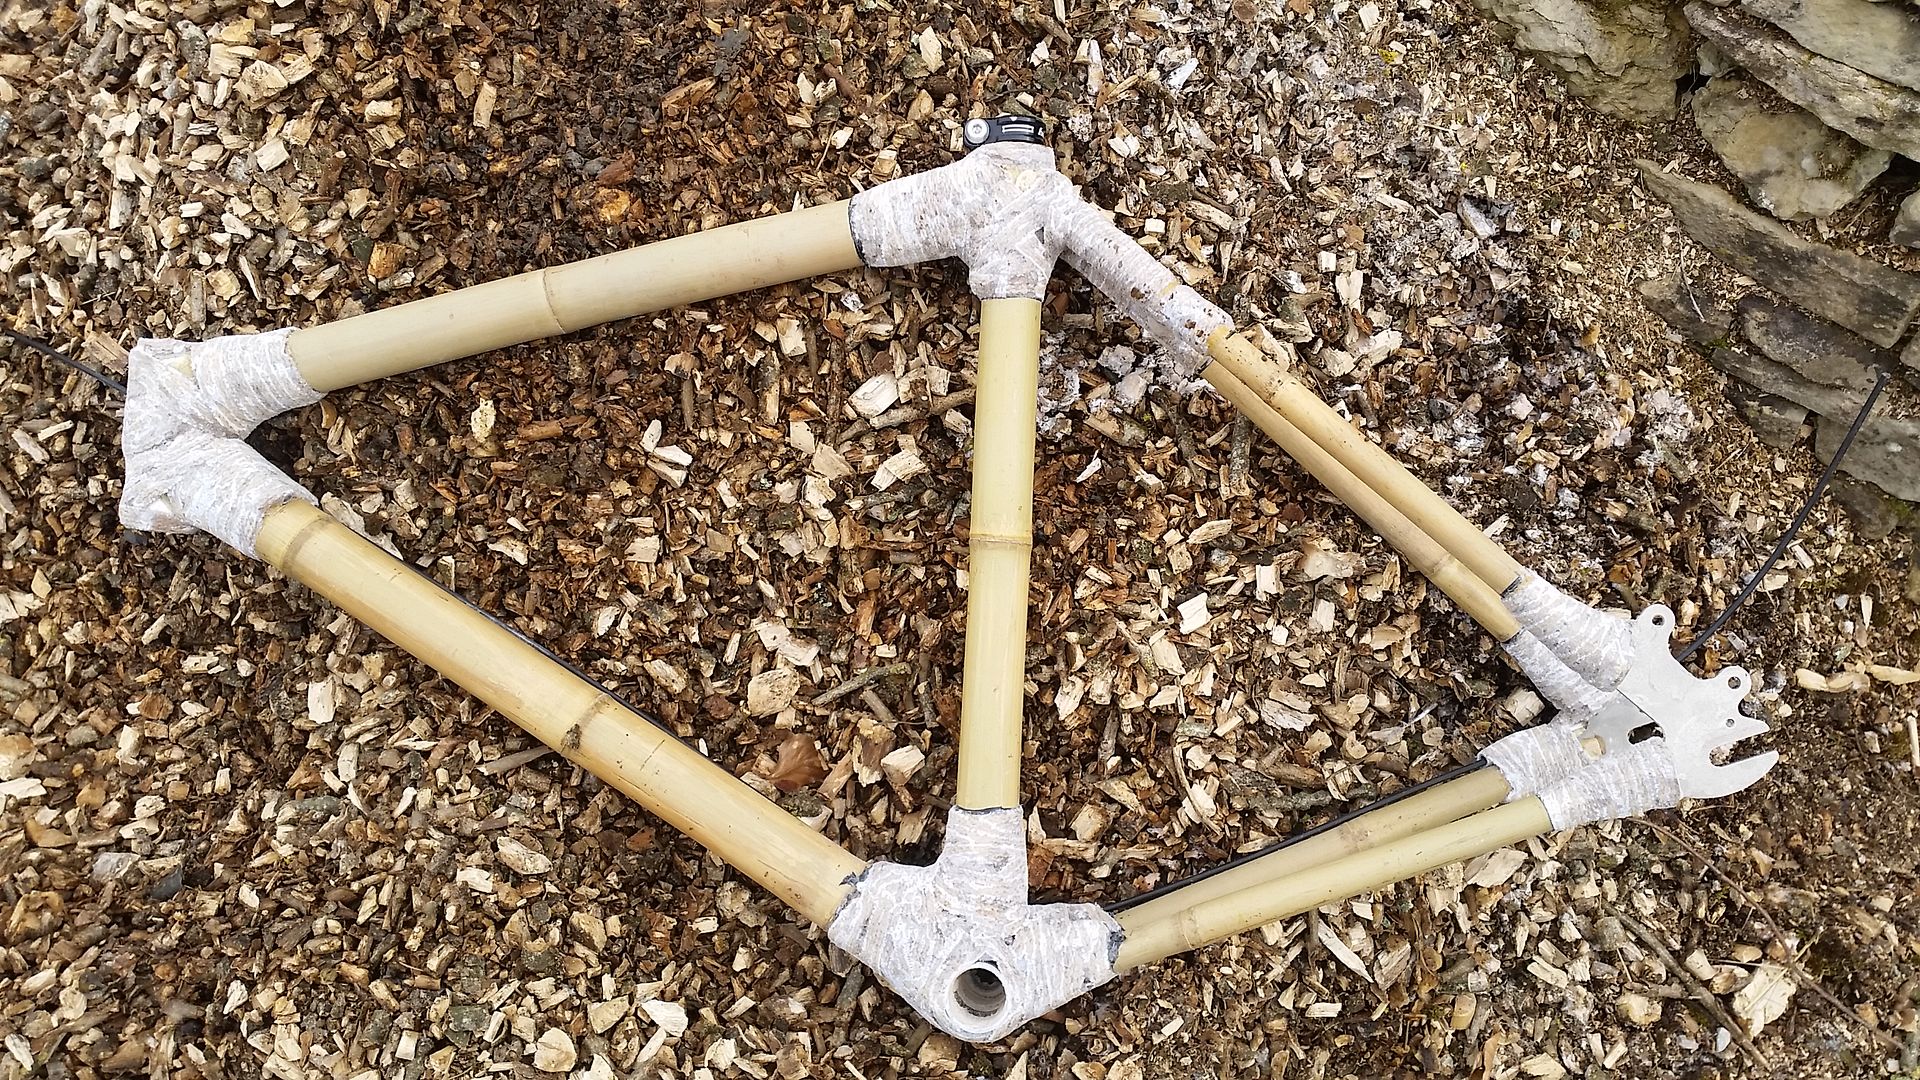 [/img]
I stuck the gear cable in to work out my cable routing and if ill need any additional guides. I think I'll end up with a crossover over the top of the down tube and use the bottle cage bolts (yet to be fitted).
This is seriously impressive, cant wait to see the finished article built up!
That's starting to look really good.
Can't wait to see it when it's finished.
Suppose it's one of those things you can just keep going and going with the finish and need to know when to stop. 🙂
There's a fair bit to go yet - I could just build it up now and ride it I guess but id like to get it as nice as I can first.
I need to get hold of a 130mm disc rear wheel next just to check the alignment is ok on the back end - if it's out, i'd rather take the rear end apart now than after more work. I will try to get the headtube area rewrapped with 1mm hemp twine in the low spots this week - I've sanded back additional material on the drive side to accommodate the extra material I'm just waiting on the hemp to turn up in the post. I'll also try to compress the second wrap with electrical tape to try to get as smooth and tight a finning as possible (less sanding and a stronger joint).
If/when I build another i'll use my own joint material, as I said in earlier posts the stuff in the kit is ok, but If your sanding it back it's way too thick.
This looks amazing, I would love to give it ago but my wife doesn't trust me.....
Will watch this to see how you get on, really looking forward to the results.
Cheers, Steve
Just bought a set of [url= http://www.planetx.co.uk/i/q/HUVIME40/vision-metron-40-road-disc-rear-28-hole-hub ]these[/url] Vision hubs for a bargain price in the Planet X sale - just need to fined some suitable rims.