![]() You don't need to be an 'investor' to invest in Singletrack: 6 days left: 95% of target - Find out more
You don't need to be an 'investor' to invest in Singletrack: 6 days left: 95% of target - Find out more
Hi guys don’t know if we have any photographers who would be willing to give some and advice on taking mtb pictures and what settings to use ?
I am new to owning a DSLR and have been lucky enough to have Been given a older canon model an 1100d.
I took some pics this Friday at Leeds bike park and enjoyed looking at the results I will post a link to my Instagram in this post, I have added no effects or filters on the picture.
I have worked out allready that I needed to quicken my shutter speed to get more continuous shots any other advice would be great I have been reading some Forums and blogs to get some ideas as well and I am allready buying a tripod for taking some images
cheess matt
As a start does it have a sport mode on the basic settings?
That was step one for me and then getting in the right place
Probably work on your camera holding before buying a tripod for this sort of thing tbh.
Tripods are great for slowing you down and making you really think about composition. They're also great for holding a camera steady though ridiculously long exposures. Tripods worth having are usually very heavy as they need to be rigid and not blow over etc (exceptions for even more expensive carbon fibre tripods)
For sports you want mobility and you're going to be using fast shutter speeds (until you start playing with panning shots) so a tripod is really likely to be more of a hinderance than a help and just one more thing to carry. Plus tripods worth having generally start around £200 including head which is a big chunk of cash for something that may not be useful to you.
If you really want to leave it on auto then go for a shutter priority mode and pick a fast enough shutter speed (this will get faster the closer you are to the bikes if you want to freeze motion).
There's a lot to it if you want to be good, not all of it can be taught effectively.
Chips, James Vincent(Justin Beiber) and others will give some pro advice however the only advice I can offer is that you need off camera flash to enhance the pic you took....
There is a photo thread, add to that and get feed back...
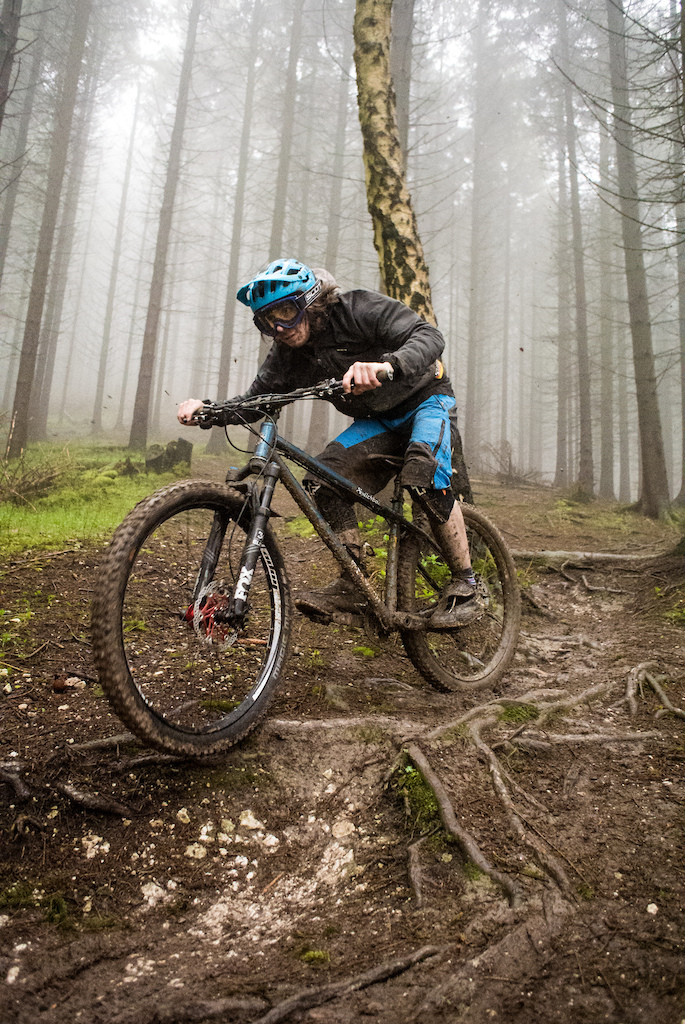
I think you need to look at your composition. The image you posted has cut off part of subject and has tree branch coming out of handlebars....
i find the biggest improvement to my images is to be light on my feet, to try many different angles and directions. I'm a rubbish photographer but do take a reasonable shot at times - and it's always the composition, not my technical ability.
Here are my tips. I'm no pro but I've gotten a few reasonable shots (out of hundreds on the day), I even got a like from Sick Mick Hannah.
1) Faster shutter speed will help a little but too fast and the resulting image will look like the rider was going really slow (unless they are doing something awesome that doesn't need to look fast). You need to practice to find a shutter speed that the motion blur isn't too bad and you need to move your camera with the motion of the rider (Google whip pan).
2) Open up your lens, lower the F number to open up the aperture. You'll need to do this if you're shutter speed is too high and the images are dark but it will also give a subjectively nicer image by narrowing the focus field (blurring the background and the foreground). Shooting wide open does make it harder to nail the focus point on the rider though.
3) Editing. Bring out some colour, give it a little pop. More than likely brighten it up a little (faster shutter speed in the woods = dark image (keep the ISO down as much as you can or the image will get grainy)).
You can see some examples of what I got doing whip pans at Crankworx Rotorua earlier this year:
https://www.instagram.com/p/Bgk4j4-A_cW/?utm_source=ig_web_button_share_sheet
(couldn't figure out Instagram embedding)
This technique is the only way I've managed to get good looking MTB photos so far.
I'd say...
Generally a faster shutter speed
If you are in woodland and struggling to get a decent exposure at a fast enough shutter speed, increase the ISO.
Rear curtain flash can help to illuminate the subject, particularly in dark woodland.
Spend some time on angles and position to get some interesting composition.
As above, shutter speed of more than 1/250 - will need to balance with available light. Increase ISO until too much grain.
Use burst mode to take lots of photos within a short amount of time so you get several pics of the same action.
Preset your exposure and focus on the distance of the subject before you shoot the actual rider. Crucial as these pics can get soft quite quickly.
Pay attention to frame and try different angles; does it look better from down below - and could the background be improved?
Learn to shoot manually. There is so much you can put in place before the rider actually does the move.
Be creative!
I'd echo the composure stuff, and frankly it's the most important. You can have a technically perfect shot but it's no good with out the rider in there!!
It's probably why I'd stick with the auto modes to start with and work out where you need to be to get the shot, what works and what angles are good.
This is a bit of my progression
Great riders help and being prepared to eat a face full of dust
https://www.pinkbike.com/photo/15056343/
https://www.pinkbike.com/photo/15045494/
https://www.pinkbike.com/photo/14604718/
https://www.pinkbike.com/photo/14604747/
https://www.flickr.com/photos/mikewsmith/sets/72157660096116432
This was as much about messing around with mates as getting the hang of the camera
https://www.flickr.com/photos/mikewsmith/sets/72157668995264615
It's the wrong time of year but an afternoon spent at a DH race walking down the course and taking a couple of thousand shots is a good way to work things out. You can try something and then adjust for the next group of riders then try something else - less pressure than trying to get that one shot of your mate!!
Finally Lightroom or something similar for the editing/fixing turns a good pic into a great one with some basic clicks and then can do a lot more.
Oh, I meant to say - in certain situations panning can be put to good use to emphasis the impression of speed and blur the background.
Often with a panned shot, you can get away with a certain amount of movement/blur that would be unacceptable in a static shot. It takes quite a bit of practice to get a good panning action though, and you generally need to be a bit further away, which can be difficult for MTB stuff. I have practiced this previously with British Superbike races and touring cars, but even with the relatively predictable nature of vehicles on a track it can be hard to get right.
Practice practice practice!
I'd add that, while you're learning how to pan and shoot, it's worth blasting out a few photos using the "continuous shoot" setting, especially if you're shooting something where you want to increase your chances of getting a "good 'un". If you do so, select the mode that doesn't re-focus between shots, so it shoots faster. You'll get piles of duff photos, but it won't cost you anything and you'll increase your chances of getting a gem in there.
As a rank amateur, most of my better panning shots have been taken from the middle of a burst, especially when using a phone and it's a good way to practice the technique of following the target.
e.g. this one was taken when it was nearly dark, using a mobile phone (Samsung Galaxy S8) and was the middle of a burst shot. More by luck than judgement, it came out quite nicely 🙂
cheers for all the comments and advice, I will take it all on board and take some more pictures this week,
the camera does have sports mode or action mode, I messed around last night with the shutter speed just to try and work out what to do and go through a few settings so I will put this into practice when I am back out with the camera.
regards lightroom and photoshop I will have a look at using these to enhance my pictures do you use the preset settings or do you all add your own tweaks and so on ?
cheers once again
First...a great subject and position
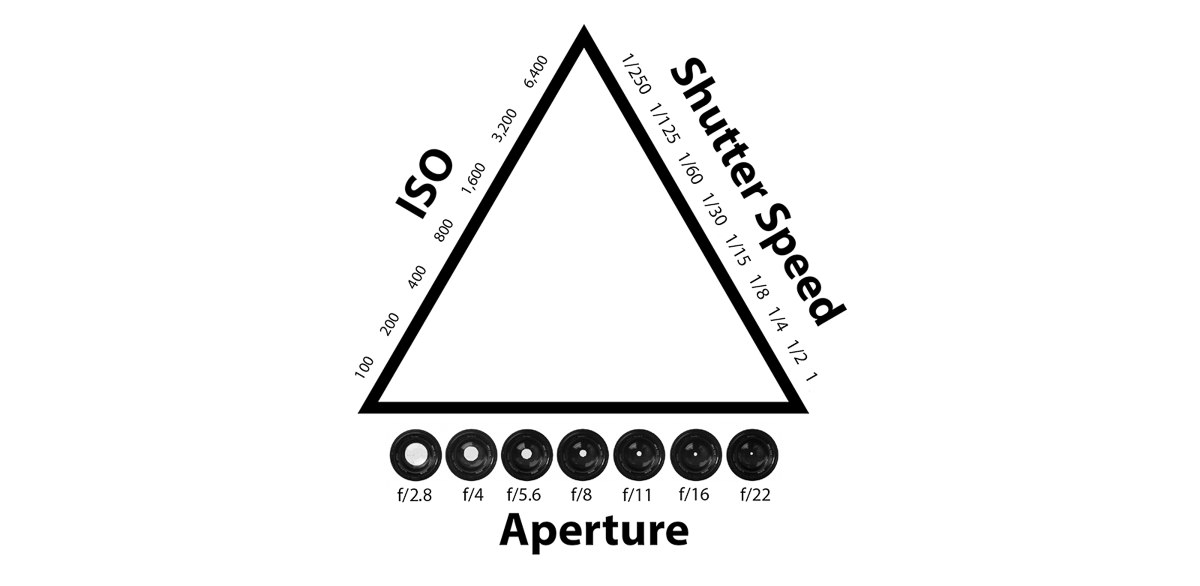
Fast shutter speed to freeze the action
Correct aperture for the Depth of field and light...spend money on your future lenses
Correct ISO for the light that you have available
You shouldn't need a tripod for you MTB shots
Practice practice practice
Few more on my IG @kbrembo
[URL= http://i800.photobucket.com/albums/yy285/kbrembo/JI2C0549_zpshd3ukvhx.jp g" target="_blank"> http://i800.photobucket.com/albums/yy285/kbrembo/JI2C0549_zpshd3ukvhx.jp g"/> [/IMG][/URL]
[URL= http://i800.photobucket.com/albums/yy285/kbrembo/JI2C4816_zpsjhuclkqq.jp g" target="_blank"> http://i800.photobucket.com/albums/yy285/kbrembo/JI2C4816_zpsjhuclkqq.jp g"/> [/IMG][/URL]
Enjoy[URL= http://i800.photobucket.com/albums/yy285/kbrembo/DSC07462_zpsj2gff42k.jp g" target="_blank"> http://i800.photobucket.com/albums/yy285/kbrembo/DSC07462_zpsj2gff42k.jp g"/> [/IMG][/URL]
[URL= http://i800.photobucket.com/albums/yy285/kbrembo/DSC06141_zps4jhmnryl.jp g" target="_blank"> http://i800.photobucket.com/albums/yy285/kbrembo/DSC06141_zps4jhmnryl.jp g"/> [/IMG][/URL]
[URL= http://i800.photobucket.com/albums/yy285/kbrembo/DSC07337_zps3jmmsvwi.jp g" target="_blank"> http://i800.photobucket.com/albums/yy285/kbrembo/DSC07337_zps3jmmsvwi.jp g"/> [/IMG][/URL]
I just use Lightroom here Photoshop is overkill.
Lots of sliders to play with first too! If your camera has WiFi the tablet app is worth a look too think it might be free
Buying a tripod for shooting moving subjects is a curious decision, unless what you're aiming for is a long exposure with a flash to capture the rider—which is a technique you can use to great effect in very low light, but not in the day.
If you want a sharp subject (99.9% of the time you do and the other 0.01% is incredibly hard to make a success of), then Principle Number One is good panning. Once you can master that, you have vastly more freedom with everything else, because you can use shutter speed to dictate how dynamic you want the image to appear while still keeping the key elements crisp.
The thing with sports mode is (I suspect—and I may be wrong) that it will try and keep shutter speed high, because it'll try to make life easier for people to get crisp subjects, ie it'll try to tolerate inadequate panning.
You can practice it with any moving subject, of course: cars, dogs, bikes, whatever. Start with a fairly fast shutter, say 1/250 and then gradually get slower as you improve. If you can keep a MTBer's eyes crisp at, say, 1/50 then you're able to create a lot of movement in the background.
+1 for all the comments about getting composition right; and note that being able to pan also helps with composition: if you have a static camera and wait for something to appear in front of it you're almost certainly going to be disappointed. Your image above is probably a prime example.
To start practising with competition, shoot a wider image than you think you want (whether by standing further away or by zooming out). Then play with cropping it later, and play with aspect ratios too. If in doubt, always shoot a bit more than you need: a little cropping isn't noticeable in the final image, but you can't add back anything that you didn't capture on the sensor.
This thread is a complicated read for a beginner. I'd say start at the very basics.
If you understand the mechanics of how a camera actually records an image you can make more intelligent decisions in any conditions and with any camera.
Have a read of this- https://bit.ly/2hfU3gQ
Then you can start getting yourself confused by everyone elses personal preferences.
Personally, using a Canon SLR, shooting action (mostly motorsports now but lots of MTB in the past ) I stick to TV and AV which stands for Time Value and Aperture Value. It means you set the shutter speed, or the aperture (f number) and the other sets itself according to the amount of available light.
For example, manually setting the aperture to it's most open setting (lowest f number) means the camera will default to the fastest available shutter speed in the conditions. This is good for freezing action or shooting something coming directly towards, or moving away from you. If your subject is blurry due to a slow shutter speed (This will happed a lot in the UK especially in the woods as it's always grim and overcast), bump up the ISO.
I switch to shutter speed when I want to show some motion. You don't always want to freeze the action as it makes your subject look stationary. You can freeze the spokes in a wheel or the knobs on a tyre but it can kill your image unless there's some other drama going on.
Switching between these two modes means you can move around quickly and not get bogged down in settings but everything is under manual control, like focus points, white balance etc.. so you don't let the camera make big decisions like you do with a preset 'sports mode' or similar.
Learn the difference between Raw and Jpeg. Shooting Jpegs is easier but they're no good for my need so I never use them.
Don't bother with a tripod.
As has already been said, but you can't really say it enough.
Practice, practice, practice.
I was always told to throw away shit photos, which in the days of shooting slide film, could be 34 - 35 shots off a 36 shot roll, if not the whole roll. I could never do it, so have folder and folders of shit photos. I did use the crap to see what I was doing wrong though, so look at what other people produce, their composition (where the rider is in the shot), the position they have used to capture the shot relative to the subject (above, below, to the side etc) and try and replicate.
cheers guys I got home form work I had a good luck at the camera and play with the settings on tv and av i cant wait to get out to take some pics and start to practice and see how i can cheers for all the info, the triangle diagram explained a lot and made things clearer in my head as well. Also cheers to all the links to your images some amazing pictures in them links.
cheers again matt
PRACTICE!
Some stuff you will just learn with experience.
However...
1. Don't be afraid of using a high ISO, I usually leave my ISO on automatic.
2. Shoot your shutter above 1/500th to freeze action. Anything below 1/100 for pan shots but DON'T let my numbers pigeon box you these are just good starting numbers. Go outside and take many photos and you'll end up using multiple exposures to achieve what you want.
3. Aperture. Leave it near open. Again the more you practice the better you will at using it.
4. Composition! Idk how to help you with this but look at magazine and pinkbike photos on articles and see how they compose photos.
5. You can use a flash, however if you are clever with natural light then you can get some very well lit photos. Most photos of races are all done with natural light. You'll gain an eye for this with experience.
6. Edit them but not too much. Don't move the sliders much!
7. Track the subject before, whilst and after taking the photo. It's like bowling in cricket, it's a process you don't just chuck a ball. Always follow through.
<div class="ibox">
<dl>
<dt>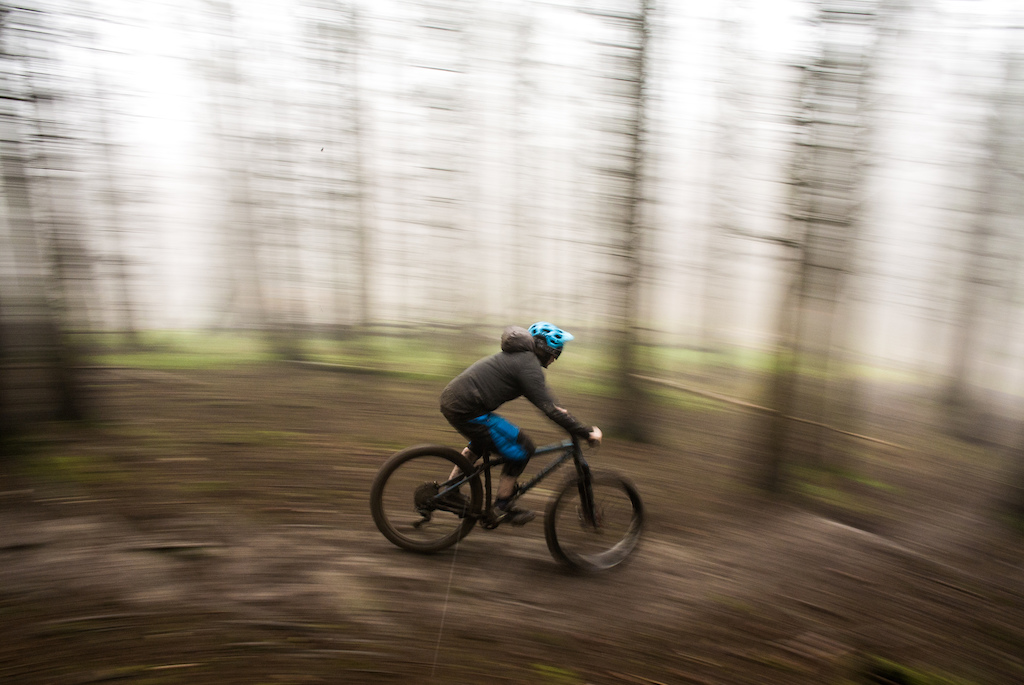 </dt>
</dt>
</dl>
Just go out and take a lot of photos.
</div>