![]() You don't need to be an 'investor' to invest in Singletrack: 6 days left: 95% of target - Find out more
You don't need to be an 'investor' to invest in Singletrack: 6 days left: 95% of target - Find out more
Hi guys,
Back with another problem!
Just in the process of fitting an integrated headset to a mates bike. He purchased the Cane Creek 40 with the frame so its the correct one for it (both brand new).
We put the crown race provided on the steerer and then the bearing for the lower part, next was the upper.
Again we placed the bearing in the frame, then the metal/rubber cover ring over it and then the compression ring (I presume its called?) before finishing off with the top cap. It all seems to fit hand in hand however when tightened up with the steerer tube wobbles about a bit as if its not properly seated in to the headset?
Anyone else been in the same boat and resolved it?
Was there enough space above the top of the steerer tube?
Make sure the steerer tube is not bottoming (or should I say topping). You may need to stick another spacer under the cap so that the whole stack preloads properly.
My bet is that you need to either fit another spacer or cut down the fork steerer a bit.
You could be right actually, I will try adding a bigger spacer and see if that helps.
The problem continues!
I tried fitting a bigger spacer which actually fits better than the last however I still have play in the headset. There is a gap about 3mm between the top of the head tube and bottom of the cover as if its not pressed in properly.?
It could be that the top cap has more than 2mm of overlap when fitted to the uppermost spacer. I have neglected to account for this when measuring a steerer tube before, but I'd far rather have a steerer tube that's too long than one too short.
is it definitely the headset and not play in the fork? 3mm is a big gap under the top cover so it ought to be at least preloaded but you ideally want the gap smaller to minimise crud ingress.
Are you doing this on a workstand without a wheel in the fork? That will make it easier to deduce where the movement is. Try assembling the lot and just putting the stem directly onto the top cover without a spacer, you should be able to press the lot together tight enough to remove most of the slack without the top cap. If it still feels noticeably loose then check the split cone that fits into the top bearing is fully pressed in. Add a bit of lube in case its getting stuck on the steerer.
See below, the top cap can be spun round freely by hand even with the bars/stem on etc.
[url= https://preview.ibb.co/cjzYD6/IMG_6349.jp g" target="_blank">https://preview.ibb.co/cjzYD6/IMG_6349.jp g"/> [/img][/url]
hmm, another dumb question or 2 - is the blue seal under the top cover part of the cover or a separate part? Is it the right way up? Is the split cone fully pressed into the bearing so it protrudes just enough for the top cover to sit on it?
Apologies for asking this, but did you tighten the top cap before the stem bolts?
Moar piktuars.
we placed the bearing in the frame, then the metal/rubber cover ring over it and then the compression ring (I presume its called?) before finishing off with the top cap.
Not familiar with that particular headset but shouldn't the compression ring go straight into the bearing first?
Also the top bearing doesn't seem to be sitting in the top of the frame far enough.
Are you sure the compression ring - the round tapered one - is properly seated? What happens if you take the fork out and stick the upper headset parts in place in the correct order. Is the compression ring the right taper to sit inside the bearing inner race? Are you 100 per-cent sure it's the correct headset, the various standards for integrated and internal headset bearings are quite confusing.
Are you 100% sure it doesn't take an Italian top bearing, they're like 1.8mm bigger or something.
It may not be relevant but your friend has bought a beige frame. It's possible that the headset is refusing to fit in just out of principle.
Hightower? I didn't have an issue with mine but I do with my new Chameleon.
I need to take the HT apart to double-check but I think the only difference is the HT has the tall top cover, which may be more recessed.
In any case, as long as everything is 'pulled together' correctly it shouldn't actually matter that there's a gap, except from sealing point of view - i.e. it should tighten up with no play anyway. It sounds like the split tapered ring is not seated in the bearing correctly..
Hope allude to the difference in top covers [url= http://www.hopetech.com/industry-non-standards/ ]here[/url]
I think you might have swapped the compression ring and the crown race for each other..?
I think bikewhisperer's shout ^^^^ could be on the money
More pics would help
Apologies for asking this, but did you tighten the top cap before the stem bolts?
My 50p is on this.
bikewhisperer seems to have it...[url= https://www.canecreek.com/store/headsets/parts-tools/40-series-crown-race ]crown race pic (blue flange)[/url]
Thanks guys.
No the crown race like liked above is fitted on the steerer tube as it should be.
I cant remember what order I tightened the stem/top cap. Should I tighten the top cap first then the two side bolts to clamp the stem to the steerer?
Should I tighten the top cap first then the two side bolts to clamp the stem to the steerer?
Yes, compress the whole assembly using the top cap (doesn't have to be super-tight - just enough so there is no play) and [i]then[/i] do up the stem. After that the top cap is effectively redundant.
Take it to a bloody shop. It's encouraging that you're attempting to further your knowledge and skills but at least have the decency to practice on your own stuff before screwing up someone else's bike.Just in the process of fitting an integrated headset to a mates bike.
Take it to a bloody shop. It's encouraging that you're attempting to further your knowledge and skills but at least have the decency to practice on your own stuff before screwing up someone else's bike.
Not the point, at the start of the year I could barely do anything on my bike. Never really tried so was always back and forth at the bike shop for daft jobs etc.
My plan this year was to further my knowledge and save me time/money going to the shops. About three months ago I built my bike completely from scratch my self and its basically all thanks to this forum and its members helping me along the way.
Next I set out to help my mates and riding buddies to save them some money on odd jobs as well.
If needs be I will take it there but it is probably just something daft.
I did the same thing with medical problems.Got tired of waiting for doctors appointments so just googled it instead.Started doing it for my mates too.
They're all dead now.
I did the same thing with medical problems.Got tired of waiting for doctors appointments so just googled it instead.Started doing it for my mates too.
They're all dead now.
Harsh, but funny.
Only kidding......I don't really have any friends.
I'm with Bikewhisper on this one, it does look like the crown race rather than the compression ring.
If you're absolutely sure that you've got them the correct was around have you checked that you've got the bearings (either or both) the right way up?
Then again, you might be right; found this picture of a fitted 40 series on the 'net:
[img]  [/img]
This looks like a semi-integrated unit as you can see the edge of a cup below the blue ring. In your picture it's still standing proud so possibly not pre-loaded correctly or not assembled correctly (again check that the bearing cartridges are the right way up).
[img]  [/img]
Only kidding......I don't really have any friends.
Because they’re all dead.
I fitted a Cane Creek 40 semi-integrated ("integral") ZS headset to my son's bike and it's absolutely flush with no gaps:
[img]  [/img]
Also, unless I'm much mistaken, your mates bike is a new Nomad (nice bike!) so here's a picture of a Tallboy with a 110 headset fitted - again, all nice and flush:
[img]  [/img]
Based on your original picture, it doesn't look like the top cup is pressed in enough, but it's hard to tell from an assembled picture - if you remove the fork and take a picture of the naked frame cups, this would help.
One other thing - I'm not normally a naysayer or a great user of LBS services, but fitting headset cups to a very expensive carbon frame is definitely something that isn't a good area for experimentation and learning! Take great care here... 🙂
Had the same (more or less) issue with a Ritchey P29er (IS headset) and a BOS fork.
The first issue was the one that @colp [url= http://singletrackmag.com/forum/topic/integrated-headset-wobbling-about?replies=32#post-8785559 ]mentioned[/url] - wrong top assembly. I was trying to use a Hope ZS bearing and top cap and it was sitting proud of the frame; switched to a Ritchey top part and it was fitting perfectly*.
*The second issue was that the tapered section on the steerer was very tall; this, combined with the very short headtube meant the compression ring was bottoming out on the tapered steerer before clamping the bearings. This was fixed with a [url= http://www.charliethebikemonger.com/cane-creek-3mm-40mm-lower-race-custom-for-salsa-7676-p.asp ]taller crown race[/url].
What scotroutes said.
It's great that you're up for learning, but buggering your mates headtube isn't the best idea.
[s]If it is a Nomad, it should definitely take a Cane Creek ZS top section without a problem.[/s]The first issue was the one that @colp mentioned - wrong top assembly. I was trying to use a Hope ZS bearing and top cap and it was sitting proud of the frame; switched to a Ritchey top part and it was fitting perfectly*.
Ignore me, I was rambling. It's early 🙂
But the frame in the image is not ZS, but IS (integrated).
Fair point, you're right it is an IS. My bad.But the frame in the image is not ZS, but IS (integrated).
Problem solved.. sort of.
I pressed down on the stem bars before tightening the stem bolts and then top cap. Its stopped the wobbling problem but there is still about a 2mm gap.
Starting to think the bearing supplied is possibly a bit too big as it seems that is whats protruding.
You should first tighten the top cap, then the stem bolts. Already mentioned on the previous page.
I pressed down on the stem bars before tightening the stem bolts and then top cap
This is not correct, as others have mentioned. The bolt through the top cap preloads the bearings and removes play. It is then all held in place by the stem bolts. Of course, all of the headset parts need to be assembled in the correct order first (and it needs to be the correct headset for the frame / forks)
Proper LOL at Rorschach btw 🙂
Take it to a shop, you don't know what you're doing.
from the photo you posted and from looking at images of this headset online I think you may have the seal that sits on top of the top bearing upside down - but yes, sounds like a trip to a shop would be the best bet.
If you're determined to do it yourself, take a look at the [url= http://www.parktool.com ]www.parktool.com[/url] website, which has an excellent basic 'how to' section and go back to first principles.
Tbh, if you're asking which order to tighten the top-cap and stem-clamp bolts in, then you don't really understand the basics of how a headset works. No-one's trying to put you down or question your enthusiasm - we all had to start somewhere - but it helps if you understand how the fundamental bits of the bike work.
Not the point, at the start of the year I could barely do anything on my bike
Not too much progress then.
Next I set out to help my mates and riding buddies to save them some money on odd jobs
For the love of god and all that is holy please don't go near their bikes again.
HtH
I've never fitted integrated or semi-integrated headsets, just old school external cup types but looking at the picture below the bearing cartridges are similarly tapered. I would assume that the inside of the headtube is shaped to take the taper (as with an external cup). I'm wondering whether you might have one or both bearings the wrong way up; this would mean they'd not fit into the taper and would stand proud; it would also mean that the compression ring wouldn't fit properly. May not be your issue but worth checking.
The other option, as others have said, is to pop along to the LBS and ask if you can what whilst they fit it - it's a great way to learn.
[img] 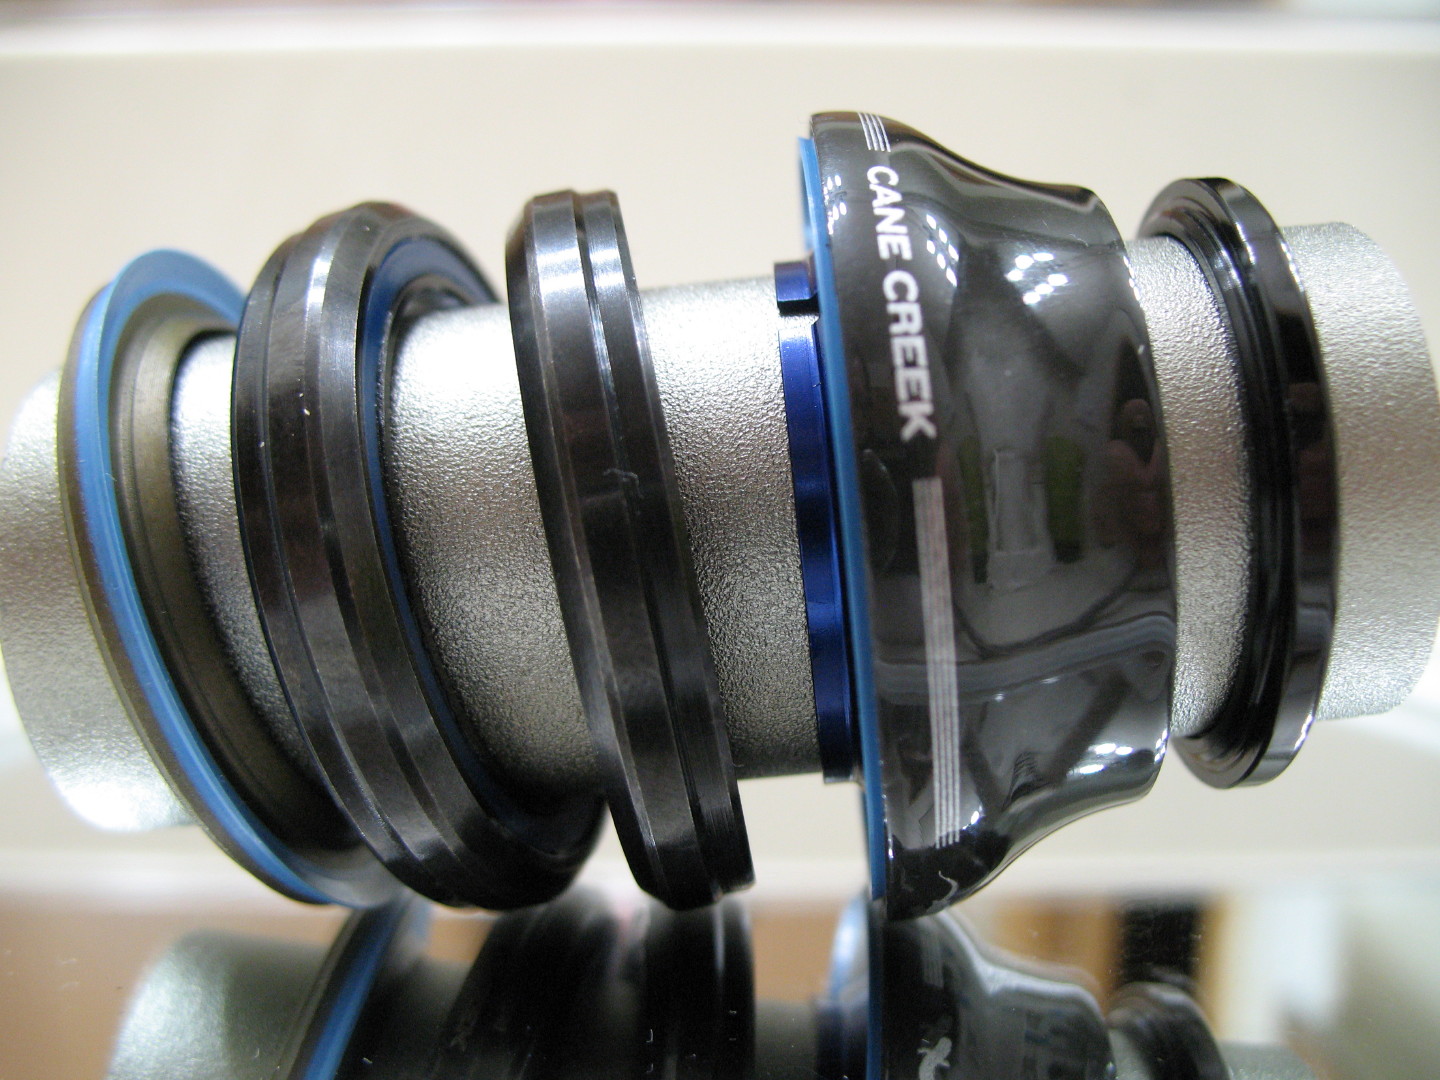 [/img]
try swapping the bearings, in that pic above the bottom bearing looks taller than the top so you might have put em in wrong, different size/profile bearings top and bottom isn't uncommon,
And don't listen to the STW spanner gods up there, keep on trying and learn from your mistakes, you'll soon pick up how things work and go together and find out it's not rocket science,
Most of us mere mortals don't have all knowledge inserted at birth and have to make mistakes and learn from em..
hth...