![]() You don't need to be an 'investor' to invest in Singletrack: 6 days left: 95% of target - Find out more
You don't need to be an 'investor' to invest in Singletrack: 6 days left: 95% of target - Find out more
I made a balance bike a while ago, for my daughter, which she has now outgrown and we are looking at getting a bigger (16" wheel) bike for her.
The wife asked last night "why can't you just make one like you did with the balance bike?"
So, do you lot think it would be doable?
I suppose the best place to start would be with a decent geometry chart?
Like making an adult bike, only smaller - probably actually trickier than an adult one too.
But your balance bike was stunning (it was the CNC'd one, wasn't it?) - if you can make that then it shouldn't be hard.
Shouldn't be too hard based on your skills. Depends what you want out of it.
Yeah, that was mine BC :-). Thanks podge
I guess one of the tricky bits would be sourcing decent 16" wheels (probably with SS hub and, maybe disc on the rear), short crank etc. Can do a normal BB shell, head-tube for headset etc so that shouldn't be too hard 😕
I can get some reasonable 32h 16" black rims, can do short spokes om my machine too if you get stuck.
For cranks, it's not too hard to shorten them as long as they're not hollow.
Ah, cool, thanks Ben.
My mind is going off in all sorts of places now...thinking carbon tubing bonded to CNC'd lugs 💡
Edinburgh bike coop do a kid's size crank for cheapness.
[url= https://www.edinburghbicycle.com/budget-r-junior-chainset.html ]https://www.edinburghbicycle.com/budget-r-junior-chainset.html[/url]
I guess it depends on what you mean by bike.
Do you just mean a frame and bolt off the shelf bits to it or do you want to make as much as possible from scratch?
If its just the frame then you could just buy an Isla / Frog / Hoy and transfer all the bits, probably little to no value in selling a frame so you'd just reassemble it and sell when they move to the net size.
If you want to do the whole lot / as much as possible then why not start thinking like Hope and designing one around what is best, not whats available.
This is what the Swarf guy did
[img] 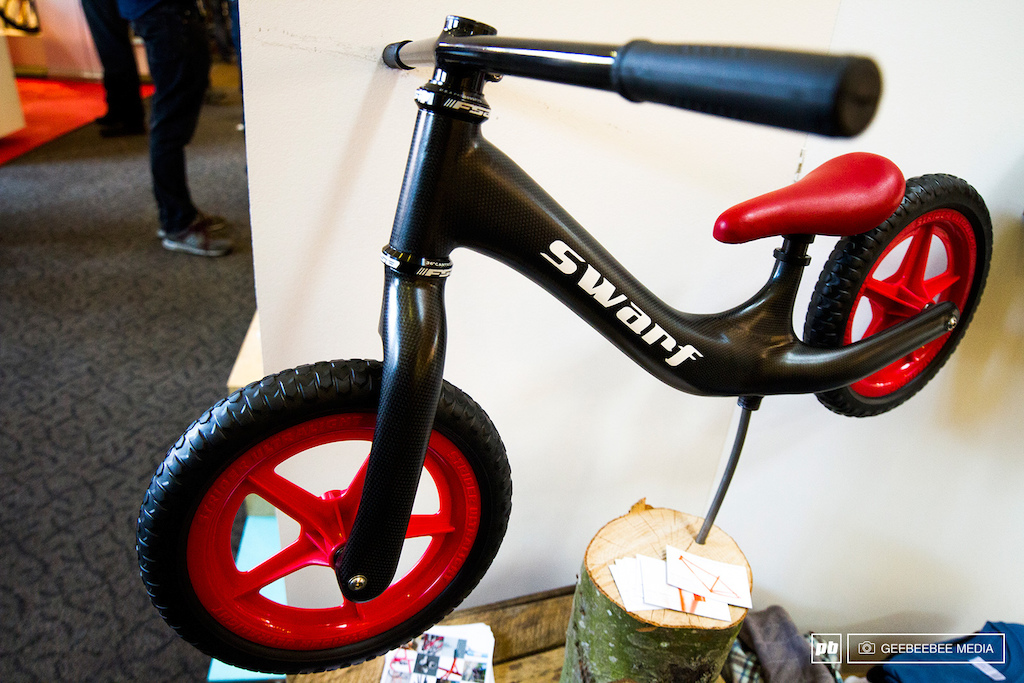 [/img]
.thinking carbon tubing bonded to CNC'd lugs
i dread to think how long a carbon tube would have lasted on the bike i had when i was 8...
oh and this is clearly a benchmark for you.
[img]  [/img]
Will this be a Christmas deadline or slightly more relaxed? 🙂
Deadlines make it much more fun.....
I'm just making a copy of my lad's 26" wheel mtb frame (originally built 3 years ago) for a friend's daughter. At the moment it is a finished front triangle and he is filing the joints. I'm currently killing time waiting for dropouts to arrive from the nice guy at the laser cutter. Latest day for the powder coat is 16th December so we should make it in time......
Can't wait to see what you'll come up with this time.
Sounds like a good project Mick, be good to see what you've come up with. I presume it's steel if you're having laser cut dropouts?
Only deadline for this is probably just her birthday in April so no rush which isn't a bad thing as we're really busy at work
Wish I had the skill set to do this.
Best I can do is bolt stuff to an existing frame.
Geometry wise I don't think you'd go far wrong looking at Frog/Isla frame geo.
Good luck with this it sounds brilliant.
How about one of those bamboo kits as a starter?
I don't think stevie needs a kit... 🙂
Mine is steel, trying to shave weight wherever possible. Just done the bends in the skinny 12.7mm seatstays. Quite nice leaving someone else to do the drudge filing and polishing whilst I chip away at one little job each night.
No online photos at the moment after Google archiving all Picasa stuff.
April gives you time to do something really special. Sounds like your wife has given full permission!
Nice to have a minion helping out Mick 🙂
Idea so far:
16" wheels, geometry based on an Early Rider, carbon tubes bonded into CNC'd aluminium lugs with the rear stays bolted on to the front triangle as I think it would make it much easier to assemble. Disc rear brake, single speed with short (or shortened cranks).
If I go carbon which tube should I go for?
[img]  [/img]
[img]  [/img]
That all sounds a bit mundane. How about single sided enclosed drivetrain in a structural chaincase? I notice all Isla singlespeeds now have Hebie chaingliders to keep fingers out of cogs.
Use a reversed 6 bolt front hub with both disc and sprocket mounted on the rhs. Then a freewheel on the cranks (like some trials bikes).
I don't like the classic carbon weave so I'd say use the bottom one but isn't bonding alu to carbon a proper ball ache? something to do with alu oxidisation or something?
However Mick's ideas are way cooler.
isn't bonding alu to carbon a proper ball ache? something to do with alu oxidisation or something?
Yes, you need to electrically isolate the carbon from the lug, a layer of glass cloth will work. Or use titanium lugs instead of ali, I mean do you really love your child or not?
Would having the lugs anodised help?
Bastion cycles do something similar to what you are describing however they make the lugs from titanium.
You may get some ideas from their web site
http://bastion-cycles.com/process/
That's what Robot do too isn't it? carbon in Ti lugs.
I've read people use fibreglass but never fully taken notice.
How much would CNCing carbon mess up a machine? maybe do it all out of tubes & cnc carbon lugs / joints.
maybe do it all out of tubes & cnc carbon lugs / joints.
That's the plan 😉
Would having the lugs anodised help?
Yes, as long as the oxide layer (anodising) is intact and isn't scratched during assembly.
Mick, nice idea but I wouldn't know where to start...A basic frame shape I can do.
Had a little doodle this morning. The front triangle should be easy enough to do, will get a bit more complex on the rear end which gave me the idea of bolting the back on, gives me a bit of freedom to make sure I get it right.
[img]  [/img]
There are no issues bonding Ali to Carbon. Just make sure you use the correct primer (or seal in an airtight container until bonding) after you've prepared the surface of the Ali.
Just keeping an eye on this... let me know when you want me to cue the A-team music 😀
Came across this a few days ago which might be of interest?
[url= http://www.hopetech.com/tbt/ ]Hope made a kids bike[/url]
Bastion cycles do something similar to what you are describing however they make the lugs from titanium.
3D printed IIRC.
Those cnc lugs are crying out to make a bolt on single sided rear end 🙂
I'll just leave this here....
http://julieracingdesig.canalblog.com/albums/_1_2_jrd____l_unijambiste/index.html
Velosolo do disc mount 6 bolt fixed sprockets.
http://www.velosolo.co.uk/shopdisc.html
And a little more inspiration
https://neilkoster.wordpress.com/tag/system-integrated-chain-case-technology/
See also Mike Burrows 2D
I was thinking of going single sided (with a Lefty hub?) but would then have issues with brake disc & sprocket on same side?
Would still need to do some sort of freewheel, if the cog was bolted to the disc mount..
A lefty hub would allow a nice big stub axle. Easy option is brake disc and velo solo fixed sprocket mounted using 6 bolts and spacers between the two. Then freewheel at the crank end (see TartyBikes for examples of trials freewheel cranks). This would however be a finger remover if no chaincase fitted.....
Could you make a freewheel carrier that attaches using the disc bolts? Disc bolt PCD is 44mm, freewheel thread is 35mm O/D I think, and M6 cap heads are around 9.5mm head diameter - so with a little head skimming it could just about fit.
Could you make a freewheel carrier that attaches using the disc bolts? Disc bolt PCD is 44mm, freewheel thread is 35mm O/D I think, and M6 cap heads are around 9.5mm head diameter - so with a little head skimming it could just about fit.
That's a great idea 🙂
Starting to make a bit of design progress 🙂
After receiving a couple of carbon tube samples I'll be going with a 35mm weave finish as it just looks way better.
Bit more design work done on the rear swingarm/hub and I think I should be OK with a nice 20mm bolt through hub with disc and freewheel on the same side allowing me to do a single sided swingarm.
CAD done for the front triangle lugs, geometry sorted....just need to get some time on a machine to make a start 😀
Fabulous!
I was thinking about it the other day. Freewheel needs a shoulder on the carrier to screw up against. That will be bigger than 35mm diameter so needs 6 cutouts to allow fitting the bolts.
My minion brings the finished front triangle back tomorrow. No dropouts until Thursday then final push to finish and paint before Christmas....
How about using a centre lock hub and modifying a 6 bolt adapter to run the freewheel?
Cheeky 1/2 hour on the machine today. Got the headtube/downtube/crossbar lug roughed out 🙂
[img]  [/img]
It's always good to get into work early 😉
[img]  [/img]
Cool. Rear end cad over Christmas?
Lots of late evenings this week finishing Alice's bike. Just got to face bb and ht then off to powder Monday. Hopefully deadline hit.....
Ooh, cutting it fine Mick. Don't forget to pop some pics up when it's finished 🙂
Alice's dad somehow got permission to soak the flux off the frame in their bath! It then made it to powder this morning. Not done a full dummy build so fingers crossed - offering it up against my lad's bike it didn't look like I'd screwed up the angles.....
Stickers are cut and ready, and we've got a pile of parts (just released Sram NX 32t cranks in 155mm are very cute - just for info when you make the 26er version in about 5 years). Not sure what day we get it back.
Need to sort somewhere to host photos.
Is it ready Mick?
I do love an early start when the boss isn't in...bit more progress. Bores for tubing and headset roughed out, outer profile finished 🙂
[img]  [/img]
I like the ramming spike / unicorn on the front
Bit more done today. Seat-tube/top-tube interface profiled:
[img]  [/img]
[img]  [/img]
Hi Stevie
Yes we got finished in time - very happy customer 🙂
They were shooting off on holiday straight after Christmas - I believe it had a good test ride on Boxing Day, but no proper photos yet.
There must be an update... 😀
Probably been sacked for going work early 😆
There must be an update...
Sorry, been busy doing proper work unfortunately. Have been doing some designing and part sourcing as I need some bits to get the design finished.
Picked up a Hope front hub that will be used on the back wheel/brake/freewheel arrangement. Also picked up a nice set of Truvativ Hussefelt cranks that were perfect for shortening. Cost me £30 including BB.
Before (170mm):
[img]
 [/img]
After (120mm):
[img]
 [/img]
They were 700g's before and are now 470g 🙂
They were 700g's before and are now 470g
That's cool!
Done a little test piece to see how the freewheel will attach and to give me something to work with to finish the design for the back end. Feels pretty good. Managed to fit an extra bearing on the hub which should help keep everything running smoothly.
The back of the adapter will be milled to allow the rotor to sit behind, flush with the adapter so it will all be tight when bolted together:
[img]  [/img]
[img]  [/img]
[img]  [/img]
Disc and drive on the same side?
Please tell me you're going for a single chainstay
Coolest kids bike ever
Please tell me you're going for a single chainstay
I am 🙂
You'd be a cool uncle.
I couldn't leave that muck on the hub, get it clean man!!
That is exactly how I imagined it - top work.
I finally got a few photos of the 26er so will post on the "last thing made" thread later.
I thought the balance bike was impressive, this is already looking astonishingly good! Keep it up 🙂
Thanks guys 🙂
mick - glad it meets your approval 😉 Look forward to seeing the pics of the 26er
Bit more done:
Bottom bracket lug nearly finished
[img]  [/img]
140mm rotor fitted: (thanks Blazin-saddles)
[img]  [/img]
Managed to source most of the parts needed now thanks to Chain reactions sale.
3 lugs almost done:
[img]  [/img]
This is looking awesome.
Are you planning on a disc guard?
Its one of the things that makes me want a drum brake but they are silly heavy.
😀This is looking awesome.
Are you planning on a disc guard?
It's certainly something I will look at once I can bolt it all together
I may have missed it but are you epoxying the tubes I to the alloy lugs or a slotted lug to allow the tubes to be swapped out to grow the bike with the child.?
Looks super so far!
Yes, they'll be bonded in place. Will get the lugs anodised 1st to prevent corrosion.
I would check the anodising before bonding as it may well make the bond to the aluminium very weak if its conventional sealed annodising which I expect it will be.
In terms of corrosion I wouldnt reply on anodising to prevent that but for the time your daughter will use it it should be fine. Some glass at the interface would be best and don't forget to add a chamfer to any adhesive joint to drop the stress off, ideally a double taper of the adhesive. as it comes out of the lug - ie LUG /\<- adhesive. Doesnt have to be huge.
I love the fact you are basically making a modern kids version of one of the most famous, and now most valuable MTB's ever, the Yeti C-26
[img] 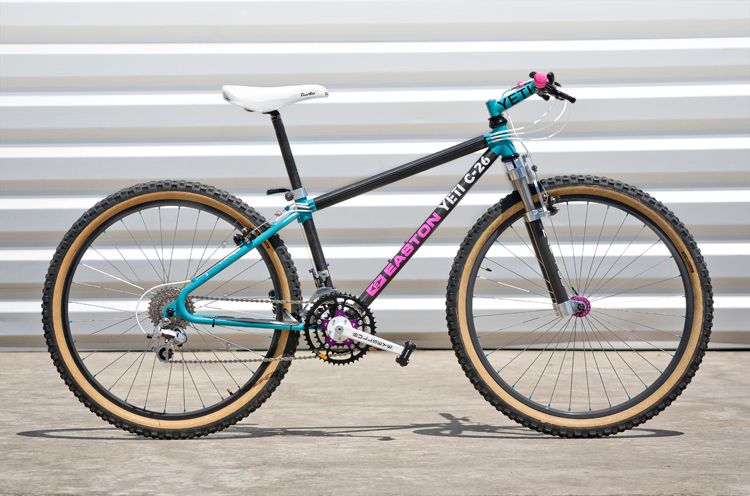 [/img]
Little bit more progress today. Got the adapter for the disc caliper done and made the slimline freewheel adapter. Starting to get there now 🙂
[img]  [/img]
[img]  [/img]
Great job, but your photos died 🙁
Hmm, photo's seem to have disappeared 🙁 Stupid Photobucket.
Anyway, bit more progress - chain and set stays nearly done:
[img]  [/img]
[img]  [/img]
Starting to look something like a bike:
[img]  [/img]
Really starting to look good.
We're having a £25 crapbike challenge at work (ending at a beer festival). I'm just off to source a central heating radiator - or pressed steel monocoque main frame as I prefer to call it 🙂
Sounds like a fun project mick 🙂
Tubing now sorted for this frame. Going with aluminium as the carbon was proving tricky to find/expensive and when I added in the adhesive etc it would have just cost too much to do.
So, just need to bore the lugs for the tubing - make the bolts - weld it up.
Light at the end of the tunnel 🙂
Bit more progress:
Tubing sorted, lugs bored, headset fitted to check steerer etc.
[img] 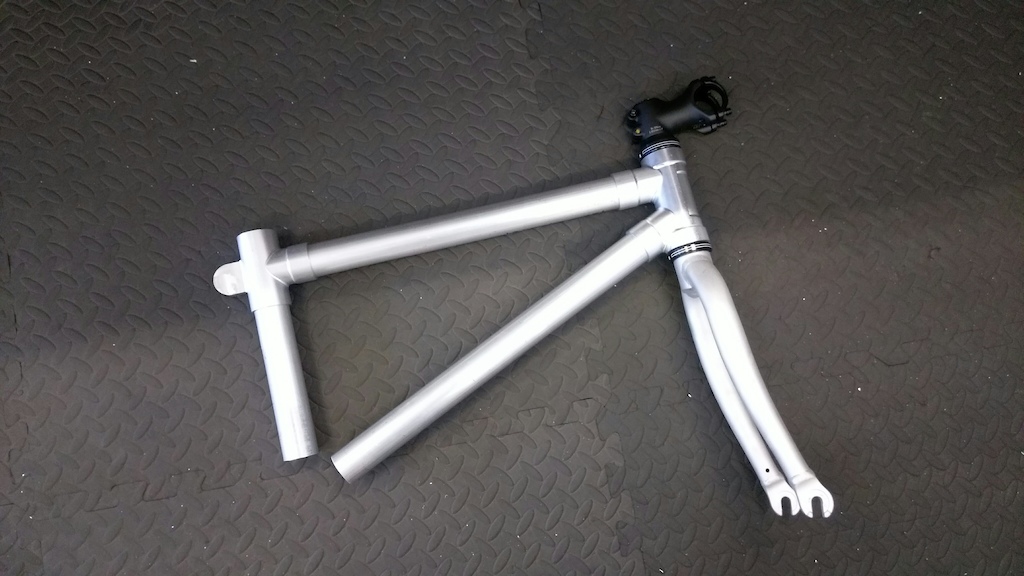 [/img]
That is very very cool.
Good work and skills.
Front end all fits well. Just need to make the bolts and I can put it all together 🙂
[img]  [/img]
[img]  [/img]
Ace 🙂
Like
Looks awesome. Not sure if I have missed it or not, is it staying raw?
Front triangle reminds me of Raleigh dynatech which i always liked back in the day.
You're teasing us by not showing how it looks with the back end fitted 🙂
But seriously a very nice job.
Thanks guys 🙂
Not sure if I have missed it or not, is it staying raw?Front triangle reminds me of Raleigh dynatech which i always liked back in the day.
She wants it pink FFS!! I had a Dynatech Pro which was some of the inspiration behind this.
You're teasing us by not showing how it looks with the back end fitted
I can't yet...don't have the bolts 😳
Knocked up a few bolts to test the fitting and it all fitted together 1St time 😯
[img]  [/img]
[img]  [/img]
[img]  [/img]
[img]  [/img]
That is bloody awesome. Can't wait to see 7th with wheels on