![]() You don't need to be an 'investor' to invest in Singletrack: 6 days left: 95% of target - Find out more
You don't need to be an 'investor' to invest in Singletrack: 6 days left: 95% of target - Find out more
So some of you may remember back in june time I came on here and asked if anyone had attempted to build a carbon frame themselves, it turned out nobody had but I was given a selection of links to people around the internet who had. 😀
So I thought "How hard can it be..." 🙄
So a few months on I realised I haven't done a write up on what happened. 😳
So I started the build with some pieces foam on the shape in the frame...
[img] 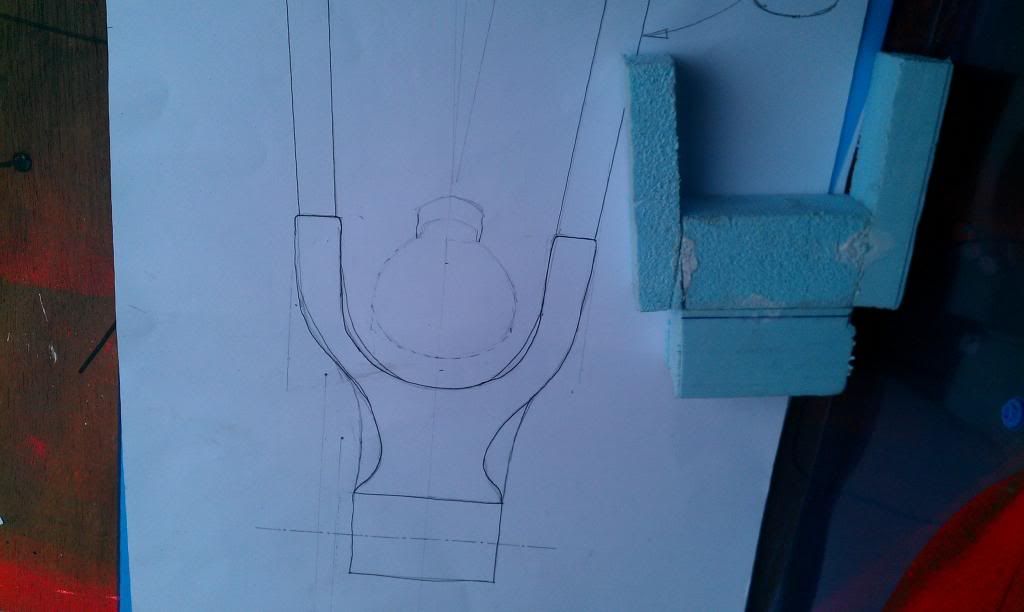 [/img]
[img] 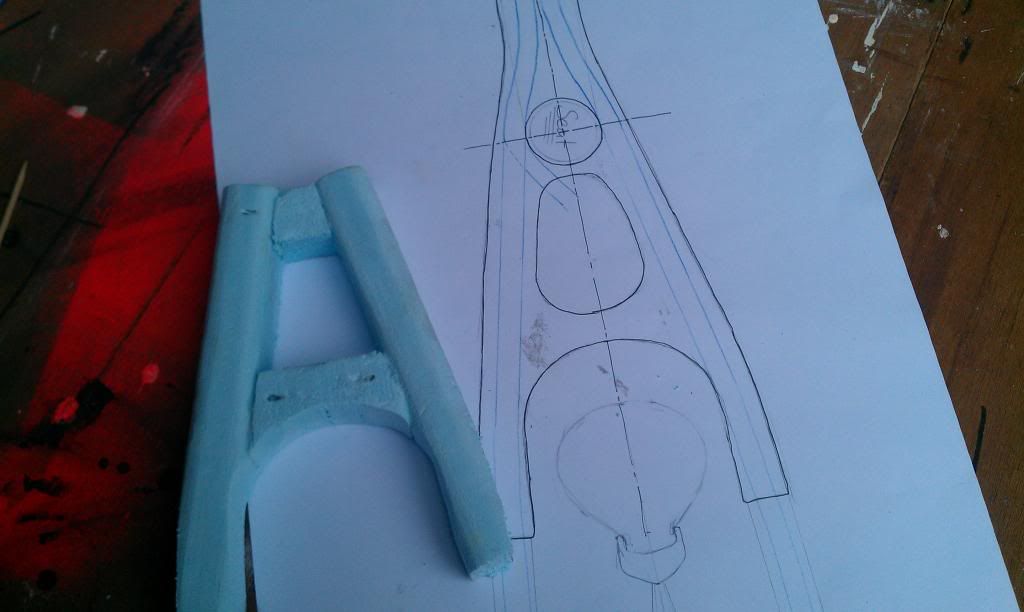 [/img]
Now this is the bit where it really got a bit hectic, I forgot to take photos and within a few days (maybe more like 12 😳 )I had someting resembling a frame...
[img] 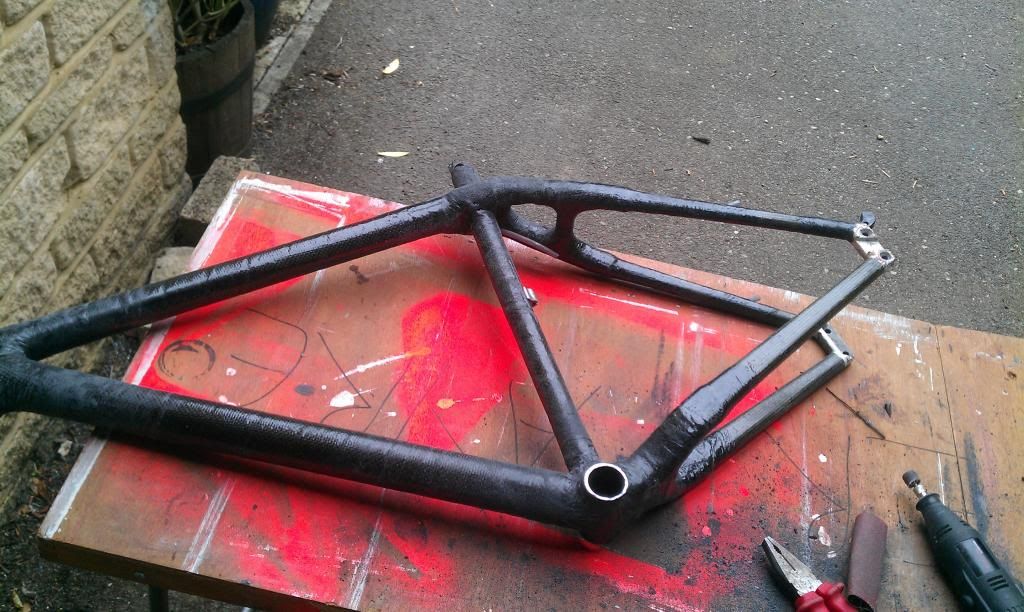 [/img]
a few more layers of carbon, some paint on the rear triangle where I had reused the dropouts and about 20cm of frame from an old carbon/alu Giant Cadex (1991)
[img]  [/img]
How the bike was durring 2 weeks of intensive testing in the alps... (note the taped on bottle cage + it survived 😀 )
[img] 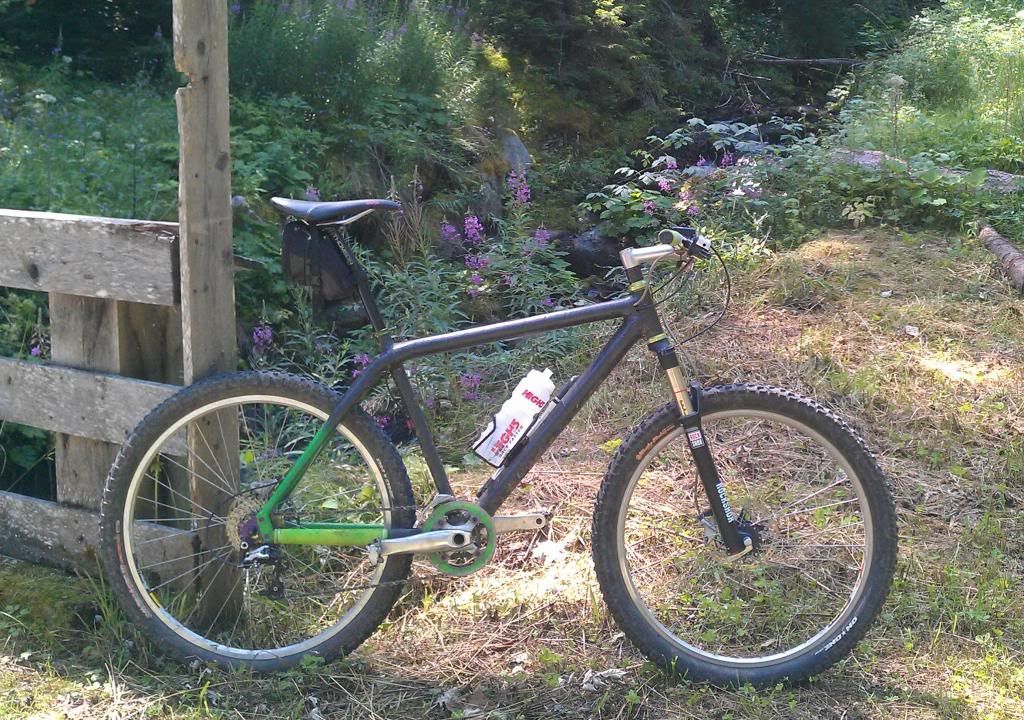 [/img]
And how it is now...
[img] 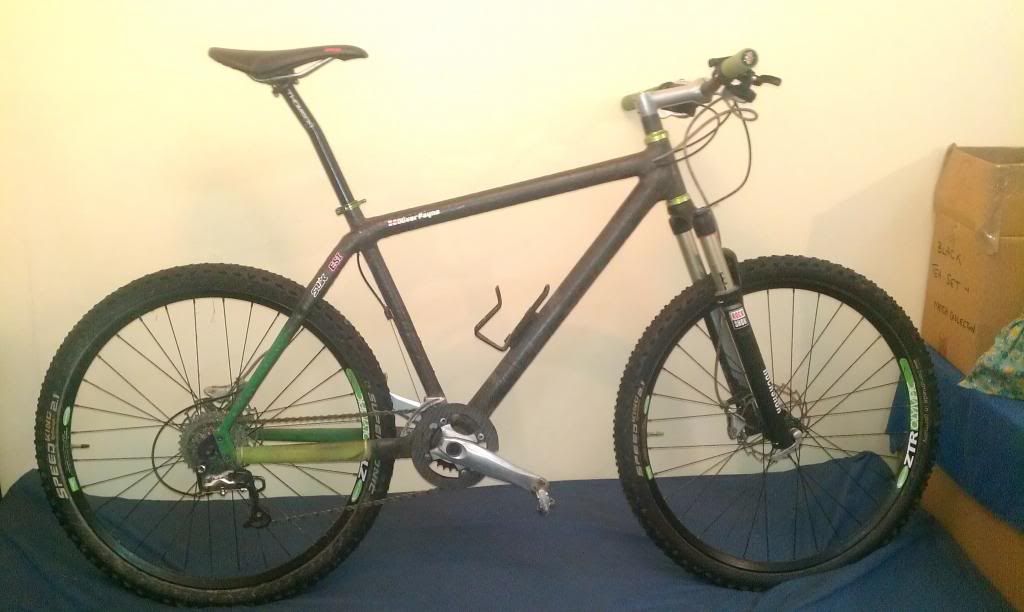 [/img]
The total weight of the frame is about 1440g ( I know not exceedingly light - but built for strength - but it's about a kilo lighter than old frame) and the total weight of this build is 10kg dead on! I know the geometry looks p****d in both these photos, both are taken from an odd angle in reality it matches very closely to other XC frames - but I really need a straight post (I built the bike to fit me - but only had a setback post available so will swap out when I can)
It really does ride well and was great fun to make! (and satisfying to defeat everyone who said it couldn't be done in a garage)- any questions feel free to ask - I do plan on doing a step by step for building it if anyone is interested?
Impressive!!
If I had a hat it would have been taken off to you. Top stuff.
😀
Full step-by-step would be ace, really interesting stuff this.
Looks good, missed your first posting, otherwise I would have helped. Here's mine:
[url= http://richmars.smugmug.com/Hobbies/Bikes/Homemade-carbon-bike-frame ]Home made frame[/url]
Amazing! I'd love to see how you managed that.
are you sure you didn't just wrap some black tape around an old alu frame? 🙂 Did you take it off any kind of jumps or drops or purely XC wheels on the ground testing?
oliver what do you do when your not up to your eyeballs in electrical tape
richmars - I had been given the link to you photos, no idea you were on STW though!
rs - probably would have been easier, I have done a 1m drop off, and quite a few small jumps, I also have done some very very fast off road descents, enough to knock a wheel out of true - but the frame still held up 😀
compositepro - not sure never been in that situation 😀
A few close ups now...
The internal routing
[img] 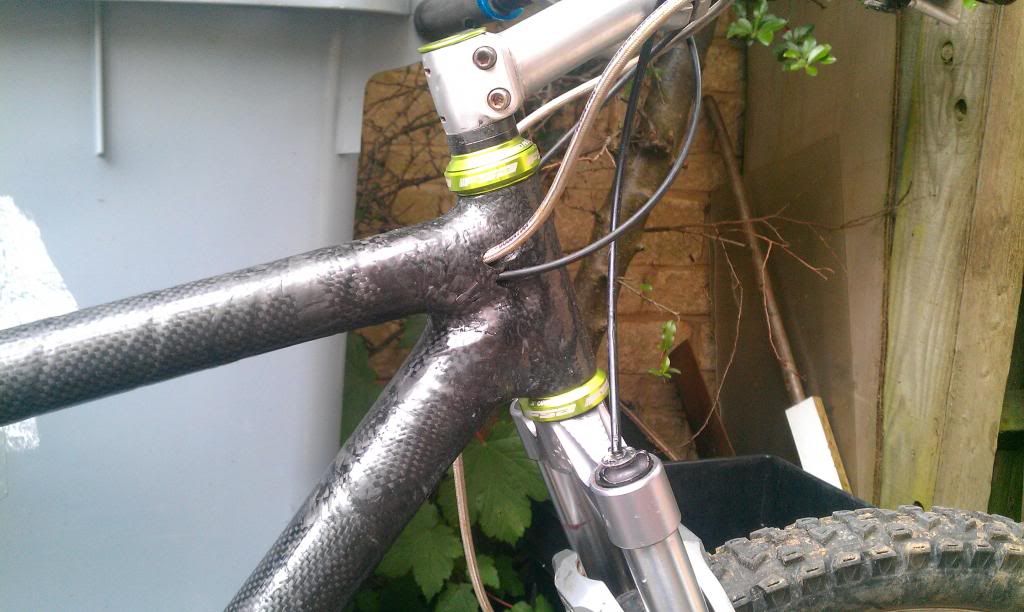 [/img]
The rear disc mount (no points for guessing how I did it 😉 )
[img] 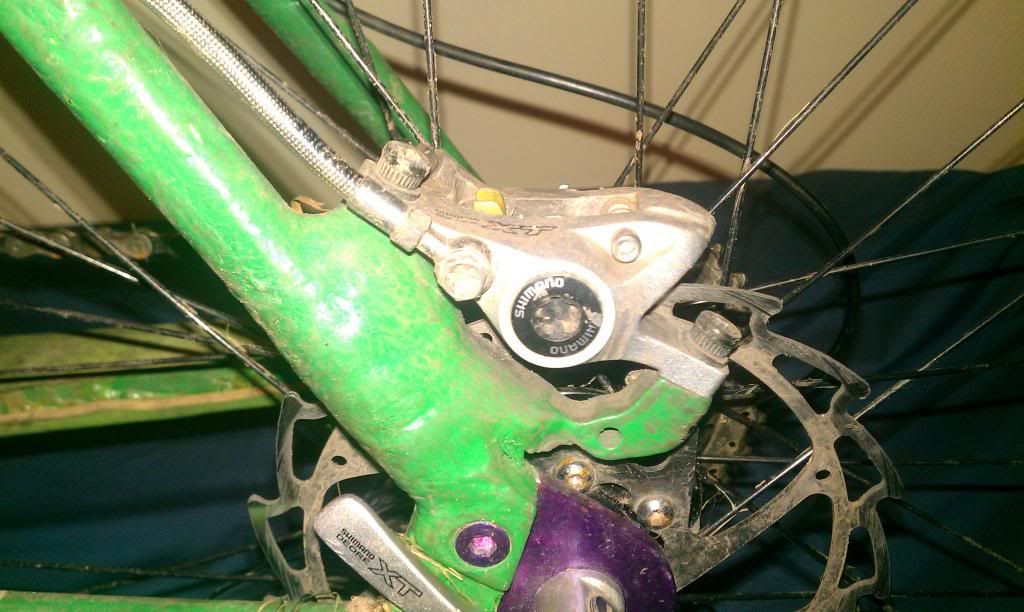 [/img]
double post 😳
it was a serious question is your background in composites,or a career outside this project you don't have an email
Post of the day.
compositepro - sorry - email now added on profile 😳 I'm a second year student studying automotive engineering at loughborough Uni, I have no formal background in composites, but for my A-level D&T project I build a Carbon and Bamboo bike trailer, where I basically spent an entire year trying different methods, from electrical tape compression (works great) though to cling-film and expanding foam (DO NOT TRY ❗ ). I had orignaly wanted to make a bamboo/carbon bike frame but my teacher said it wasn't original enough and my supply of bamboo was pretty crappy so wouldn't have stood up to bike like stresses. so for the year between me finishing A-levels and starting this I spent most free nights (when not riding) researching and self teaching methods on how to do it!
I will do a full "step-by-step" but basically I made the three main tubes and a rear subsection and bonded them together, if I were to do it again (tempted to attempt a full suss ~100mm travel bike) I would probably use the same method as if I messed a tube up i could do it again without ruining the whole frames strength
Jamie - thanks 
Nice 🙂 I do always like to see people doing things like this I know I should be able to do, but probably never will. Still very tempted by the idea of a bamboo one though when I have some spare time to waste (when I'm retired most probably).
The rear disc mount (no points for guessing how I did it )
With a spoon?
Brilliant thread bud, let's see more! This is how mountain biking started with guys just building there own bikes in garages etc. Very impressed. That seat tube does look like its at a crazy angle though. Do you have the exact dimensions there?
Wow and Wow. Great thread.
Not only is this how MTBing started, but this is how many great British manufacturing started....you've got a bright future ahead!!!!!
I'm embarrassed to say I sat on my arse whilst several (probably Mexican) slave labourers melted down used coke bottles in California in order to charge me a fortune for my, imminently arriving Tallboy ( did I mention!!!;-)))))
I salute you
fair play. does it have a name? 🙂
So if i'm right in thinking you cut the foam to the right shape and wrap like hell!
off to google foam bikes
This is great!
9/10 - 1 point deducted for lack of spoons 😛
Seriously, great effort. How many man-hours?
blimey! I managed to get an A all those years ago making a cabinet! Did have a bike obsessed chap who built a chop shop recumbent in my class.I had orignaly wanted to make a bamboo/carbon bike frame but my teacher said it wasn't original enough
Fabulous - post of the day!
Keep up the hands on stuff - combined with a decent degree, the best graduates / placement students we get at work are often the ones that did "projects" in their own time.
Also stay in touch with Compositepro - he is a very useful guy.
Jamie - thanks
No, no. Thank you. Just a shame you got carried away and only got a couple of pictures.
I found making the frame is easy, but you need some metal bits (brake mounts, drop outs). This is what stops me doing more, now I've moved on from working for a company with mill and lathe.
Having been inspired to google... I found this http://www.instructables.com/id/How-I-built-a-carbon-bike-frame-at-home-and-a-bam/#intro
Does that kind of follow what you guys did - new house with a garage on Friday so maybe time for a project (sold to the missus along the lines that she wanted a carbon 29r race frame)
Wow. Impressive effort on both of those.questions I have are
Does carbon not need some sort of oven or vacuum?
And second do you really trust it?
I wonder if you could 3D print a mold?
This what got me going, way back in 1995:
[url= http://sheldonbrown.com/rinard/howibuil.htm ]old carbon frame link (first?)[/url]
Jamie - yeah - I'm really annoyed with myself over that, but hindsight is a wonderful thing
richmars - yeah - I cannibalized and old giant cadex for parts, probably wasn't the best option, but was definitely the cheapest! do you mind if a borrow a few of your pics in my "how to guide" - I'll credit you of course 😀 That link from sheldon was definitely one of my inspirations pieces (shame I was only 1 year old at the time of that being written!)
mikewsmith - he uses a similar concept - bike he build the whole frame out if foam, and then carbon wrapper it, I made tubes formed around pvc piping, and then bonded/carboned them together - mainly so if one of the early bits went wrong in wouldn't wreck the whole frame
mikey-simmo - yep carbon for full strength does normal need a vacuum, but i wrapped mine in electrical tape (as did mr meres in the link, no doesn't need an oven - that's only prepreg carbon, I used wet lay ([url= http://honda-tech.com/showthread.php?t=1161157 ]clicky[/url])
do I really trust it... not sure I think is the honest answer, but now I don't think I't stopped me from running anything, other than the fact it's an XC bike - I'm happy to do rock gardens as fast as others in the club and drop off stuff no problem (other than my nerves - but that would be on any other bike too) - TBH I forget I'm on a homebuilt bike 99% time I'm riding it!
do I really trust it... not sure I think is the honest answer, but now I don't think I't stopped me from running anything, other than the fact it's an XC bike - I do rock gardens as fast as others in the club and drop off no problem - tbh i forget i'm on a homebuilt bike 99% time i#m riding it!
Have you got it out of the lufbra flatlands yet?
I'm assuming based on your course you had a easy access to some of the materials or was it all internet based? Tempted to have a go seriously though just for some fun, might have to learn to weld properly and perfect the jig with some steel bits
I do like your garage.
It reminds me so much of my own one.
The frame's good too 🙂
[quoteI wonder if you could 3D print a mold?
Simple answer is yes moulds can be printed
Problem arises if you need to cure at 200 degrees...theres a solution to that also
When you consider its a pretty much self taught job most impressive
I like that, a lot.
Nobby Jr was only talking about this the other week & asking whether it could be a long term school project for him. I'll show him this as both inspiration and a reference point for his tutor if he does get to argue his case.
Brilliant - love garage builds of anything mechanical, very impressive project. 😀
This is amazing - well done OP!
Seriously impressive stuff.
[url= http://dirt.mpora.com/news/hcomeragh-n56-carbon-hardtail.html/ ]Why not just build your own bike?[/url]
I witnessed him taking it off that last photo of the large drop... couldn't believe it to be honest. Not that he did it on a home made bike, but that he did it on a bloody hardtail, its a huge one!
Chapeau!
Nice work!
I am always very happy to see people have a go. This provides you with some great hands on experience if you choose to have a career in this area. Incidentally, your area of study (automotive) is getting very big in composites so its all good.
With respect to your wrapping method you tried tape and cling film? Well for the future you should be aware of a product called shrink wrap. Wrap this material on like tape and heat it with a heat gun and it will apply good compression to your part.
Cheers!
in your internet travels you probably came across the article written by some spoke length calculator geek called Damon Rinard, who built his own bike out of CF many years ago...
http://sheldonbrown.com/rinard/carbon_fiber.htm
...and you probably know he is now a senior engineer at Cervelo...
http://www.cyclingnews.com/features/photos/pro-bike-theo-bos-cervelo-s3/122755
Fingers crossed!
richamars - most inpressed by your ingenious makeshift lathe!
Spazzolino - I did try heat shrink wrap, but I didn't have much success with the results, as sometimes I got over-compression (crushed the foam core) - I found some 50mm cheapy electrical tape, which seemed to work the best as it had a good amount of stretch. I also used the method of pricking holes in it to allow excess resin to seep out. I used clingfilm and expandin foam mainly as a school experiment to pad my coursework a bit - it really didn't give good results (strong but looked crap)
Crashtestmonkey - TBH I have never actually considered a career with composites, as vehicle dynamics (primarily F1) is my main area of interest. - but I never know where my interest will be in 10 years time!
lol - hadn't seen the lathe - LOVE IT!!!!
Impressed, good work..
Not sure what I'm more impressed with, the ride-able end result or the fact you did it in a garage that makes mine look tidy and not many do that.. I struggle to build bikes there never mind make a frame )
I was looking up info on making some small parts in carbon a while back, feeling inspired to get back onto those ideas now. Thanks - great project + post.
Looks great!
I assume it also doubles as a life vest if you happen to find yourself in a lake (having all that foam in it) 😆
jameso - I will admit I was lucky with the weather and did 99% out the front of the garage as you do need space to work with carbon, I worked on the folding table with green + orange paint. The disassembled jig to the right can also be seen 😀 - if the weather had have been bad I would have cleared the garage out as you need 360 degree access when building. In terms of small parts - I have made my own bash out of a flat sheet of carbon (works great), I did try a bottle cage but that wasn't as successful - but will try again with a new bottle 😀 (it stuck last time)
FunkyDunc - no foam left in it - I moulded the main tubes around pvc pipe, and the small parts I melted the foam out with acetone - as I did internal cable routing I needed clear routed though the frame 😀
fair play to the OP, great to see this kind of stuff 🙂
its as much as I can do to bolt a bike together from its component parts
Mightily impressed.
Good for you!
The lathe didn't work very well, but did produce a massive amount of dust. It does show how crude you can be but still get something that works.
how about doing some destruction testing with the other tubes that didn't make the frame...
but I never know where my interest will be in 10 years time!
well I went from postdoc research into superplastic aluminium alloys intended for the Eurofighter/Typhoon to being a copper.... 🙄 😀
rs - all tubes went well so that sorta stuff that...
crashtestmonkey - haha - nah definitely want to do something engineering based, I love doing things like this so why not make a career out of it!
I thought you mentioned you used some other techniques that didn't work so well, would be good to see them being hit with a hammer 🙂 or make a few spares and hit them with a hammer!
Fantastic stuff.
I keep thinking about trying something largish as a project.
A canoe is currently winning in my head.
A canoe is currently winning in my head.
Easy. Big block of foam, curved to a canoe shape. Lots of carbon (might be a bit expensive), lots of tape. Dig out the foam when cured.
Bloody brilliant & not sure whats best the actual build or '..two weeks intesive testing in the alp..'
Cap well & truly doff'd
wow, hat off to you
A canoe is currently winning in my head.
I was actually thinking about doing a full suss sometime in the next few years... let the designing begin!
richmars - MemberA canoe is currently winning in my head.
Easy. Big block of foam, curved to a canoe shape. Lots of carbon (might be a bit expensive), lots of tape. Dig out the foam when cured.
Carbon fibre isn't usually used on its own for canoes.
Kevlar is the better bet.
Although to be honest I'm leaning towards a cedar strip construction with glass fibre outside.
you mentioned bamboo - I thought this was interesting a few weeks ago;
[url= http://www.theguardian.com/technology/2013/sep/21/bamboo-mountain-bike-review ]null[/url]
ps. well done on your creation!
yeah - when I looked around oxford brookes uni a few years ago, they were doing the development and testing for these next door to the room I was in so I went and had a look around -They let me have a quick spin on it - and to be honest I was a bit disappointed, but probably didn't ride it enough to see the benefits and might have been an early prototype. By then I had already started making the bamboo bike trailer for my a-level, so it was a bit late for extra credit/research.
Fair play mate - sounds like a great Uni project
The best projects i could come up at Uni was designing an electric chair, determining, through statistical analysis, the number of women Bond had nailed and programming a computer to beep 'Baa-Baa Blacksheep'
Bolton Institute at its very finest 🙂
Oliver - yhm with a proposition 😉
thought I would update this with the latest turn of events...
so I went to cannock chase today with a few mates from uni, all going well till I have a bit of a nasty pedal strike (dented a m520 pedal kind of hard) so think nothing of it till about 20 mins later where it felt like I had bent a chainring but then realised the BB shell had parted company with the rest of the frame...
[img] 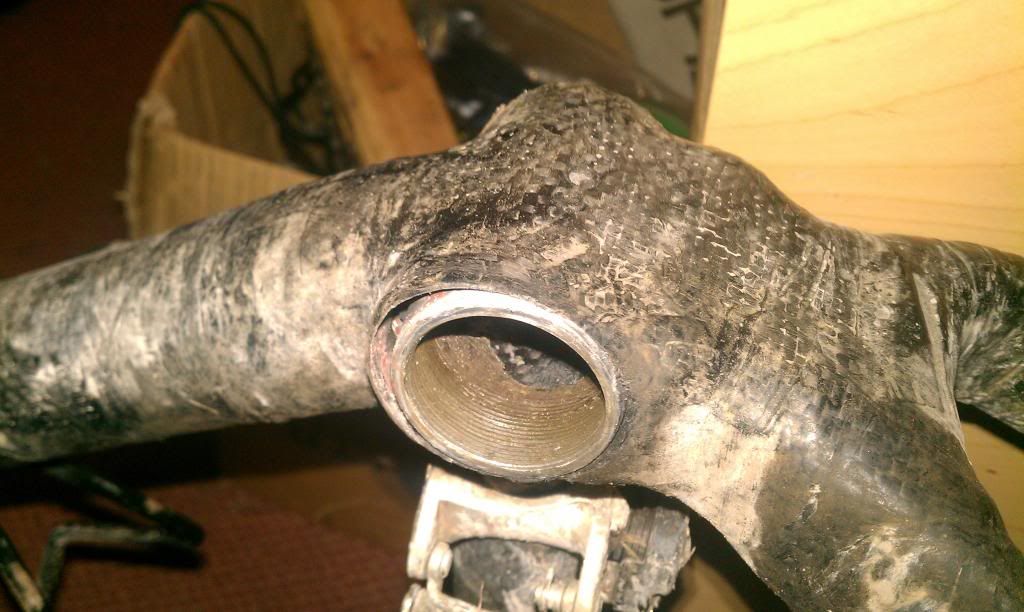 [/img]
[img] 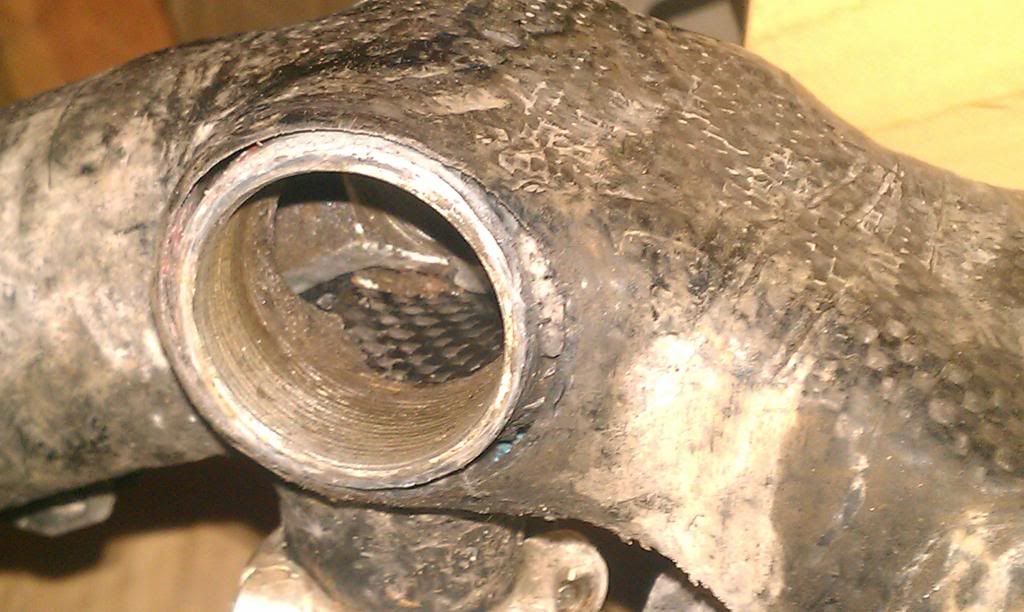 [/img]
It's repairable at least, just need to go home from uni to access the correct equipment to do it - now this I promise to do a full photo documentation (hopefully)
That's the bit I was always concerned about on mine. I used a layer of glass fibre between the shell and the carbon, as, in theory, you can get galvanic corrosion between the carbon and steel.
Also, it's not easy to get a good surface area contact between the shell and the rest of the frame
yeah - used the glass fibre method - but I think the hit I had would have cracked most carbon frames 🙁
If I was doing another one, I'd make a carbon tube, with an internal diameter a bit bigger than the shell, build the tube into the frame, then glue the shell inside the tube.
yeah - Hadn't thought about doing it that way, but I guess that would give you the best chance of getting a decent bond
a decent bond will only occur if you can get the fibreglass to stick to the aluminium anyway ,a bond is only as strong as its weakest element the fibreglass is not the weak element the interface between the aluminium and whatever epoxy or adhesive is used is(some adhesives are not epoxy based)
Google FPL etch (still a bit old) and extrapolate from there or even CAA etch or the phosphoric (sometimes called boeing) process
glassfibre ...old hat chaps
compositepro - I have just looked at the failure in a bit more detail and it appears that it is infact the fibreglass-metal joint that has failed, I guess I needed to so a bit better surface prep that a bit of sandpaper before hand! - I have also realised that the way I have designed it the BB shell was only in contact with the carbon around the bottom 50% of it - so an upward impact would just push it up - both these issues should hopefully be fixed in frame version 1.1 🙂
I have looked into both those method, but they seem a little out of reach for a shed-job - so I guess I'll have to increase the surface area
Aluminium is filthy in terms of materials to glue the ano and etch is more for future reference
Any form of surface conversion is always a help but cleanliness is pretty much key
Latest update...
so last weekend I took the frame home from uni to fix it so heres how it went...
shell cut out
[img]  [/img]
shell fiberglassed and carboned in place
[img] 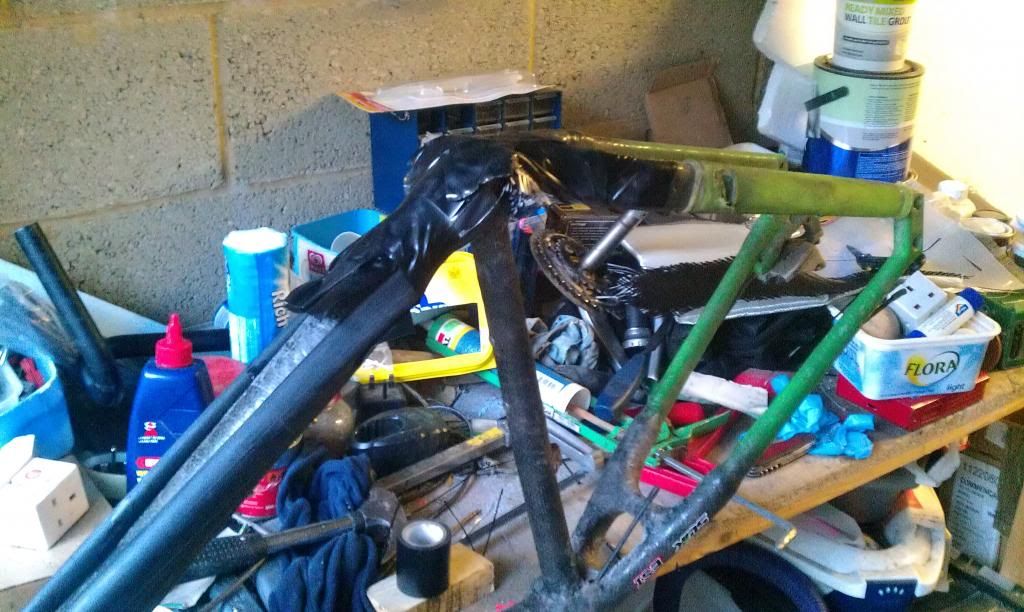 [/img]
first layer done
[img] 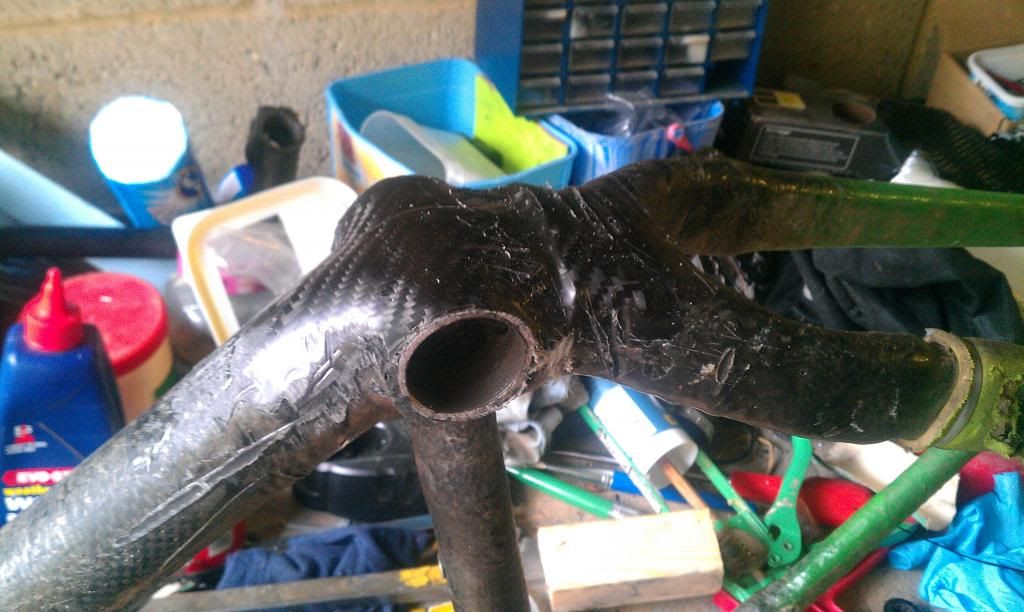 [/img]
sanded down a bit
[img] 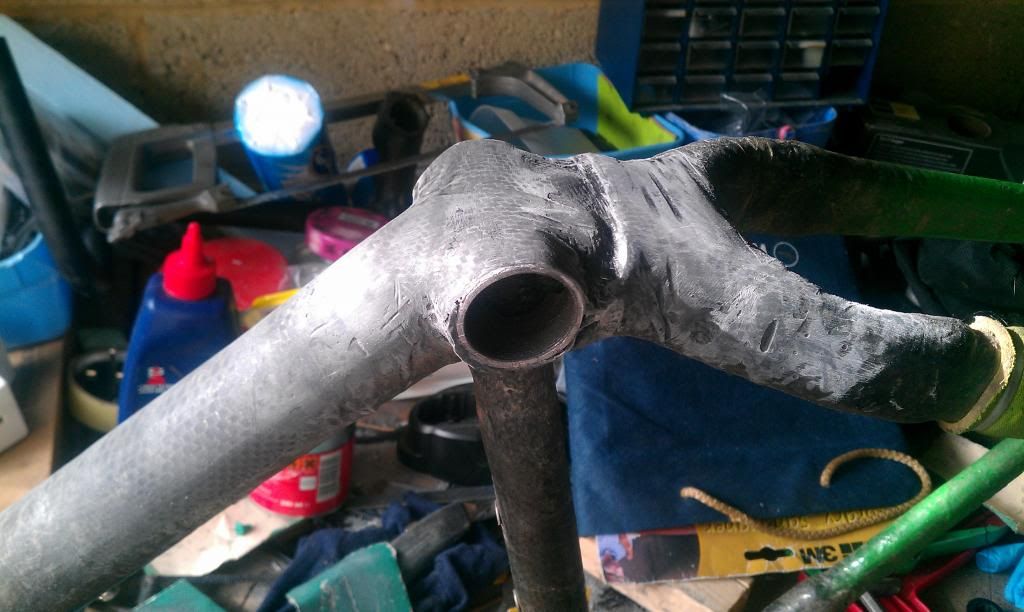 [/img]
some carbon added
[img] 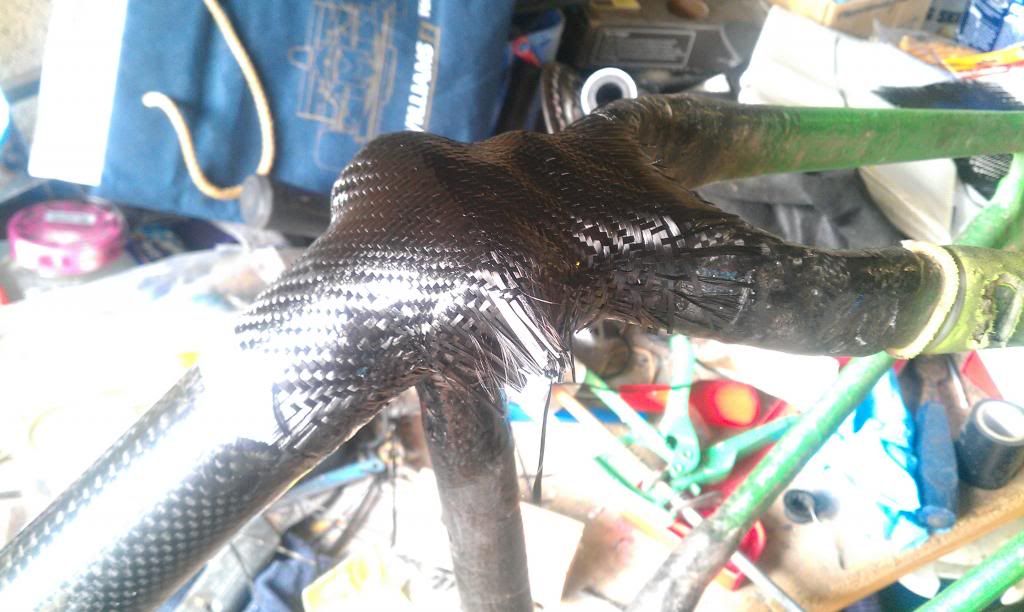 [/img]
[img] 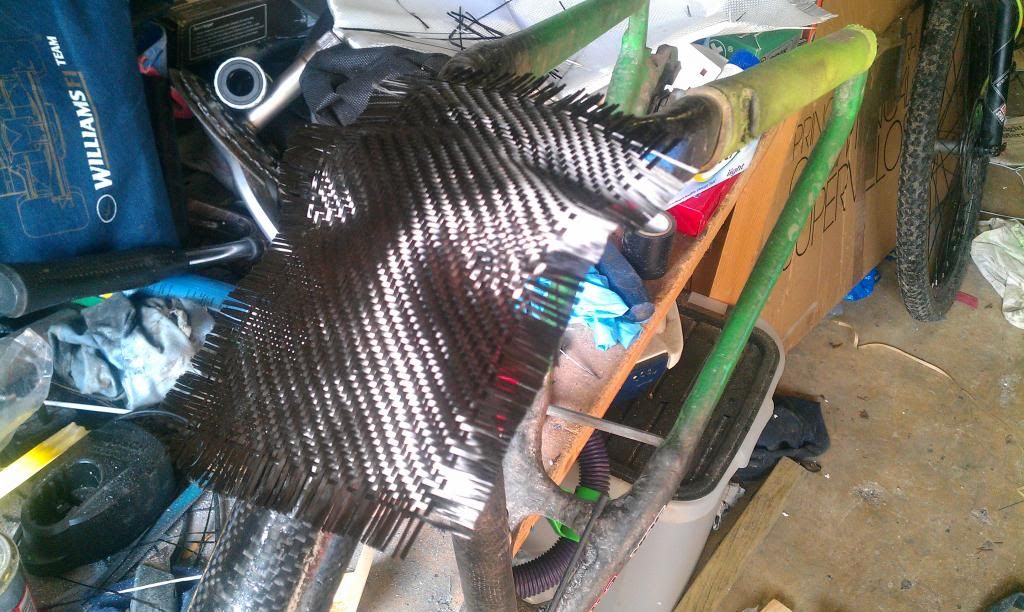 [/img]
electrical taped...
[img] 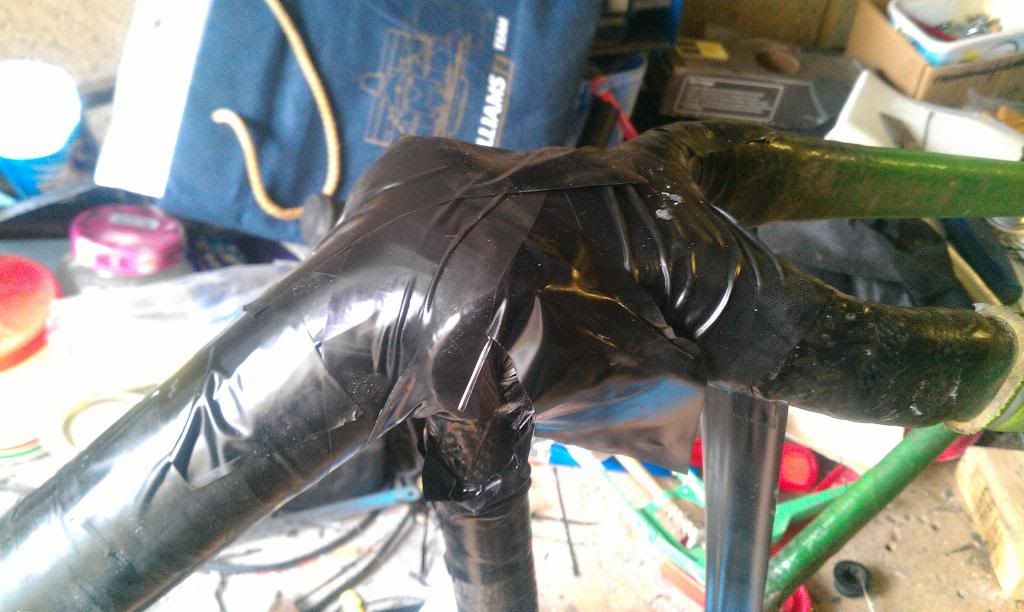 [/img]
done!!!!!
[img] 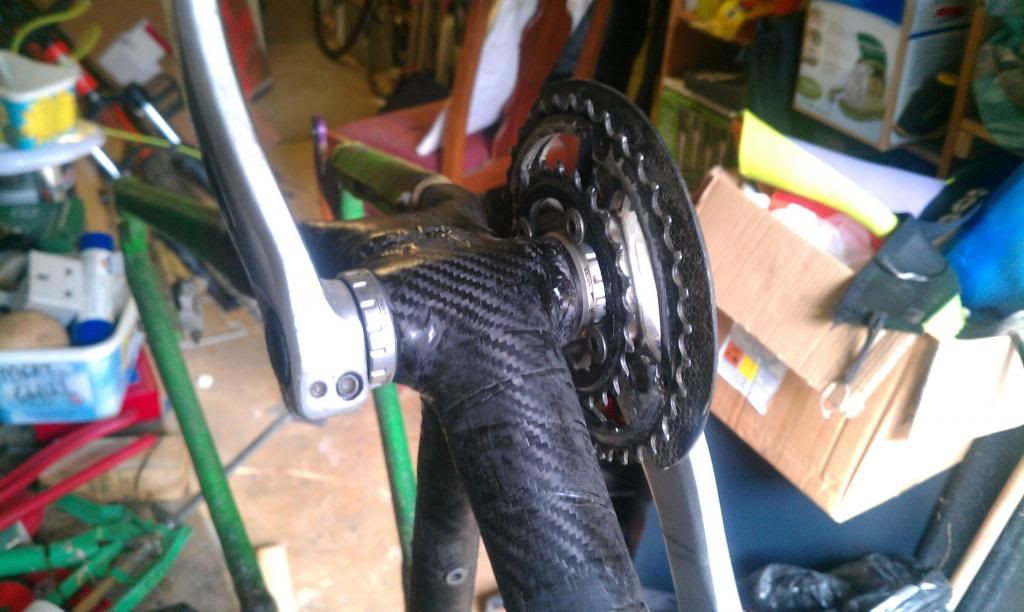 [/img]
sure it's been answered but can't see it, what is the cost of the materials? got a link to some good stuff?
to be honest - not sure I have said, so here I go...
Carbon fibre - free 😀 - a composites company donated for a school project I did a few years back (15m^2)
resin - £20 - [url= http://www.easycomposites.co.uk/products/epoxy-resin/EL2-epoxy-laminating-resin.aspx ]clicky[/url]
pvc pipe for moulding main tubes - £10 [url= http://www.ebay.co.uk/itm/Solvent-weld-waste-pipe-32-40-50mm-white-black-grey-/120758396565 ]clicky[/url]
other laminating kit ~ £50 - [url= http://www.easycomposites.co.uk/Default.aspx ]clicky[/url] (gloves,pots,stirrers,brushes,foam for mold, release wax for pipe)
old frame for parts (bb shell, headtube, dropouts) - £?
probably forgotten something major - but will update if I remember
awesome - manic plot hatching going on as I have just got the garage sorted - well the beer fridge is in
I use this stuff [url= http://www.westsystem.com/ss/ ]West System[/url] 105/205, you can get graduated dispensers that screw in like soap bottles and give you the right ratio amount, saves loads of measuring hassle.
The soap dispensers aren't great, I gave up on them. Just buy a cheap set of digital scales, much easier.
any prices on the carbon fibre?
I have been googling but i'm currently stumbling a bit in the dark
The soap dispensers aren't great, I gave up on them. Just buy a cheap set of digital scales, much easier.
Fairy snuff, last few years I found them excellent, except where you let the resin get too cold and wax up
Have you never tried [url= http://www.ebay.co.uk/itm/Mini-Handy-Clear-Pallet-Stretch-Shrink-Wrap-Film-x-1-/120764235614 ]Pallet/Shrink Wrap instead of the tape?[/url]
I used tape to start of with, but once I tried the Pallet Wrap, I found it so much easier to use and wrap stuff.
Mike, [url= http://www.carbonmods.co.uk/Departments/carbon-fiber-kits.aspx ]here you go.[/url]
I got the £40 kit to get me started years ago. Its got enough to play around with for a while.
[url= http://www.carbonmods.co.uk/Departments/Carbon-fiber-cloth.aspx ]If you need more cloth.[/url]