![]() You don't need to be an 'investor' to invest in Singletrack: 6 days left: 95% of target - Find out more
You don't need to be an 'investor' to invest in Singletrack: 6 days left: 95% of target - Find out more
Going to put a new headset tomorrow.
Plan to knock the old one out with an old screwdriver and a big hammer.
Intending to put the new one in with a threaded rod, a couple of bolts and plates and plenty of swearing.
Anything I should look out for?
A bigger hammer - tbh i just hammer them in with a rubber mallet and block of wood over the cup - if the tube is so shonky it breaks then rather then than when I am riding it.
Makes sure it is going in square whatever you do
Take bearing out of new cups pre press and stop if cups start going a bit skew.
Top tips
Anything with a bigger hammer is good.
Old frame and not the end of the world if it goes wrong.
TBH I've used the threaded rod method, and I've used a proper headset press, but the approach I get the best, quickest, easiest result from is the rubber mallet.
It's not for the cackhanded though... But then, neither is a headset press, you can ruin a frame with whichever tool you choose, if you're a big enough knobber.
Chuck the new headset cups in the freezer for 2+ bourse first, grease the head tube up and your threaded rod will work a treat.
I usually knock the old one out with an old set of handlebars and a mallet rather than a screwdriver. More forgiving...
Some STW posts provide nothing, some provide oven cleaner for anodising and this is one of those, thanks.
Grease the insert of the headset, get a couple of bits of 2x4 one to rest the frame on, one to use between the mallet and headset to even out the force of the blow.
Don't do it after 8 pints of real ale. Expensive fail from experience 😀
My headset press looks like this, threaded rod a few nuts and some ali plate. Put one cup in at a time.
+100 the tip about putting the cups in the freezer, you can nearly fit them by hand after that.
[IMG] 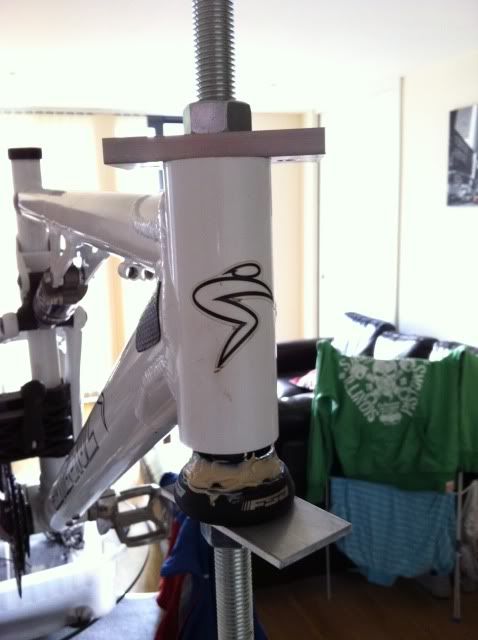 [/IMG]
A decent headset press has a taper to hold the headset square in the tool before inserting. Using a threaded rod will pull it into the frame but may cause it to stretch the headtube. I know that the 'majority' of riders here are happy to take that risk and 99.9% may have got away with it, but a press is made for a reason. Luckily I have one and will always use it. I always put a slight touch of grease on the cups, you dont need much and check the inside of the tube for any paint overspray and wet and dry out if needed. If you can check the inner diameter of the tube and the outer of the headset, make sure it is within a sensible tolerance. Like seatposts, manufacturers have their own sizes. If its too tight, could cause an issue with overstressing the head tube.
Other than that, take your time with doing it.
Thrustyjust - Member99.9% may have got away with it,
It isn't "getting away with it". All you need to do is be slightly careful, or perhaps I should say not be totally oblivious- if it starts to go in squint, stop.
FWIW the only time i've personally had a headset fitting failure was when my "proper" press with its taper ended up settling on a delicate part of a Giant headset, and pushed it out of shape. Wouldn't have happened with my home-made press or with the rubber hammer.
I did it recently with a wooden mallet and a block of wood underside giving a nice solid support. It's so ridiculously easy, it wants to go in straight. Just take your time. I then cut the steerer with a hacksaw and a reversed stem as a guide and installed the star nut with a bit of metal rod that was in my tool box.
Saved myself the quoted £44 from my lbs, got it done that evening (took 1hr to do everything) and gained satisfaction from a job well done.
Just as an update.
Decided on just two pints of real ale as a good starter for this softy southerner. Cups in the freezer. Tried my super home made press one at a time but it wanted to pull them in a bit wonky and I kept wanting to tap them. So I gave in to temptation, another two pints of real ale and out with the rubber mallet and a bit of 4by 2. Easy. All standing and correct. Frame OK etc and so another couple of pints in celebration.
Thanks for the advice. Hic