![]() You don't need to be an 'investor' to invest in Singletrack: 6 days left: 95% of target - Find out more
You don't need to be an 'investor' to invest in Singletrack: 6 days left: 95% of target - Find out more
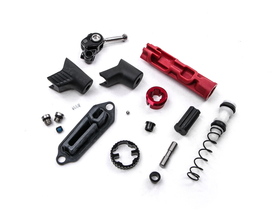
So, to fix the sticky lever piston I've now got these nice alluminium replacement piston from China all of £6 each shipped (x2 for both levers).
Doing the job as per this video and skipping the DIY fix in the video of sanding the original piston down, just replace with new.
Ah, bugger @ 8:40, needs a special tool it seems.
https://www.amazon.co.uk/Avid-00-5318-015-000-Brake-Assembly-Disassembly/dp/B00TQ43B3Y
Or can I bodge it? Looks like it's just a tool to get the bit that locks into the adjuster dial to thread in to the housing?
I specifically went with cheap Chinese piston to avoid spending £30 quid on the rebuild kit that contains the official fixed piston, plus other bits I don't need, although I notice now it contains the tool also. Buying the tool means pushing the price higher and waiting for another part. Though I need to do two levers so it's still cheaper than £60 for two official kits.
Yes you can do without the tool .I did mine but made a boob and took a while to figure out how to set it. You will need to turn the bite adjuster all the way out before you start to disassemble (towards the caliper) as in use the bite adjuster pushes out both ways. A left hand in one end and right in the other one so when you turn the bite adjuster it does twice movement for each rotation.
When I took mine apart I did not know where the bite adjuster was , somewhere in the middle I think. So when I'd stripped clean it all I was not sure where it should be. If you do take the brake lever apart fully count the turns on the rod from the brake lever that pushes onto the piston does when taking it apart. When you reasemble pop the bite point adjuster back in and rotate it all the way to the caliper end and as long as the rod from the brake lever is set the same as when you disassemled it.
Hope that helps a little , it should become clearer when you take it apart.
The Rod is at the top of pic
Hmm, I've already pulled it apart following the video above, which just twiddled the adjuster until the bits fell out. It's just when I got to putting the bit that joins the adjuster I realised there's a tool involved that seems to screw it in place. Without that the bite adjuster is just rotating without doing anything. I can get the joining bit to slot in but it's loose because it needs setting or screwing in it seems.
Yes sounds like what I did, looks like without the tool you might need to put it togther a few times and check you get full lever movement when adjuster is at fully wound in and out.
So assemble as per instructions in video and instead of using tool to screw adjuster you just turn the adjuster bezel thingy all the way to the cailper end . I think my Rod was about 4-5 turns into the swing link thingy.
What the tool does is turns the adjuster bezel all the way to the caliper end and it also has a guide to show you how much the Rod sticks out of the swing link.
Pop it back together and you should get the idea on how it works.
I will check back here tomorrow to see if you sorted !!!
Nite Nite Blast
It's good you can buy spares, but I ended up buying a complete lever at cheap sale price.
I had to make the same mod but sanded the pistons as the video.
First time I bodged up my own 'tool', using a piece of tubing & some insulation tape.
Worked OK, but when the 2nd lever needed doing it didn't work out so well.
Ended up buying the tool separately, but it only cost me a few quid. Re-did both levers & now they feel much better.
I'd say the setting tool makes all the difference.
I'll try to remember where I ordered it & re-post.
Edit. Here we go, Bike-components.de, for 3 euros.
https://www.bike-components.de/en/SRAM/Guide-Assembly-Tool-p43124/
I will check back here tomorrow to see if you sorted !!!
Ha, not likely. Been out on the other bike, which thankfully has the revised Guide brakes without this problem. Maybe I'll end up getting the tool. I can't quite get my head round it at the moment. There's thread stuff in there but can't see how that engages.
Aha, got it. Sort of. Using flat bladed screwdriver I can screw in the plastic bit and screwed it fully in. That seems to be the full out bite position though. Swing arm not sure but had to unscrew it slightly to align. Rest assembles okay. Lever seems to pull fine. Just need to put the cable in, bleed (faff) and see if it works. Not sure it's set right though.
Then repeat with the other brake.
Definitely better with these pistons though. The others are properly stuck.
First brake is fine and surprised the bleed went fine.
Second brake is screwed. Did the same and lever position and throw seems fine, but on bleeding it just pulls to the bar. Repeat bleed, same again, and repeat, same. If I pump the lever loads it will bite, but after that it's to the bar again.
Is it the setting is not right, hence I need the tool or is the brake buggered and/or I'm hopeless at bleeding brakes? Been using the official SRAM video for bleed guide, to the letter.
Anyway, seems I'll be getting the tool, plus a big supply of dot fluid.
They are hard to bleed, you could always try the holding the brakes on overnite trick.
Just zip tie the levers on and leave overnite and the any air in the system will make its way up into the reservoir.
Use the official SRAM bleed video - some subtle tricks that give you a solid lever first time round.
Sorry to jump in but what type of circlip pluses are you using to get the circlip off?? Mine ain’t long enough