![]() You don't need to be an 'investor' to invest in Singletrack: 6 days left: 95% of target - Find out more
You don't need to be an 'investor' to invest in Singletrack: 6 days left: 95% of target - Find out more
Pics coming soon.
Fixed chainstay area:
[img]  [/img]
They've made a tiny indent in the stay where the tyre goes but they are still chunky. You can see the difference here:
[img]  [/img]
Workmanship is excellent, and customer service was good. I only wish they'd explicitly said something like 'if we crimp it any more it'll be too weak' because now I"m wondering if they've erred too much on the side of caution and reduced clearance.
What size tyre do you normally run?
Looks like great work. How about getting it stripped and cleaned completely, some stickers made up in the red you like (original colour) and then clearcoat it to show off the lovely metal ness.
One of the best looks I had on all the frames I've owned was a simple raw on one 456. Just loved the way it looked. Rode quite nice too.
At least if nothing else it will allow you to keep an eye out for any more damage whilst you decide on a final colour if you don't like it clear.
2.35s. They used to fit with the sliding dropouts in any position, now it's really only the rear most position. And even then there's less clearance for mud. Just a bit of a shame really, cos that was a cool feature, but maybe it was overly optimistic for Salsa to build it that way in the first place. It still rides ok with the dropouts at the back but I preferred them in the middle.
I think I will ride it for a year or so and see if I still care and maybe get a second opinion.
Did it snap on the section where they had bent it for tyre clearance? If so, perhaps its better they didn't do it?
I had a salsa horsethief (non split pivot) the one where the stays flexed. They snapped in almost the same place.
Sometimes simpler is better.
I like the idea of a raw finish over some stickers
Did it snap on the section where they had bent it for tyre clearance? If so, perhaps its better they didn’t do it?
In my case, it snapped because I'd heavily gouged the chainstay after chainsuck caused the chain to get badly jammed, which in turn was because I had the BB spacer on the wrong side. This is what irritates me - would it have been strong enough as it was without my poor bike assembly skills?
Those chainstays were weak anyway - lots of stories of them cracking on the internet - but on the other hand, I'm not hardcore MTBing on that bike and I'm pretty light on kit so I might've got away with it. Could Argos have crimped them a bit more than they did, but not as much as Salsa? The Argos stays looked like they were thicker tubing than the original ones - would this have been enough? Who knows.
And yes, the raw shot blasted finish looks amazing but sadly there's no way of ensuring it stays that way!
What spacers have you got fitted to the BB now?
I’ve just managed to buy a new 2016 El Mariachi frame, I must have a look at how thin they are?
Repair looks good Molgrips. I gave up doing a proper repair on mine and just bought a Stanton Sherpa. I've built it up now with exactly the same kit and it is good but quite different in good and bad ways. Tyre clearance is outstanding though.
Just checked my frame and it’s linked on the inner and outer of the driveside chainstay. I hope that’s intended. I do intend to run it 1x so hopefully it holds up. Not sure what my warranty length is will find out once I register it.
@fudge9202 You may yet be ok. Mine was fine for a few years on the NDS, which is the one that other people have had fail. Mine only snapped cos I mangled it up. Bloody brilliant adventure bike though, I love mine more than I've ever loved a bike!
Anyway. Painting day:
[img]  [/img]
Painting tent set up - fortunately that seatpost is a tight fit:
[img]  [/img]
Primer on - a couple of runs in it, will need to sand and add another coat. The paint may be advanced powder coat type no-run stuff but the primer is just normal primer apparently. It's not easy to spray from a good distance onto a bike tube, most of the paint misses!
[img]  [/img]
I wouldn't recommend trying a chainsuck plate. Went through this with Principia Mac B frames back in the 90s - the chainsuck plate is a bodge that never really worked. The force of a chain jamming up into the stay can't be inderestimated! We found that it with moved of damaged the plate - or worse just got jammed in the plate.
You may find with the new stay layout that it doesn't happen so much, but 1x or maybe 2x would be the best way to sort it. Get rid of the granny ring. Definitely worth the initial spend.
Yes, 1x is in the near future for this bike once I have found the cash. I'm strongly leaning towards stripping the Trek for it actually.
@molegrips This might be an option if you have cranks, all you need is a chainring of your choice
https://www.bike-discount.de/en/buy/shimano-slx-1x11-speed-upgrade-kit-with-11-46-652950
Ta fudge - I actually have a chain and cassette too, so I only need shifter, mech and chainring (stealth ad!)
So - paint's gone on, and I'm not sure tbh. Either it's not gelling well or it's actually reflecting the shot blasted finish underneath the paint. Try as I might I could not get it to gel into a glossy finish like car paint does, it's orange-peel-tastic. And it's not like I've never sprayed from a can before.
[img]  [/img]
[img]  [/img]
[img]  [/img]
Ok so I used oblique light to show it up - in reality it's pretty even. Not sure if I should leave it like that or try to fix.
Did you heat the frame with a hairdryer and stick the cans in a bucket of hot water before spraying? Not a great time of year to be painting.
Personally I would be going to a powder coater, I've has steel frames blasted and powdered for £35 before.
I would also be tempted to crimp a few more mm clearance....
I did it in the internal garage, with a heater on. It's not as warm as the house but definitely over the minimum 10C stated on the can. I couldn't see my breath. I've had this effect before with spray cans but when the panelling is too hot, not too cold.
Orange peel like that is usually because application is from too far away. The solvent part volatilises before the droplet lands on the frame and it's too jelly-like to settle out and blend with others into a smooth skin.
Could you have asked Argos to put a yoke in there to execute decent tyre clearance better than over squished, weedy tubes?
I have rattle canned several bike frames over the years and can turn out a good finish, smooth, shiny and no orange peel.
But dont bother any more as the paint is just not hard wearing enough and once you factor in labour and materials its as cheap to get it blasted and Powdercoated.
For a hardwearing paint job really you need proper 2 pack which isnt viable at home, even tried some lacquer that is supposedly 2-Pack from a can(some catalyst reacts as its sprayed out) was shite, nothing like proper 2 pack paint.
You could lacquer what you have got and after some flatting and buffing after the final finish it will look decent enough, but I'd imagine a trip to the powdercoaters will be inevitable at some point.
I like the rugged effect personally. I'm all over it!
Even the best paint jobs come off with heal rub, falls, general wear and tear. Having a rattle can to touch it up is 2nd to a raw finish for me.
My new bike is black for this reason. Its hard to get black wrong.
Good look with the build.
Just to be clear, this is spray.bike paint, and I can confirm it's NOT the same as standard car rattle can paint. It's much thicker for a start and it smells different.
I think the problem at first was I was using my normal car paint technique, which was too quick. Because it's thicker and evaporates faster, you need to be much closer and apply more thickly than car paint - in a way that would have car paint running like a toddler's nose. The instructions say you need to be 5-12cm away from the tube to spray - well, this is actually pretty difficult because you just cannot get the can that close in many areas.
It is however very even despite being peely, so I think it'll look ok with the lacquer on. However...
I’d imagine a trip to the powdercoaters will be inevitable at some point.
This was always the plan - this is only a stop-gap and also an experiment out of curiosity. To be honest, I might take it back to Argos for a full respray later on - having seen that they have the exact same colour and finish, and how good their quality is.
I might also ask the for some more crimping at the same time.
Just buy this On eBay 😀
Item no 372860745929
Nice bike that. Wonder what the chain stays are like 🙂
`A Ti El Mar frame on eBay also. Lovely looking bikes.
I'm surprised Argos didn't crimp the stays a bit more tbh.
I’m now paranoid about the frame I bought 🙁
I'll swap you for one with reinforced chainstays? 😉
I’m surprised Argos didn’t crimp the stays a bit more tbh.
Yeah I think they thought I was a clumsy biffer who breaks frames. This is my first breakage in 30 years of riding.
Molgrips - if its' 1 x 10 stuff you're after I have a Zee mech and shifter going spare that I just haven't got round to putting on ebay yet? PM if its' any use 🙂
I really need 1x11 - well, ideally 1x12 but that's too big an outlay currently! Thanks tho.
Hmm, clear coat is on, but it's going to need a rub down. I figured out how to get the clearcoat to gel into a nice gloss under direct spray but all the overspray ends up powdery on the frame and is not glossy. So it'll need a rub down with something or just a cutting compound.
It's a bit smoother with the clear coat:
[img]  [/img]
[img]  [/img]
[img] [/img]
You can see the run in the top pic, but I've no idea what the blotches are - didn't see those in real life!? B*gger
Paint looks good, hopefully its robust.
I think I'd have gone for clear coat straight over the raw 😎
The peel effect wasn't too bad but it wasn't the same - can't apply paint evenly across a tube at the same time. So I decided to sand it gently with 1200, then rub with a finishing pad and finally T-Cut. The results aren't bad at all - not a high gloss, but more than satin. Looks a bit like a snooker ball. I wish I'd bought lacquer with sparkles now, or maybe done something else a bit more adventurous. But it'll look ok when I get the stickers.
Certainly looks and feels like powdercoat and feels pretty bombproof.
[img]  [/img]
[img]  [/img]
Looks really good! Who’s doing the stickers for you?
Thanks. A mate has offered to convert my tracing into Illustrator, then I'll send them off to a printer. I've lost the head badge though, need to clean out the garage and try and find it!
I added some more clear coat today and rubbed it down a bit more with some better quality 2000 grit I found instead of 1200, so finish is a bit nicer.
However, I'm really not overly happy with the fix. Fitted the cranks and there's really not that much room between the chainrings and the stay. Previously, with the spacer fitted correctly, there was loads of room - the chain would never have got caught. But now I think it will. With that and the lost clearance, I think I am going to look at crimping it at some point. I've got some ideas...
Looks good now it's painted
What speed os your cassette? I have 10 and 11 speed Shimano mwchs and shifters I wouldn't want alot for....
Can’t believe this is just at £275 with two hours to go , anyone after a bargain(possibly)
Item no eBay 372860745929
Blackm, if he's not interested in the 10s I may be, especially if clutch mech and shifter with it too. Want to convert my lads bike from 9 to 10
Spray.Bike takes a little practice; sounds like you've already figured out a few of the issues. The first time I tried it I was deliberately slapdash and it did chip really easily; on recent frames I've been more diligent with prep and used more lacquer, and so far it's fared better. Haven't tried T-Cut to buff up the finish, might give that a go.
I won't mention that I've had two chainstay repairs done for under £20 each at the local smithy 😉
Can’t believe this is just at £275 with two hours to go , anyone after a bargain(possibly)
Item no eBay 372860745929
Son of a b*tch.
I might have to bid on that.
Went for £387 in the end. If I hadn't already had mine fixed it would have been a decent bargain, but not if it would have left me with another frame to shift.
Still mega cheap at £387 for a complete bike
No I know. If mine hadn't been repairable I'd have bought it for a fair bit more than that.
I think I'll call Argos tomorrow. I stressed I didn't want to lose tyre clearance and I have. I feel they could have talked me through the results better.
@molegtips that El Mariachi on eBay has been relisted due to a timewaster
Shut the front door...
Looks a very well looked after frame
Shut the front door…
My mate who's coming down to BPW on the 3rd lives close to that too 😉
Bollocks.
Anyone want to buy a frame with slightly less tyre clearance than usual?
I don't think I can make it work tbh. I could flog the fork and wheels off that bike, but the drivetrain isn't worth much. The dropper I'd keep but no-one's going to want the one of my current bike. I'd be well out of pocket here and end up with a frame that'd be even harder to shift.
Did you get a chance to speak to Argos again?
If only someone on the forum had offered to help out for minimal cost.... 🙂
Just kidding. Tricky situation for a professional repair business. They will be nervous of large amounts of crimping due to the known crack risk. Somebody earlier said "just fit a yoke", but that is at least an extra £200 for a Paragon one. A plate yoke design would have worked, but you can't buy them off the shelf so that adds the cost for CAD time, sending out for laser cutting, bending and more prep before it will fit etc etc so all cost and risk for something very bespoke as a retrofit to an existing frame.
If you do go for a crimp then DON'T just squash it in the vice - that will just give you a flat / pointy oval tube that will crack along the top or bottom edges. You need a former to push the middle of the tube in on itself without growing the tube vertically. See photo below.
[url= https://i.postimg.cc/7ZQFFT04/P1020933.jp g" target="_blank">https://i.postimg.cc/7ZQFFT04/P1020933.jp g"/> [/img][/url]
that El Mariachi on eBay has been relisted due to a timewaster
Was it a time waster or was the seller not happy with the price? Seems to happen a lot. I've been watching a few bikes on eBay recently and they bid to a much lower price than the seller wants (compared to the buy it now) then get relisted. Ones been "sold" 4 times now.
Right, Argos said that they can crimp after it's been built. I said at the time 'I don't want to lose much tyre clearance', so they've written on their form 'check clearance for 2.4s'. Of course, the 2.4 does fit, but only if you leave the dropouts on their longest setting and there's only a few mm clearance. If I put them in the shortest setting the tyre doesn't even turn. So that counts as 'losing too much clearance' in my book. I would have gone for a slightly less severe crimp, but there's no crimp at all.
They're calling me back soon.
If you do go for a crimp then DON’T just squash it in the vice – that will just give you a flat / pointy oval tube that will crack along the top or bottom edges. You need a former to push the middle of the tube in on itself without growing the tube vertically. See photo below.
I had been wondering about doing it myself. My idea was to make a form then line it with some sort of hard setting putty to form to the outside chainstay shape exactly to minimise pressure. Then make a form for the inside based on the original crimp out of a piece of steel rod hammered to the correct curve. But that's last resort if Argos won't help.
If only someone on the forum had offered to help out for minimal cost….
I know mate.. it was always a difficult choice!
I’ve been watching a few bikes on eBay recently and they bid to a much lower price than the seller wants
Surely that’s just one of the pitfalls of selling on the ‘Bay?
Surely that’s just one of the pitfalls of selling on the ‘Bay?
Actually I think it is more of a pitfall of having an unrealistic selling price in your head. They are going for what I have seen others go for and what I would say it was worth, it just doesn't seem to be enough for the seller so they try again (usually with the same result)
Yep.
Argos used heat somehow to make the chainstays narrower by ovalising. It's not clear how hot they got it, which has implications... I'm still not particularly happy because whilst there is now more clearance there still isn't much and nowhere near what there was. There's also clearance for my 32T oval ring, but only barely, and again far less than there was. This means chainsuck could cause a jammed chain and hence ruin the stay again. I've given up with them, so I'm wondering what I can do myself.
After researching it a bit and getting great help from the framebuilder subforum of bikeforums.net I've learned that what makes 853 is a secret heat treatment process - it's otherwise the same as one of the other steels. Reynolds tell you not to shape the tubes yourself but they don't say why. And after long discussion we don't know how much heat was used and what effect this will have on the tube. It could end up harder (and therefore more prone to cracking during any crimp) or more ductile, meaning I could crimp away.
I'm tempted to crimp just a little (using a home-made jig, not just attacking it with pliers), give myself a couple more mm - this would probably satisfy me on the inside at least. But I don't think I can do much about the outside for chainring clearance.
I'm quite disappointed. 853 was clearly a terrible choice for a customer who was particular about clearance and needed shaped stays because there's very little you can do to work it. None of this was discussed at all when I went in. I wish I'd just had it welded up now, would have saved a lot of time, money and hassle.
Sounds like you really want the clearance so try crimping. Go steady and it shouldn't be a disaster....
If you cock up or it cracks later then I'll convert it to a plate yoke. I can get the plate laser cut foc, and can reuse / leave the majority of the stays in situ (just chop out the front bit). After this tale of disaster you can just cover postage.
Thanks mate, I really appreciate it but I would not let you do that without compensation 🙂
I think I will add a roll of FiberFix to my trail kit from now on 🙂
Sheared the chainstay on my Stooge last week.....also very gutted as it's my only bike and was out of warrantee but called Andy at Stooge and have come to a deal on a new MK4 which is lovely. Was going to get it repaired but couldn't resist a shiny new one. Still bloody waiting for 15mm wheel axle conversions off the internet though.
It's failed twice - would you every trust it again?
The new chainstays are different material / crimping and as far as I'm aware don't have any memory of what happened to the old ones.... Why should the rider trust them less than the chainstays on any other steel bike?
It’s failed twice – would you every trust it again?
The chainstays failed - but they were replaced, and the new chainstays are of a completely different construction. Why would they fail? Also the cause of the failure was chainsuck and a wrongly fitted chainset. The chainset is now correctly fitted.
Update:
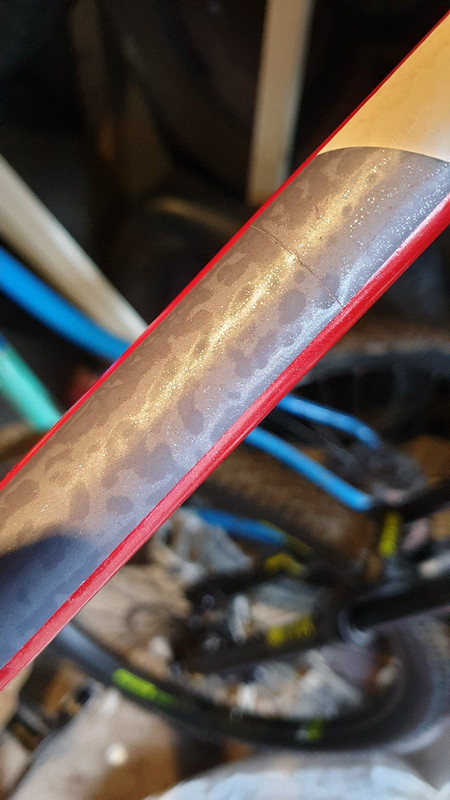
Build a jig to crimp or rather simply crush the chainstays. Those 853 stays are incredibly tough - I mangled up my jig and only moved the stays a couple of mm:
[img] 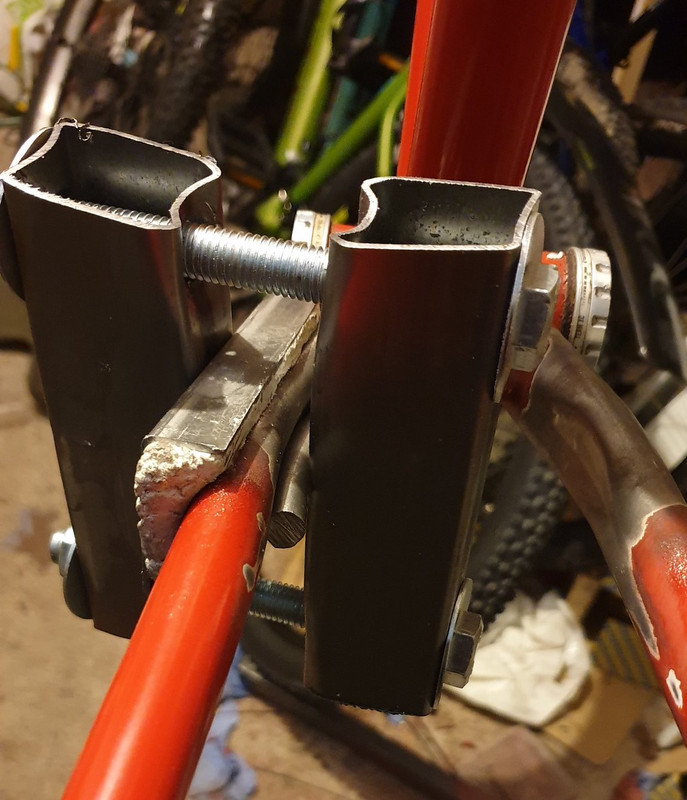 [/img]
The thing you can see on the outside of the chainstay is a U shaped section of metal that I filled with epoxy putty and moulded to the shape of the stay, to spread the load across as much area as possible. On the inside, the force was being applied through a shaped piece of steel rod so the pressure would be far higher on the inside this ensuring only the inside would deform. The rod was thinner than I'd have liked, so the crimp is more of a crease. Hope this isn't an issue.
[img] 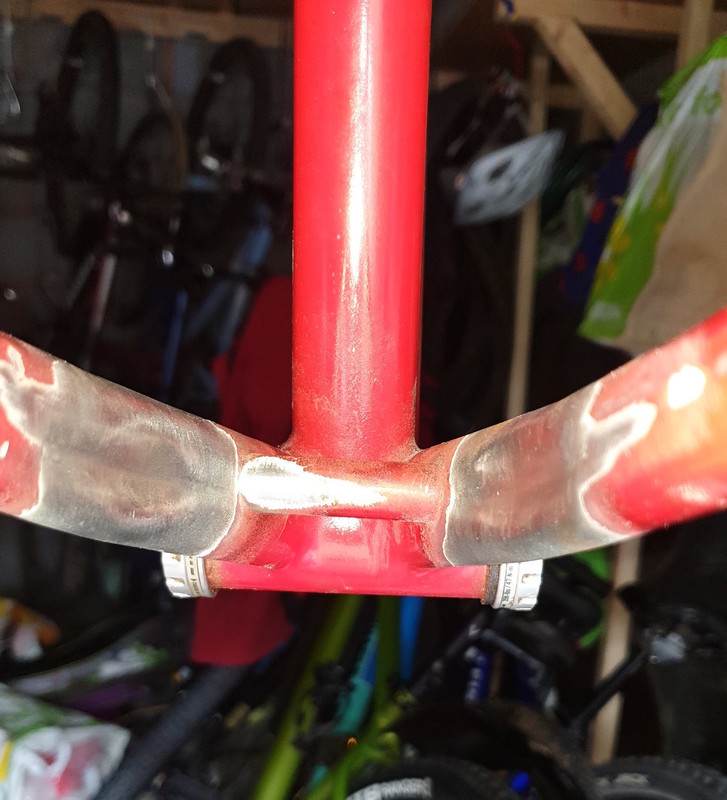 [/img]
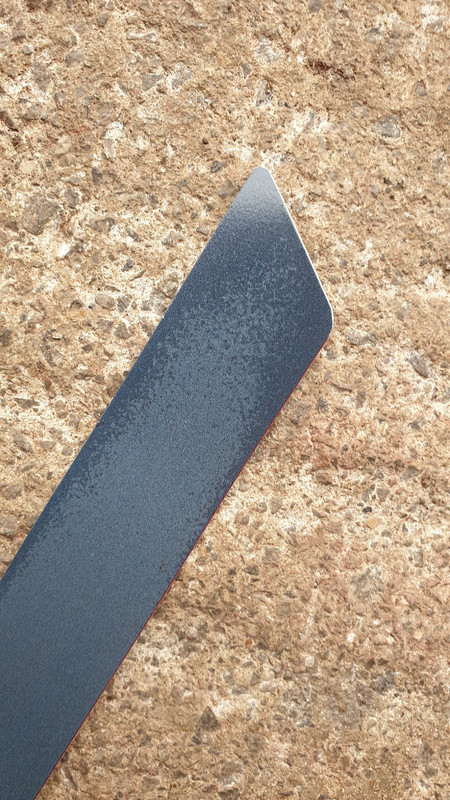
It seems to have worked - a couple of extra mm of clearance, and it seems comparable to the original if slightly less:

This is with the dropouts on the shortest position. I reckon I've gained myself a few more mm over previous, and it's quite usable in this position. I normally have the droupouts 2/3 of the way back and there's plenty of clearance there.
There's not a lot of chainring clearance now though. I think that a chain could get wedged in maybe, but given I'm going to use a single ring I'm not sure if it would simply ride up stop against the top chain i.e. remain in the same plane as the chainring, rather than get jammed. It's enough space for a 32T oval or 34T round. I might have gone for a 36T if I ever upgrade to 12sp but hey ho, that'll just have to do as I'm not farting about with it again.
A side effect of doing this is that I converted the frame to road spacing, I lost 5mm from the dropout spacing! So I just bent it back. What's interesting though is that in the past I'd noticed that it was pretty easy to flex the dropouts with the wheel not in the frame. Now though it's dead hard, it needed huge force to bend them back out to 135mm. I had to get my shoulder in there and push. So I reckon it's far stronger than it was before. Hopefully it won't be unpleasantly stiff to ride but then again I am using big tyres so I dunno if it'll make a difference.
Curious to know what rear tyre are you running? If I decide to keep my frame was hoping to run 2.4 Barzo or XR4.
It’s enough space for a 32T oval or 34T round.
That's interesting, Salsa only recommend a 32t round ring as maximum with the original chain stays.
I have Racing Ralphs 2.35 on it - tons of room on the original.
Salsa only recommend a 32t round ring as maximum with the original chain stays.
Hah, did not know this!
what was the paint like to remove?
They removed the paint, apparently with a grinder. I need to strip it back a bit more though and it's a total bastard to remove. I put it on thick, to be fair, but I'm impressed with its toughness.
I'm not sure i like it, i'm not sure i approve... but that's certainly interesting and informative work. Nice one.
You don't approve? Of which bit?
Of which bit?
DIYing bending chainstays 🙂
i’m not sure i approve…
@molgrips did you forget to ask for permission? 🤣
I love stuff like this. Sometimes it doesnt work out, sometimes it's more expensive but he had fun doing it.
@molgrips did you forget to ask for permission? 🤣
I love stuff like this. Sometimes it doesnt work out, sometimes it’s more expensive but he had fun doing it.
Not arguing that at all... I really hope it works and doesn't collapse and leave him stranded.
It is hardly going to collapse - at worst it will gradually crack over a very long period of time. At that point it can be repaired / modified.
"Professional" bending of the chainstays hasn't exactly worked out well for him so far......
Not arguing that at all… I really hope it works and doesn’t collapse and leave him stranded.
Given the amount of force I had to use to get that tiny dent, and how hard it was to spread the droupouts, I am not in the least bit worried. It's tough as boots now.
Having said that, I'm putting a sachet of fiberfix in my adventure pack just in case (or other failures - it weighs nowt and is great)
Must say, this has been a thoroughly interesting read, so thanks 🙂
Hope this all works out for you in the end 🙂
So after the crimping I had to clean up the burnt paint (this was hard - the cured spray.bike paint is tough as nails) and I gave it some more primer, then I had to buy another can of red cos I'd used the last one. I gave the rest of the frame another coat, and it came out much nicer than previously. A nice deep matte finish.


So now onto the stickers. I'd traced them before sending the frame to be fixed, and I scanned these in. After a few false starts trying to copy the lines by me and my mate, my wife had a go - she started with a font that was fairly similar, converted it to a shape in Krita and then modified it.
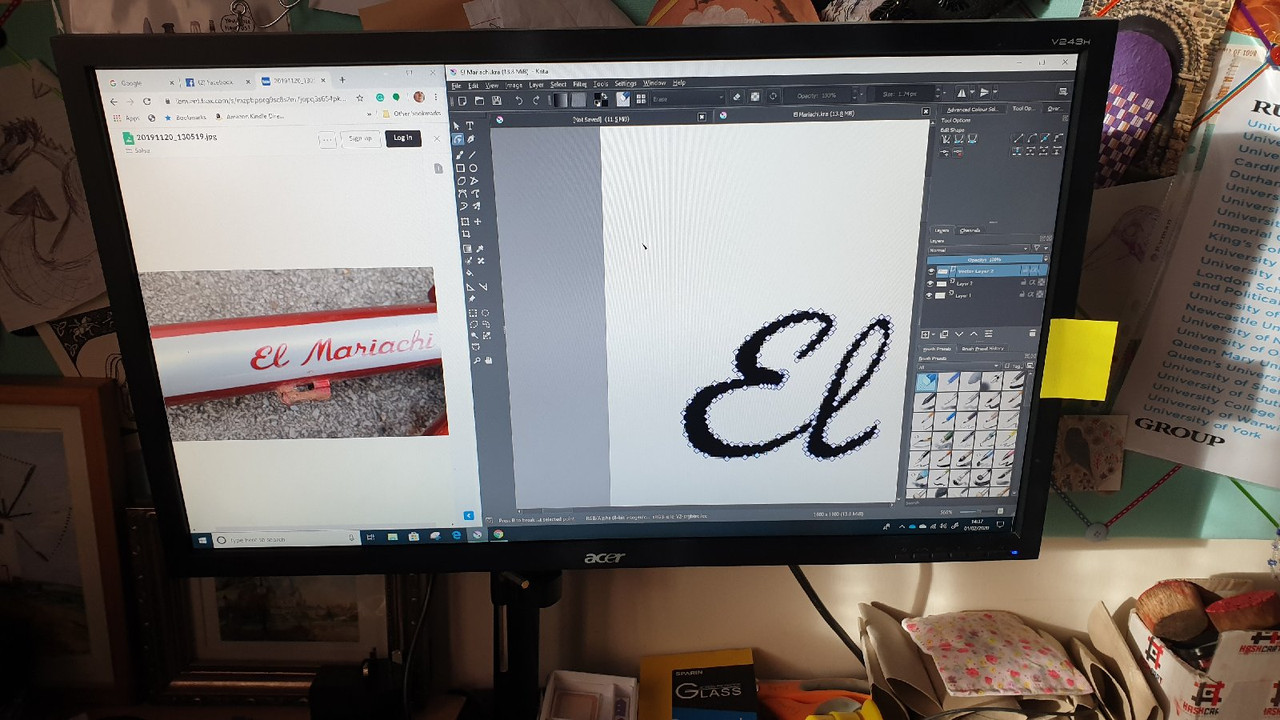
And did a brilliant job. Krita only saves as bitmaps though, but this shouldn't be a problem as I had a plan to print it myself on waterslide transfer paper. But then I realised that since part of the sticker is white, printing onto clear paper won't work! Fortunately you can get white vinyl sticker paper:
This took ages to sort out, but then there's a problem. I did a bit of testing and I found that the clearcoat soaked into the paper a bit and made it blotchy:
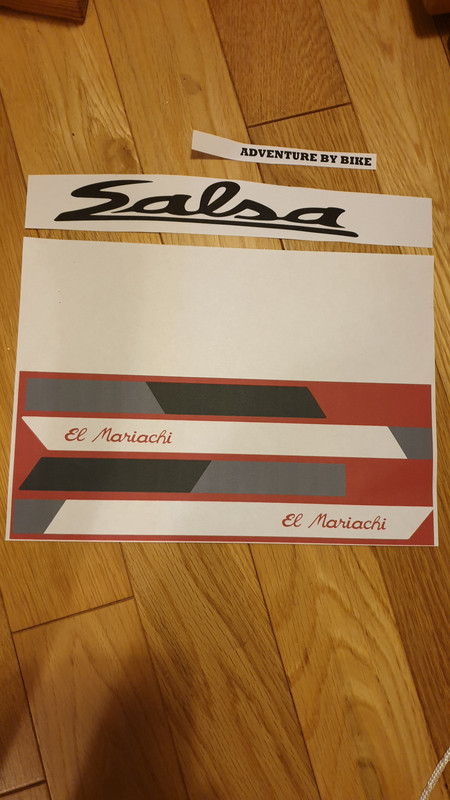
So, I gave up and rang around some local printers. Urban Monkey in Cardiff were the first ones to actually pick up their phone, so I went down there and they were brilliant. I had to vectorise my bitmap again, which went ok, but the guy opened up my images and smoothed them all out and tidied everything up - I've never seen anyone use software as fast as he did with Illustrator and something called Composer. I had the top tube stickers printed on white stuff which he laminated, and the black Salsa logo was cut out of black vinyl by his machine.
When I ordered new primer and red, I decided I wanted to try the sparkly topcoat. I thought it could add a bit of texture back to the frame, not the same as the original metallic paint but along those lines. However I realised that I'd made a bit of a logical blunder. You can't just keep on applying more sparkly clearcoat to thicken up the finish, cos you get more sparkles and it ends up looking like an enthusiastic 5 year old's birthday card. I should have used a light dusting of sparkles then applied a load of normal clearcoat. It's not the worst thing now, but it's a bit more fabulous than I wanted.
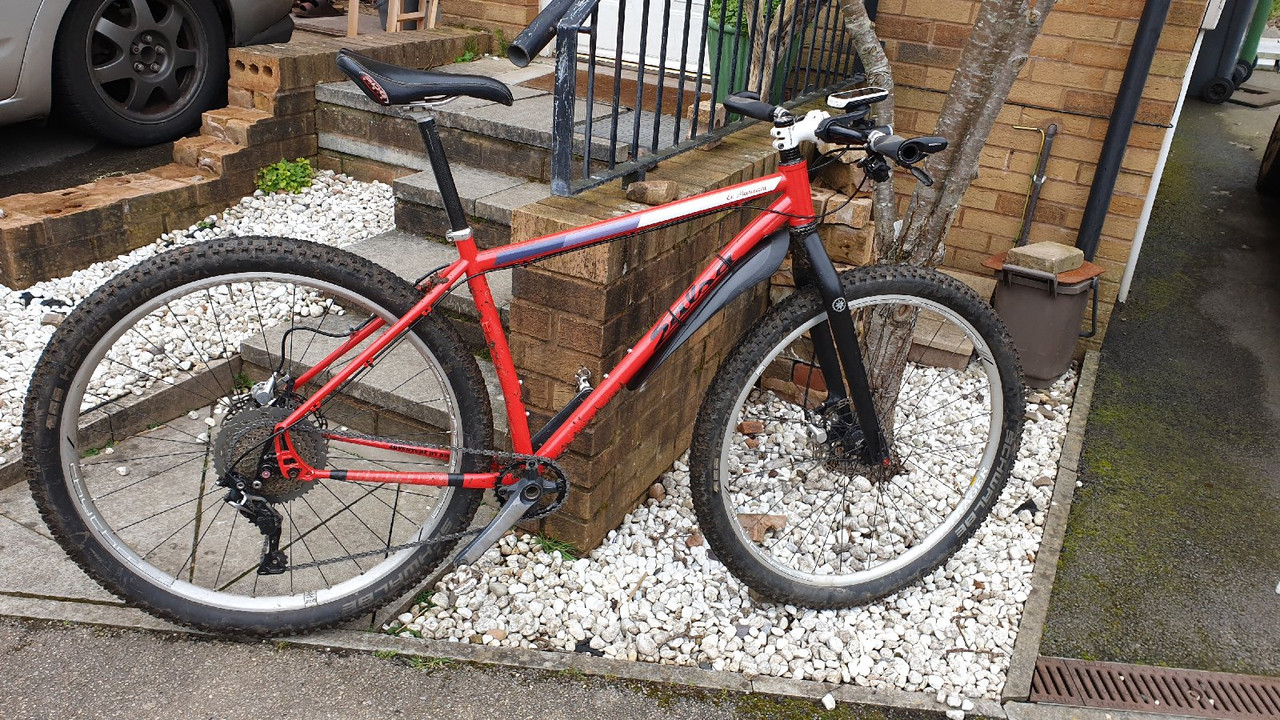

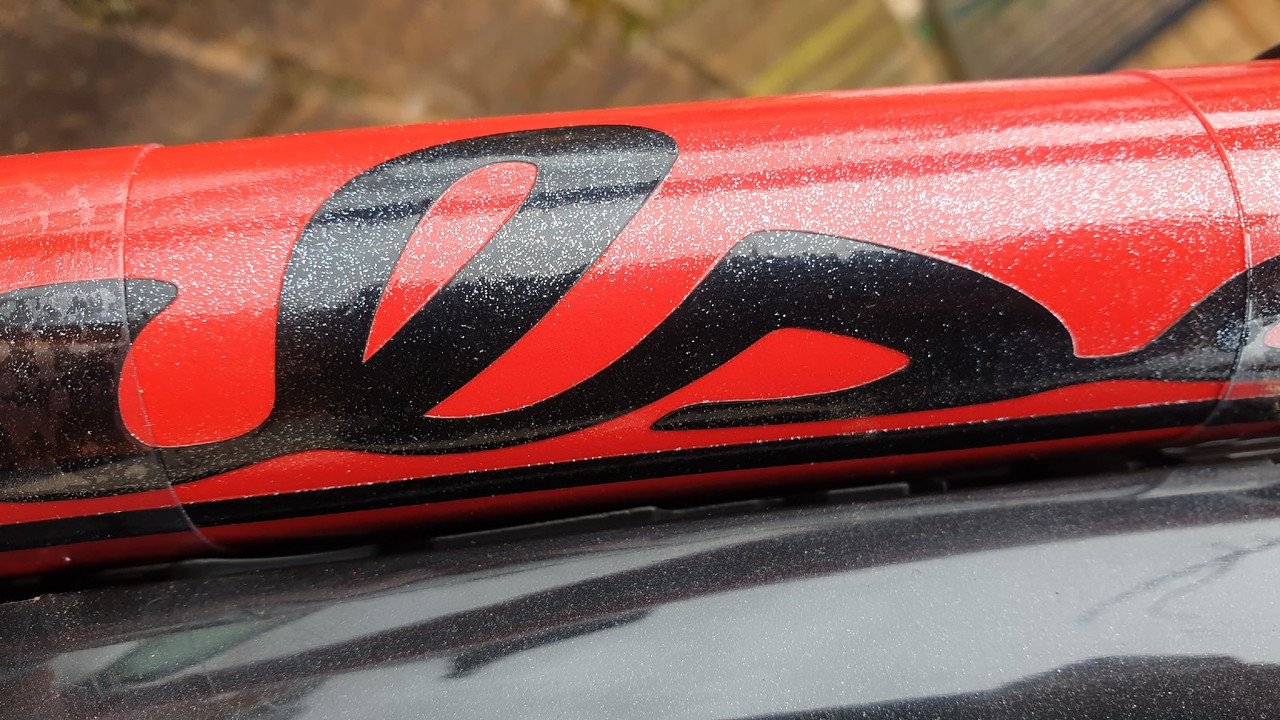
However as a practical finish it looks thick and tough as boots. I actually really like the red - much redder than before but rather striking with the white and black.
I've also given it a 1x upgrade with an oval ring which is quite nice too. It's only been ridden to the LBS so far but I'm quite positive. I'm hoping it'll be the ideal bike for the weather, I can get some miles done whilst in the shelter of the woods instead of being exposed out on the roads.
Awesome job you've done. Here's hoping no more cracking!
After the crimping, what's the clearance like? What size tyre did you squeeze in?