![]() You don't need to be an 'investor' to invest in Singletrack: 6 days left: 95% of target - Find out more
You don't need to be an 'investor' to invest in Singletrack: 6 days left: 95% of target - Find out more
Some time ago I posted this: [url= http://singletrackmag.com/forum/topic/disc-brake-pads-too-low-will-i-die-after-sticking-some-washers-under-caliper ]disc brake issue[/url].
I ordered 180mm adapter, to fit a bigger disc. However when it arrived I realized I couldn't remove that bas***d rotor of the spline (centerlock)! Properly seized! The nut came off easily, but the rotor itself did not want to move at all... I decided to take it easy and to order that Finishline Chill Zone spray - someone here was recommending it the other day after successfully removing a stubborn seat post. Before that I had a look at the existing rotor...
After reading the advises you guys gave me on my post I decided to clean the pads and disc properly... And yes! It was contaminated! A black stripe of burned stuff on both sides! I removed it using very fine grade sand paper (200) and disc brake cleaner. The same with pads. They were clean as new after that!
I hit the road to work this morning. First steep hill - great place to bed-in the brake! I pull on the lever...
Result below. 😐
[img] 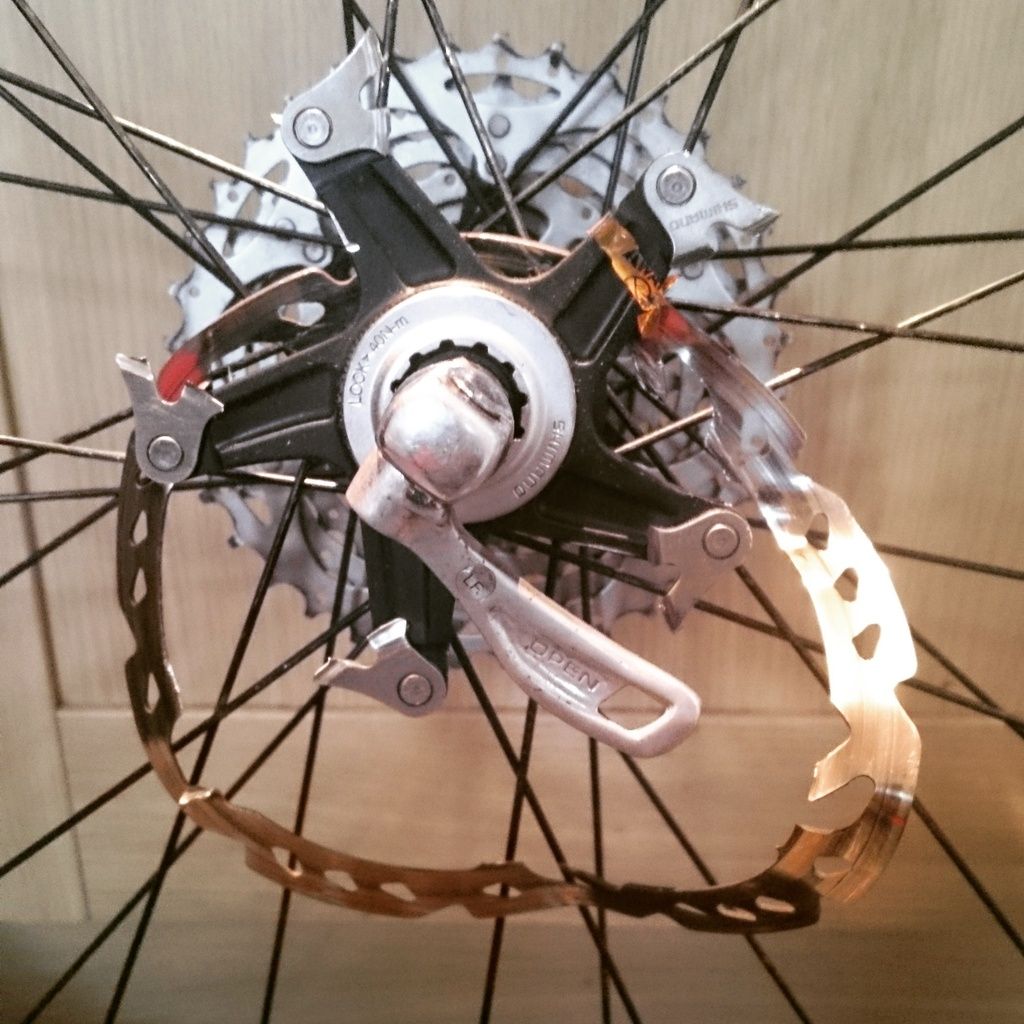 [/img]
Eeek
Too much sandpapering.....
Jeez! Take it you're ok...?
how much sanding did you do? 😯
Blimey 🙁 At least it was a rear.
What's the old rotor v new rotor thickness difference? the one that broke looks quite thin.
Wowzers! Looking at the photo it looks like something may have been rubbing the rotor (just above where the pins are to hold it onto the spider). Did you notice any noise when riding along?
Duct tape and you'll be fine.
Hope your forks and calliper are OK?
EDIT: Oh yes, it's your back wheel. Any damage to the frame?
how much sanding did you do?
Very gently, just to remove the the black residue...
And yes - I was OK, thanks! It was the rear brake, fortunately...
A assume the whole "cooking process" described in my previous post did some damage to the structure. And this morning the pads hit the rotor "full power"...
Shirely the disc wear (groove) is the cause of the failure, looked obvious even before I clicked on the other thread link (where I can't find any mention of what caused it), little lost on why you mentioned anything else?
Bodge it with a stick and a few zip ties
so this is the same "wrong track for the caliper" rotor you were trying to space out last week ?
looks to me like you wore through the arms.
[i]Shirely the disc wear (groove) is the cause of the failure[/i]
it is but the disc contamination was preventing any real force being put through the disk itself by the brake so it only failed after cleaning.
Did you heat the rotor up to clean it?
Pretty sure its just a sticker
[i]What's the old rotor v new rotor thickness difference? the one that broke looks quite thin. [/i]
This
[URL= http://i992.photobucket.com/albums/af45/bruce_nikki/10496211_470389646437020_572453996356425611_o_zpszj7ucefr.jp g" target="_blank"> http://i992.photobucket.com/albums/af45/bruce_nikki/10496211_470389646437020_572453996356425611_o_zpszj7ucefr.jp g"/> [/IMG][/URL]
[img] 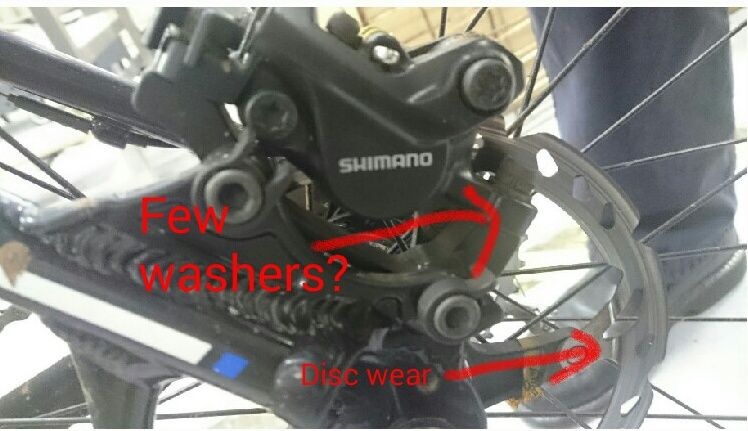 [/img]There's already a groove in the arm of the rotor in this previous photo. Is that normal?
Fair enough WWW, but no issue is seemingly made of the very obvious potential failure point, till it breaks
[EDIT]See, see that... the photo from the previous thread, with a big pointer sticking at the grove, yet no mention is made about what caused it (well not from a skim of the thread)
[img] [/img]
Now I look at that pic, I see a pinch point at the outer part of the arms.
You also mentinoed it being thinnner than the last one.
It looks like it was worn out there, thinner than it should be.
Where did you get the rotor?
How long were you running it short before you posted the other thread?
I am glad you're uninjured!
Snap.
crikey, trust you and rest of the bike are ok
Bright side is you're gonna have a pretty cool throwing-star.
RM.
Looks like something has seriously worn away at the disc spokes. Might be worth checking your caliper / mount hasn't been rubbing away at the disc.
You've had something wrong there well before you cleaned the disc and you really should have noticed that disc was wearing badly and was no longer usable.
Caliper alignment, sticking pistons, worn pads, incorrectly installed split pin? All could be issues leading to this.
just realised I've got a 180 version of that rotor on the front of my 456, note to self, check state of rotor!
Might be a bit late to mention this but did you checked your caliper alignment, and had the IS mounts for the caliper bracket been faced?
Looking at that groove in the disc spoke it looks to me like the surround of the rear bolt hole on the caliper might have been rubbing on them.
How old are the brakes and when were they last serviced, other than just pad replacement?
On the earlier thread, the OP had only just fitted them. Possibly bought 2nd hand?
You've had something wrong there well before you cleaned the disc and you really should have noticed that disc was wearing badly and was no longer usable.Caliper alignment, sticking pistons, worn pads, incorrectly installed split pin? All could be issues leading to this.
I'm not arguing it was differently... 🙄 I posted it more as "kids, don't try it at home!" sort of thing 😉
just realised I've got a 180 version of that rotor on the front of my 456
That's what I'm putting on the back now. I had it on a front wheel which got damaged in off-road OTB few months ago. New front is 6-bolts, so I'm transferring the "old front" rotor to replace the failed one... To be honest - putting them side by side (well, whatever was left from the "cooked" one) showed a big difference in thickness... 😳
Now I need another advice! Would an old rear QR axle fit into the modern'ish QR hub? It's a "long story"......
I don't think it's a rotor specific thing - if there is an issue with any of the parts, then I'd suggest everybody with that caliper should be checking! Impossible to tell from the pics supplied, but given the depth of that groove I'd expect there to be something very obvious which is rubbing on that part of the disc - please report back.
the pad was rubbing on that part under braking.....
the disk track is wrong for the caliper.
Looking at the pre-broken pictures its quite a pronounced groove. More than just pad wear, something else must have been rubbing.
A bit of pad overlap on the disc spokes doesn't matter. In this case the disc has been used way over its usefulness; I'm not sure if it is the IceTech version - if it is then the worn area of the disc is most likely the aluminium core.
Not very clear in the pictures, but if there was also a groove in the spokes before this then... I can't even.
I'm checking all mine just to be sure!
thinking about it I've a hope 165 on the back of my other bike that is getting proper thin in the middle of the brake track, should probably be more worried about that. Just has to last until the trails dry out a bit, got some new brakes/transmission lined up for it.I don't think it's a rotor specific thing
I did wonder but from the pics looks like the older version, don't icetech have flared sections?I'm not sure if it is the IceTech version
The washers you added. They weren't too big and sticking out and clipping the disc were they? The groove on the disc looks to be in about the right place...
...but given the depth of that groove I'd expect there to be something very obvious which is rubbing on that part of the disc - please report back.
I have an old pad somewhere, I'll try to take some photo of it later. It corresponds with my previous post, linked in the top one here. I connect the facts now:
1. The bottom of the pads was about 2mm below the bottom of the braking surface of the rotor.
2. Some contamination got onto the disc due to my carefulness.
3. Pads cooked the contamination onto the braking surface. From then this was my main braking surface.
4. Every time the main "braking area" was in contact with the rotor, trying to work with the dirt under, there was 2mm of fresh pads hitting the rotor spider. It was not enough to slow the bike down, but enough to wear the rotor in that place...
5. I removed the contamination (no heating up, just "mechanical work"), hit the freshly cleaned brakes, the pads grabbed the rotor with full power, as there was no dirt under and... The rest is self-explanatory... 😆
First of all - and something a few previous posters seem to have missed - thank the great god of bicycle maintenance that you're okay and that the bike is otherwise okay.
It's a strange one, I've never seen the like of this before. I'm now going to check all three of my bikes (plus this missus') for disc wear, I've a set of discs on one bike that are approaching their eleventh birthday.
*checks new build sitting in the living room*
*Checks t'other bike in the out building*
You learn something everyday. I've now learnt that not all shimano rotors are compatible with all shimano calipers and will be doing some checking of multiple bikes this evening...
I wouldn't have said 200 grit was very fine sandpaper, 800 or 1000 would be.
I realise that not everyone has the mechanical skills of an F1 team track engineer, but no one should really miss the fact that two metal bits of their bike that shouldn't be hitting each other, are in fact hitting each other! (especially as they can't do that silently!)
The test is simple.
1) turn bike upside down
2) spin wheel
3) does wheel revolve silently and continue to do so for some time
It's all fixed now! Further investigation led me to a conclusion that my reckoning about the cause of the failure was right...
Anyway, now I've got 180mm on the back. The same model, but bigger. I put 1.5mm washer under the caliper, carefully matching the pads contact area with the disc. It's spot on. And the brake works so much different! No fade at all, even on the steep bits where previously there was no brake at all (just the burning smell...). I'm well chuffed now! 😆
I just need to re-learn applying the rear brake, as it's quite easy to lock the wheel now... 🙄
Not to mention how much more careful I am now with applying the lube and other "bike cosmetics"... 😆
Jeez, that was a close one.
Glad your OK!