![]() You don't need to be an 'investor' to invest in Singletrack: 6 days left: 95% of target - Find out more
You don't need to be an 'investor' to invest in Singletrack: 6 days left: 95% of target - Find out more
I need to give my rear brake a complete fill and bleed after replacing the hose.
Unfortunately it needs to be done whilst fitted to the frame as its internally routed.
Has anyone got any hints and tips for getting a good bleed?
Should I use the proper Shimano bleed kit or is another one just as good?
Do I need to use Shimano fluid or again can I use other makes?
Thanks.
Yep - follow the manufacturers instructions.
No need to be concerned about hose remaining in the frame, with the bike in a workstand it can be orientated to ensure no low points?
I use an Epic bleed kit and the Shimano funnel.
*I remove the caliper, pump the pads out a little until maybe a disc thickness apart.
*cover discs and anything vulnerable with cloth/towel.
* attach the funnel to the lever, attach the syringe to the caliper bleed nipple.
*open bleed nipple and pump through to the funnel, obviously not getting any air bubbles in. Give the hoses some flicks where possible and snap the lever a few times.
*close bleed nipple, remove funnel and replace the screw and o-ring.
*wipe up a bit. Prise the pads apart very carefully just enough to allow the caliper to drop over the disc all nice. Spin wheel, dragging brake lightly, nip up bolts.
*shred that rig
*HARD
I always get a lovely solid feeling brake this way and am so far not dead, however, someone will be along in a minute to inform you that you will die using this method.
I find shimano Shimano brakes benefit from a vertical arrangement whilst bleeding.
Easy enough with the front because it's already in that position. If you don't have a bike stand, some creativity with bike position is required to get the rear in a similar position.
I find shimano Shimano brakes benefit from a vertical arrangement whilst bleeding.
This.
Also, make sure there is no air in the reservoir when you're finished. Position the lever so the port where the funnel attaches is at the highest point and pump the lever repeatedly to jiggle any remaining bubbles out of the reservoir. If you have air in the reservoir, it can get into the master cylinder when you turn the bike upside down. This seems to be the cause of a lot of problems that people have with Shimano brakes.
Definitely make sure caliper is lowest point. I've found syringes at both ends work, but it has been a seriously long time since I did any Shimano brakes (like 2007-ish)...plenty fluid in the lower syringe and give it a good push of the plunger so the force helps force the air out and up. Not hard enough to introduce air, but a decent force.
Kayak23's method sounds good, it also ensures a shorter lever throw as the pads will be closer to the rotor, so there may be a bit of rotor rub, but the brake lever throw should be really nice.
Same as above. Hang the bike up by the front wheel and don't be shy in shifting the bars around to make sure there are no bubbles trapped in the reservoir.
Just to add I always use the Shimano yellow block that comes with the brakes
I did a gravity fill and bleed like the mechanic from The Syndicate (Marshy?) does when I replaced the hose to fit my new (longer) bike.
Absolutely zero wandering bite point.
I wander if its just easier to stick it into a shop to do as to do it myself I need to buy the fluid and the correct bleed kit.
I wander if its just easier to stick it into a shop to do as to do it myself
It's definitely easier, but knowing how to do it yourself is useful. The first time will be a huge ballache but one you understand the idea, it's fairly simple. All you're trying to do is pump fluid through the system and keep air out. You can put the fluid in from the top or the bottom, you just have to make sure you get all the air out.
I wander if its just easier to stick it into a shop to do as to do it myself I need to buy the fluid and the correct bleed kit.
Nah man it's pimps. Try it.
You can do it with the below, an 8mm spanner(I think, might be a 7mm), allen keys some alcohol wipes/spray and some blue towel.
It sounds harder than it is, have a go and see how you get on. Worst case is it doesn't feel right first time and you have another go.
I wander if its just easier to stick it into a shop to do as to do it myself I need to buy the fluid and the correct bleed kit.
Thats up to you. The logistics of getting it to a shop in working hours is a pain for me, plus, if I do it, I know how carefully its been done, and how.
Plus, I don't have to be reliant on a shops workshop waiting list.
Shop will certainly be easier, but it won't be cheaper and it will take longer. The bleed, taken great care is less than 10 minutes per brake - I'd suggest if it was that long then you are either not doing anything or plunging the plunger on the syringe far too slowly.
It is a very easy thing to do, so don't be afraid to give it a bash - if the first one feels awful, give it another try, if that feels bad, go to a bike shop, but I suspect you'll find the job very simple and won't need to go to the shop.
How much fluid will a rear brake hold from completely empty? will 50ml be enough?
Another vote for the marshy technique final in the top tag at the bottom and let gravity do the rest. Close off the calliper and flick the lever to get any sort out of the reservoir
Epic bleed kit and make sure you’ve got plenty of fluid. I’d get 100mm which will leave you with some spare I’d imagine. If you get the kit via Amazon the delivery is amazingly quick usually.
I did a gravity fill and bleed like the mechanic from The Syndicate (Marshy?) does when I replaced the hose to fit my new (longer) bike.
Absolutely zero wandering bite point.
I second this. My XT M8000s (supposedly a problem model for the wandering bite point issue) have been absolutely faultless for two years after I bled them using Marshy's method.
Yep, another vote for marshy here too
I'd say the main point from the 'Marshy' bleed is to send all the dirty fluid down, rather than pushing it up through a delicate master cylinder. I've seen many levers trashed by pushing dirty fluid up and seizing them.
I'm not convinced about the comment that using a syringe and putting the fluid in a (really light....) vacuum state will significantly alter the temperature of the fluid. I'd like to see some scientific proof of that!
Race mechanics are exactly that. Awesome at keeping bikes in tip top condition, but not having to deal with brakes that haven't been bled in two years and have fluid that looks like tar. To that end, it's a good idea to do a final bled back up through the lever to clear the remains of the dirty fluid out that will be trapped in the likes of the folds of the reservoir bladder (not an issue with car brakes).
The current Shimano levers from SLX and above seem really bad at trapping bubbles so expect to spend much more time that he did on the older models, tilting the lever up and down while flicking the lever blade and screwing in and out the pointless bite point adjustment screw to release trapped air. When you think the last of the air has been expelled, it probably hasn't 😉
Don't force the pistons back on current higher end Shimano brakes with the lever bleed screw in place as the bladders are really delicate and will rip under pressure, and fluid will leak out of the 'button' looking cap that people seem to think is a valve but isn't.
My 2c / pence from bleeding hundreds or maybe thousands of these.
Just to follow up on this ....
Received my bleed kit and started to bleed it from the caliper up.
Was feeling really nice and the lever and then all of a sudden I heard a squirt.
One of the pistons is leaking fluid everywhere when I press the lever.
Can't see any reason why it would be bit I'm glad it failed on the bike stand and not on the trail.
I was using a proper Shimano bleed block so can't see why it's done what it has.
I've ordered a new caliper so hopefully that will be fine.
You defo had the funnel fitted without the bung in it yeah?
Seems strange.
Yeah definitely. I took that out as I was bleeding up from the caliper.
It's felt really good and I was thinking how easy it was and they pfft.... Brake fluid all over the floor.
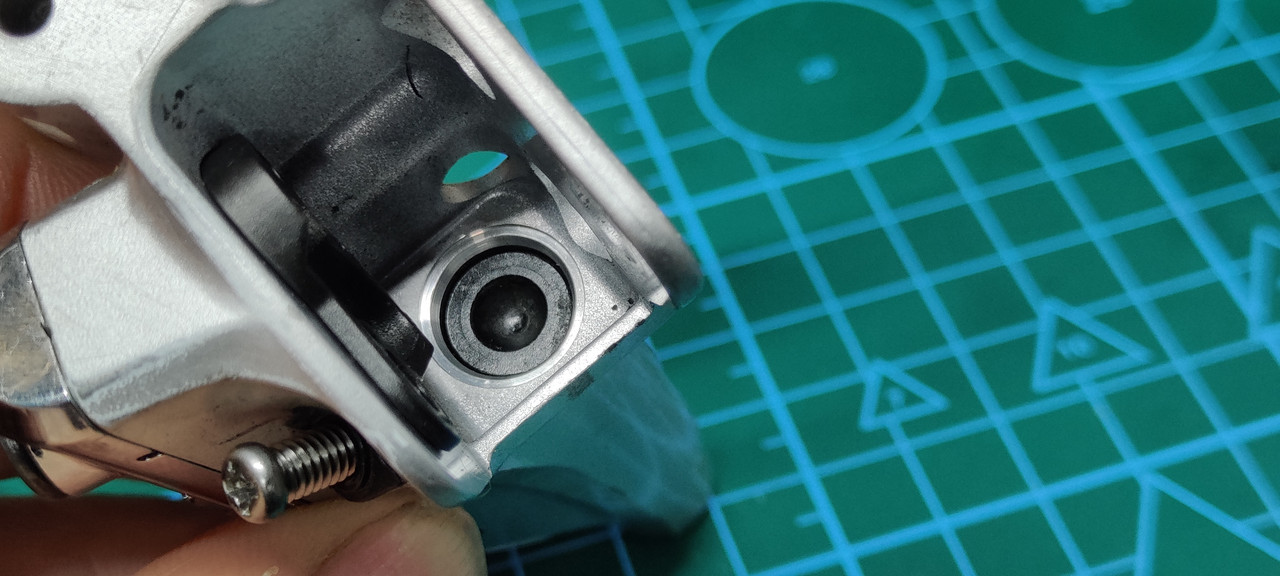
Are there different yellow bleed blocks you can get ? Mine is pretty old but fitted correctly but not fully over each piston. Just wondering if the piston has come out on the squiff.
The yellow Shimano blocks are caliper specific. Usually you would get one with the brake set.
Ah so that is what it will be @Tracey.
My brakes came on the bike so I didn't get a yellow bleed block with them. Had to go searching in my spare parts and found this. I'm guessing it's for an older caliper then.
Dammit.
Don’t force the pistons back on current higher end Shimano brakes with the lever bleed screw in place as the bladders are really delicate and will rip under pressure, and fluid will leak out of the ‘button’ looking cap that people seem to think is a valve but isn’t.
Uh oh. @walleater so are we to remove the bleed screw every time we replace pads? That's inconvenient.
I did think this was a valve (SLX 4-pot). And I have had a bit of fluid come out of it on pushing the pads back. However the brake has been fine for a year since. I've pushed pads back for multiple pad changes and bled them a couple of times.
Don’t force the pistons back on current higher end Shimano brakes with the lever bleed screw in place as the bladders are really delicate and will rip under pressure,
This will only happen if they are overfilled. The first time you bleed them, open the bleed port at the lever and push the pistons completely into the caliper. This will ensure there is no air in the reservoir and also that they aren't overfilled. The next time you replace pads, you can push the pistons back in without needed to open the bleed port because there isn't enough fluid in the system to overpressure the reservoir.
Depends on one's definition of overfilled. If you have the pistons retracted into the bores when closing the system, and then advance them significantly to get the pads into the correct position, the system will be in a vacuum state all the time, and even more so when the pads wear down. This will potentially attract air into the system over time.
People think that brakes are sealed, and in basic terms of course they are, but over time water and air get inside so one should never trust the amount of fluid that is in the system.
We perform the final lever bleed with pads in place so there is no constant stress on the reservoir bladder (just expansion when hot, but that's what it's designed to do).
It's not a big deal to crack open the lever bleed port a bit when changing pads. It's good practice to do a lever bleed at the same time anyway.
That Redbull video started badly by spelling brakes as 'breaks' and didn't get any better.
@luket there may have just been some fluid in between the bladder and lever externals that was forced out rather than any damage done. If there was a problem, fluid would continue to seep out, especially with pressure / heat changes.
Every 'mini bleed' during the life of a set of pads will put the system further into an "overfilled" state.
Most sets I've seen the diaphragm can't keep up with pad wear fluid volume so the master cylinder will need topping up by a few bubbles worth of fluid (no evidence of leaking or weeping seals)
Per walleater (I think we're on the same page here), bleed cup stays on with the plug out until pads are in, wheel in place, pads advanced/caliper centered and bolts tight.
(Essentially in an overfilled state at this point but that's ok)
Having watched air bubbles rise up a clear tube attached to the bleed nipple during a marshy type gravity bleed makes me wonder how effective this is on anything but an already perfectly bled system.
I find there's a decent amount of caliper tapping and position changing to release some of the stubborn air bubbles that seem to get stuck in the piston pockets.
I just picked up a litre of Shimano fluid (no putolene available here) so I've a few sets to catch up on.
If you have the pistons retracted into the bores when closing the system, and then advance them significantly to get the pads into the correct position, the system will be in a vacuum state all the time, and even more so when the pads wear down. This will potentially attract air into the system over time.
No, it will not be in a "vacuum state". There's a bladder in the reservoir to allow the fluid level in the reservoir to change as the pads wear and the pistons extend. If you don't overfill the system, there's no danger of overpressurizing the reservoir when you fit new pads.
Just seen this post, apologise I haven't read the previous replies, but... MAKE SURE you overfill the system, that is to say once bled, that you top up the reservoirs with the pads in place and having pulled the levers to get the pads into their normal resting place in use... Shimano brakes have a pitifully small master cylinder reservoir, and bleeding them simply with the bleed blocks in place results in a brake that will be inconsistent and introduce the famed "wandering bite point" once the pads are half worn or so...
Shimano brakes are about the easiest to bleed out there, yet also the most poorly designed in terms of fluid capacity. Simply "overfilling" the reservoirs on a well bled system will take care of pad wear and the famed wandering bite point up to the point the pads need replacing anyway in my experience. 👍🏻
Shimano brakes are about the easiest to bleed out there, yet also the most poorly designed in terms of fluid capacity. Simply “overfilling” the reservoirs on a well bled system will take care of pad wear and the famed wandering bite point up to the point the pads need replacing anyway in my experience. 👍🏻
Mine too, hence why I bleed mine the way I describe at the top. Very solid lever feel right until the pads are down to the metal.
"There’s a bladder in the reservoir to allow the fluid level in the reservoir to change as the pads wear and the pistons extend."
Exactly 😉 And if you close the system before advancing the pistons the bladder will get sucked in. Hydraulic brakes absorb water / air over time so why have differences in pressure 24 hours a day that will increase this issue. Plus see other comments with regards to reservoir capacity above.
My current 4 pot slx seem to be working OK all the way through pad wear so far. I've done both gravity bleeds and lever bleeds but so far always kept the yellow bleed block in until finished.
So are we saying that I should follow this with a quick lever bleed on fitting new pads? It's easy to do this but if I'm not experiencing a functional issue without, is it better to do so or leave them be? Is the vacuum issue referred to above also risking damage? I'm a little wary of the idea that I run overfilled brakes and run the risk of damaging the bladder the next time I push the pads back in, which realistically I'm likely to do at some point out of force of habit from many years of doing so for either new pad fitting or resetting for a bit of brake rub or cleaning a sticky piston or whatever.
I've experienced bite point issues on other shimano brakes, but on these, if they're well bled, no problems so far. Same for the single 4 pot Deore I have.
So are we saying that I should follow this with a quick lever bleed on fitting new pads? It’s easy to do this but if I’m not experiencing a functional issue without, is it better to do so or leave them be?
Stop buggering about with them.
Fit brakes.
Bleed according to Shimano instructions.
Ignore.
Stop buggering about with them.
Fit brakes.
Bleed according to Shimano instructions.
Aye, but advice above seems contrary. An extra lever bleed with the pads out a bit (and perhaps again further into wear) feels like a fundamental departure from intended bleed procedure, with "overfilling".
I don't think the gravity bleed is at all. It's just a perhaps easier and/or more effective way of achieving the same desired outcome.
Re the sending to the shop comment - I had my rear brake bled at the Malverns by one of the Shimano tech guys and he mentioned that it's a job that often gets under quoted time wise compared to what it should take so it tends to get rushed. He spent at least 1/2hr getting mine perfect after it had been suffering from the wandering bite point and suspected that a shop wouldn't be able to give it the full bleed he had.
From memory the technique was:
Remove pads and insert correct yellow block. This should be sized to allow fro rotor and fresh pads.
Fill from caliper via syringe.
Empty dirty fluid from funnel (mine was embarrassingly filthy)
Repeat until fluid clear
Swap syringe for the bleed bottle.
Top up funnel with fresh fluid and allow 5ml to drain down through system into the bottle thingy.
Close off caliper
Move bike/lever around to allow any trapped bubbles to escape from lever.
Close, fit new pads and check lever travel bite point etc.
Also mentioned not to let Shimano pads wear down past about 1mm thickness or things tend to go to pot.
I may have missed some details but that was the jist of it. Was very impressed with those guys and am very grateful for their patient work.
Very helpful and now my rear brake feels amazing. Just got to find some time to do the same to the front one.
@luket, you asked a question on a public forum, so it stands to reason that you are going to get a multitude of answers from people who are all convinced that they are correct based on their own experiences 😉
So with that in mind, I spend much time working on bikes that will turn brake fluid black in 3 months due to the riding around here (Whistler, Squamish etc). I've seen what can happen on a number of occasions what can happen if one pushes really dirty fluid up through the system and out of the lever which is what the Shimano tech above did. I've seen a number of current spec Shimano levers fail due to people pushing the pistons back (older and lower end models are fine).
I will say that if it's a set of old XT / Saint 2 pots from 2007, you could bleed them as per whatever official procedure was at the time (they tend to change every few months.....even Sram and Park have a completely different way of bleeding in their current videos....) and forget about them for a couple of years..... The current brakes with their 'cracking' pistons and delicate levers are a different matter.
Do what you wish 🙂
And if you close the system before advancing the pistons the bladder will get sucked in.
The bladder isn't a pressure seal, it's there to allow the reservoir to remain at atmospheric pressure. It does this by expanding and contracting. The system cannot be in a "vacuum state" because the bladder keeps the reservoir at atmospheric pressure.
If you're regularly getting water and air into your brakes, you have a serious problem with the seals. The master cylinder and wheel cylinders have seals capable of withstanding very high pressures, much, much higher than atmospheric pressure. If water and air can get past those at atmospheric pressure, then they will leak fluid when you apply the brakes.
Out of interest, if nothing can pass the seals then why do we need to replace dot fluid and why does Shimano fluid turn black with age?
Out of interest, if nothing can pass the seals then why do we need to replace dot fluid and why does Shimano fluid turn black with age?
The idea that you need to replace DOT fluid regularly is largely a myth. If you store it in an unsealed container, it can absorb moisture from the air. If it's in a sealed container, it lasts for years. Under normal use, you can run DOT fluid brakes for years and years without changing the fluid because the system is sealed. I've done it. Never been a problem.
If you are overheating the brakes severely, flushing and replacing the fluid every time you replace the pads is probably a wise precaution. Mineral oil has a lower boiling point than DOT fluid. If you drag your brakes down a long alpine descent, the pads and calipers can get very, very hot. The discoloured fluid might be from simply overheating the fluid, or it could be from the seals overheating and compounds from the seals boiling off into the brake fluid. It's not from water getting into the system.
With very old brakes, you can also get discoloured fluid from the seals physically wearing and tiny pieces of rubber and metal being suspended in the fluid. That will normally take years though, not weeks or months. This is why pumping the lever when you're bleeding the brakes should only be a last resort - you're running the master cylinder piston and seals over any rubbish that might have collected in the cylinder.
Blasting the brake calipers and levers with a pressure washer (not to mention bearings) is probably not a good idea. I don't know whether that would be enough to force water past the seals, but it would force grit into the seals which would then damage them once the brakes were operated.
I don't really buy into walleaters views on this.
In my travels with my own brakes I've observed that dirty fluid originates in the lever. Its easy to check this.
Pushing it out via the shortest route rather than distributing it through the system strikes me as the most sensible thing to do, so I also start a bleed from the caliper upwards first. To drive dirty straight into the bleed funnel.
I've had cause to fully dismantle my Zee's during the life of this thread and all the visible wear is on the lever internal bore and piston. There are two 'apron' seals in the master cylinder. Theres no way that seals that can resist the pressure of full on brake honking is going to be damaged by pushing the pistons back. Those ceramic pistons are only prone to cracking if they're pushed back at an angle and bind on the piston bore.
It's also notable that there aren't any exterior seals for the lever piston to stop mud, dust and debris entering the piston - granted the end of the piston is in a fairly sheltered position, but its exposed and I suspect this is the main factor for dirty oil predominantly located in the lever.
It’s also notable that there aren’t any exterior seals for the lever piston to stop mud, dust and debris entering the piston – granted the end of the piston is in a fairly sheltered position, but its exposed and I suspect this is the main factor for dirty oil predominantly located in the lever.
Yes, this makes sense. It would be much easier for fine dust to work its way past the master cylinder piston seals than to get past the wheel cylinder seals.
A couple of pics - 4 year old zee lever piston. Youll need to zoom in to see the wear marks on the body.
The exposed end in an m785 lever. AFAIK all shimano brakes of this type are similarly 'unsealed'.
AFAIK all shimano brakes of this type are similarly ‘unsealed’.
Technically, there is a seal there, otherwise the fluid would just pour out. It's just that the seal is designed to keep fluid in, not keep debris out. If you blast it with a pressure washer, you could easily blast dirt into the seal. Even if it wasn't enough to get it past the seal, it could work its way past with repeated movement of the piston.
Yes. Thanks for clarifying my point.
Does anyone know how thick the pistons are? What I mean is, how far can you allow them to extend before they pop out completely? If cleaning them and then lubricating with silicon is advised, what is the cut off point for pushing them out? Does anyone have a pic of a 4 pot piston that has been removed from the caliper? I'd be very interested to see one...
Ime dot fluid gets filthy as the rubber diaphrams degrade. And before anyone says "that's not true" it certainly is.
Guides/codes suffer with the lever bladder degenerating whilst the piston seals are ok.
I'd guess half the thickness of the caliper side the piston is sitting on for a rough guide to how deep the piston is...a very rough guide though.
how far can you allow them to extend before they pop out completely?
It should be safe to extend them the thickness of the friction material on a new pad. If you have some old pads, you could try chiseling the friction material off the backing plate and then just fitting the backing plate and pumping the lever (with the wheel fitted, obviously). This should extend the pistons without popping them right out.
Ime dot fluid gets filthy as the rubber diaphrams degrade.
I haven't used Guides or Codes, but I've never had problems with diaphragms deteriorating with Juicys or Hayes HFXs
key bit in the Marshy vid for those with XT and above with the freestroke adjusters is he does back the screw out before you bleed.
if you do this it def helps the bleed and then also actually means those screws actually do something compared to all those that say they do nothing - wonder if ready bleed from Shimano are perhaps done from the factory with the freestroke screws wound in...
My understanding of the freestroke adjuster is that it advances the piston, so the tranfer port is closed with less lever travel. If you advance the piston too far, it will partially close the transfer port and make bleeding more difficult. Backing the screws out should make sure the transfer port is fully open.
I suspect one of the main reasons Shimano brakes are tricky to bleed is the mineral oil is more viscous than DOT fluid, so that makes it more difficult for air bubbles to escape. This would explain why people report that using different brand mineral oil makes bleeding easier and also explain sensitivity to the freestroke adjustment.
Nnnnnnnggggg
Move bike/lever around to allow any trapped bubbles to escape from lever.
100% this. I was having a 'mare on my XT brakes until I watched a Park Tool tutorial on YouTube. Moving the lever released a surprising amount of air into the funnel. All good after that and no wandering bite point.
Yep it surprised me too.