![]() You don't need to be an 'investor' to invest in Singletrack: 6 days left: 95% of target - Find out more
You don't need to be an 'investor' to invest in Singletrack: 6 days left: 95% of target - Find out more
I've had a printer for several months, and just getting into basic onshape CAD stuff.
They're actually ruddy fun and useful.
So far I've made:
Clips for my stand dart tubeless thing..

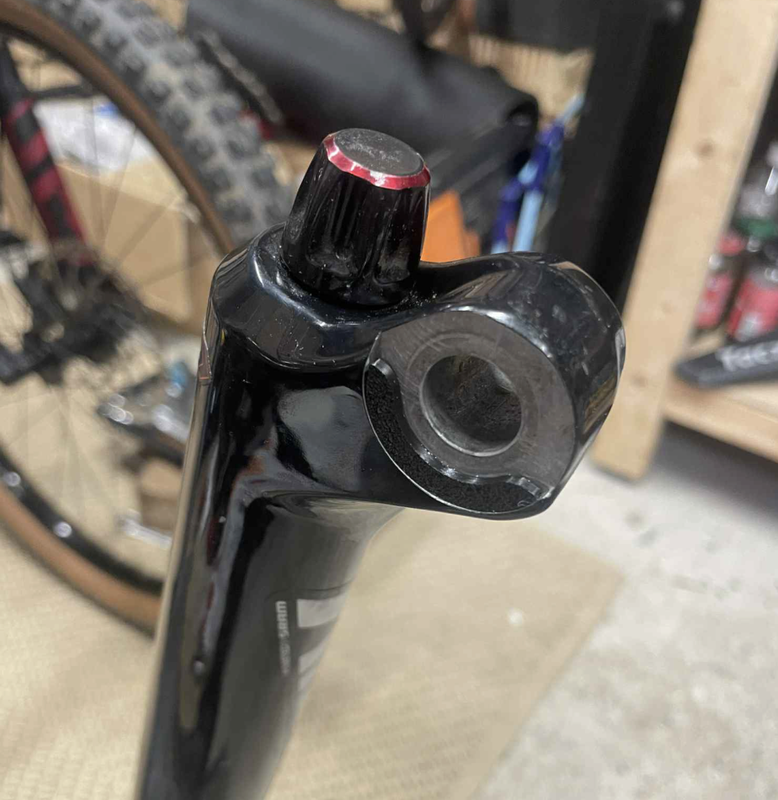
A top cap dial for a mate's fox fork (he lost it)

A thing to hold forks in a vice

And the most useful... Tonnes of hooks for helmets and such (I downloaded these files).

What else can/should I design and print!
What have you lot made!
DrP
No, but I keep thinking about getting one. Which printer do you have?
A bike light mount, a GPS mount, a chain pip, bottle cage mounts for different cage placement.
Useful things (though I bought one for use at school initially, it now lives at home).
I bought a DaVinci Jr. as they're pretty much plug and play. I'd faffed around previously with school owned ones that needed constant calibration.
I've had it for 9 years now and it's still working, which for a piece of tech is pretty good imo.
Sure i can make a new top cap for you, but the price will be high...

I've no idea what small batch 3D printing costs are but if somebody could make these for me at less than £15 each I would buy a fair few.
(Currently getting through a couple a week)
These are great little tools for tight tyres/inserts:
https://www.printables.com/model/38269-bead-buddy-for-bicycle-tire-installation
Otherwise most stuff I've done is prototype stuff, although my Exposure Joystick mount is working a treat.
@Bregante - what even is it?
Cost is pretty minimal - a simple object using 10-15m of PLA filament will cost about 60p to £1 in materials and about 30-50p of electricity.
Print time might be anywhere from 1-5 hours depending on print quality.
Full Member
@Bregante – what even is it?
Cost is pretty minimal – a simple object using 10-15m of PLA filament will cost about 60p to £1 in materials and about 30-50p of electricity.
Print time might be anywhere from 1-5 hours depending on print quality.
Yeah sorry it's not bike related!!
It's a stiff brush mounted to a threaded bottle top. I use it for applying protective coatings in my business but as mentioned, they wear out pretty quickly. My only UK supplier is charging over £20 a unit plus postage and they look remarkably similar to something I used to be able to get from eBay for a few quid.
I've made loads of things from tools to functional parts.
Bearing press, suspension tools, light brackets, spacers, pump holders, cable clips, shaft clamps and more. I've also made loads of bits for the house and DIY and a few van things too.
I started on an Ender 3 which was great to learn on. I'll be posting my heavily tweaked one on classifieds soon.
I got a Bambu to replace it. They are so much faster, as well as very easy to use. I am going to print materials that need an enclosure so went for the p1s. They are closed source which may put some people off but the trade off was worth it for me. Very impressed.
I keep meaning to get one of these printed:
https://www.printables.com/model/156666-mud-guard-fender-for-cane-creek-helm
Because cane creek have discontinued the actual fender for the helm fork. Can anyone recommend anywhere to order from?
Awaits the Atherton's contribution to the thread....
No printer but I ordered this design printed https://singletrackmag.com/forum/topic/cage-lock-for-shimano-diy-3d-print/
Also brake caliper measuring tool to fit on a digital caliper, an articulating syringe holder for brake bleeding, and a fork axle stand to keep the adjuster knobs off the floor when the wheel's out.
@chambord I was in the same boat as you about 12 months ago and managed to find the last official Cane Creek one available in Canada, I must have spent over £50 for that bit of plastic and a couple of bolts and they then decided to start manufacturing them again about 3 weeks later!
Keep an eye on the Cane Creek website, they seem to keep stop/starting manufacturing of them for some reason.
I keep meaning to get one of these printed
FWIW, I attempted to print that and wasn't happy with the results. It was on a cheapo filament machine though, SLS will likely produce much better results...or even just a finer quality printer.
I suspected printing a mount and attaching to/adapting an existing fender might be a better solution
Just this morning I was thinking about how useful my own printer would be to do a cylindrical light (Lezyne Macro Duo) to GoPro mount adapter.
Keep an eye on the Cane Creek website, they seem to keep stop/starting manufacturing of them for some reason.
I was in touch with extra UK for months trying to get hold of one - apparently they were on order, until February they said they weren't getting any because cane creek had discontinued the line. I do keep checking but having no luck. 3d printing one is likely to be a bit more than £50 as well
FWIW, I attempted to print that and wasn’t happy with the results.
Yeah the main reason I haven't yet is I don't believe it'll turn out very good and it's a lot of money to waste
Oh, sorry1
I've a creality ender 3 v3 SE.. they can be had for about £142 nowadays, which is quite frankly, a bargain!
They're really good fun, and a pretty basic but workable printer TBH
DrP
Yup, have a v2 model and it is perfectly good for most prototyping. I think the last thing I made was a pair of brackets to allow me to hang up my old Kampus wakeskate on the wall in the lounge.
I need to do some more designing for another project soon and have just flashed my printer with the latest community firmware. Apparently it has more tuning functions so is betterer.
Also brake caliper measuring tool to fit on a digital caliper,
I'm struggling to see the point of this when you could just use the jaws directly on the disk? (it appears to be a disk measurer, not a caliper measurer).
The jaws would normally just hit the lip that forms on the outer edge of the brake disc. This tool allows the calipers to reach around that lip.
For the Cane Creek fender - surely it's just a matter of making an adapter for one of the other universal fit ones rather than print the whole thing. I can't imagine that PLA would be the right material to make one from. Especially 3D printed.
I've made some spring adapters so I could fit a Cane Creek spring to ,my Ohlins shock and a chain guide spacer because I got fed up of it spinning on the bodged washer setup.
I bought a Bambu Lab A1 mini (it's still at the sale price of £169 which is a bargain), after watching mates struggle with Enders and the like over the years it's a revelation.
Been printing a lot of gridfinity baseplates and bins to organise stuff, things like drill holders so they can sit ready underneath the shelves, and various silly things for the kids.
The jaws would normally just hit the lip that forms on the outer edge of the brake disc. This tool allows the calipers to reach around that lip.
All the verniers I've ever seen have a reasonable rebate at the scale end of the jaws to avoid it - if you have a lip larger than that, you'd not need to measure it!
Granted you may have to angle the tool to get on the swept surface. And it would be good for car disk brakes with a larger lip. I think I'm talking myself into getting one here. 🙂 Can acutally see a 3D printer in my future as I've recently upgraded my workshop space.
Chambord,
I'm in the same boat as you. Keep trying to find a helm fender but no joy. Even messaged people selling whole bikes with a helm and said fender fitted to see if they would part with it but no joy. I've looked a few times at the printed one but it looks like it slides under the arch and since I run 2.6s, it's super tight there already.
John
Topology optimised 3D printed Ti64 topcap:
[img]  [/img]
I've also done a topography optimised bell end...yes, you read that right. Bell dome for a Spur Bell in Inconel 718
A topology optimised Ti64 stem - replaced it with carbon,
The Ti dropouts for this:
https://bikerumor.com/charge-bikes-3d-printed-titanium-bike-parts-production-begins/
And some ScAlMalloy hub adaptors for a White Industries 130mm disk hub to make it fit a 135mmm frame. Knurled and everything.
And saddle rails for this:
https://bikerumor.com/fabric-weaves-a-line-of-revolutionary-new-saddles-more/
Not sure if this will work, but possibly a video of the topcaps being made:
[img] https://i.imgur.com/Vr7ua1D.mp4 [/img]
Apparently not.
You want a business idea?
Have a look at silly goat climbing brushes. Dont copy his brush, just make a new one of similar size etc. My tip would be to add personalisation as well. Now instead of making it cost nearly as much as the mega expensive brushes to re-bristle the brush (Pay postage x 2 plus £18 for bristles) which kind of defeats the entire business model of sustainability and money saving, make it like cartridge brake pads where you slide the worn one out and slide the new one in. Sell the bristle kits for a decent mark up but make it affordable to keep coming back for replacements.
A regular user of these brushes wears out a set of bristles on a pretty regular basis which when you have a mega expensive brush makes paying the same again to re-bristle it a painful process.


Trying to organise the garage, and thought I may as well have easy access to the wet and dry oils!
DrP
I went down the grifinity black hole for a while after getting my Bambu Labs A1.
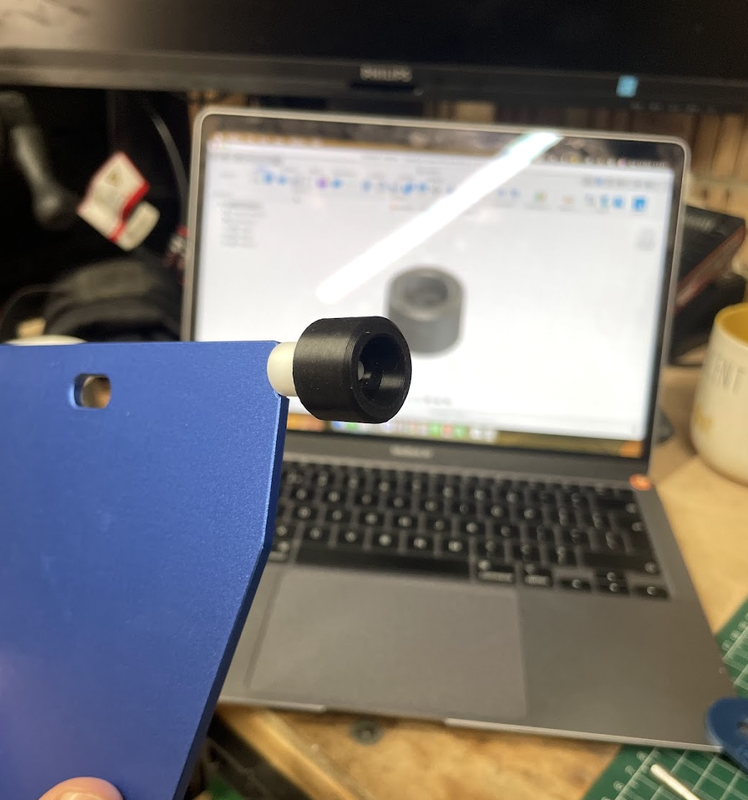
I was wondering if anyone would be kind enough to print the following items for me to help fix a broken Xbox wireless headset volume dial...
I'd need x2 seats, x2 dowels and x1 ring (only 1 side has broken, but seeing how fragile the plastic standoff is I anticipate needing a spare for the other side at some point!).
Tried hot glue but it didn't work, and was going to try Sugru next but came across the above fix when Googling to see if others have had the same issue.
More than happy to pay for time, materials and postage.
Thank you!
I was wondering if anyone would be kind enough to print the following items for me to help fix a broken Xbox wireless headset volume dial...
@citizenlee
I could have a bash at this, maybe over the weekend.
Only issue would be that he recommends ABS for the dowel - this is quite a good idea as the acetone he suggests will melt and adhere the ABS parts together but not affect the PLA centring ring, so it won't get accidentally glued in place.
I don't print ABS - but could do all the bits in PLA. But, you run the risk of sticking the centring ring in place if you aren't super careful with the glue.
I'd recommend sanding the join area well to create a flat surface & good key for the adhesive. Then if you use a tiny drop of superglue to get the part in place, leave it to dry so you can remove the centring ring & then add some more superglue around the foot of the dowel. That should make a good joint.
The design of the seat is a bit crap as it will require supports on one side - it should work but might be a bit messy on that face.
Drop me a DM if you want me to give it a go.
I was wondering if anyone would be kind enough to print the following items for me to help fix a broken Xbox wireless headset volume dial...
@citizenlee
I could have a bash at this, maybe over the weekend.
Only issue would be that he recommends ABS for the dowel - this is quite a good idea as the acetone he suggests will melt and adhere the ABS parts together but not affect the PLA centring ring, so it won't get accidentally glued in place.I don't print ABS - but could do all the bits in PLA. But, you run the risk of sticking the centring ring in place if you aren't super careful with the glue.
I'd recommend sanding the join area well to create a flat surface & good key for the adhesive. Then if you use a tiny drop of superglue to get the part in place, leave it to dry so you can remove the centring ring & then add some more superglue around the foot of the dowel. That should make a good joint.The design of the seat is a bit crap as it will require supports on one side - it should work but might be a bit messy on that face.
Drop me a DM if you want me to give it a go.
That would be brilliant, thank you!
I'll DM you now 😉
I printed a couple of Wolftooth Valais copies in ABS to use a seatpack with my dropper. The proper ones are like £30 each, and my pack has two straps. Plus I could get the exact strap/post dimensions I needed. Modified from this nice design which has a lip to avoid seal damage if you bottom it out. I changed it to take standard hex nuts as captives. https://www.printables.com/model/125810-bens-better-dropper-post-seat-bag-adapters-264-22-
Also printed a new valve for my hydration hose, since the stock ones have an inherently weak design and are tricky to use with gloves/one-handed.
I'd show you these, but the forum won't let me add the photos even though they've uploaded :/
I made some 3D printed Titanium cranks. Still going strong - in fact I rode them last night.
https://www.instagram.com/stellarperformance1/p/CF1tkkvHPLX/
@citizenlee - print done. I sent you a DM.
I tried to add a pic, but for some reason nothing seems to happen when I select 'add to post'. Not sure why the forum controls still don't work.
Tried it on mobile & desktop with same result.
@citizenlee - print done. I sent you a DM.
I tried to add a pic, but for some reason nothing seems to happen when I select 'add to post'. Not sure why the forum controls still don't work.
Tried it on mobile & desktop with same result.
Much appreciated! I'll go check and reply now.
STW image hosting still seems broken unfortunately!
Don't have a printer but have bought a few 3d printed things on Ebay and got my nephew to print a few. Would be useful for those posting pics of cool things they've made or bought to add links...
Orbea E Bike charger wall bracket . Had the last ones velcroed to the wall which was ok for storage but the heat generated charging softens the glue and they fall off so they ended up balanced on the saddles.
Hope - bleed blocks/caliper position blocks
Wattbike handlebar reach adjuster knob and phone shelf
Also just bought some Drill holders and battery holders for the Makita 10.8v drills we use all the time in the workshop so they're easily to hand and not buried in a drawer behind a piece of furniture
I also made some fake end caps for my truing stand gauge.
Spring adapters so the Cane Creek progressive will fit on my TTX
A little spacer for my chain guide which puts it in the right position laterally and should help stop it spinning.
A mudguard spacer/adapter for my D'Fender so i can do away with the stupid little bumpers supplied with it that fall out and disappear for fun. It also sits it at the right angle to give just enough tyre clearance and has a nice locating lug built in which engages into the lightening holes on the back of the 36 to keep it centred and make sure it goes on in the same place every time. I'm quite pleased with it. Even if it is dead simple and of no use to almost anyone else.
I'd show pics but it's not working